|
|
 Rank: Elite      Groups: Registered
Joined: 13/02/2011 Posts: 2,243 Points: 6,849 Location: Sussex
|
Hello Alan, It is great to see some progress on the Spitfire as I am sure It will be a great build, it is a shame that there are not more build diaries but I will do my best and keep sending,looking forward to pack 10 now. Regards Trev. Work in progress: Tombstone (Scratch) - San Francisco 2. -The Mayflower ( scratch by plan).
OcCre- Santa-Maria (Kit).
|
|
|
Rank: Elite Groups: Registered
Joined: 13/02/2011 Posts: 2,243 Points: 6,849 Location: Sussex
|
Hello All, Well pack 10 has arrived today it seems a long time to wait may be it's me this is such a good build. I have posted some more pictures as promised this is Pack 10. Issue 36. Tail fin flap Wooden strips 2x5 300mm Brass wire 0.5 mm Plastic tube 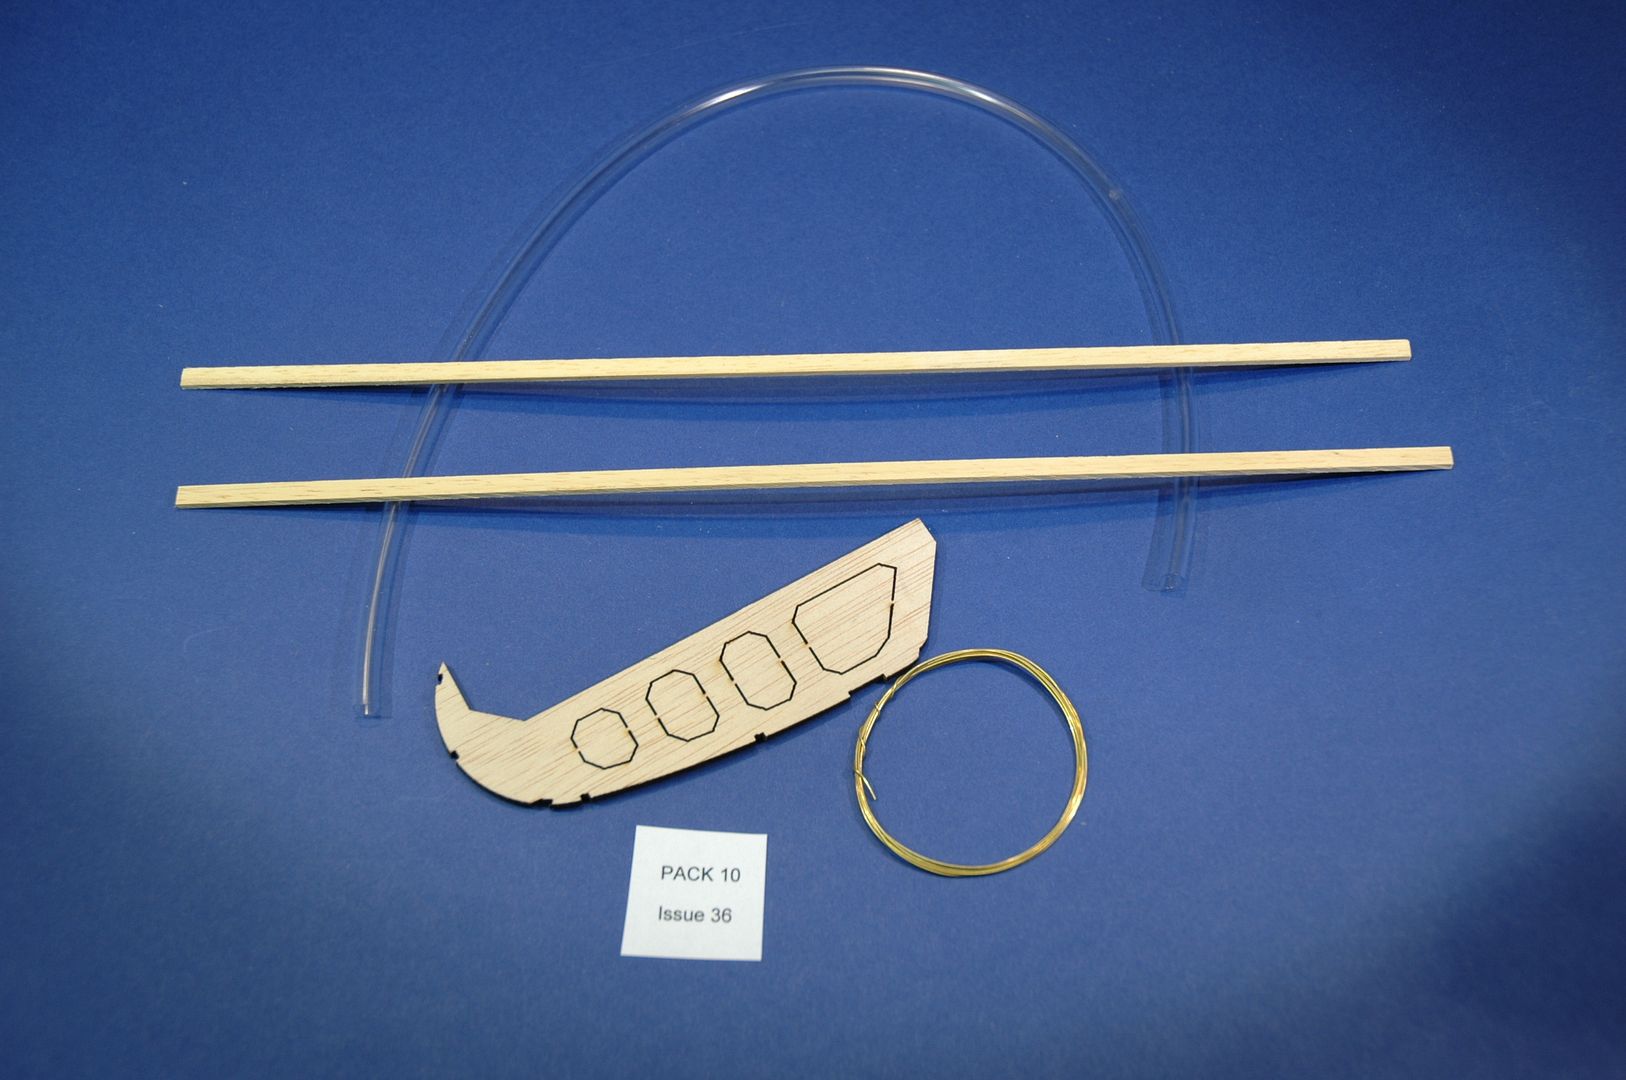 Issue 37. Fuselage reinforcements fret Wooden strips 3x3 300mm Wooden strips 4x4 300mm Antenna. 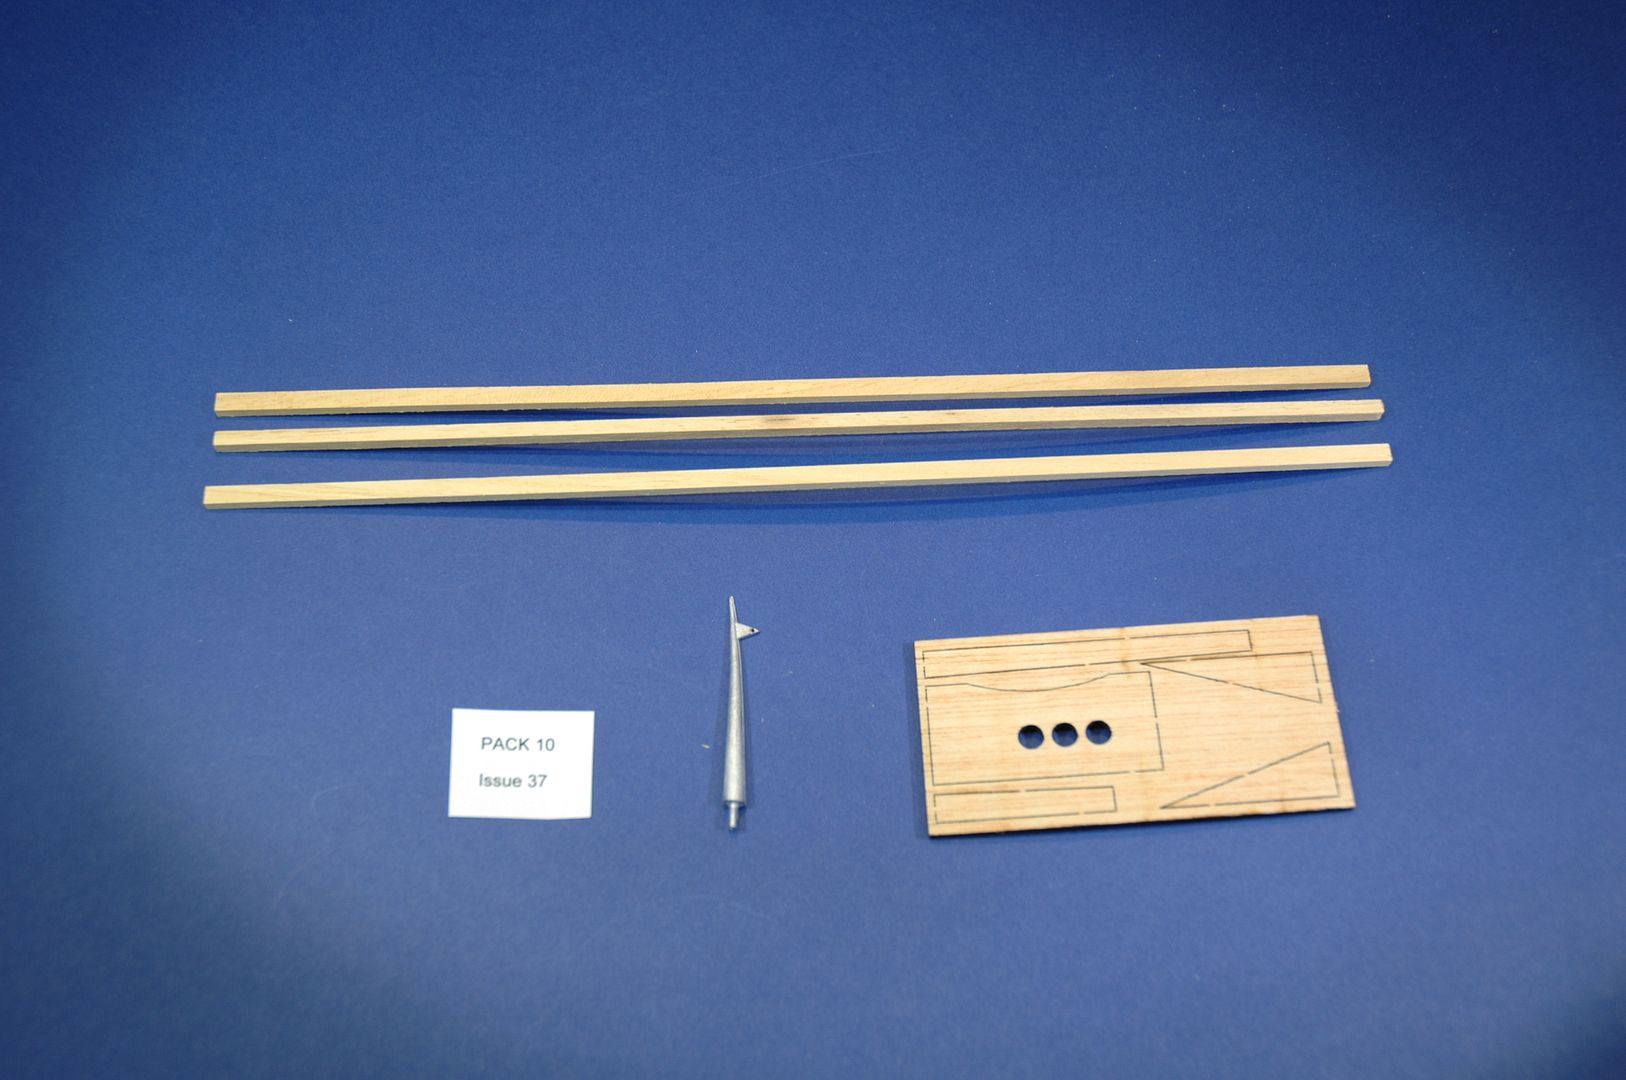 Issue 38. Fuselage side reinforcements Wooden strip 3x5 300mm  Issue 39. Fuselage side reinforcements fret Wooden strip 3x5 300mm 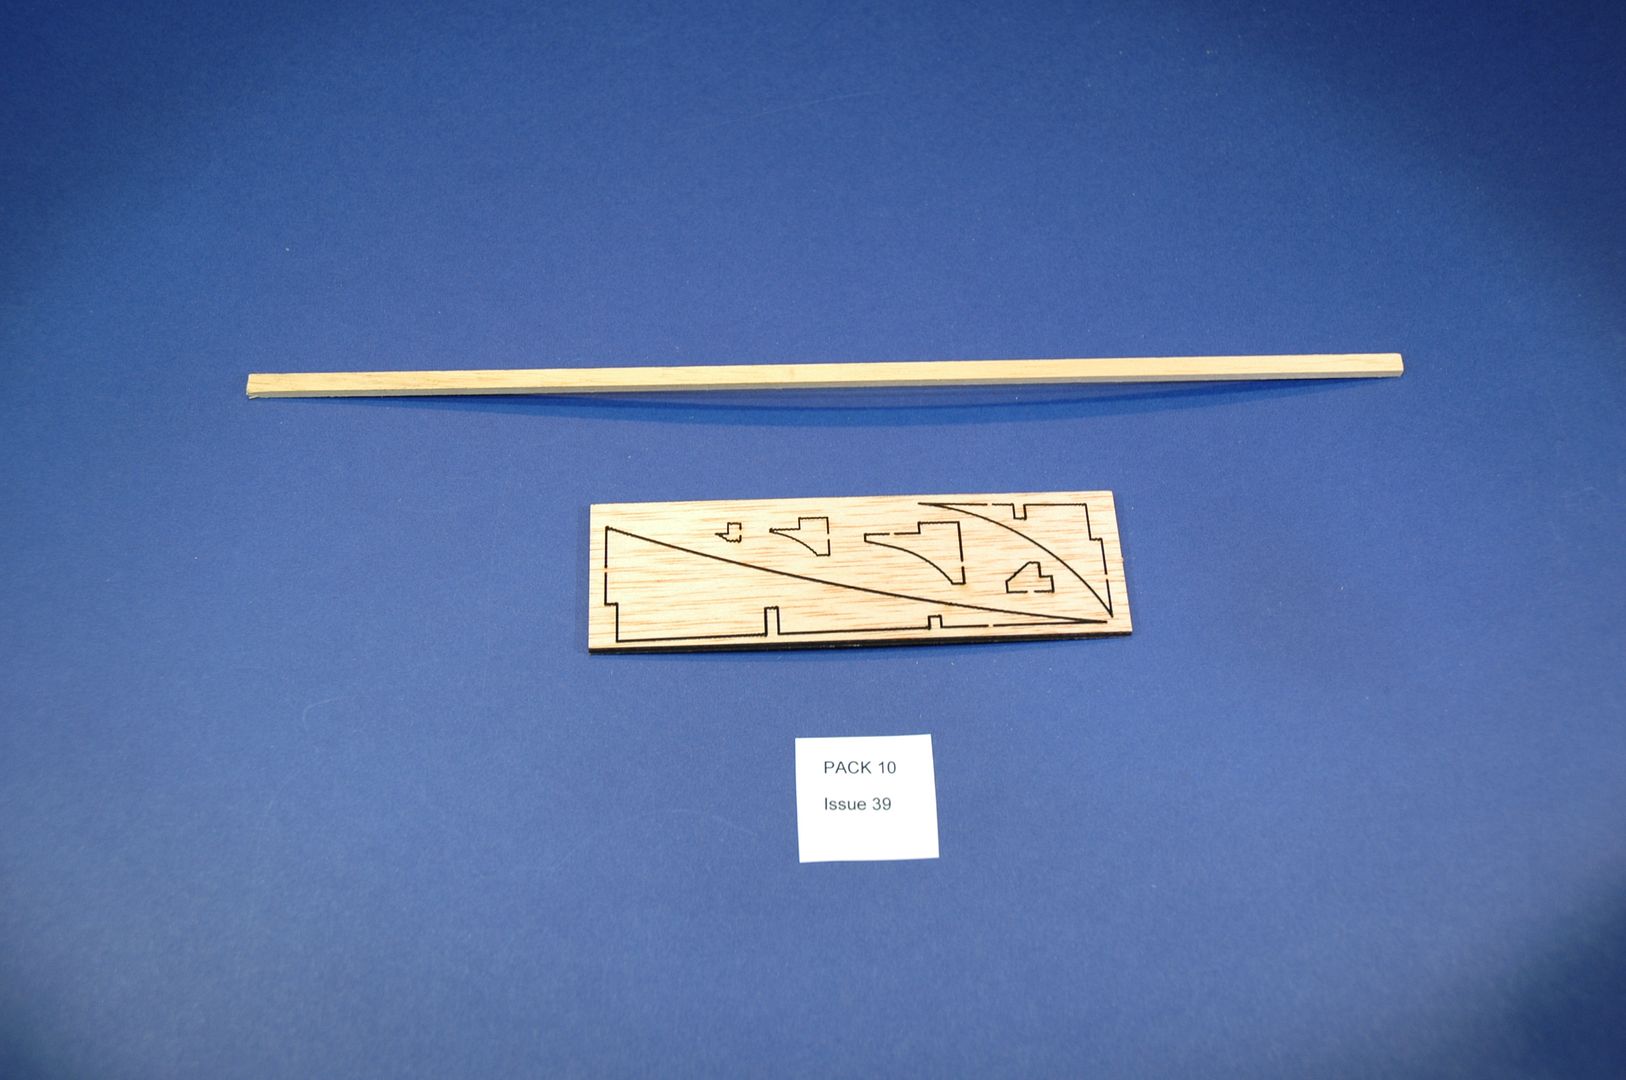 That's Pack 10 by the look of it I think I will be posting about mid month anyway looking forward to the build,( oh! no lighting sent) Regards to all Trev. Work in progress: Tombstone (Scratch) - San Francisco 2. -The Mayflower ( scratch by plan).
OcCre- Santa-Maria (Kit).
|
|
|
Rank: Elite Groups: Registered
Joined: 13/02/2011 Posts: 2,243 Points: 6,849 Location: Sussex
|
Hi All, Pack 10. Stage 37. First job was to remove the piece with three holes from the fret and test fit before gluing, this was a good fit in my case and just need a light sanding and glued into place as shown in picture( 1 )what I did find it was that it made a better fit by filing a chamfer top and bottom much the same as you would planking a hull, as shown in picture 2. 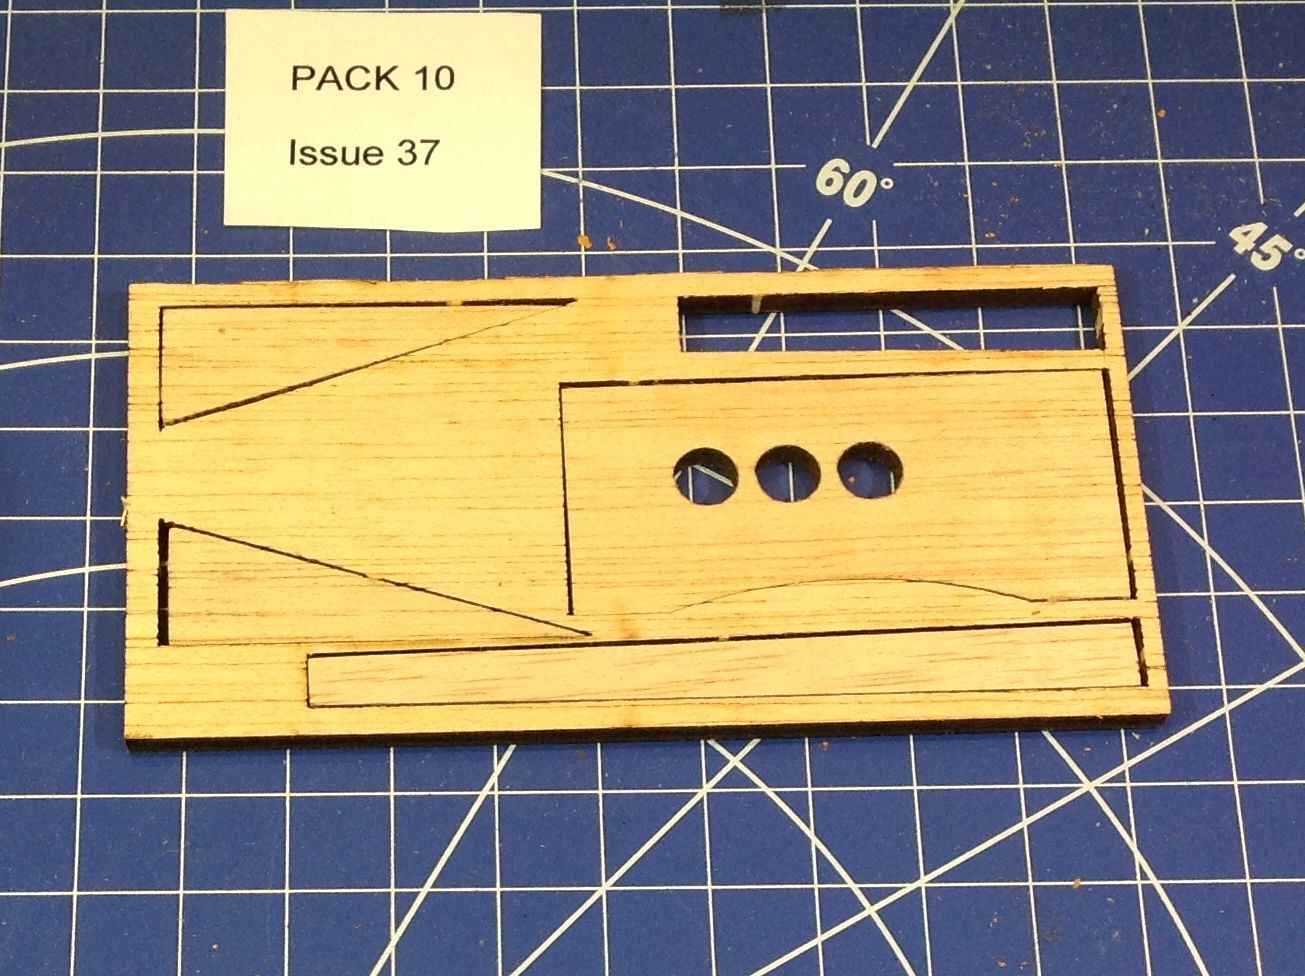 This picture shows a file chamfering top and bottom as you would planking a hull.  This picture shows the shorter piece glued and in place just slightly proud of the frame ready for sanding. 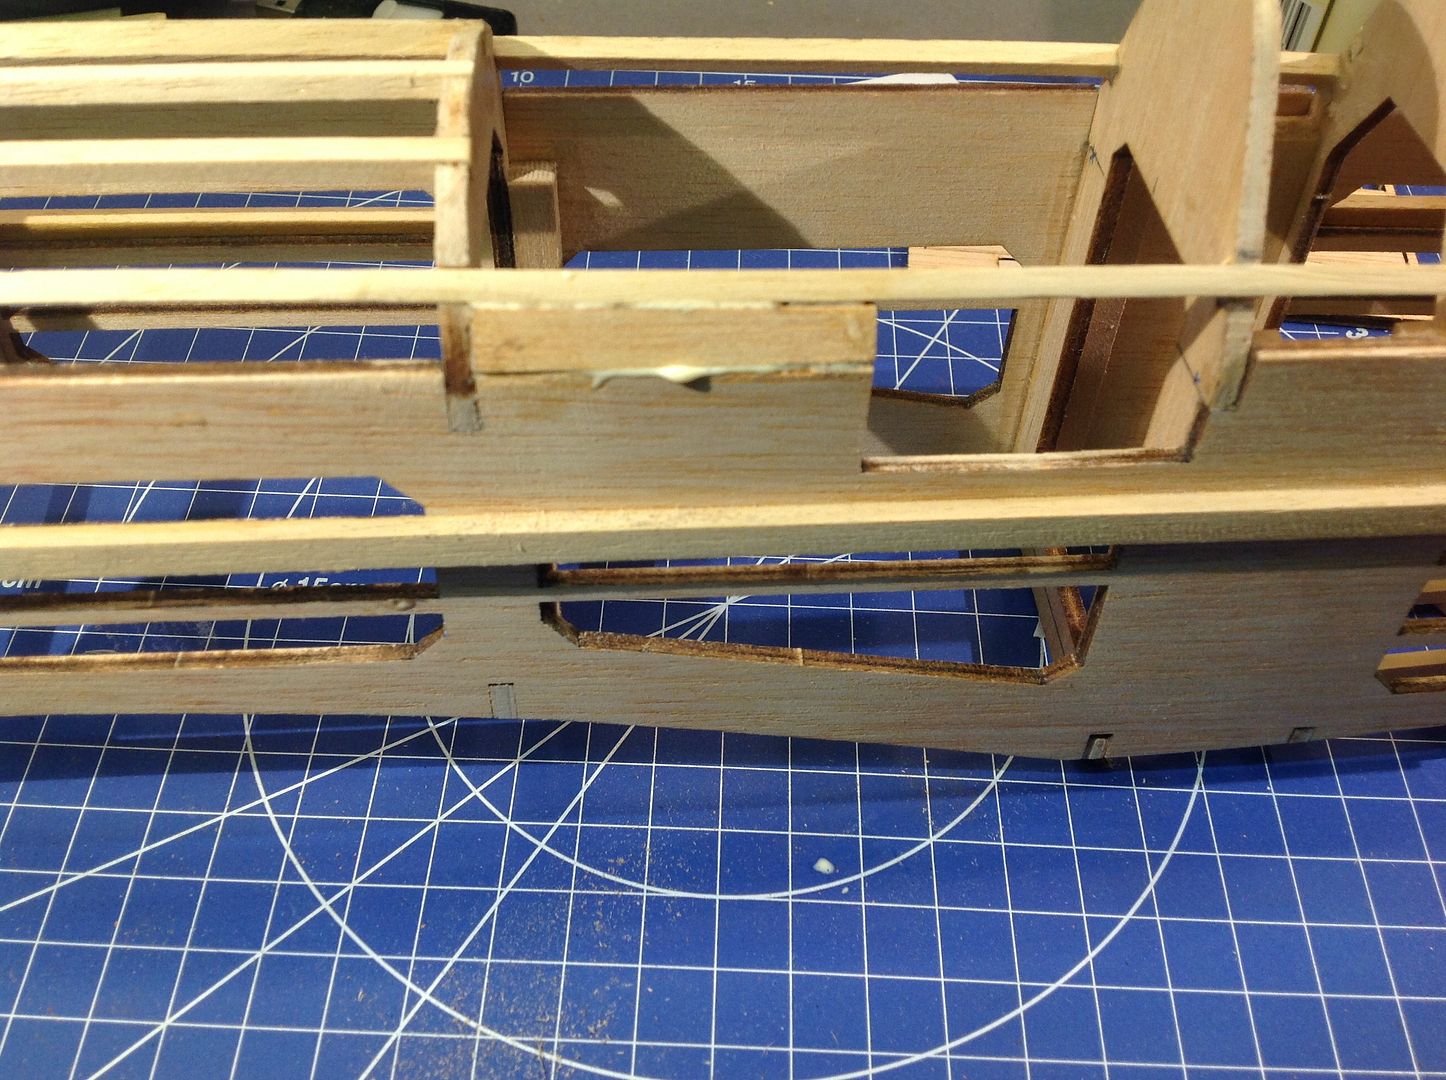 Next was to fit the longer piece, this was much the same as fitting the short fret, you may find that it is necessary to sand down to fit when your happy glue it in position. This fits on top of the wooden strip and the fuselage. 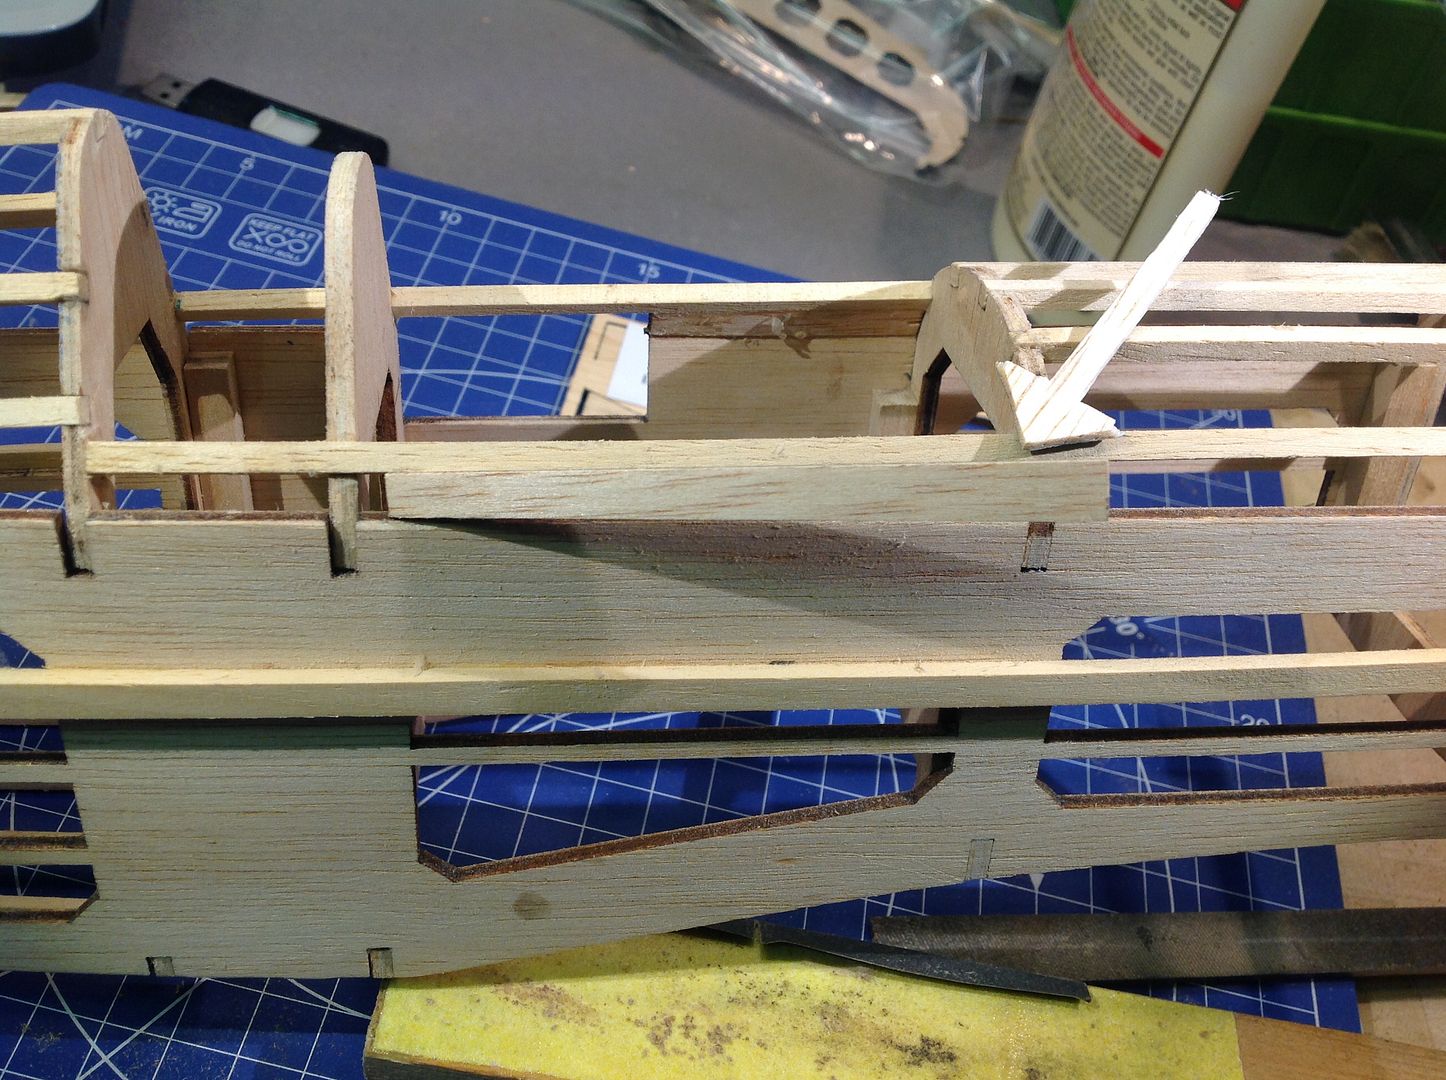 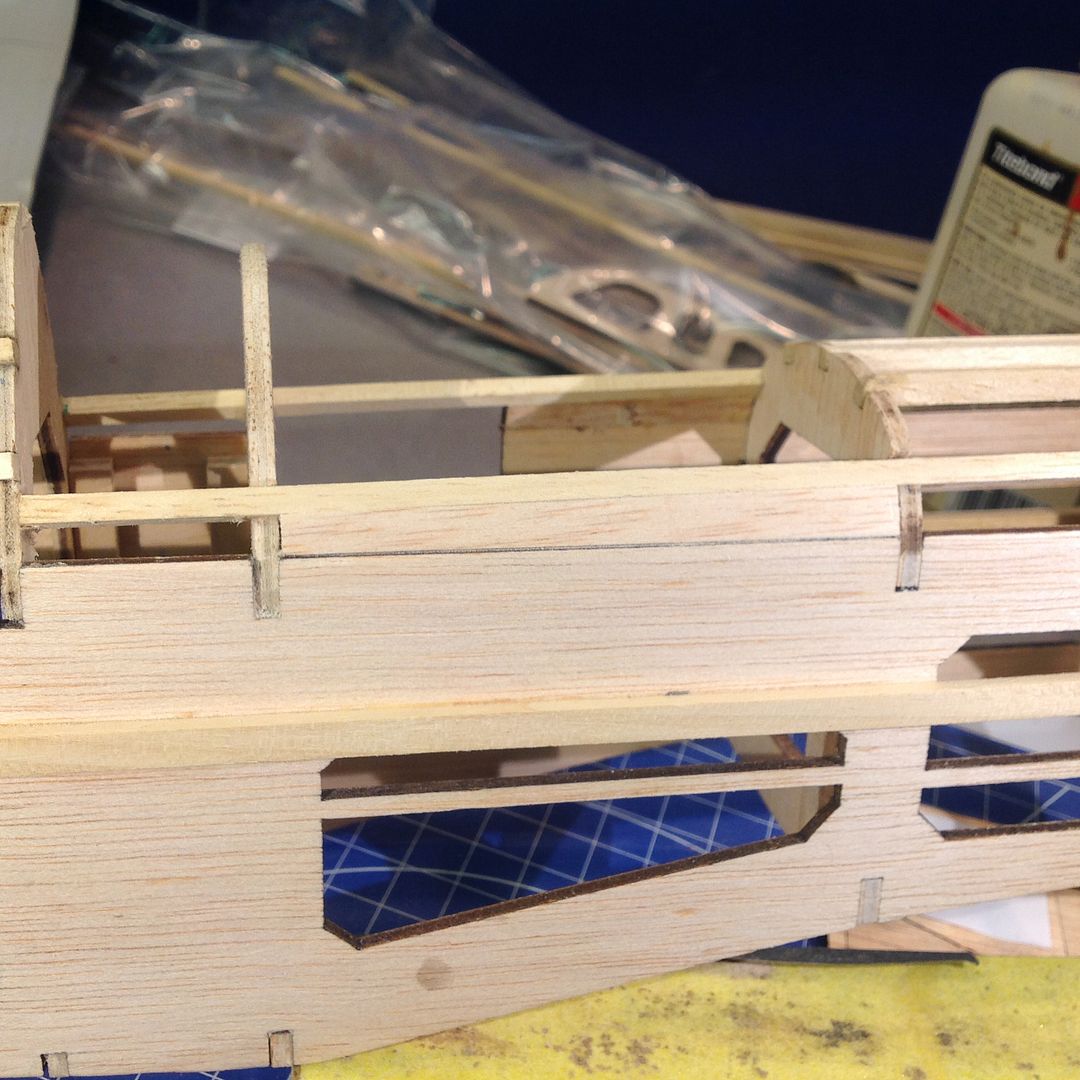 Next part was to remove the two fret parts and lightly sand them down.  [/URL [/URL
The first piece has to fit above the shorter reinforcement fret and against the main frame fuselage.
 The last remaining piece has to fit over the longer piece of fret and up against the fuselage just proud ready for sanding. 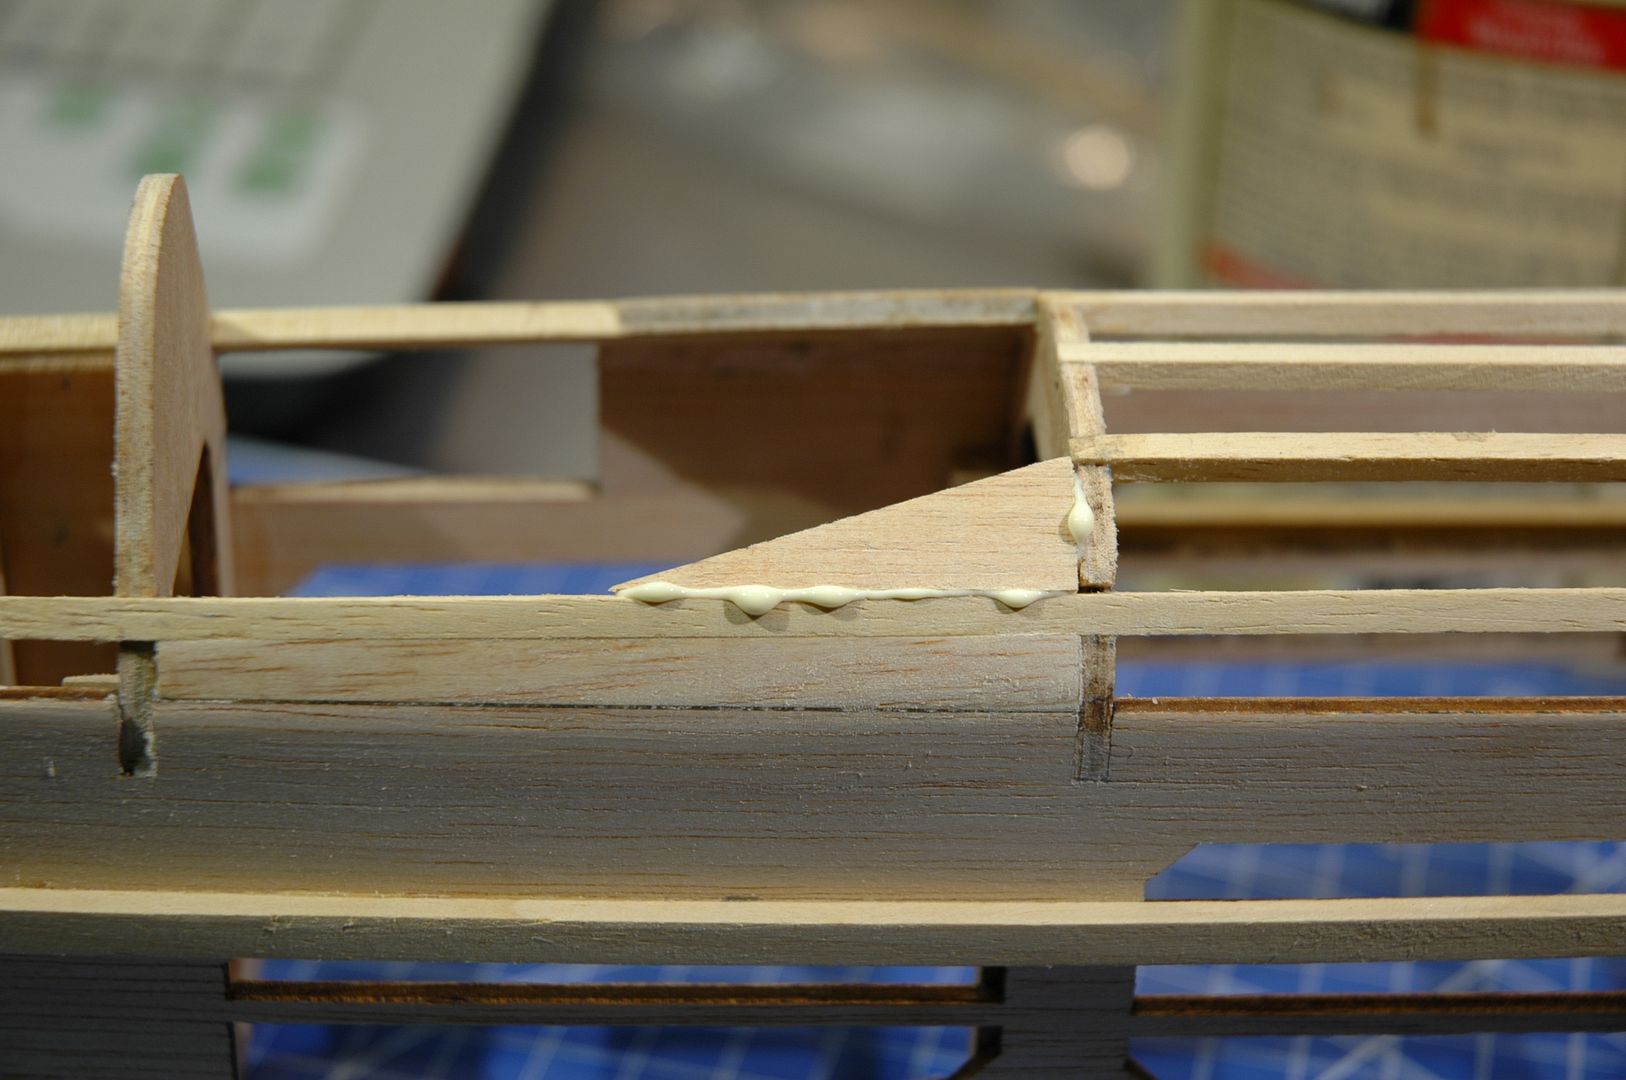 This picture shows both pieces of fret in place. [URL=http://s1134.photobucket.com/user/tf64/media/DSC_5794.jpg.html] 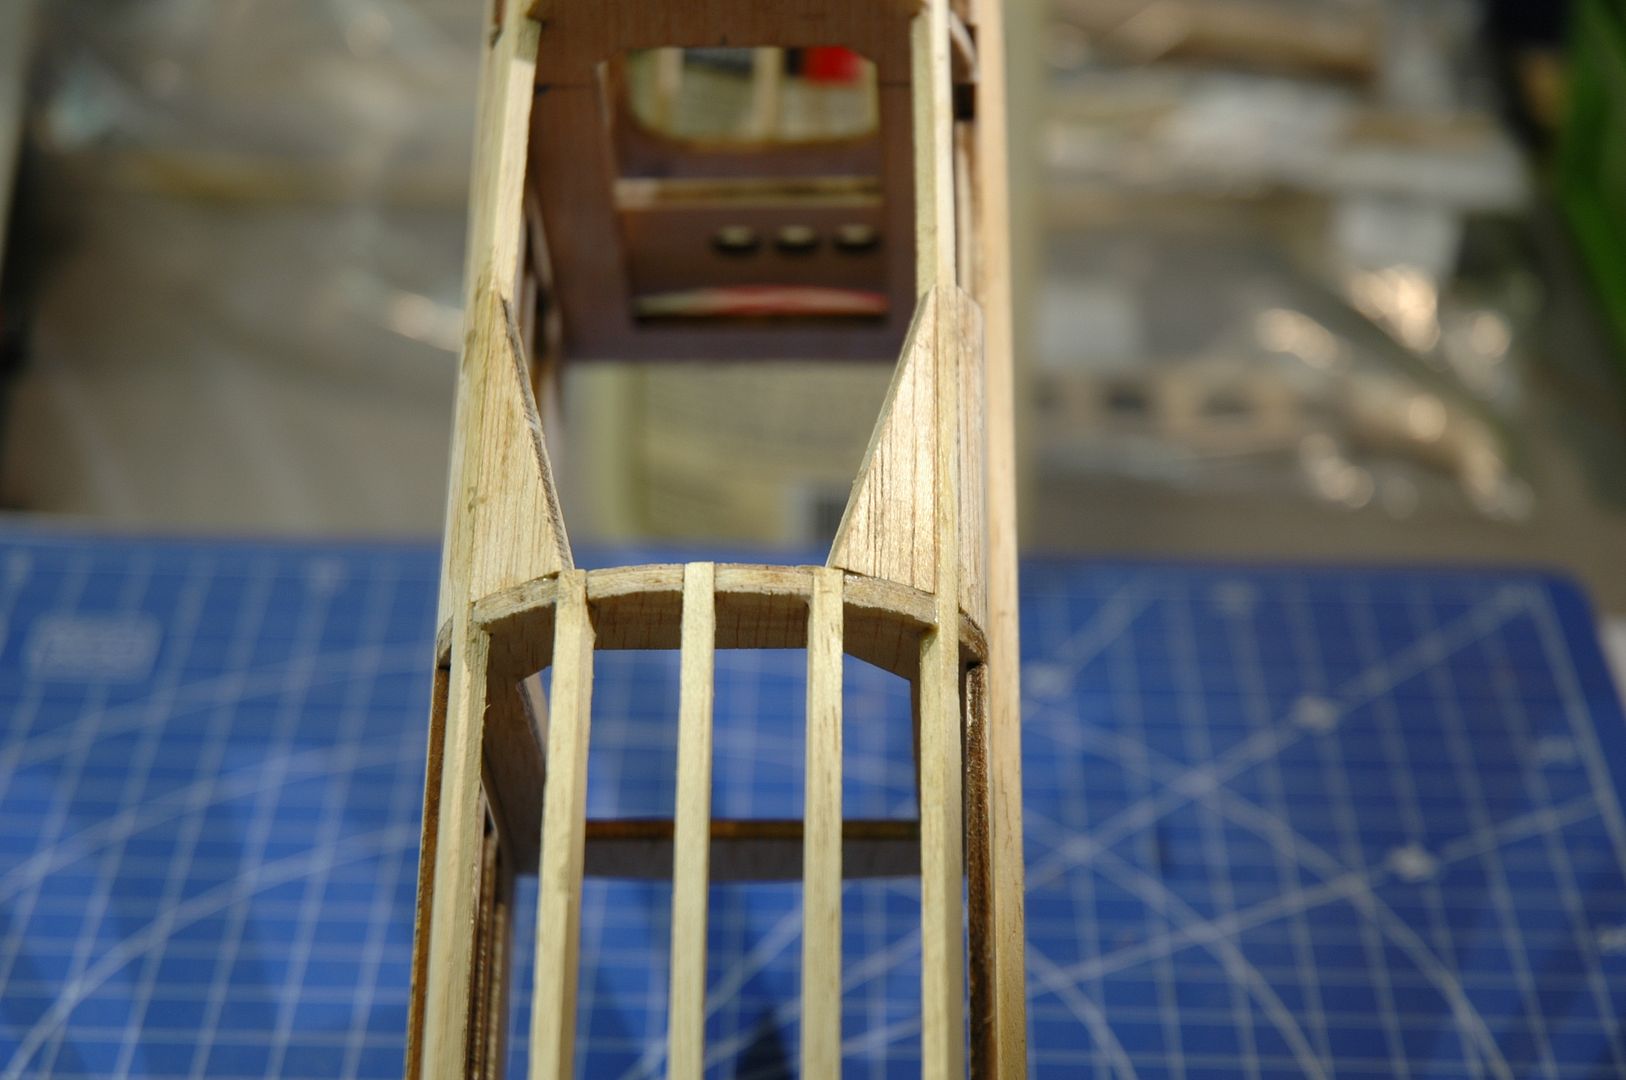 More to follow soon. Regards to all, Trev. Work in progress: Tombstone (Scratch) - San Francisco 2. -The Mayflower ( scratch by plan).
OcCre- Santa-Maria (Kit).
|
|
|
 Rank: Super-Elite    Groups: Registered
Joined: 30/01/2013 Posts: 4,604 Points: 13,607 Location: Monmouthshire UK
|
Nice work Trev, watching this one all the way  Steve
|
|
|
Rank: Super-Elite  Groups: Registered, Forum Support Team, Administrators, Global Forum Support Team, Moderator, Official Builds Joined: 09/11/2012 Posts: 8,520 Points: 24,651 Location: East midlands
|
Hi Trev, Looking good M8,  It`s nice to see a bit of shaping coming into the build now. Will be coming back to my Spit build in the very near future, as now have all parts for the second wing`s main construction. Keep up the good work, will be following with great interest.  Regards delboy271155 (Derek) COME BACK GUY FAWKES "YOUR COUNTRY NEEDS YOU"
|
|
|
|
|
Lovely work Trev, can see the lines of this beautiful aircraft starting to show.....  .very well done... . Look forward to the next instalment.... Regards Alan
|
|
|
Rank: Elite Groups: Registered
Joined: 13/02/2011 Posts: 2,243 Points: 6,849 Location: Sussex
|
Hi Steve, Thank you for looking in on my build and your comments, as you say this will be worth watching as it is a great kit to build. I think when Derek starts his Spitfire build for me that will be worth watching as like yourself he is a very skilled builder. Regards Trev. Work in progress: Tombstone (Scratch) - San Francisco 2. -The Mayflower ( scratch by plan).
OcCre- Santa-Maria (Kit).
|
|
|
Rank: Elite Groups: Registered
Joined: 13/02/2011 Posts: 2,243 Points: 6,849 Location: Sussex
|
Hi Derek, Thanks for looking, as you can see the build is moving on now and I have more to add in a few days, like yourself I to have other builds on the way which I will post, yes a plastic 1950 Javelin 1/48 the new airfix kit. All the best Derek. Trev. Work in progress: Tombstone (Scratch) - San Francisco 2. -The Mayflower ( scratch by plan).
OcCre- Santa-Maria (Kit).
|
|
|
Rank: Elite Groups: Registered
Joined: 13/02/2011 Posts: 2,243 Points: 6,849 Location: Sussex
|
Hi Alan, Your comments are very welcome thank you, when I stand back and take a look at the build with the wings in place I can start to see (as you say) the shape, and it helps to keep in mine what I am aiming for and I am sure that's the reason that your Sots has turned out so well. Warm Regards Trev. Work in progress: Tombstone (Scratch) - San Francisco 2. -The Mayflower ( scratch by plan).
OcCre- Santa-Maria (Kit).
|
|
|
Rank: Elite Groups: Registered
Joined: 13/02/2011 Posts: 2,243 Points: 6,849 Location: Sussex
|
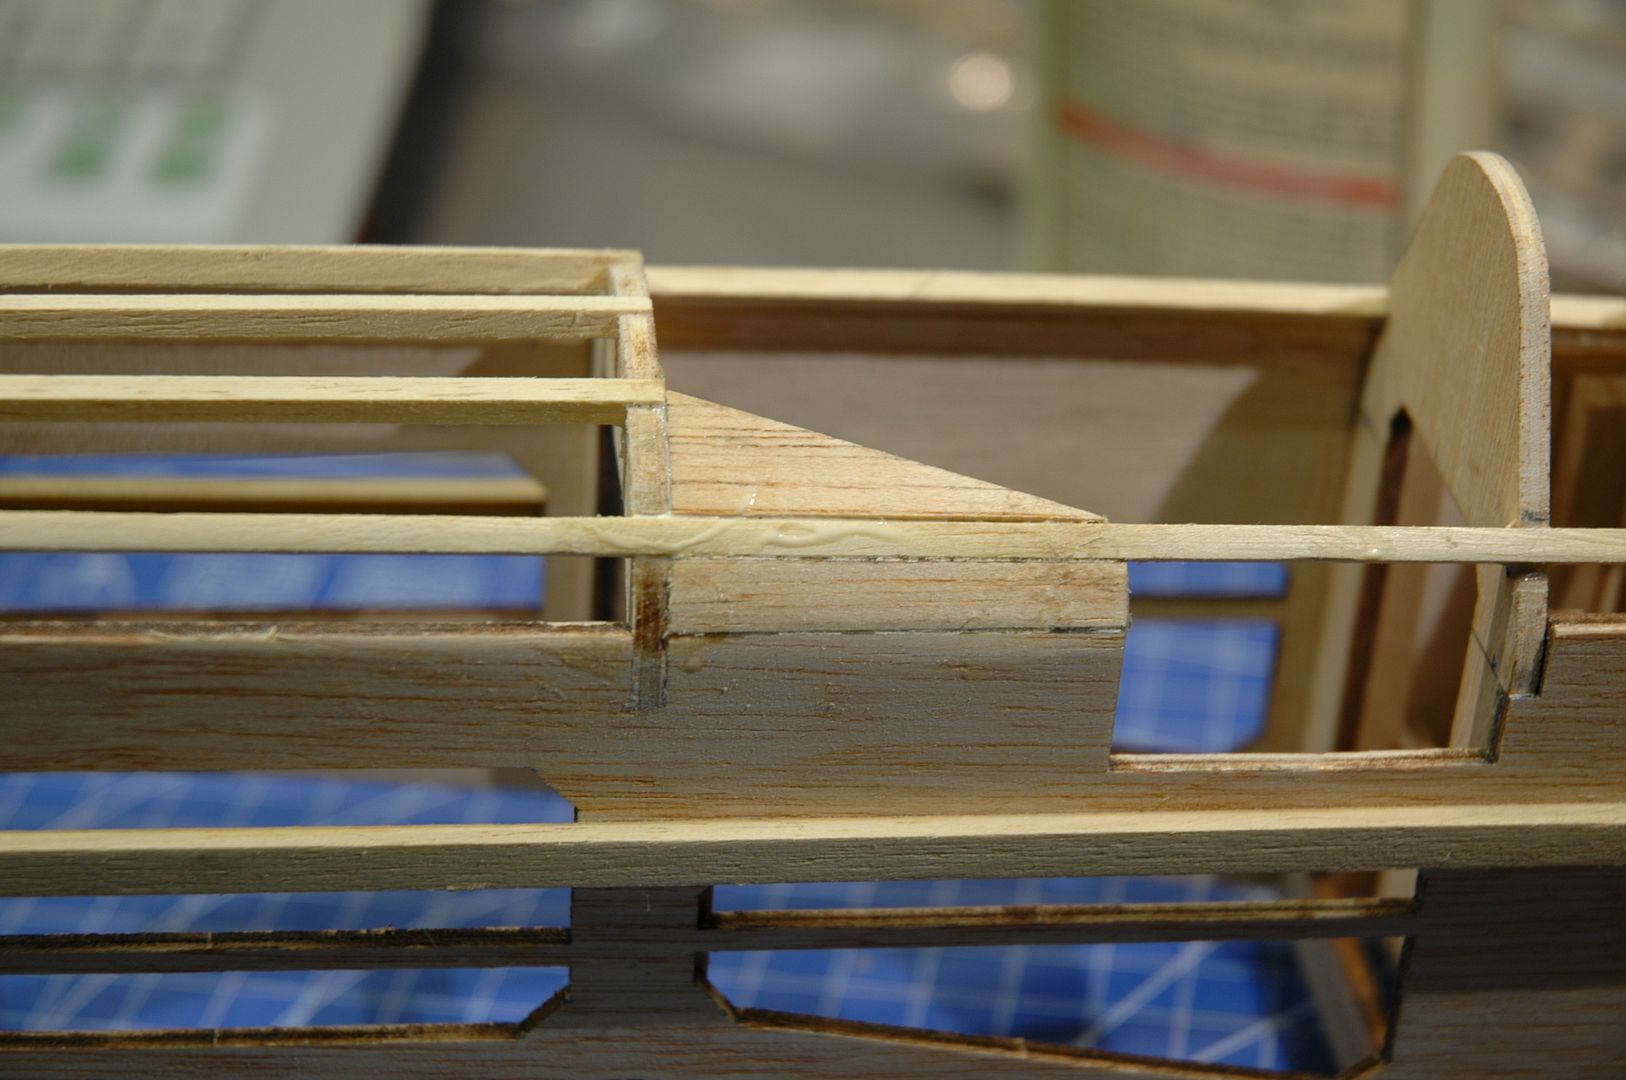
Update Pack 10. Stage 37. First job was to remove the fret with 3 holes, after sandpapering the ruff bits off I test fitted to the fuselage I found in my build very little had to be sanded off it was a good fit. 1st picture shows fret with 3 holes. 2nd picture shows fret in place. 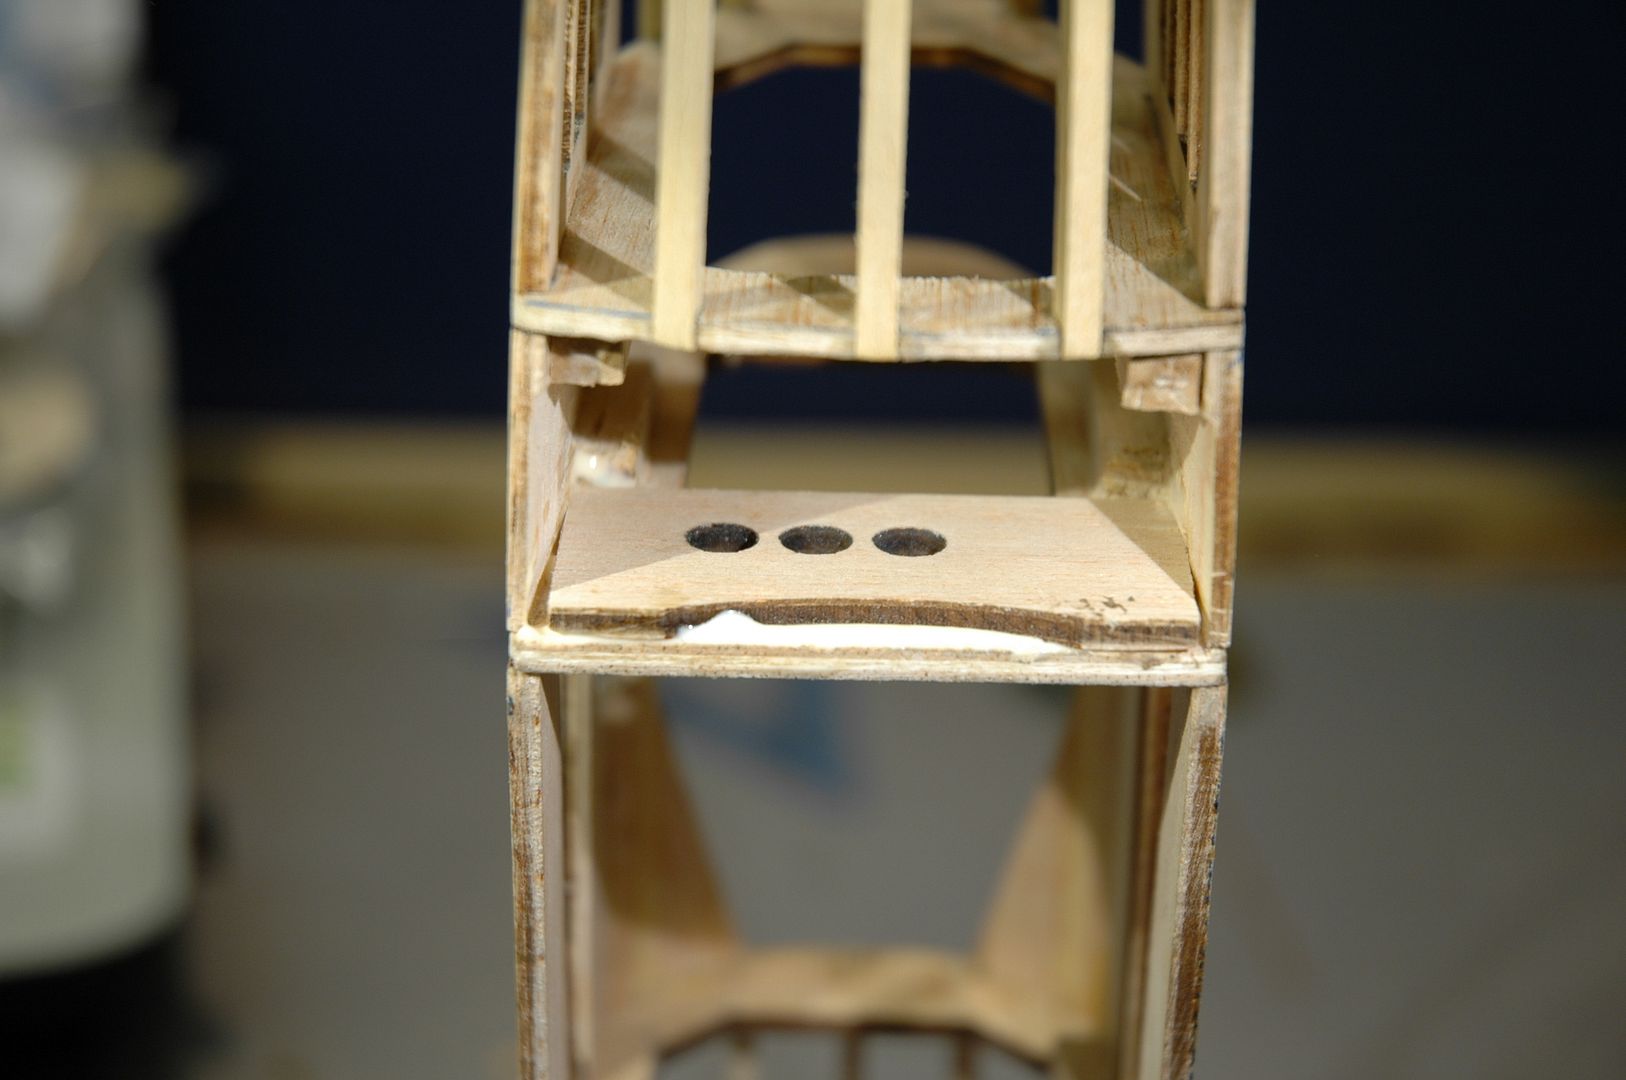 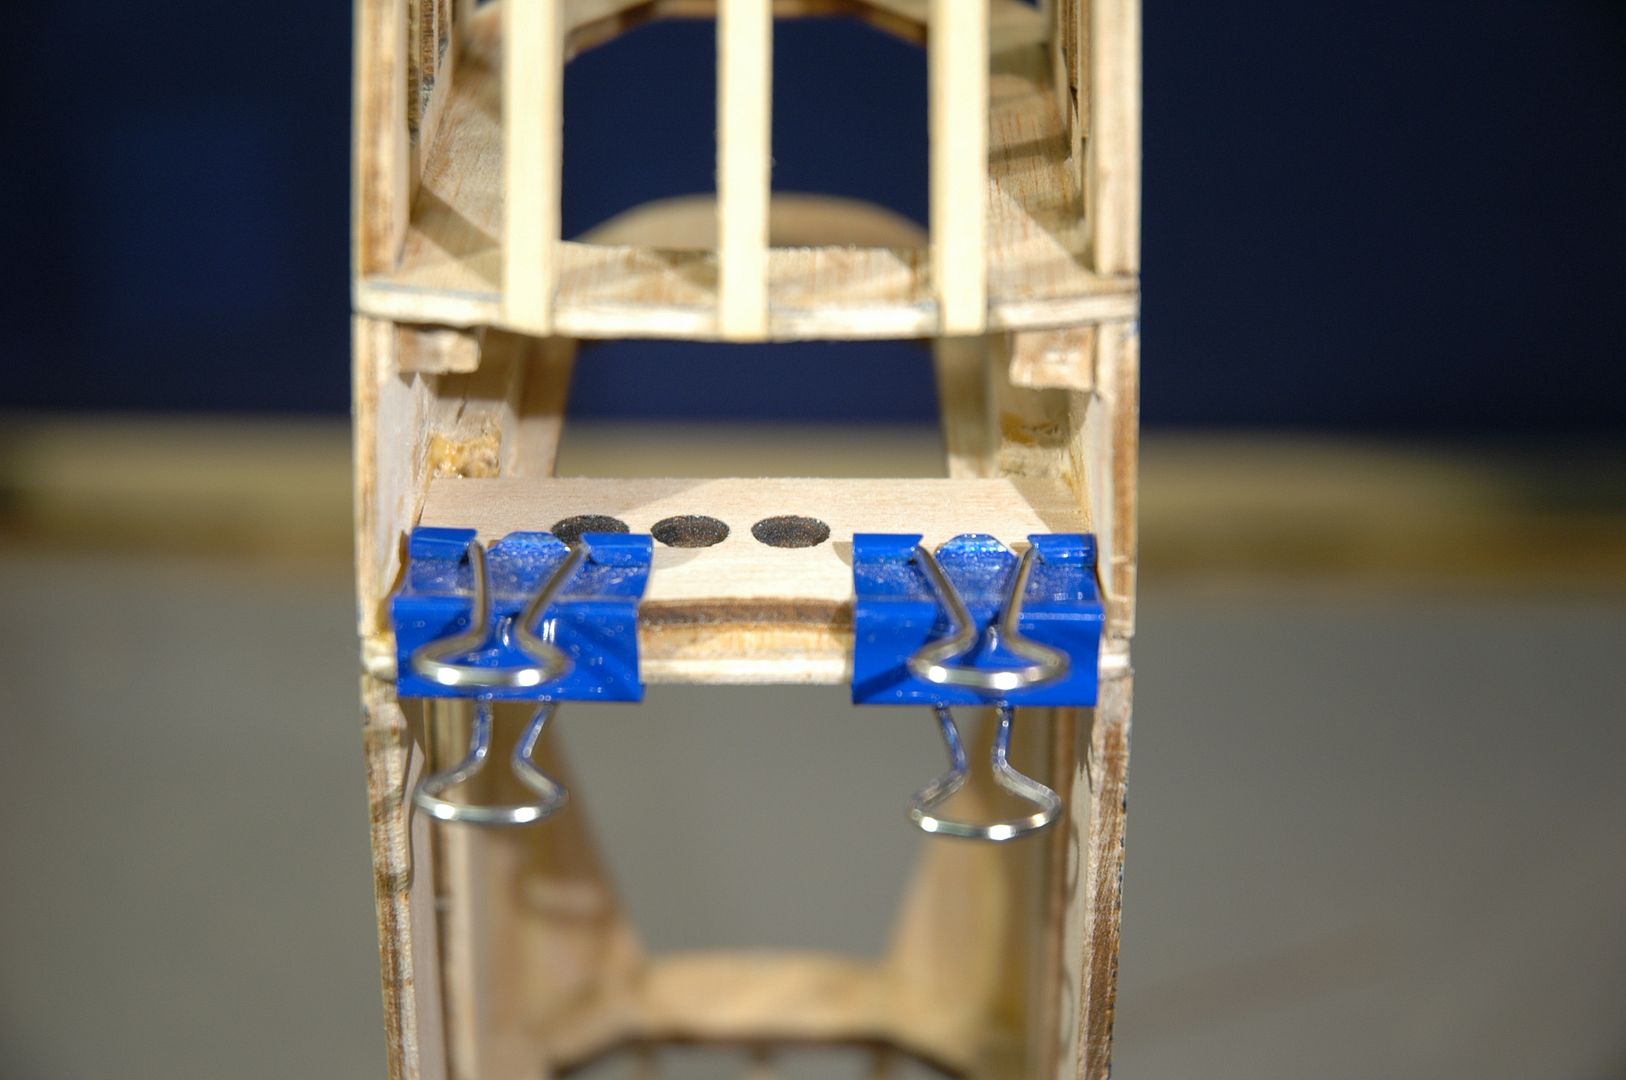 Stage 38. The next job was to remove the two pieces of fret that hold the small and large fairing then glue them together at 90then if all ok glue in place behind the piece with 3 holes. 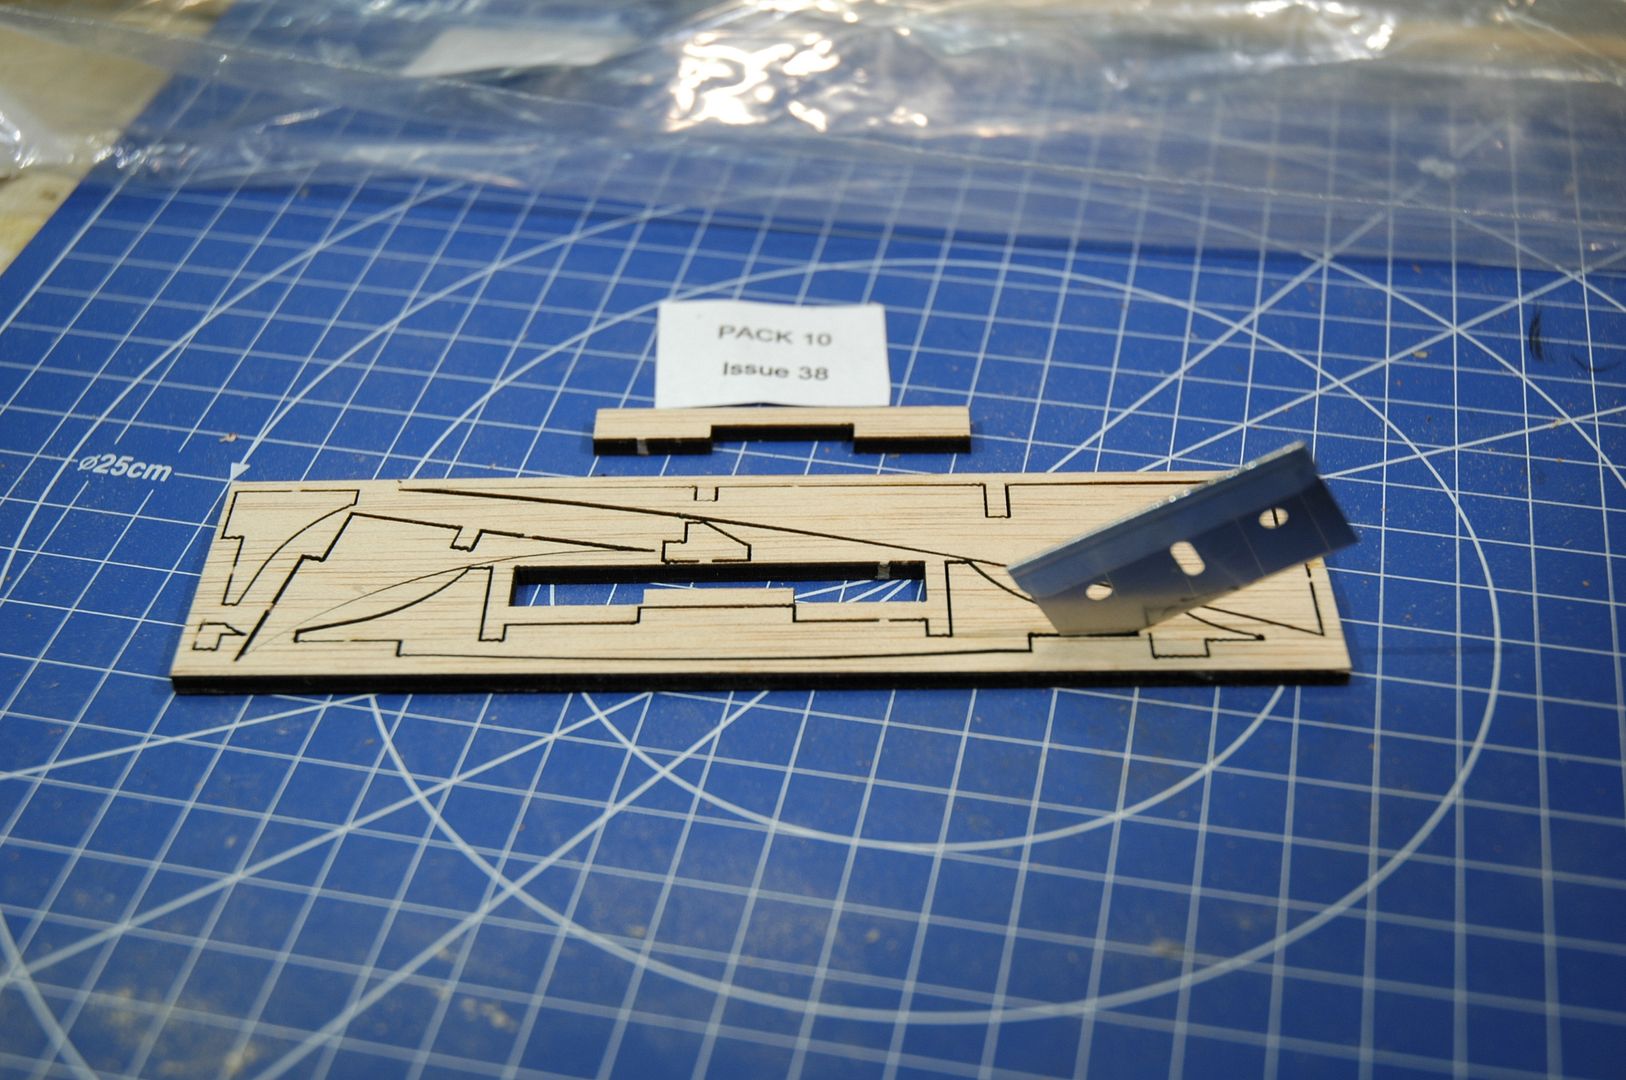  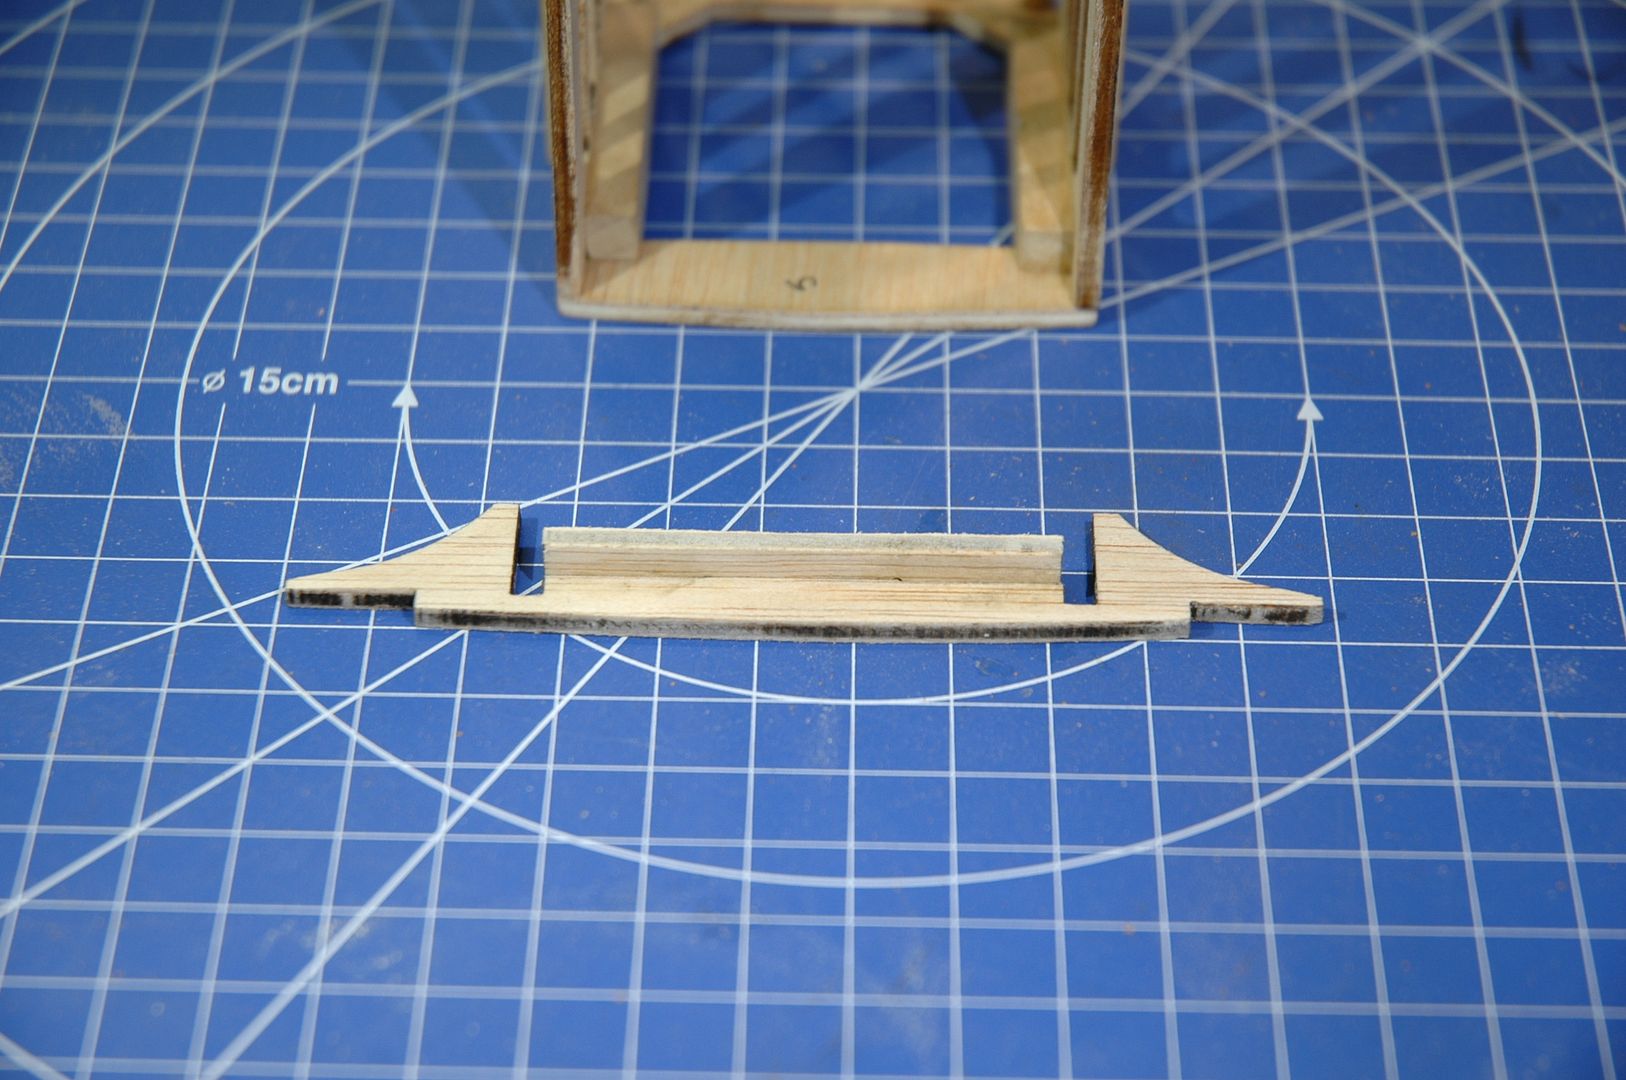 This picture shows a small piece of fret (yellow arrow ) this has to be glued Port and Starboard. This is to help with reinforcement, test and fit the small fret and glue in place. 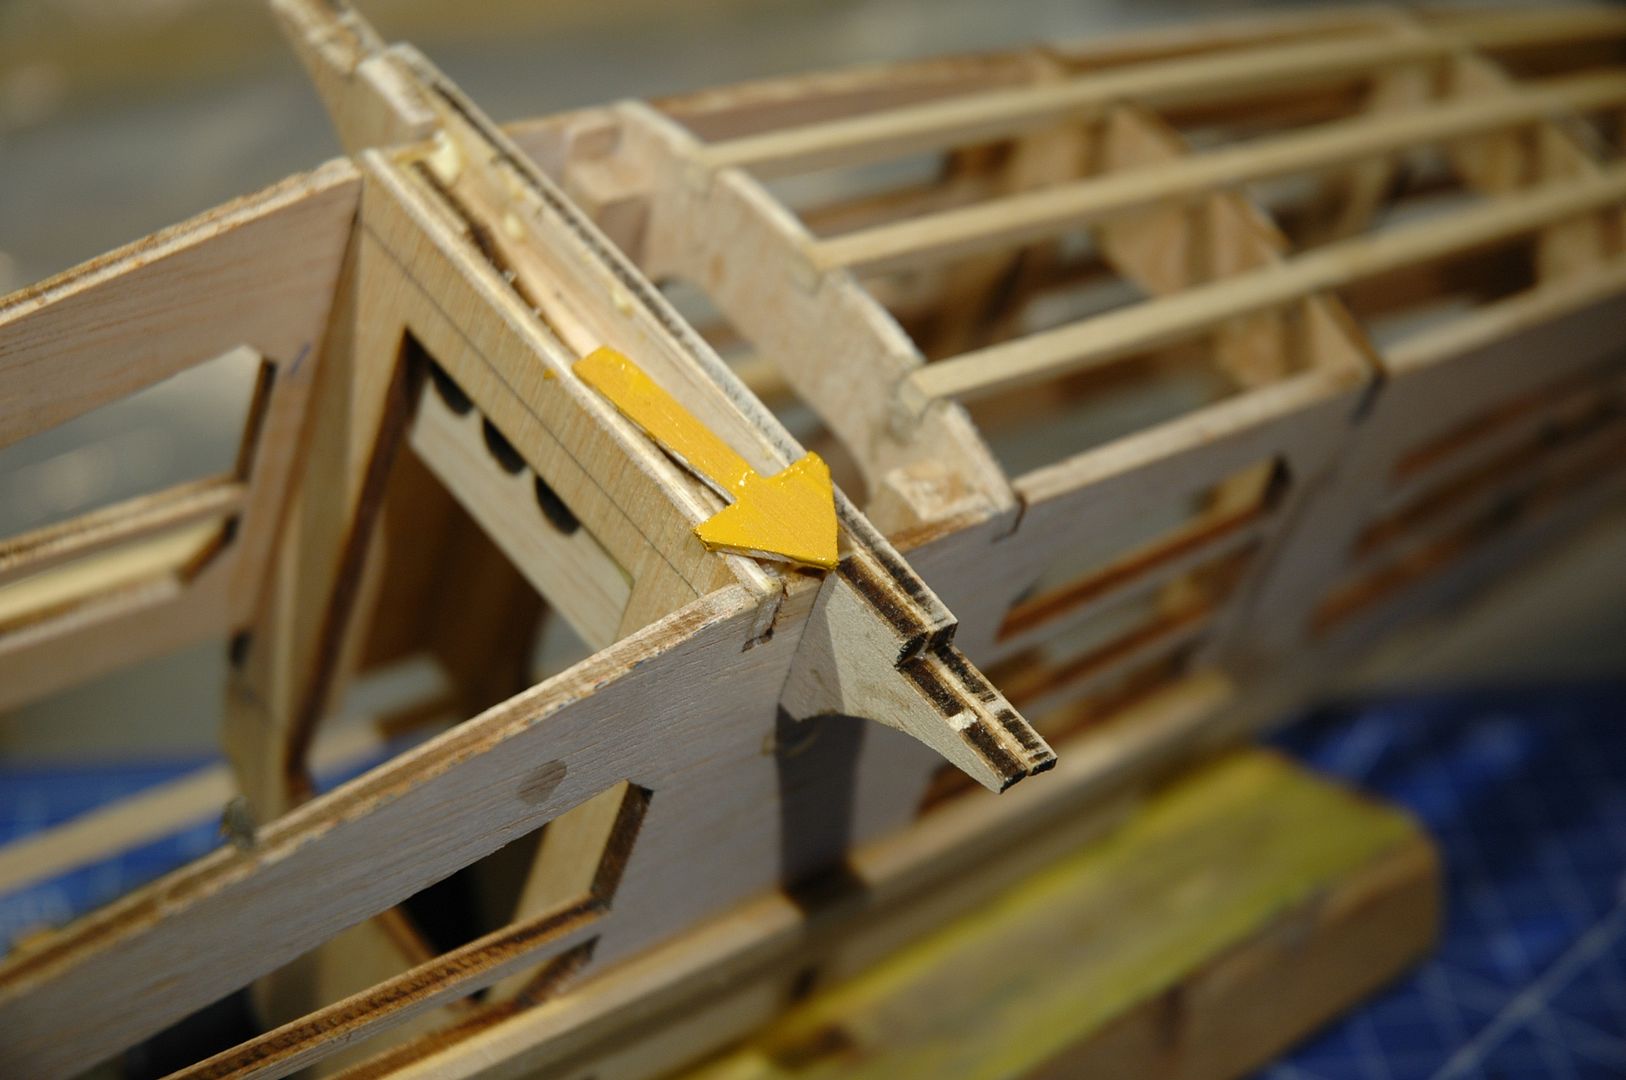 Next was to fit the large fairing (same side as the small piece)now this is the tricky bit, what you have to do is follow the curve of the fuselage, how I did it was to Glue and clamp the thick end and pin the thin end. You must take care with this part the pins I used were like the pins you get when you plank a hull. 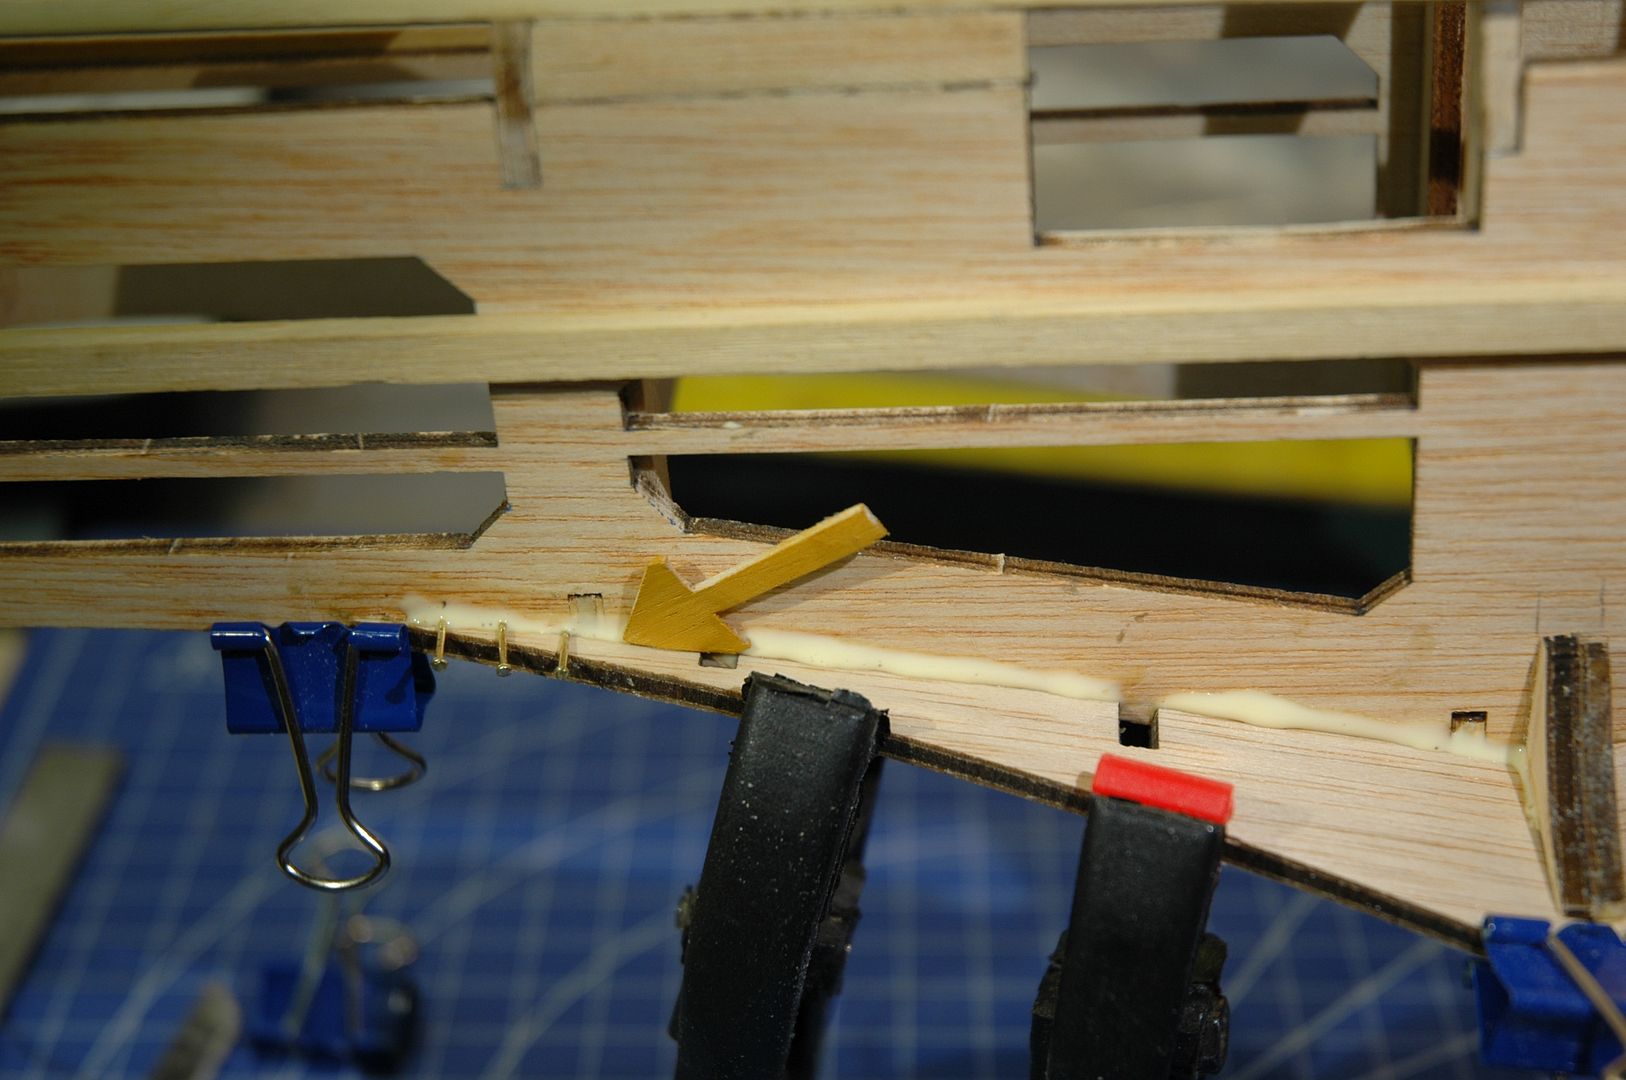 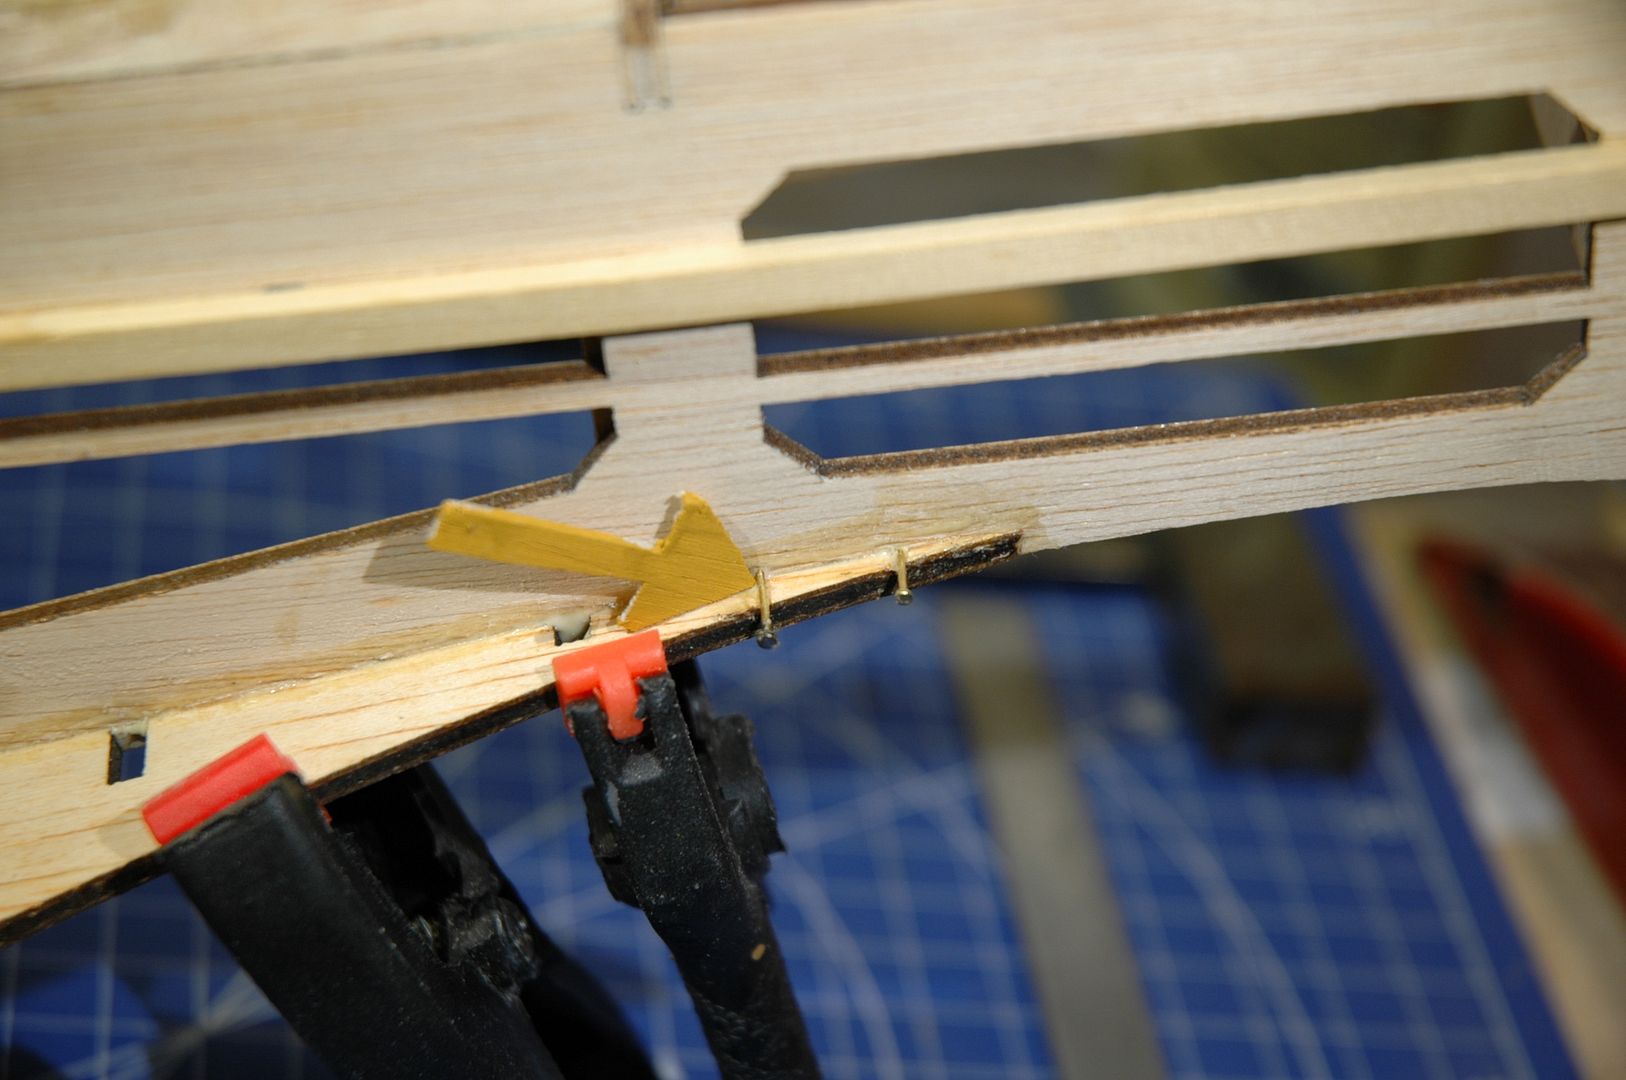  What I did find I had to shape a small chamfer at the large end to get the correct angle this may be just my build but it left a small gap which I filled with left over fret.  The next job was to fit the small fret very much the same as fitting the large, here are a few pictures to show. 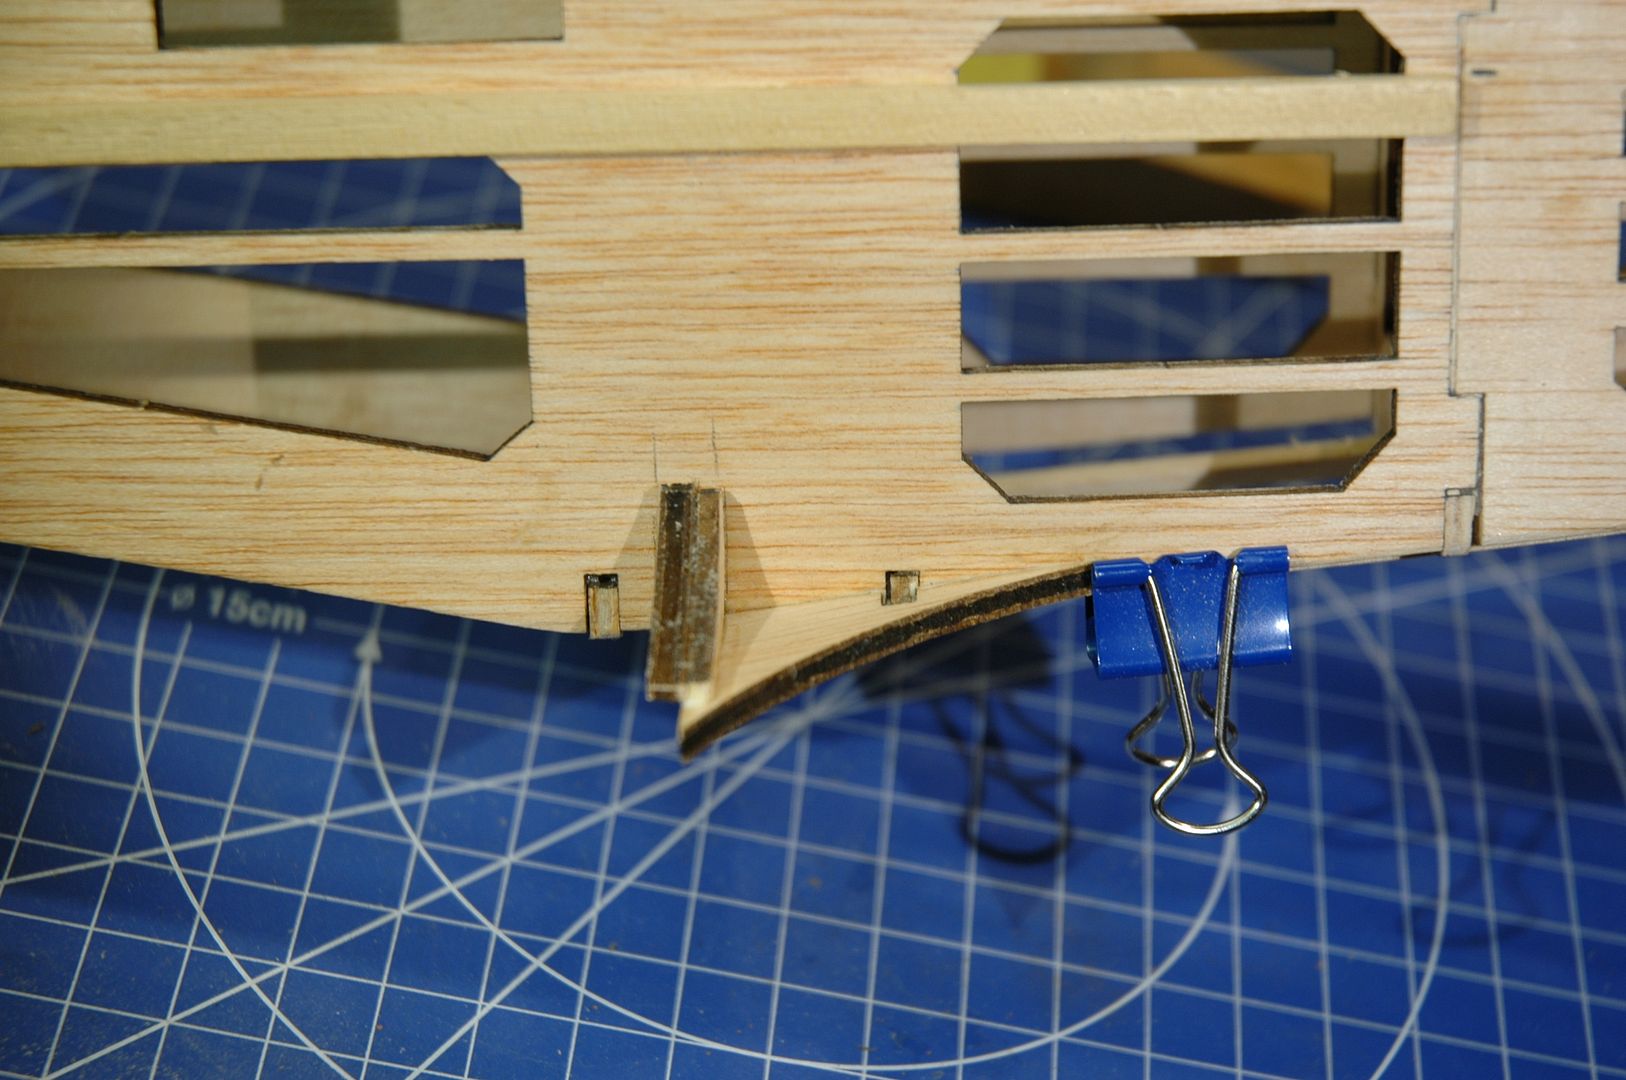 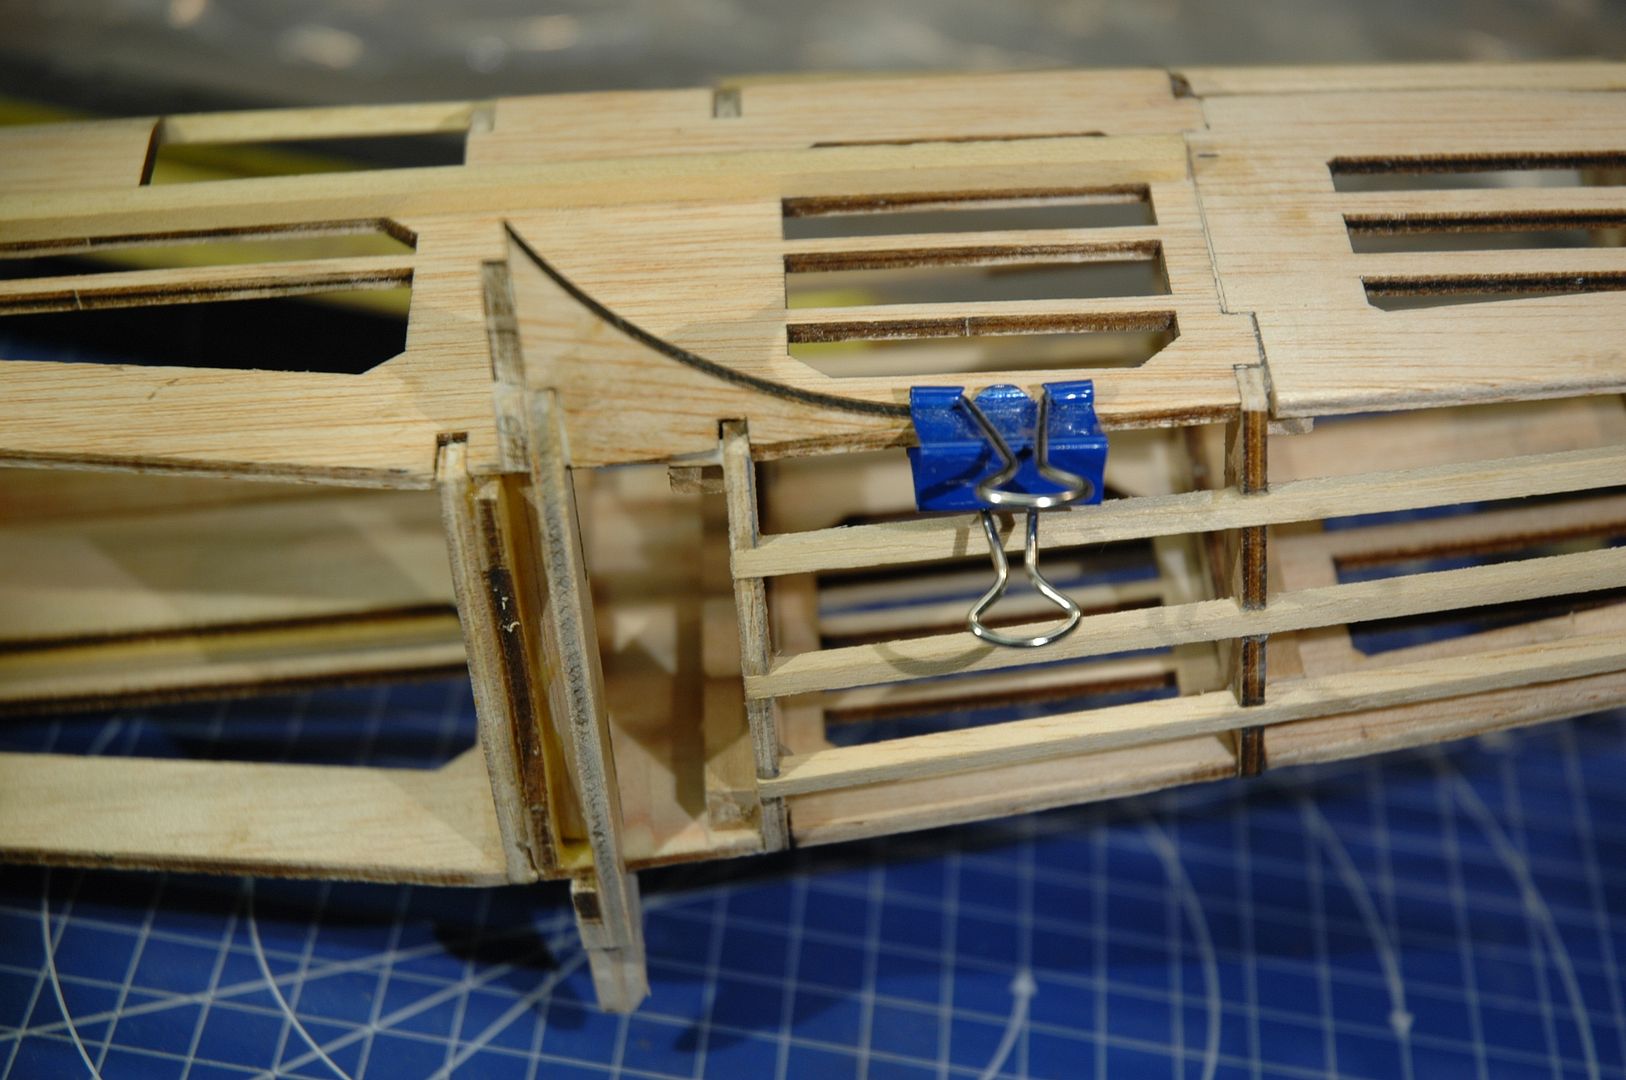 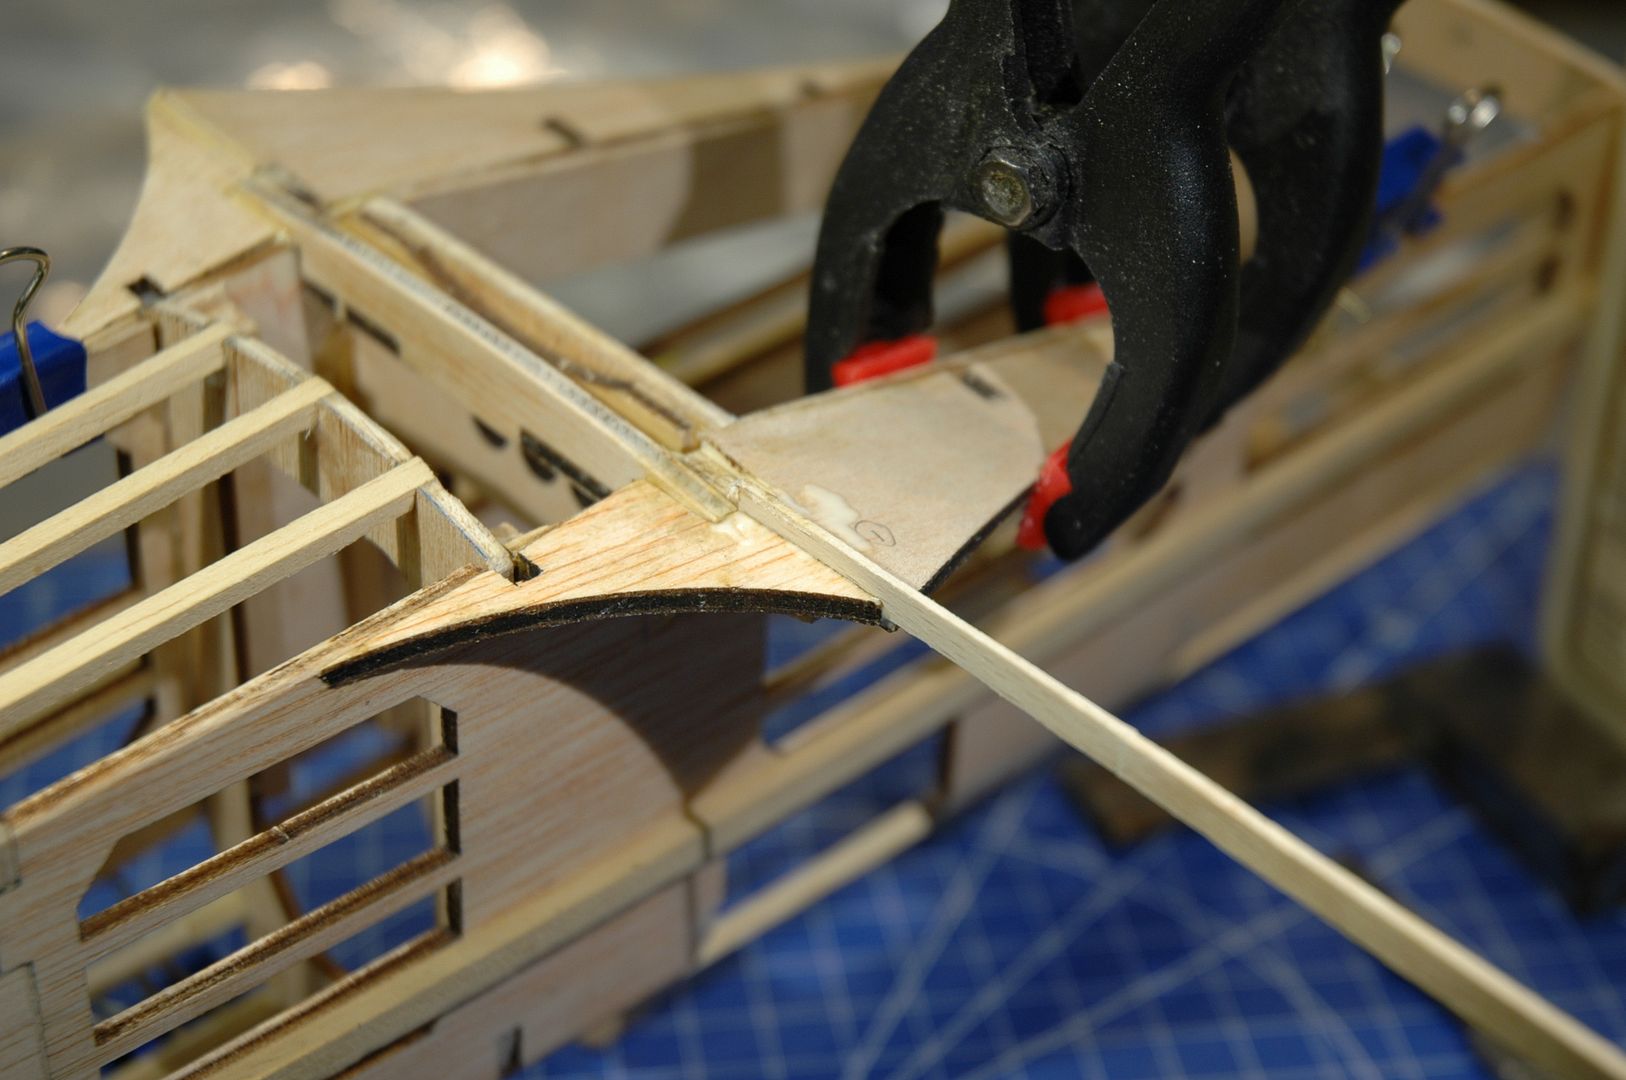 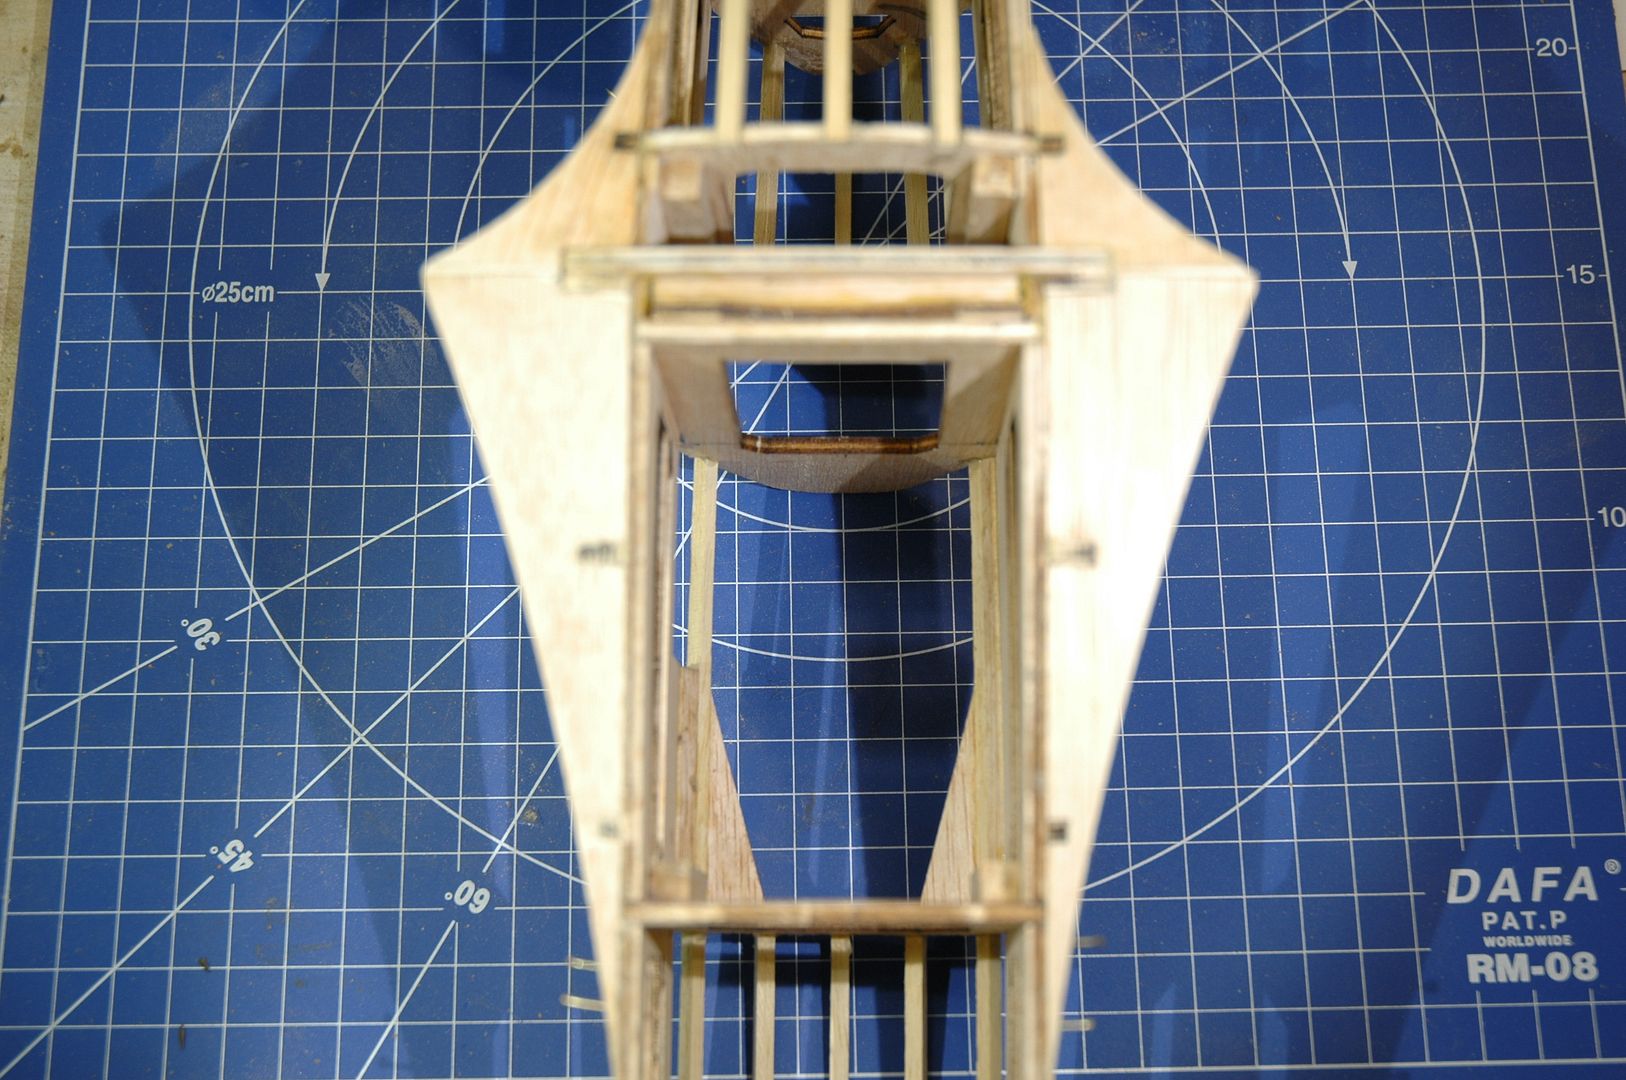 Now to fit the 3 small pieces of fret to complete this stage, you may find that a little adjustment will be necessary if you can follow the angle of the Fairing in my case the holes were drilled at 90 so I will have to adjust at some point. 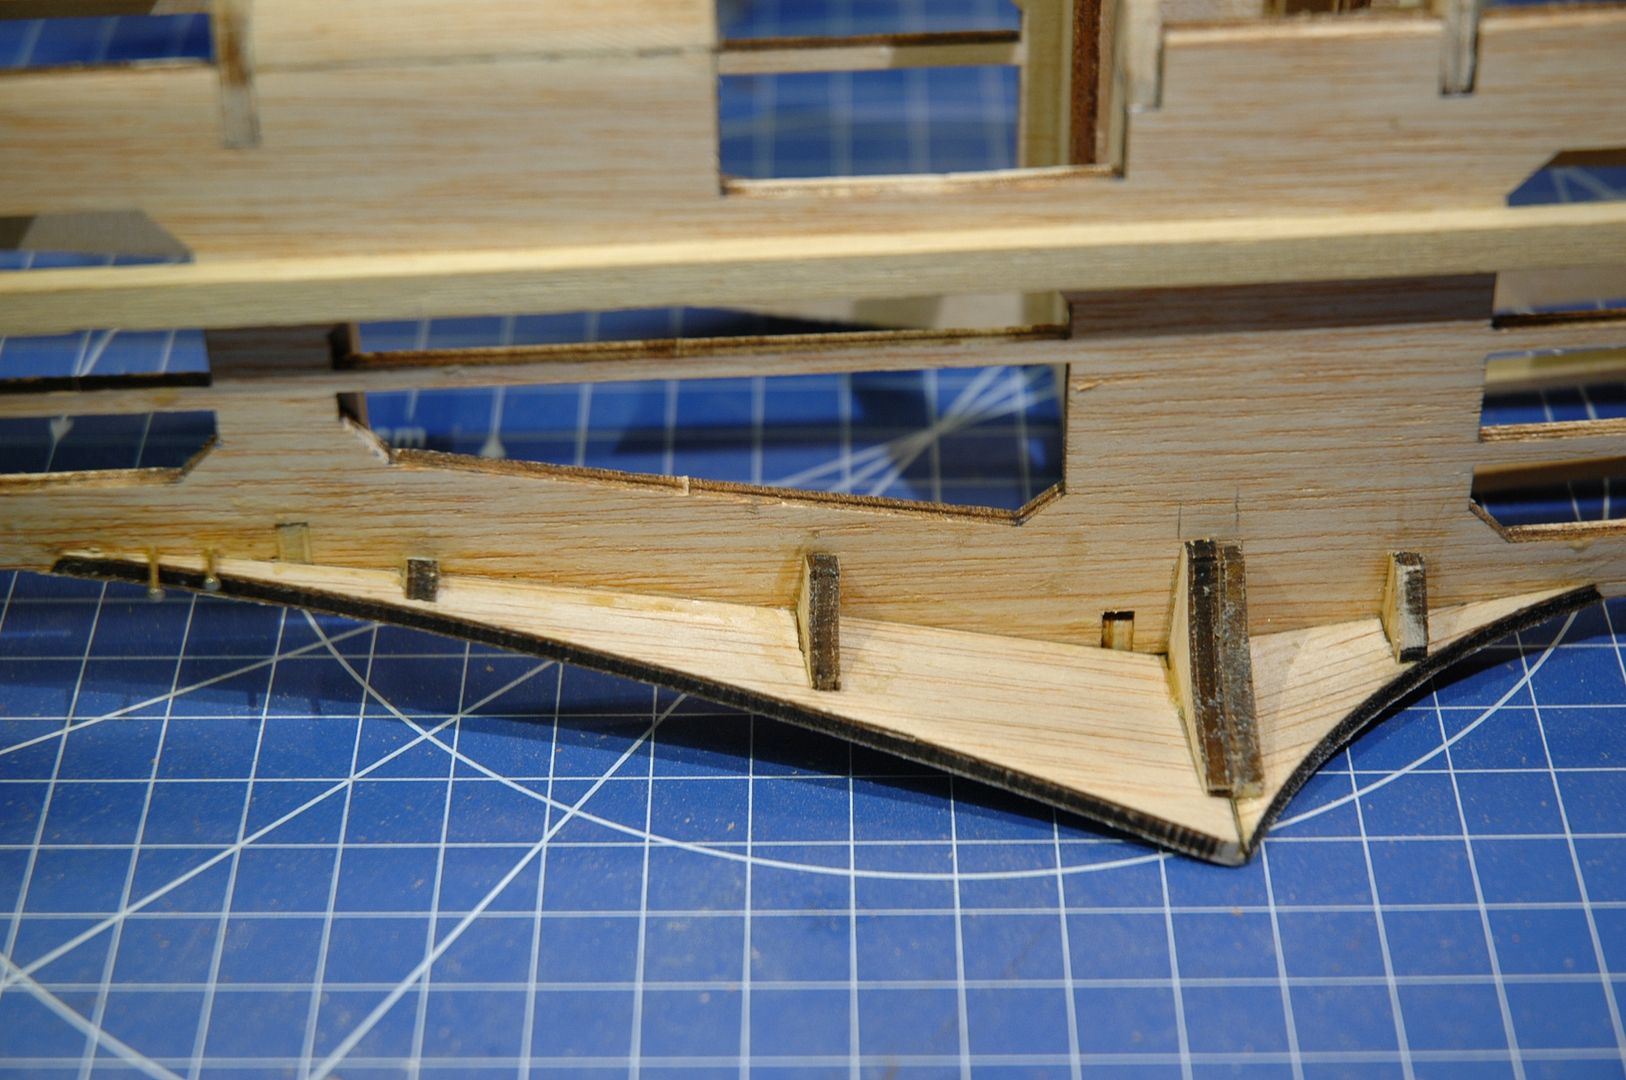 Well thank you for looking at my Spitfire build and the pictures, I do hope you find them as interesting as I find this build. Kind Regards Trev. Work in progress: Tombstone (Scratch) - San Francisco 2. -The Mayflower ( scratch by plan).
OcCre- Santa-Maria (Kit).
|
|
|
|
|
Hi Trev That's a clever use of brass nails to get the curvature of the former to follow the line of the fuselage. Top work as always. Regards Andy Current builds:-C57,Zero, Lamborghini Countach, Caldercraft HMS Agamemnon,Robi,R2-D2, MFH Cobra .
|
|
|
Rank: Elite Groups: Registered
Joined: 13/02/2011 Posts: 2,243 Points: 6,849 Location: Sussex
|
Hi Andy, Do you know that fret was so hard I had to sharpen the pins up, so it is a solid old build, still it worked that's the main thing, and it may help others who are in this build, anyway up to date with the Spit now waiting for the next pack, I think things will start to move a bit now as I have a lot of bits waiting, so on to the Vic now. Regards Trev. Work in progress: Tombstone (Scratch) - San Francisco 2. -The Mayflower ( scratch by plan).
OcCre- Santa-Maria (Kit).
|
|
|
|
|
Trev, the more I see of your build the more I am tempted..... problem I have is having nowhere to display the finished build.....  .. Keep the great work coming.... Regards Alan
|
|
|
Rank: Elite  Groups: registriert, Registered Joined: 20/03/2011 Posts: 2,356 Points: 7,122 Location: UK
|
She's looking great Trev and going to be a beast once all the major parts start going together.. Great job  Spencer
|
|
|
Rank: Elite Groups: Registered
Joined: 13/02/2011 Posts: 2,243 Points: 6,849 Location: Sussex
|
Hi Alan, I know the problem so very well, I would like to buy more but a bit short of modelling space myself, thank you for looking. Regards Trev. Work in progress: Tombstone (Scratch) - San Francisco 2. -The Mayflower ( scratch by plan).
OcCre- Santa-Maria (Kit).
|
|
|
Rank: Elite Groups: Registered
Joined: 13/02/2011 Posts: 2,243 Points: 6,849 Location: Sussex
|
Hi Spencer, Glad you looked in, as I have said before this is a great build for both those that are new to modelling, and those that need a challenge, but all very well explained by Mr T. thank you for looking. Regards Trev Work in progress: Tombstone (Scratch) - San Francisco 2. -The Mayflower ( scratch by plan).
OcCre- Santa-Maria (Kit).
|
|
|
Rank: Super-Elite Groups: Registered, Forum Support Team, Administrators, Global Forum Support Team, Moderator, Official Builds Joined: 09/11/2012 Posts: 8,520 Points: 24,651 Location: East midlands
|
|
|
|
Rank: Elite Groups: Registered
Joined: 13/02/2011 Posts: 2,243 Points: 6,849 Location: Sussex
|
Hi Derek, Thanks, I know you are very busy with other builds but looking forward to seeing you Spitfire build at some point. Regards Trev Work in progress: Tombstone (Scratch) - San Francisco 2. -The Mayflower ( scratch by plan).
OcCre- Santa-Maria (Kit).
|
|
|
 Rank: Pro Groups: Registered
Joined: 27/06/2011 Posts: 437 Points: 1,321 Location: milton keynes
|
very fine work there Trev enjoying watching your build progress regards Dan Built - Deagostini MP4/23, deagostini Zero, Deagostini Falcon, Deagostini R2D2, Model Airways 1903 Wright Flyer, Deagostini Senna Mp4/4.
Entex Mclaren M23 1/8th scale to complement the Deagostini MP4/23 & Mp4/4, deagostini Ferrari 312T4, Pocher lotus 72D, Pocher porche, Deagostini Lotus 97T
on the bench, Model Airways Sopwith Camel, HK Models B-17F flying fortress, Galactica Viper, Stap droid
|
|
|
Rank: Elite Groups: Registered
Joined: 13/02/2011 Posts: 2,243 Points: 6,849 Location: Sussex
|
Hi Dan, Thanks for having a look at my build,it's just starting to shape up now I was very tempted to start the Zero then I saw the Spit was available so I went for that, looking at your build Dan it appears to be more complex in metal than wood,but a wonderful job you have done with your Zero. Regards Trev. Work in progress: Tombstone (Scratch) - San Francisco 2. -The Mayflower ( scratch by plan).
OcCre- Santa-Maria (Kit).
|
|
|
|
Guest (23)
|
 US
US

