|
|
 Rank: Pro Groups: New Members, Unapproved Joined: 24/08/2009 Posts: 48,827 Points: -13,348
|
I know we have a few weeks before the next issues arrive so this topic is intended to give folk something to think about and hopefully contribute his or hers experience in what is probably the 2nd most important aspect of model shipbuilding. I've attached a few pictures to show the idea Tomick showed in the latest issue. 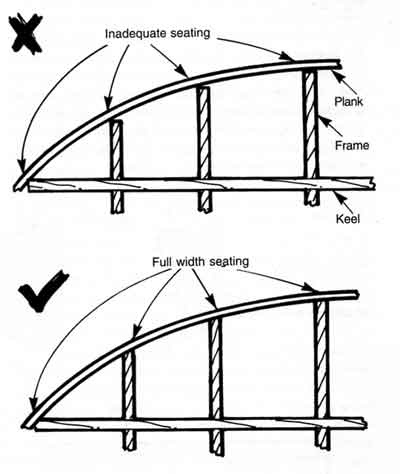 As you can see it's pretty simple to understand, the planks need something to adhere (stick)to, at the moment on my build I have noticed frames 15 as being a little bigger that those around it, so this will need sanding down. By using a plank (supplied in future issues) you can lay this over the upper and lower parts of the hull from stern to bow (front and back of ship) to make sure it lays flat across the frames..again this will be explained in the next issues. At some point also the hull will need to be turned upside down for planking and or coppering and various other bits and bobs, so this link and picture show a simple jig, the picture speaks volumes.   The full post is here - http://modelshipworld.co...2/viewtopic.php?t=10974
This link is worth re posting again for the newcomers SIMPLE HULL PLANKING TECHNIQUES FOR BEGINNERS http://modelshipworld.com/phpBB2/hptintro.php
Again this images (which is part of the above link) shows the idea of adding and testing with a plank as you sand the frames.  I hope other members who have done this before can add any comments. The Victory is a big hull and well worth time understanding what needs to be done, time well spent now, if you rush these step it WILL show. Below is a set of pictures on my launch showing me place a single plank around various parts of the frames, in principle the main hull is just BIGGER!..     and the final picture is of my scratch build Syren, the plank again is layed across the frames.  Ask questions now.I hope this helps to understand the next stage of the HMS Victory.
|
|
|
 Rank: Vice-Master   Groups: Registered
Joined: 25/04/2010 Posts: 748 Points: 2,285 Location: bognor regis
|
thanks for that zeptrader and very well explained cheers benny
|
|
|
 Rank: Elite  Groups: Unapproved
Joined: 24/05/2010 Posts: 1,761 Points: 5,351 Location: London & Greece
|
 Terrific, thanks. John
|
|
|
 Rank: Master    Groups: Registered
Joined: 08/07/2010 Posts: 1,036 Points: 3,086 Location: Thetford, Norfolk, UK
|
Your diagrams make it very clear what needs to be done to ensure a strong,
well-built hull. You've just instilled in me the need for good preparation.
Many thanks
Daffy09
|
|
|
 Rank: Beginner Level 3  Groups: Registered
Joined: 07/05/2010 Posts: 25 Points: 96 Location: Sussex by the Sea
|
Thanks Colin - very well explained and presented with easy to follow pictures a great help to us new comers.
Thanks again John
|
|
|
 Rank: Super-Elite   Groups: Registered
Joined: 16/08/2010 Posts: 2,771 Points: 8,344 Location: Brighton
|
A realy usefull post for any new model maker who has never planked anything before Current builds.Hachettes build the bismark,HMS Victory, HMS Hood.
Finished Builds Corel HMS Victory cross section.
|
|
|
Rank: Pro Groups: New Members, Unapproved Joined: 24/08/2009 Posts: 48,827 Points: -13,348
|
I really glad this has been of some use, but I also think its important even for me, it's so so tempting to get the hull planked and see her take shape that sometimes these area's can be missed or overlooked, and I'm saying that from experince on my Bounty build, if only I had a forum or place to ask question I could have saved myself some serious headaches.
The front part of the ship I would say is going to need some serious times spent on it, if you look at you build with all the frames/formers in place just look at the bend the wood has to follow..ouch.
I do have an idea about pre bending these strakes/planks of wood but would like to get it straight in my head before showing here, that I think could be another topic?
|
|
|
Rank: Pro Groups: New Members, Unapproved Joined: 24/08/2009 Posts: 48,827 Points: -13,348
|
Cheers Colin,
Some really good pointers in your post.
Really impressed with the "simple Hull Planking Techniques for Beginners" Link.
Brings me out in a cold sweat just thinking about this stage of the build as this really is the make or break point.
The only other hull I have started is the hav=chette Bismarck and those planks were fairly thin and did not have to cover such tight curves as we see on victory.
I just hope thatth esupplied planks with Victory are thin enough to work with easily - only time will tell.
Enjoy th rest of your build.
Kind regards
AJB
|
|
|
Rank: Beginner Level 3 Groups: Registered
Joined: 04/06/2010 Posts: 23 Points: 65 Location: wales newport
|
many thanks for the diagrams and pics will sure help us novice builders
to start planking
cheers turboman
|
|
|
Rank: Pro Groups: New Members, Unapproved Joined: 24/08/2009 Posts: 48,827 Points: -13,348
|
Here is an example of Balsa filler blocks used whilst fairing both ends of a ship, this is NOT the victory but HMS Vangaurd, as you can see the filler blocks will help the planks to adhere better to the rather tight turn both ends of the ship.   Im not saying this is necessary but only an option. here is the link to this wonderful build. http://modelshipworld.co...der=asc&&start=0
|
|
|
Rank: Pro  Groups: Registered
Joined: 27/03/2010 Posts: 188 Points: 614 Location: Llandudno
|
Once again. Nice one Colin. Great help that mate. Bob 
|
|
|
Rank: Pro Groups: Registered
Joined: 08/05/2010 Posts: 236 Points: 808 Location: Manchester
|
Thanks for the advice Colin. I think i will do this with mine as it will help on the fairing of the ribs. I had big nightmares on the fairing of the launch. 1st attempt an all that. Never did anything like this before. Didnt know when to stop fairing lol. It will help me to visualize and more importantly FEEL it better than dry running/placing the planks over gaps. Top advice. keep it coming shipmate. i dont know what weapons will be used in ww3 but ww4 will be sticks and stones.
|
|
|
Rank: Pro  Groups: Registered
Joined: 20/03/2010 Posts: 498 Points: 1,522 Location: South Wales
|
Nice one Collin!!!! Just a point though, this method is very good for the bow and stern, but sometimes, its a good idea to leave the side of the hull bare, as some of the planks will try and clinker (try to overlap the plank above or below)when this happens, get a bulldog clip and clamp the plank to the one above or below to keep them together until dry, with balsa in between the bulkheads, you wont be able to use this method, but this is just my opinion. Ship Builds on the go
Yamato - DeAgostini Subscription - Highly Recommend This Model
AKAGI - DeAgostini Subscription - Highly Recommend This Model
RMS Titanic Lifeboat (Kind Gift from DeAgostini Crew)
|
|
|
Rank: Pro Groups: Registered
Joined: 30/03/2010 Posts: 126 Points: 335 Location: Bradford West Yorks
|
great pictures Colin and a big help especially for someone who hasnt done it before I was wondering if you had any idea of the width of the planks The reason i am asking is ihave built a 5ft model of titanic but this was double planked and i have alot of planking left 0.5mm but the length goes from bow to stern of victory no problem I have decided to paint my model so the type of wood would not be an issue any ideas
Peter
|
|
|
Rank: Pro Groups: New Members, Unapproved Joined: 24/08/2009 Posts: 48,827 Points: -13,348
|
Lonestar I agree 100% Quote:Just a point though, this method is very good for the bow and stern, but sometimes, its a good idea to leave the side of the hull bare, as some of the planks will try and clinker (try to overlap the plank above or below)when this happens, get a bulldog clip and clamp the plank to the one above or below to keep them together until dry, with balsa in between the bulkheads, you wont be able to use this method, but this is just my opinion. A good point that I missed, maybe some filler in the bow. I also think if when faring the hull you lay the planks around those rather heavy curves you can gauge if the bulldog clamps are needed or some filler blocks. I have just ordered 100 bulldog clips on a fleabay shop, I wished I used this method on my Bounty but looking at people who have used this method do seem to think it works really well.  out of 3 bulldogs clips you will get 2 planking clamps.
|
|
|
Rank: Pro  Groups: Registered
Joined: 17/03/2010 Posts: 215 Points: 617 Location: Blackburn
|
May be helpful, looking at partworks forum were a few are doing this build and are on issue 20 the parts supplied are 2 Bow fillets
20 planks 5mm x 2mm x300+ a bag of pins
We now know the size of planks for the hull, glad they are 2mm thick same as the cutty sark i am currently building.
|
|
|
Rank: Vice-Master Groups: Registered
Joined: 13/10/2011 Posts: 851 Points: 2,628 Location: Leeds, Yorkshire
|
Lonestar Spirit wrote:Nice one Collin!!!! Just a point though, this method is very good for the bow and stern, but sometimes, its a good idea to leave the side of the hull bare, as some of the planks will try and clinker (try to overlap the plank above or below)when this happens, get a bulldog clip and clamp the plank to the one above or below to keep them together until dry, with balsa in between the bulkheads, you wont be able to use this method, but this is just my opinion. I agree with you that some clamping may be necessary but more importantly in order to avoid 'clinkering' the planks need to be gently shaped along their length to accommodate the fact that we are not planking a flat surface. The planks should lie together reasonably well before they are fixed to the ribs. Mike T
|
|
|
Rank: Pro Groups: Registered
Joined: 20/03/2010 Posts: 498 Points: 1,522 Location: South Wales
|
Mike Turpin wrote:Lonestar Spirit wrote:Nice one Collin!!!! Just a point though, this method is very good for the bow and stern, but sometimes, its a good idea to leave the side of the hull bare, as some of the planks will try and clinker (try to overlap the plank above or below)when this happens, get a bulldog clip and clamp the plank to the one above or below to keep them together until dry, with balsa in between the bulkheads, you wont be able to use this method, but this is just my opinion. I agree with you that some clamping may be necessary but more importantly in order to avoid 'clinkering' the planks need to be gently shaped along their length to accommodate the fact that we are not planking a flat surface. The planks should lie together reasonably well before they are fixed to the ribs. Mike T Maybe the use of the term clinkering was a bad example, but no mater how good you prepare a piece, you will sometimes find a plank will try and disagree with you, where it's placed, then a bulldog clip usually becomes the persuader in the matter, but there again, I love using them on the hull, gives an even tighter fit when you use them to push a plank against its predecessor, you can also do away with the pins too.   Sorry about my graphics, still learning and have a long way to go lol Ship Builds on the go
Yamato - DeAgostini Subscription - Highly Recommend This Model
AKAGI - DeAgostini Subscription - Highly Recommend This Model
RMS Titanic Lifeboat (Kind Gift from DeAgostini Crew)
|
|
|
Rank: Pro Groups: Registered
Joined: 08/05/2010 Posts: 236 Points: 808 Location: Manchester
|
I think i know what your getting at Lonestar. Sliding the bulldog clip down the rib to push it closer to the last layed plank. If im wrong tho tell me. lol i dont know what weapons will be used in ww3 but ww4 will be sticks and stones.
|
|
|
Rank: Pro Groups: Registered
Joined: 20/03/2010 Posts: 498 Points: 1,522 Location: South Wales
|
piot007 wrote:I think i know what your getting at Lonestar. Sliding the bulldog clip down the rib to push it closer to the last layed plank. If im wrong tho tell me. lol Your spot on mate!!!! glad someone sort of understood my gibberish  Ship Builds on the go
Yamato - DeAgostini Subscription - Highly Recommend This Model
AKAGI - DeAgostini Subscription - Highly Recommend This Model
RMS Titanic Lifeboat (Kind Gift from DeAgostini Crew)
|
|
|
|
Guest (2)
|
 US
US

