|
|
 Rank: Vice-Master     Groups: Registered
Joined: 28/05/2014 Posts: 938 Points: 2,823 Location: Milan (Italy)
|
birdaj2 wrote:Hope you do not kind me asking but you add a date to each of your postings and I was wondering if these are builds you have completed a few years ago as your posts are headed up with the year 2009. Only asking because if these are your 2005 builds your skill levels now must be off the scale. Regarding the date at the beginning of each post you are right: I report and highlight the date because the builds and the events described belong to that date; in few words is something happened time ago. And this just to avoid confusion and to state the truth. An example is when I posted about my "borning" workshop: today it is my usual site where I do my hobby but I had to fight and work to have it. I wrote the original messages in italian language at the right time in the past and now I'm practicing myself in translating the text I wrote time ago in english. To do this I've found great help in using "Google Translator": it makes for me at least 50% of the work. But it is quite far for 100% satisfaction and the translation must be adapted in many points, especially for nautical terms. Regarding the skill level, you may be right: it is highly probable that in this meantime my ability with this hobby may be improved but I think that to become perfect in shipmodelling an entire life cannot be considered enough. There are still a lot of aspects on the field that are 100% unknown to me and I'm still learning from the past and by participating to forums or simply surfing the internet. You may learn a lot by looking other modellers in techniques, methods and ideas. For example in these days I started the project of the "brick de 24" but I spent much time researching infos about that class of ships and also regarding builds of similar models to acquire techniques on how to best realize some parts. In this task I get great help by reading a "practicuum" by Chuck Passaro, an american modeller, who built the english brig "Syren". Hoping to have satisfactory answered you . . . Jack.
|
|
|
Rank: Vice-Master Groups: Registered
Joined: 28/05/2014 Posts: 938 Points: 2,823 Location: Milan (Italy)
|
Now there are many other elements to apply on the quarterdeck, both on the deck and inside of the bulwarks. Regarding the external side there are also new pieces to build and install. In the latter case there are in particular to build and install the gunport lids. The kit supplies metal frames where the lids can be fixed, but this is absolutely unrealistic, a genuine invention of the kit manufacturers to simplify the matter; this wasn't the way the gunports and the gunport lids were built. So I decided since the beginning to avoid this "solution" and to "scratch build" them as they really were. It should not be a huge work, in total there are only 12 gunport lids to build. The quarterdeck has no lids. This is one advantage of a cross section model compared with the complete model . . Having in mind the future activities, I will install them not so early. I'm defining a plan to put in the right sequence all the tasks needed to finish the hull; may be this job will remember me when I was employed as project manager . . . my preferred software of that period was Microsoft Project ! I take advantage of this message to insert new photos . . 01 Cross%20Section%20Santisima%20Trinidad/P1060016.jpg  02 Cross%20Section%20Santisima%20Trinidad/P1060017.jpg  03 Cross%20Section%20Santisima%20Trinidad/P1060018.jpg  Cheers. Jack.
|
|
|
Rank: Vice-Master Groups: Registered
Joined: 28/05/2014 Posts: 938 Points: 2,823 Location: Milan (Italy)
|
Tuesday February 2nd, 2010 It is since half december 2009 that I've interrupted any activity about shipmodeling, fully dedicated to the fitting of my "long awaited workshop". Now, after having past an afternoon to plan the future activities for the cross section, I started to do something very easy and less demanding in term of diligence. So I started to prepare some pieces such as casks, boxes and packages. Just a couple of hours to restart the wheels. 01 Cross%20Section%20Santisima%20Trinidad/P1060055.jpg  02 Cross%20Section%20Santisima%20Trinidad/P1060056.jpg  That's all for today. See you tomorrow, Jack.Aubrey
|
|
|
Rank: Vice-Master Groups: Registered
Joined: 28/05/2014 Posts: 938 Points: 2,823 Location: Milan (Italy)
|
Wednesday February 3rd, 2010 This was the second day of work spent in my new workshop. Today I worked around other elements: the main channels, or better the part of them that is contained in the cross section, and so on. In building these elements I did not used any kind of material supplied by the kit, its quality was too poor for me. 01 Cross%20Section%20Santisima%20Trinidad/P1060057.jpg  02 Cross%20Section%20Santisima%20Trinidad/P1060065.jpg  03 Cross%20Section%20Santisima%20Trinidad/P1060061.jpg  04 Cross%20Section%20Santisima%20Trinidad/P1060063.jpg  Cheers, Jack.Aubrey
|
|
|
 Rank: Semi-Pro Level 1  Groups: Registered
Joined: 15/09/2014 Posts: 60 Points: 156 Location: Prestwick
|
jack.aubrey wrote:First of all I needed a basement that allowed me to mount perfectly aligned the two frames. I built the one shown in the first two images. 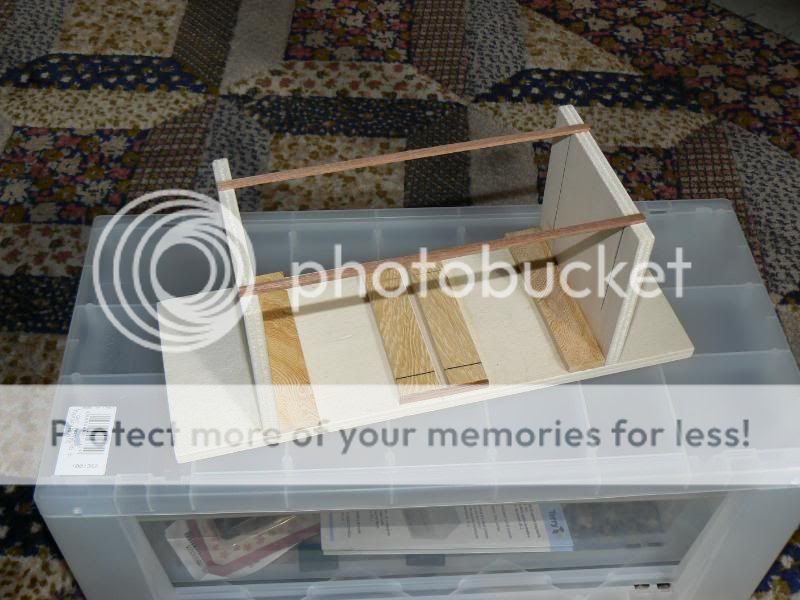 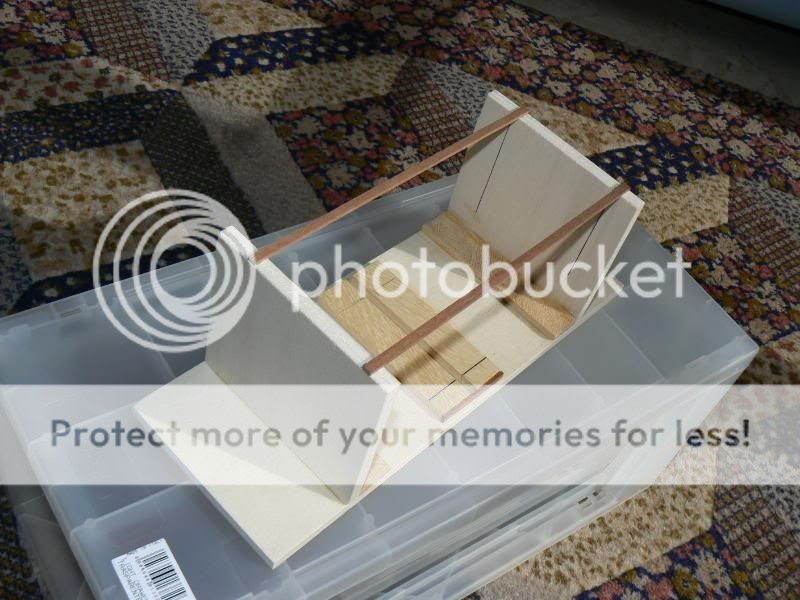 Here below you can see how it should work. The frames and the keel are simply positioned, not yet permanently. Here below you can see how it should work. The frames and the keel are simply positioned, not yet permanently. Kind regards, Jack.Aubrey 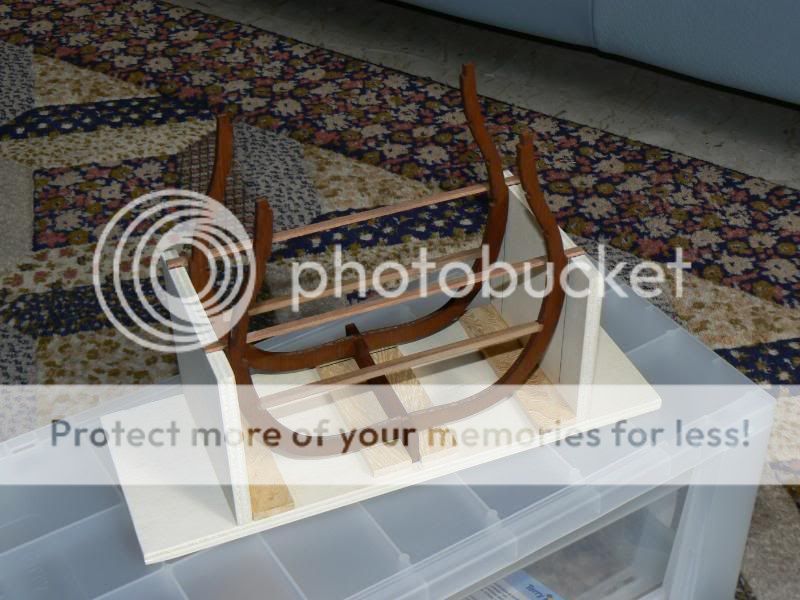 PS: For this project I decided to use the aliphatic glue, instead of the vinyl. PS: For this project I decided to use the aliphatic glue, instead of the vinyl. Hi jack... great looking jig! Promise too much ...and many will be in search of you!
|
|
|
Rank: Semi-Pro Level 1 Groups: Registered
Joined: 15/09/2014 Posts: 60 Points: 156 Location: Prestwick
|
hello jack What fantastic work!.... every picture and page was awe inspiring... I have just started building these works of art and you are a big credit to the modelling society. hope to see more of your work. Kindest Regards David. Promise too much ...and many will be in search of you!
|
|
|
Rank: Vice-Master Groups: Registered
Joined: 28/05/2014 Posts: 938 Points: 2,823 Location: Milan (Italy)
|
captain bligh wrote:hello jack
What fantastic work!.... every picture and page was awe inspiring... I have just started building these works of art and you are a big credit to the modelling society.
Hope to see more of your work.
Kindest Regards
David. Hi David, I satisfy you immediately, usually I post something each day. Thanks for the appreciations. Jack. Thuesday February 4th and Friday 5th, 2010 Third and fourth consecutive days of work on the ST Cross Section in my new workshop !! I worked outside the hull to build the boarding steps. According to the instructions this was the right time to build these elements and the method to be followed was to use two strips of sapelli, of different size and shape, glued together. I made a variant by using walnut and ebony. Here below you can look at the boarding steps already installed, on both sides and with a coat of oil for wood applied outside. The colour of the wood is now darker, expecially over the walnut. It was only a matter of patience to build these steps. In the background the model of San Juan Nepomuceno, from Artesania Latina, which is resting idle for several time . . someday I will resume it and first I will correct a big error I made (always by following the instructions) to plank the decks with a so dark wood. I have now the right strips, in a lighter wood, that are wonderful. 01 Cross%20Section%20Santisima%20Trinidad/P1060066.jpg  02 Cross%20Section%20Santisima%20Trinidad/P1060067.jpg  In the next images you can see a barricade over the deck. The small pillars were supplied with the kit and are made of boxwood. I painted the handrail in light blue. It is like a personal trademark for my models . . 03 Cross%20Section%20Santisima%20Trinidad/P1060068.jpg  04 Cross%20Section%20Santisima%20Trinidad/P1060069.jpg  05 Cross%20Section%20Santisima%20Trinidad/P1060068A.jpg  Continuation . . Jack.Aubrey
|
|
|
Rank: Vice-Master Groups: Registered
Joined: 28/05/2014 Posts: 938 Points: 2,823 Location: Milan (Italy)
|
I particularly like these two images. I'm now getting more used with my workshop and its light and I found the best way to shot photos . . It seems I am close to see the chequered flag but I discover also I have a lot of new pieces to build and install. I'm too much slow . . And at first, again, there are the guns. Some time ago I decided to build from scratch,for this last deck, the guns and their trucks. On the real model in this position of the deck there were two different kind of guns: two of them are the traditional long guns I believe of 9 or 12 pounders. The other two were called "obuseros", a kind of carronade made in Spain and derived by the French "obusiers". 01 Cross%20Section%20Santisima%20Trinidad/P1060070.jpg  In addition I have also to build the gunport lids, I don't want to use the metal pieces supplied. I have to make some experiments to find the best solution to apply for all of them. 02 Cross%20Section%20Santisima%20Trinidad/P1060071.jpg  And then there are the dead eyes and the chain plates. And again the ballast, casks and parcels. The finish line is still so far . . Cheers, Jack.Aubrey
|
|
|
 Rank: Super-Elite     Groups: Registered
Joined: 31/05/2010 Posts: 5,679 Points: 17,011 Location: Wiltshire
|
Jack Wonderful installment to your build log. The cross section gets better and better Happy Modelling
BUILDING: Hachette Spitfire Mk 1A, Constructo Mayflower
SUBSCRIPTION COMPLETE (Awaiting building): USS Constitution, Sovereign of the Seas, 1:200 Bismarck (Hachette)
COMPLETED: Porsche 911, E-Type Jaguar, Lam Countach
|
|
|
Rank: Vice-Master Groups: Registered
Joined: 28/05/2014 Posts: 938 Points: 2,823 Location: Milan (Italy)
|
Saturday May 7th, 2011 - Shipyard reopened
It is more than a year that all the activities about this model were stopped.
The model was in a good point of finishing but, because of a change in my plans, I paused it to begin working again on the Soleil Royal. If you look at its log you will discover I spent this year working near 100% only on it. It is tipical of my way of working . . I normally have two or three model on the yards.
So I decided to resume the Cross Section and to finish it . . sometimes it is necessary to close some projects.
After some planning to define the tasks to perform I started yesterday afternoon to do something.
The task on the top of the list was the installation of the last four guns, on the quarterdeck. This deck will be fully visible, and, for this reason, I decided to build these guns from scratch, at least partially, having in mind to use four barrels, which are right for my needs, that I found in my "spare parts wharehouse". Two barrels serve to simulate the 9pdr long guns and two for the 24pdr "obuseros". The gun trucks, instead, are totally built from scratch: in the traditional shape for the long guns and with a slide for the obuseros.
Here the work done yesterday:
- Blackening of the gun barrels with the "ad hoc" liquid;
- building of the various components of the trucks;
- assembly of the four trucks:
- first coat of red paint for the trucks.
This is only the beginning after a year of "seasoning" . . I'm keep you informed about future news. For now it is not the case to show photos.
Cheers, Jack.Aubrey.
|
|
|
Rank: Vice-Master Groups: Registered
Joined: 28/05/2014 Posts: 938 Points: 2,823 Location: Milan (Italy)
|
Sunday May 8th, 2011 Saturday and today I resumed this model after a long period of inactivity. I re-started by building the last four guns for the quarterdeck/waist/forecastle. This fourth deck (the Santisima Trinidad was at its time the only ship with four complete gun decks) received three different kinds of gun, and in the cross section there are two of them. I got these infos from the book " The ships of Trafalgar" from Peter Goodwin: each ship which fighted in that great battle is described in this book. You can see the barrels, blackened, positioned over their trucks. The trucks are now painted and positioned on the deck. Now I will start to prepare the other details for the guns. 01 Cross%20Section%20Santisima%20Trinidad/P1070574.jpg  02 Cross%20Section%20Santisima%20Trinidad/P1070575.jpg  Here below a more detailed image of the truck for the "obuseros" showing also the pivot where the slide below the truck is fixed to the deck. 03 Cross%20Section%20Santisima%20Trinidad/Obuseros.jpg  These pieces are now only positioned, the complete installation will follow. I'm spending some time to prepare the remaining details, details that need a lot of time to be completed. 04 Cross%20Section%20Santisima%20Trinidad/P1070576.jpg  05 Cross%20Section%20Santisima%20Trinidad/P1070577.jpg  See you next time. Jack.Aubrey
|
|
|
Rank: Super-Elite  Groups: Registered
Joined: 27/01/2014 Posts: 5,060 Points: 14,980
|
Beautiful as always Jack. If you still have that jig laying aroun somewhere and you want someone to take it off your hands then give me a shout 
|
|
|
Rank: Vice-Master Groups: Registered
Joined: 28/05/2014 Posts: 938 Points: 2,823 Location: Milan (Italy)
|
davetwin wrote:Beautiful as always Jack. If you still have that jig laying aroun somewhere and you want someone to take it off your hands then give me a shout Thank you very much for your appreciation. Jack. Wednesday May 11th, 2011 - Quartedeck guns Yesterday I continued to work around the quarterdeck guns. I needed 5-6 hours, divided into two sessions, to reach the following result and to 95% finish the installation of the 9pdr long guns. Now I have to work around the obuseros. To properly install the guns I should have to use some two ways blocks, but they were too big for this scale and I wasn't able to find any of them in the right scale. So i used the one way blocks, making some changes to the way they were mounted. I made some test to scratch build them but I wasn't completely successful: similar for me to "Mission Impossible II" movie. I know only one person within my modellers circle, able to do this work but it is light years far from me . . A new set of elements implemented are the belaying pins. The pins supplied by the kit, again, were very poor so I found something in my "old pieces warehouse". Some adaptations were necessary to adjust the overall pins length: now they should simulate a real pin of 50/55 cm length. On a marine terms vocabulaty I found that in average a pin was about 30 cm. long but there were two kindsof them: the belaynig pins and the spike, with the second one probably smaller then the first. It is not clear if the definition is for the pins or for the spikes. Anyway I reproduce them, together with the guns, here below: 01 Cross%20Section%20Santisima%20Trinidad/P1070578.jpg  02 Cross%20Section%20Santisima%20Trinidad/P1070579.jpg  03 Cross%20Section%20Santisima%20Trinidad/P1070580.jpg  04 Cross%20Section%20Santisima%20Trinidad/P1070581.jpg  See you next time, Jack.
|
|
|
Rank: Vice-Master Groups: Registered
Joined: 28/05/2014 Posts: 938 Points: 2,823 Location: Milan (Italy)
|
Monday May 16th, 2011 During these last days I thought a bit on how to complete the model. I have two solutions in mind, the first is to install the complete main mast, the second, considering the height of the mast itself compared with the height of the hull, is to limit the mast to the main top. Anyway I continued the installation of the "obuseros" and now all the four guns are close to be finished. There is just an element still missing: the recoil rope. Next time also this element will be installed. Here below three images of the quarterdeck guns, from different viewpoints. 01 Cross%20Section%20Santisima%20Trinidad/P1070584.jpg  02 Cross%20Section%20Santisima%20Trinidad/P1070585.jpg  03 Cross%20Section%20Santisima%20Trinidad/P1070586.jpg  Then, while I was waiting the glue used for fixing the ropes became dry, I started to install some other details I had available: casks, packages, etc. Last I started to install definitely the ballast. I have used some small stones. On the paper it may seem a simple task but I soon discovered that it was a long, time consuming work: I needed to individually fix each piece of stone with tweezers, using vinyl glue in the proper quantity and position. As I said, long but also relaxing and without problems at all. I had only to wait with patience the glue was dry to discover that all the stones are well fixed. Now I think to continue tomorrow with other smaller stones to obtain a more flat bed of ballast. What is showed here below is just an idea of this unfinished ballast. 04 Cross%20Section%20Santisima%20Trinidad/P1070587.jpg  Kind regards. Jack.Aubrey.
|
|
|
Rank: Vice-Master Groups: Registered
Joined: 28/05/2014 Posts: 938 Points: 2,823 Location: Milan (Italy)
|
Three new images of the cross-section as it was last monday. Three overall viewpoints where it is possible to note that the decks are becoming crowded . . And it is not yet finished: there are several details still missing that I will add as soon as possible. They are, for example: stepladders between the upper deck and the quarterdeck, shrouds, chain plates, casks, ropes and, more important, the gunport lids. They are small details in term of dimensions but they need some time and efforts to be built. In "background" I am also thinking to define a display case for this model. At this point I have 100% decided to finish it with the complete main mast. So the model will be +/- 90 cm high. I have in mind a dislay case conceived in a way that it can be hanged at a wall as a picture. The model has a relative small depth and I believe this makes possible this kind of presentation. The ideal display case should also be planned making possible to open it in order to change the orientation of the model and show it oriented towards the prow or the poop with minimal efforts. Kind regards, Jack.Aubrey 01 Cross%20Section%20Santisima%20Trinidad/P1070582.jpg  02 Cross%20Section%20Santisima%20Trinidad/P1070583.jpg  03 Cross%20Section%20Santisima%20Trinidad/P1070588.jpg 
|
|
|
Rank: Vice-Master Groups: Registered
Joined: 28/05/2014 Posts: 938 Points: 2,823 Location: Milan (Italy)
|
Sunday May 22nd, 2011 Yesterday I prepared the twelve gunport lids for the first three decks. The fourth deck doesn't need them because its gun ports are always open without the lids. I will explain better in a dedicated message the process of their building. I have also done new (and few) progresses in spite of the amount of time and work I dedicated. But let's see the new things presented in this message. The first image shows the guns of the quarterdeck finally 100% completed, including the recoil ropes. 01 Cross%20Section%20Santisima%20Trinidad/P1070589.jpg  The next three images show the new details I prepared and installed for the hold and the area above the ballast: some great barrels, a couple of packages, boxes, reels of hawser and various kind of ropes. 02 Cross%20Section%20Santisima%20Trinidad/P1070590.jpg  03 Cross%20Section%20Santisima%20Trinidad/P1070591.jpg  04 Cross%20Section%20Santisima%20Trinidad/P1070592.jpg  I believe it may be of interest the preparation of the reels of hawser. I've used some round pieces of wood, of different sizes, covered with adhesive tape. I have then twisted the rope around them and I kept them in place with diluted vinyl glue. The day after I extracted the rope from their support of wood and, handling them at will, I obtained the wanted shape. Finally I fixed them in their final place using, again, the vinyl glue, but not diluted. Other shapes of reels, not rounded, were obtained by wrapping up the rope around four nails hammered on a woodden tablet and by using the same technique for glueing. That's all for today, cheers. Jack.Aubrey
|
|
|
Rank: Vice-Master  Groups: Registered
Joined: 26/09/2010 Posts: 851 Points: 2,565 Location: Walsall
|
Hiya Jack A really stunning build there and great detail. Really looking forward to your progress on this with great interest. Keep up the great work. Regards Foz 
|
|
|
Rank: Vice-Master Groups: Registered
Joined: 28/05/2014 Posts: 938 Points: 2,823 Location: Milan (Italy)
|
Foz wrote:Hiya Jack A really stunning build there and great detail. Really looking forward to your progress on this with great interest. Keep up the great work. Regards Foz Many thanks Foz . . I accreciate your comment . . and you win three new photos of the model belonging to the same period . . Jack. . . . continuation . . . 01 Cross%20Section%20Santisima%20Trinidad/P1070593.jpg  02 Cross%20Section%20Santisima%20Trinidad/P1070594.jpg  03 Cross%20Section%20Santisima%20Trinidad/P1070595.jpg  See all of you next time. Jack.
|
|
|
Rank: Super-Elite Groups: Registered
Joined: 31/05/2010 Posts: 5,679 Points: 17,011 Location: Wiltshire
|
Jack A true masterpiece you have yourself there. Will be interested in seeing your display case for this one. It certainly needs one to keep all that fantastic detail from dust. Happy Modelling
BUILDING: Hachette Spitfire Mk 1A, Constructo Mayflower
SUBSCRIPTION COMPLETE (Awaiting building): USS Constitution, Sovereign of the Seas, 1:200 Bismarck (Hachette)
COMPLETED: Porsche 911, E-Type Jaguar, Lam Countach
|
|
|
Rank: Vice-Master  Groups: Registered
Joined: 26/05/2014 Posts: 912 Points: 2,773 Location: East Sussex UK
|
Fantastic work Jack. Building: DelPrado HMS Victory. Building: DeAgostini Sovereign Of The Seas.
|
|
|
|
Guest (3)
|
 US
US

