|
|
 Rank: Pro Groups: Joined: 24/08/2009 Posts: 48,827 Points: -13,348
|
|
|
|
Rank: Pro Groups: Joined: 24/08/2009 Posts: 48,827 Points: -13,348
|
Yorkieboy Quote:I have been mucking about all morning withthe gun port dilema and have done a mock of the victorys side and using tomicks measurements 12mm by 12mm I have cut down some planking to 2mm by 1mm and made some inserts which now makes the gun port 10mm by 10mm and it looks the business un fortunately my camera is poorly so I cant upload any photos do we know the muzzle width of the mock cannons I have tried the cannon 12Lb and the scale ie spot on with the inserts in place the gun hatch would have to be 10mm *10mm Brilliant, you beat me to it:) get some pictures ASAP.
|
|
|
Rank: Pro  Groups: Registered
Joined: 30/06/2010 Posts: 242 Points: 720
|
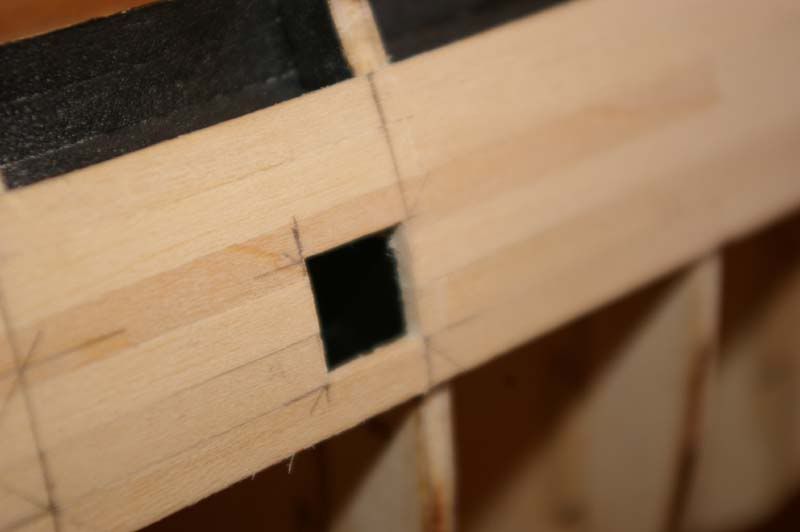
Gave in and just did one gun port, I think it took me about an hour?  Very pleased with it - will look even better when framed and veneered the rest of the hull! Tom
|
|
|
Rank: Pro Groups: Joined: 24/08/2009 Posts: 48,827 Points: -13,348
|
well done tom, gotta picture?
|
|
|
Rank: Pro Groups: Registered
Joined: 30/06/2010 Posts: 242 Points: 720
|
Zeptrader wrote:well done tom, gotta picture?
  And I thought planking was time consuming! Tom
|
|
|
Rank: Pro Groups: Joined: 24/08/2009 Posts: 48,827 Points: -13,348
|
Nice planking, very smooth, and your gonna double plank?
To be honest this is the stage that we are gonna make or break this model, so time spent here is time well spent..IMHO
I'm hoping my issues come this week, what does the mag say about the position of the gun ports?
and the last question for ya, is the planking wood 1mm thick?
|
|
|
Rank: Pro Groups: Registered
Joined: 30/06/2010 Posts: 242 Points: 720
|
Zeptrader wrote:Nice planking, very smooth, and your gonna double plank?
To be honest this is the stage that we are gonna make or break this model, so time spent here is time well spent..IMHO
I'm hoping my issues come this week, what does the mag say about the position of the gun ports?
and the last question for ya, is the planking wood 1mm thick? Thanks Colin, I'm very pleased with it so far. Still double planking  I like the finish on the lime veneer more than the supplied wood. If I was painting it then I'd just leave it with one layer, but the way the lime comes up will work for me. Indeed, at least with planking there is a bigger room for error, whereas one mistake here and its very hard to cover up! I don't have the gun port magazine yet - I followed Tomick's diary for the one I did, and I think I'll leave it at that until I get the mag just in case theres some more points to take note of! Do you mean the planking veneer? Th veneer I have is 1mm, and the supplied wood is 2mm, meaning the hull will be 3mm thick. I think its quite likely I will be buying some wood for the framing as this increase in size might effect the wood we will be getting with the issues. Best wishes, Tom
|
|
|
Rank: Pro Groups: Joined: 24/08/2009 Posts: 48,827 Points: -13,348
|
Tom Quote:the supplied wood is 2mm yes that was what I was interested in knowing, cheers. The more I think about the framing of the gunports the more I like the idea, and going over Chuck's Syren model again it has given some encouragement on looking into this a lot more. and looking at the mock up I did some months back this is what I want from my Victory.  
|
|
|
Rank: Pro Groups: Registered
Joined: 30/06/2010 Posts: 242 Points: 720
|
Brilliant mock-up there Colin, how long did that take you to make?
Think I'll be heading in this direction myself - I like how the frames are slightly sunken in from the hull edge. Do we know how the magazine will be telling us to fit them? I know its a while off yet but helps to know.
Would be interesting to hear from those going for a natural finish; any thoughts on the type of wood you will be using (if you are replacing the supplied stuff) ?
|
|
|
Rank: Pro  Groups: Registered
Joined: 28/03/2010 Posts: 152 Points: 513 Location: Liverpool,England
|
Zeptrader wrote:Tom Quote:the supplied wood is 2mm yes that was what I was interested in knowing, cheers. The more I think about the framing of the gunports the more I like the idea, and going over Chuck's Syren model again it has given some encouragement on looking into this a lot more. and looking at the mock up I did some months back this is what I want from my Victory. Hi Colin, That looks spot on. Have you set the gunport frames slightly in or is it a veneer (second skin) applied afterwards ? Jimmy L.
current builds : Lancaster 1/32 (Hachette)
Revell USS Kearsarge
Titanic Lifeboat
I started off with nothing and I've still got most of it left.
|
|
|
Rank: Pro Groups: Joined: 24/08/2009 Posts: 48,827 Points: -13,348
|
this is the original post for the mock up, it was done to find awy of getting the colours of the victory without the use of paints. http://forum.model-space...s&m=10670#post10670
I used stain and Indian Ink, with white paint and the red paints only, I quite like it.
|
|
|
 Rank: Elite       Groups: Registered
Joined: 22/03/2010 Posts: 2,065 Points: 6,295 Location: Gorleston-on-sea
|
Looks a damn fine neat job Colin, I would be champing at the bit to see your build in its completed state mate...  Current Builds: Deagostini HMS Victory: Deagostini HMS Sovereign of the seas. Completed Builds: Del Prado: HMAS Bounty: Hachette: RMS Titanic: Del Prado: Cutty Sark...
|
|
|
Rank: Pro  Groups: Registered
Joined: 23/03/2010 Posts: 202 Points: 528 Location: Bedfordshire
|
Hi Colin sorry if i missed the post, the linings for the gun ports can you tell me the size of the material used to line the gun ports and are the linings flush or behind the first layer of planking?  Allan
|
|
|
Rank: Pro Groups: Joined: 24/08/2009 Posts: 48,827 Points: -13,348
|
Hi shipmates!  A picture paint a thousand words so here are 2, the plans are at 1/48 scale the gunport linings are 9mm, making the gunport linings around 5mm deep at a scale of 1/84. Son of Bulwark attached the following image(s):
|
|
|
Rank: Pro Groups: Joined: 24/08/2009 Posts: 48,827 Points: -13,348
|
Allan Quote:the linings for the gun ports can you tell me the size of the material used to line the gun ports No idea mate, we haven't got that far yet, this is just coming up with ideas and guessing. Quote:and are the linings flush or behind the first layer of planking? Still not sure how the kit will approach this but for me the lining would be inset, as the planking is 2mm I would hazard a guess at the scale side of things and place them 1mm in, so when the gunport hatches come down it would sit flush with the hull, this all really depends on what extra work you want to put into it. Another build show the linning as flush but to me and other here looks odd, so again we move away from the kit.
|
|
|
Rank: Elite Groups: Unapproved
Joined: 24/05/2010 Posts: 1,761 Points: 5,351 Location: London & Greece
|
|
|
|
Rank: Pro Groups: Joined: 24/08/2009 Posts: 48,827 Points: -13,348
|
Quote:the plans are at 1/48 scale the gunport linings are 9mm, making the gunport linings around 5mm deep at a scale of 1/84. How do you work this out? 
|
|
|
Rank: Pro Groups: Registered
Joined: 30/06/2010 Posts: 242 Points: 720
|
Very interesting reading this thread is making, nice one everyone.
Just a heads up for everyone - I've found that the inside of the ports may need going over again with black paint as they get covered in sawdust and the odd slip with a file means some of the original paint gets scuffed. I carefully went over the one I did and it now looks like a black hole to oblivion.
Tom
|
|
|
Rank: Pro Groups: Joined: 24/08/2009 Posts: 48,827 Points: -13,348
|
Hi Colin! Zeptrader wrote:Quote:the plans are at 1/48 scale the gunport linings are 9mm, making the gunport linings around 5mm deep at a scale of 1/84. How do you work this out? Simply really made a spreadsheet on execl 2007 entered 48 in the 'Start Scale' so it showed 1/48, then entered 84 in the 'Convert To Scale' so it showed 1/84 and that gave my a 'Correction Factor' of 0.571428571. Next measured on the plan 9mm so entered 9 in the 'Measurement' section and got 5.14 in the 'Converted To' section, so rounded 5.14mm down to 5mm. Below that I setup a section to convert measurement from yards down to millimetres so I can use reference measurements from all sources real and from scale plans. As you enter the scale your can go from 1/1 scaled down to 1/99999999 or the other way from 1/99999999 scale up to 1/1 scale. Example you have the real deck plank measurement 21 foot so you want the scale measurement for a scale 1/84. Enter 1/1 for 'Start Scale', 1/84 for 'Convert To Scale', 21 in the 'Start Measurement' section on the row for 'Feet'. This give you all the converted measurements from yards down to millimetres, Enter 6400.8 in the 'Measurement' section and you get 76.20 in the 'Converted To' section that's 76.2mm. Darron Son of Bulwark attached the following image(s):
|
|
|
Rank: Pro Groups: Registered
Joined: 30/06/2010 Posts: 242 Points: 720
|
|
|
|
|
Guest (3)
|
 US
US

