|
|
 Rank: Master     Groups: Registered
Joined: 26/04/2014 Posts: 1,444 Points: 4,244 Location: Essex
|
Has anyone else got a gap where the plenum meets the intercooler pipes? 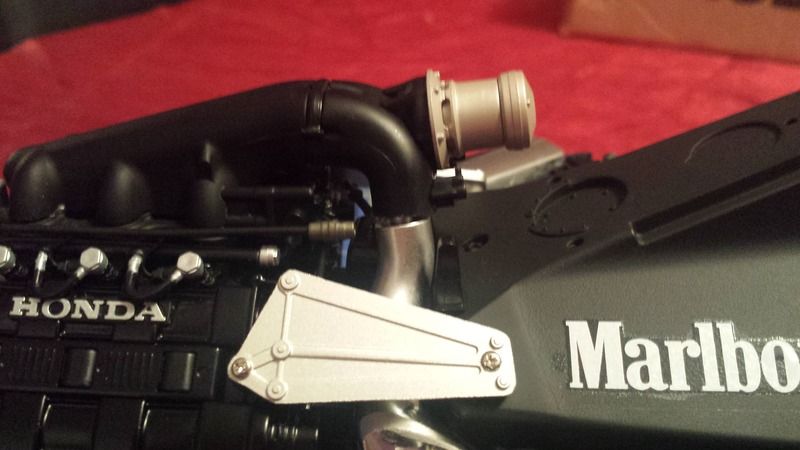 Senna mclaren mp4/4 build complete mp4/4 build http://forum.model-space...spx?g=posts&t=12029
Dodge charger build complete https://forum.deagostini....1686229545.1.1.utmcsr=(direct)|utmccn=(direct)|utmcmd=(none)&__utmv=-&__utmk=9709046
|
|
|
|
|
Hi Steve Not teaching you to suck eggs but did you dry fit the two intercooler pipes before you glued them in place. When I reached this stage I saw that the problem you have could arise so I fitted the engine 1st then added the intercooler pipes and lined them up into there correct position before gluing them into place. Perhaps it may be possible to take the intercooler pipes off and reposition them correctly as they are only glued at the bottom right now as the engine is removed again after completing this stage. Also if removed carefully any damage if any is made to the lower pipes is hidden by the engine mounting plates. Hope this is of help Andy Current builds:-C57,Zero, Lamborghini Countach, Caldercraft HMS Agamemnon,Robi,R2-D2, MFH Cobra .
|
|
|
 Rank: Master     Groups: Registered
Joined: 26/04/2014 Posts: 1,444 Points: 4,244 Location: Essex
|
It seems that the pipes are too short though so if I take them off at the bottom to take up the gap at the top then there will a gap at the bottom instead which wouldn't be possible as they are to be glued at the bottom. Not unless I can pack out the bottom? Senna mclaren mp4/4 build complete mp4/4 build http://forum.model-space...spx?g=posts&t=12029
Dodge charger build complete https://forum.deagostini....1686229545.1.1.utmcsr=(direct)|utmccn=(direct)|utmcmd=(none)&__utmv=-&__utmk=9709046
|
|
|
|
|
Hi Steve If they seam too short then it could be a case that the side radiator assembly's being fitted too low or more likely that the plenum chamber is not seated correctly onto the engine block. Regards Andy Current builds:-C57,Zero, Lamborghini Countach, Caldercraft HMS Agamemnon,Robi,R2-D2, MFH Cobra .
|
|
|
 Rank: Semi-Pro Level 1 Groups: Registered
Joined: 06/08/2011 Posts: 64 Points: 206
|
I had this problem and I think you have got the pipes mixed up.
It should be a pretty much perfect fit if you get the correct pipe on the correct side.
|
|
|
 Rank: Master     Groups: Registered
Joined: 26/04/2014 Posts: 1,444 Points: 4,244 Location: Essex
|
I have checked and double checked all this and can't see what's wrong. I'll have to check again. Senna mclaren mp4/4 build complete mp4/4 build http://forum.model-space...spx?g=posts&t=12029
Dodge charger build complete https://forum.deagostini....1686229545.1.1.utmcsr=(direct)|utmccn=(direct)|utmcmd=(none)&__utmv=-&__utmk=9709046
|
|
|
 Rank: Master     Groups: Registered
Joined: 26/04/2014 Posts: 1,444 Points: 4,244 Location: Essex
|
I have now checked it all again including taking the engine off again. And I can't find nothing that I have done wrong. Here are some various pics which shows the height I've glued the side pods, engine position, plenum position on the engine. If any of these pics look different to other people's builds could they comment please. 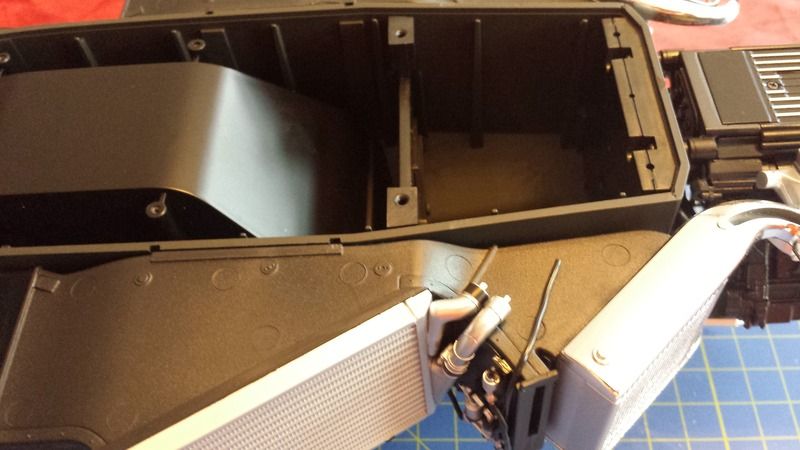 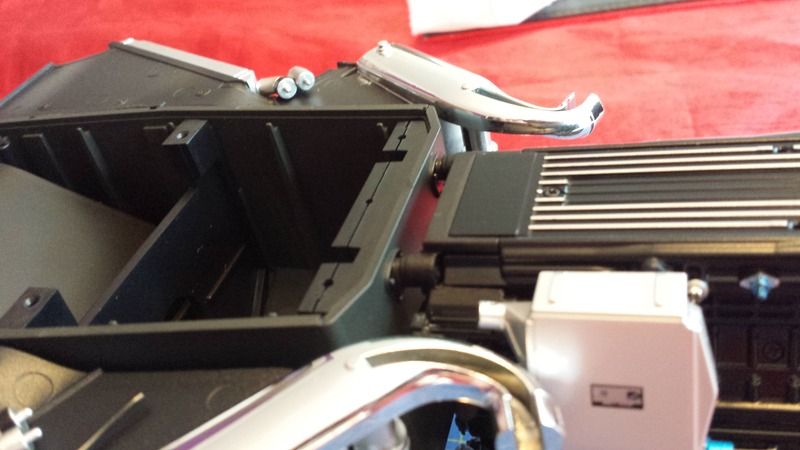 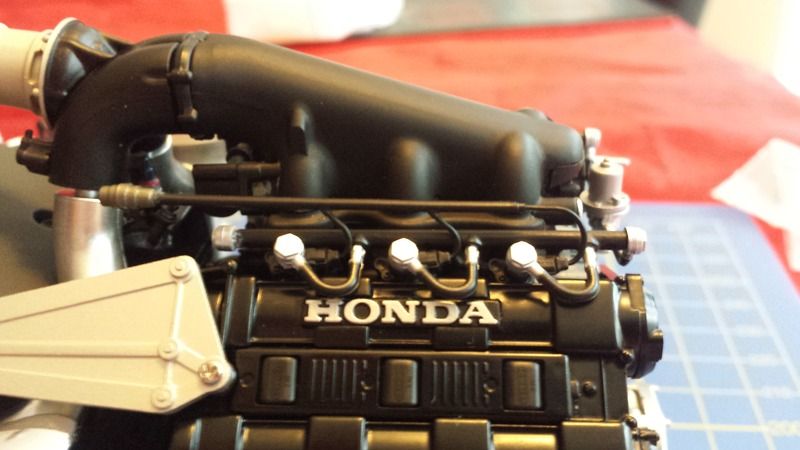 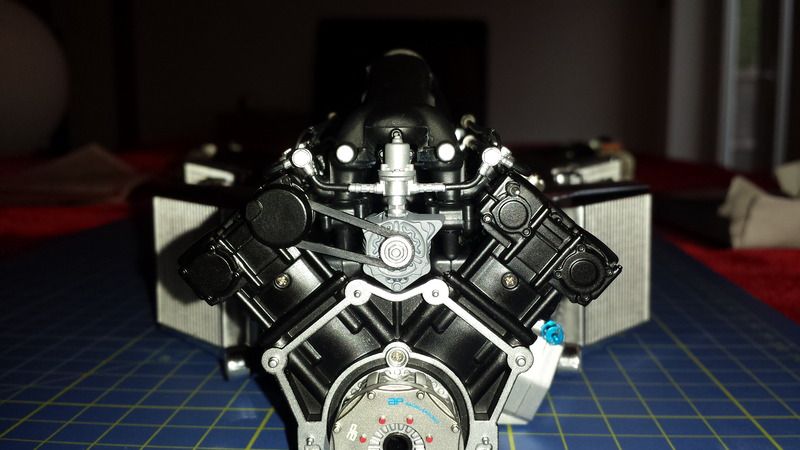 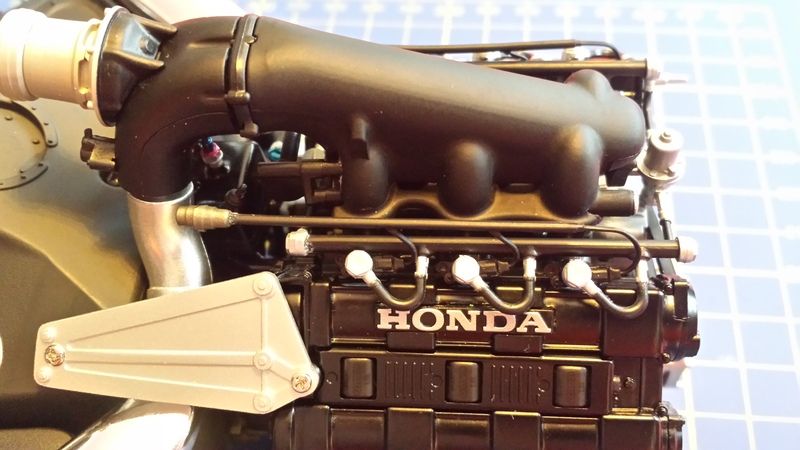 Senna mclaren mp4/4 build complete mp4/4 build http://forum.model-space...spx?g=posts&t=12029
Dodge charger build complete https://forum.deagostini....1686229545.1.1.utmcsr=(direct)|utmccn=(direct)|utmcmd=(none)&__utmv=-&__utmk=9709046
|
|
|
 Rank: Semi-Pro Level 1 Groups: Registered
Joined: 06/08/2011 Posts: 64 Points: 206
|
When I first put mine together I had the same problem,it was a poor fit.
On checking again I had the engine pipes mixed up,I had the right pipe on the left side and left pipe on the right side.
Once I had corrected this everything fitted perfectly with no gaps.
Those pipes are easy to get mixed up !
|
|
|
 Rank: Semi-Pro Level 1 Groups: Registered
Joined: 06/08/2011 Posts: 64 Points: 206
|
The raised groove should angle down if you check the photo.
|
|
|
 Rank: Master     Groups: Registered
Joined: 26/04/2014 Posts: 1,444 Points: 4,244 Location: Essex
|
Yep, I have checked and double checked these and referred back to the instruction book and they are definitely the correct way round. Senna mclaren mp4/4 build complete mp4/4 build http://forum.model-space...spx?g=posts&t=12029
Dodge charger build complete https://forum.deagostini....1686229545.1.1.utmcsr=(direct)|utmccn=(direct)|utmcmd=(none)&__utmv=-&__utmk=9709046
|
|
|
 Rank: Semi-Pro Level 1 Groups: Registered
Joined: 06/08/2011 Posts: 64 Points: 206
|
No idea then.
If you put a photo up of that part and how you have fitted them I am sure someone on here will figure out what is wrong.
|
|
|
 Rank: Master     Groups: Registered
Joined: 26/04/2014 Posts: 1,444 Points: 4,244 Location: Essex
|
Here you go.  Senna mclaren mp4/4 build complete mp4/4 build http://forum.model-space...spx?g=posts&t=12029
Dodge charger build complete https://forum.deagostini....1686229545.1.1.utmcsr=(direct)|utmccn=(direct)|utmcmd=(none)&__utmv=-&__utmk=9709046
|
|
|
 Rank: Semi-Pro Level 1 Groups: Registered
Joined: 06/08/2011 Posts: 64 Points: 206
|
Looks perfect,will have a check of me ne in the morning😊
|
|
|
 Rank: Pro Groups: Joined: 24/08/2009 Posts: 48,827 Points: -13,348
|
Steve,
This isn't an answer I'm afraid, but I'm just letting you know that you're not alone in having this problem. Mine look pretty much identical with yours, and there are noticeable gaps.
Yes, I did make the mistake of getting the left & right pipes wrong initially, but the gap when I'd done that was way bigger, and the angles they met at weren't right either. I took them off and replaced them the correct way and, as I say, they look exactly like yours do.
My plenum is definitely correctly seated on the block as well.
I can't think of a solution, apart maybe from putting some sort of packing material at the rear end of the plenum chamber to lower it's front end down a bit, but I have a feeling that will just make the plenum look untidy at the rear end instead of the front.
I'm just sort of hoping that when we properly fit the engine & gearbox to the monocoque with those big hob-dobbing 'Screws F', and it's all tightened up, the gaps will be smaller...
|
|
|
 Rank: Master     Groups: Registered
Joined: 26/04/2014 Posts: 1,444 Points: 4,244 Location: Essex
|
Well at least if I know Other people have the problem then I can stop spending ages looking at it to see where I've gone wrong as it seems I probably haven't. I am tempted to do what andy suggested and remove the pipes and re glue them in situ having the gap at the bottom behind the engine mount plates. How would I remove the pipes as they've been glued with instant? Senna mclaren mp4/4 build complete mp4/4 build http://forum.model-space...spx?g=posts&t=12029
Dodge charger build complete https://forum.deagostini....1686229545.1.1.utmcsr=(direct)|utmccn=(direct)|utmcmd=(none)&__utmv=-&__utmk=9709046
|
|
|
 Rank: Elite        Groups: registriert, Registered Joined: 20/03/2011 Posts: 2,356 Points: 7,122 Location: UK
|
Guys I am looking into this and will let you know my findings as soon as I can. Steve.. You can use CA glue softener to remove the parts. Regards Spencer
|
|
|
 Rank: Master     Groups: Registered
Joined: 26/04/2014 Posts: 1,444 Points: 4,244 Location: Essex
|
Cheers Spencer although I may wait to see what you come back with before I remove them. Senna mclaren mp4/4 build complete mp4/4 build http://forum.model-space...spx?g=posts&t=12029
Dodge charger build complete https://forum.deagostini....1686229545.1.1.utmcsr=(direct)|utmccn=(direct)|utmcmd=(none)&__utmv=-&__utmk=9709046
|
|
|
|
|
Hi All I fitted mine a little differently to the instructions but it worked for me but im not saying this is the way to do it just that this worked for me. I first mounted the engine to the mono and then dry fitted the pipes and adjusted to get a good fit. My pipes are just glued at the bottom at the moment so the engine can still be removed if needed and I too have a small gap at the plenum chamber end but once the pipes are finally glued to the plenum chamber this gap will be minimal. Hope this is of help. Andy Current builds:-C57,Zero, Lamborghini Countach, Caldercraft HMS Agamemnon,Robi,R2-D2, MFH Cobra .
|
|
|
 Rank: Master     Groups: Registered
Joined: 26/04/2014 Posts: 1,444 Points: 4,244 Location: Essex
|
Well I have decided to remove the pipes and refit them with the engine in situ lining it up at the plenum and leaving the gap at the bottom which will be covered up by the engine mount plate. I will build up the gap with super glue and hope it holds. Have only done 1 side at the moment to see how it goes. 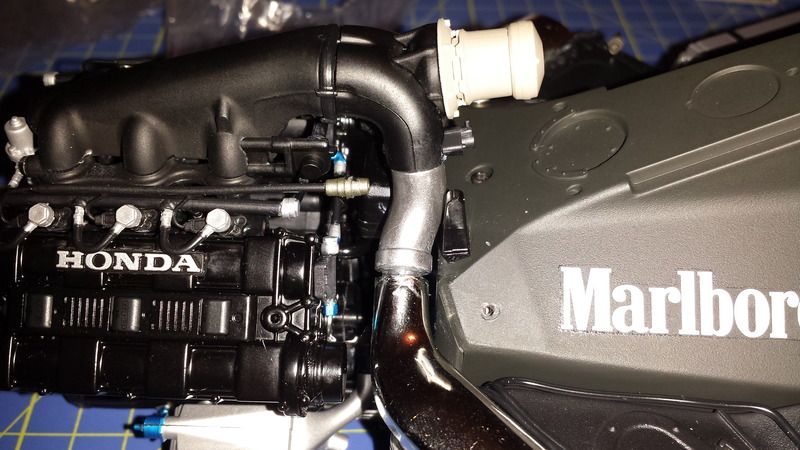 Senna mclaren mp4/4 build complete mp4/4 build http://forum.model-space...spx?g=posts&t=12029
Dodge charger build complete https://forum.deagostini....1686229545.1.1.utmcsr=(direct)|utmccn=(direct)|utmcmd=(none)&__utmv=-&__utmk=9709046
|
|
|
 Rank: Pro   Groups: Registered
Joined: 05/05/2014 Posts: 230 Points: 657 Location: Northeast USA
|
I also had that fit issue on my build: I removed the radiator tops and bent them and left the tubes loose until the engine was installed-also removed the 'slot' molded in so I could twist the tubes for the best fit.
|
|
|
|
Guest
|