|
|
 Rank: Pro Groups: Joined: 24/08/2009 Posts: 48,827 Points: -13,348
|
|
|
|
|
|
 Looks good to me ,top work. Its a big learning curve with getting to grips with paint finishes and something that you will always improve on and learn by on every model you build. Im still learning with every post on here with techniques and ways to do things that's what makes this forum so special people share to help others get their builds to a standard they could only dream of.  Current builds:-C57,Zero, Lamborghini Countach, Caldercraft HMS Agamemnon,Robi,R2-D2, MFH Cobra .
|
|
|
 Rank: Super-Elite        Groups: Registered
Joined: 31/05/2010 Posts: 5,679 Points: 17,011 Location: Wiltshire
|
That looks a very nicely detailed model for the size. Cannot see anything wrong with your finish and if i had achieved this standard i wiuld be very happy with the result. Its always a subjective thing with paint finishes because if you think , by way of example, a brand new shiny car, 10 different people will all see it 10 different ways. Its as you, the modeller, and how you feel something should look like that makes it right. And this one looks right to me so fery well done Happy Modelling
BUILDING: Hachette Spitfire Mk 1A, Constructo Mayflower
SUBSCRIPTION COMPLETE (Awaiting building): USS Constitution, Sovereign of the Seas, 1:200 Bismarck (Hachette)
COMPLETED: Porsche 911, E-Type Jaguar, Lam Countach
|
|
|
|
|
That's a tasty piece of work, nicely done..... Regards Alan
|
|
|
Rank: Super-Elite  Groups: Registered
Joined: 27/01/2014 Posts: 5,060 Points: 14,980
|
Nice job, it looks really impressive I particularly like how you've not gone to overboard on the engine area, this is an area I often see way overdone 
|
|
|
Rank: Pro Groups: Registered
Joined: 08/05/2015 Posts: 239 Points: 693 Location: Wisconsin
|
I think it looks fantastic. As I am new to weathering could you please explain what you did and how you did it?
Thanks in advance.
|
|
|
|
|
Really nice weathering skills. Its a skill I have yet to figure out. Chris On the bench 1/350 Revell Tirpitz Platinum Edition (Pontos PE and Wooden deck) plus extra Eduard PE set and extra MK1 door sets.
|
|
|
Rank: Pro Groups: Joined: 24/08/2009 Posts: 48,827 Points: -13,348
|
For this model I very closely followed Scale Model Medic's technique for painting. He hasn't finished his videos of painting to Falcon yet but he did a very nice job documenting what I used here. I'll explain what I did beyond his example as well. You can see his videos here: Part 1Part 2Part 3And still awaiting the conclusion with Part 4. I'll just run through a list of the techniques I used.  The cockpit and turret interiors were sprayed and then hand painted and dry brushed. Had to do this first because most of the build was going to make them inaccessible later. I used a hand drill and scribe to gouge out the hull to represent the blast marks and other bits of damage over the hull top and bottom.  Masked off the cockpit interior and the turrets with liquid latex before adding a primer coat that's pretty simple.  Then there's a dark pre-shading that went into all the heavily recessed places and panel lines. It doesn't show much in the final product. Then there was a base coat. Two actually because the first one ended up being too dark. Having to spray it again covered up most of the pre-shading.    I then hand painted a layer of hairspray onto each panel that was a different color (dark grey, red, yellow, light grey) before masking them off and airbrushing the appropriate color.  I then brushed some water onto those panels once they were completely dry in order to achieve that chipped and flecked appearance. Then I airbrushed the entire model with a clear varnish to lock in the look at this point and protect the work I'd done up to this point. To be continued...
|
|
|
Rank: Pro Groups: Joined: 24/08/2009 Posts: 48,827 Points: -13,348
|
  Then I used a small brush to apply washes. Used some dirty brownish greys for the panel lines and recessed areas. It then got an airbrushed coat of Matt Varish to seal the washes and cut the shine from the Gloss Varnish. After that I used a small brush to apply some rusty washes to spots that needed it. Dabbed some different shades of oil paints onto various panels and to vary the color and give shading.   The rust and rain streaking was achieved by putting a small amount of oil paint in key panel notches and then feathering it lightly with a small brush (see part 3 @ 10:45).  I then uses a few shades of black to amplify the battle damage and scorch marks. After that dried I dry brush a little silver around the edges of some of the damage that pierced the hull.  I broke out a flat brush and applied some light brown oils dry brushing to simulate some heat marks around the exhaust vents. Using the same flat brush, I dry brushed some black for the exhaust grime through the middle of the heat marks.  Oh...and brushed a little of that black soot onto the tips of the cannons.
|
|
|
Rank: Pro Groups: Joined: 24/08/2009 Posts: 48,827 Points: -13,348
|
An excellent end result and very well weathered - you should be very proud of your work!!
Very well done!! 
Kev 
|
|
|
Rank: Super-Elite Groups: Registered
Joined: 17/12/2013 Posts: 3,982 Points: 11,974 Location: NY, USA
|
I agree it looks great.Nice weathering, great color on the panels and the blast marks and streaking are just right.Quite an achievement for such a small Falcon.
I think your "full size" Falcon will be outstanding if you can do this well on a small kit
Carl
|
|
|
 Rank: Semi-Pro Level 1  Groups: Registered
Joined: 30/11/2015 Posts: 57 Points: 180 Location: Beds
|
an excellent job very well done indeed
|
|
|
Rank: Pro Groups: Joined: 24/08/2009 Posts: 48,827 Points: -13,348
|
I have to admit, while I appreciate all the praise, I was really hoping to see some more criticism or people finding faults. Anyone?
|
|
|
Rank: Super-Elite Groups: Registered
Joined: 17/12/2013 Posts: 3,982 Points: 11,974 Location: NY, USA
|
|
|
|
Rank: Pro Groups: Joined: 24/08/2009 Posts: 48,827 Points: -13,348
|
|
|
|
 Rank: Master  Groups: Registered
Joined: 07/07/2015 Posts: 1,292 Points: 3,928 Location: Allentown PA
|
I usually don't like to give criticism when I myself don't have much on here to be criticized. However you asked so here goes. I don't like the way the rear circle vents are painted. I don't know if its just the photograph or not, but they don't look like vents with exhaust residue. They just look like the vents were painted black/dark grey and then the paint was smudged across the back to try and get the effect of exhaust residue. Like I said, it could just be the photo, but that's how it looks to me. Other then that I really like how it turned out. I myself will never paint anything that small of scale.
DeAgostini kit builds:
Millennium Falcon: 18% Complete
Shelby GT-500: 28% Complete
Thunderbird 2: 13.75% Complete
|
|
|
Rank: Pro Groups: Joined: 24/08/2009 Posts: 48,827 Points: -13,348
|
Excellent. Thanks. Ok, so you think it looks like they were painted then streaked back? It may be the picture. The actual vents weren't painted but were just dry brushed as I added the soot. The front edges of the forward vents have almost no soot while the trailing edges of the rear vent are completely covered. I attempted to make it look like the grime came radiated outwards from the center but was blown towards the rear. Perhaps you can show me what you think it should look like? Maybe I did do it wrong but it's what made sense to me. Please show me an example.
Seriously...thanks.
|
|
|
Rank: Master Groups: Registered
Joined: 07/07/2015 Posts: 1,292 Points: 3,928 Location: Allentown PA
|
Looking for a picture now. Without a picture I think the best way I can sum it up is that the vents themselves need to pop a bit more so they stand out a bit more. Ok here is a photo. Not that great, but kinda shows what I am thinking. The grills for the vents are fully painted, then darker spots are applied to make them look dirty in areas, and then there is the residue but its lighter then the grills. In your photo it looks like the grill is the same color as the outer ring with heavy residue streaked across. 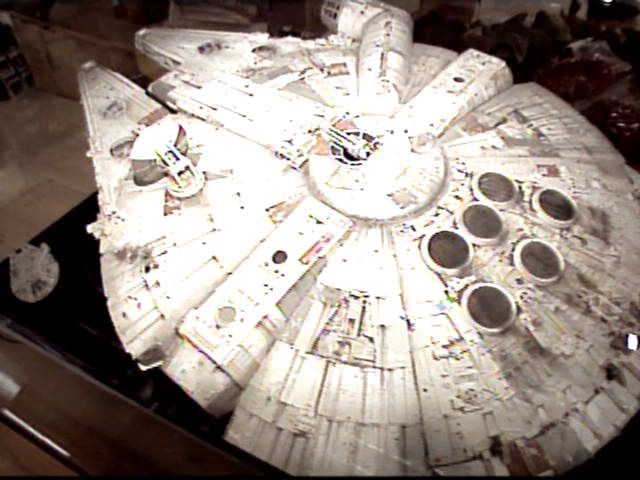
DeAgostini kit builds:
Millennium Falcon: 18% Complete
Shelby GT-500: 28% Complete
Thunderbird 2: 13.75% Complete
|
|
|
Rank: Pro Groups: Joined: 24/08/2009 Posts: 48,827 Points: -13,348
|
I understand what you mean, but that img is so burned out that its making many shades vanish. Can't use that for reference.
Looking at some other reference pictures I see exactly what you're referring too. It's one of the things that I feel doesn't make sense on the original though. The edges of the vents are just too clean. I can only assume that was done to make them pop a bit more. I'm currently considering dry brushing some lighter shades over a few places but I won't be doing it to the extreme that I see on the studio model.
|
|
|
Rank: Master Groups: Registered
Joined: 07/07/2015 Posts: 1,292 Points: 3,928 Location: Allentown PA
|
Yeah that picture is horrible but I was in a hurry and my search results kept pulling Mercades Benz photos for some reason. Anyway this critic is of course my own opinion and that may be the reason it looks wrong to me. I have grown up with the way it was done on the studio model so that's what I am used to. If your trying for a different look with something that's a bit dirtier that's cool. I appreciate people that try things out of the norm and not do the same old thing. I still think that you need a bit more definition/separation. I wondering if something as simple as panel lining between the grill and ring would make a difference without changing the effect of being dirty. Also if your wanting to try something different and change things up a bit. You could make one side darker and dirtier then the other side. Give it a little asymmetrie. Plus it's not unreasonable that some vents would give off more waste then others if things aren't in tip top shape.
DeAgostini kit builds:
Millennium Falcon: 18% Complete
Shelby GT-500: 28% Complete
Thunderbird 2: 13.75% Complete
|
|
|
|
Guest (3)
|
 US
US

