|
|
|
|
Very nice work Barry. Those lights look great. Chris On the bench 1/350 Revell Tirpitz Platinum Edition (Pontos PE and Wooden deck) plus extra Eduard PE set and extra MK1 door sets.
|
|
|
 Rank: Pro   Groups: Registered
Joined: 18/04/2016 Posts: 134 Points: 402 Location: Durban, South Africa
|
Thanks Chris, wouldn't be doing this if it weren't for the masters like yourself.. The inner planking and gun port lining are taking a little longer than I expected, going into the third day already and not even half way down the port side yet with still a lot of touching up to do...Keeps me off the streets though. Barry BarryM attached the following image(s): There's no time like the present.....
|
|
|
|
|
Building these ships Barry is never a race and the fact you're taking your time with it is really paying dividends, she's looking fab.... Very well done....
Regards
Alan
|
|
|
 Rank: Super-Elite      Groups: Registered
Joined: 27/01/2014 Posts: 5,060 Points: 14,980
|
Hi Barry
I've just caught up with your build of this and must say you are doing a sterling job with her, I'm really loving what you have done with the lanterns!!
I was also inspired by some of the masters here to tackle a ship build, I started the Santisima Trinidad, however at the moment it's still sat in its jig waiting for the second layer of planking to be done. I must get back to her sometime but just so much else going on.
Keep up the great work and keep the pictures coming
|
|
|
Rank: Pro Groups: Registered
Joined: 18/04/2016 Posts: 134 Points: 402 Location: Durban, South Africa
|
Hi Dave, Thanks for your comments, I should have started this years ago, the old eyeballs are not what they used to be..I finish a part and say to myself "that looks o/k" then revisit it a bit later Hmmmmm a bit more of this a bit more of that. The digits on the front paws not fairing much better either, after a couple of hours they start to resemble an old gnarled tree...all in good fun though..haven't had as much fun since I left Girl Guides or was that the Scouts. Barry There's no time like the present.....
|
|
|
Rank: Pro Groups: Registered
Joined: 18/04/2016 Posts: 134 Points: 402 Location: Durban, South Africa
|
I started cutting out the port-side Gun Ports around the 18th, now the 28th June, had no idea it would take that amount of time after lining them and fitting the inner planking...Happy with the results so far though, now onto the starboard side..here's a few pics.. Barry BarryM attached the following image(s): There's no time like the present.....
|
|
|
Rank: Pro Groups: Registered
Joined: 18/04/2016 Posts: 134 Points: 402 Location: Durban, South Africa
|
TIP..when cutting out the Gun Ports it's much easier to cut a "V" section than trying to cut through the Basswood when cutting the vertical sides across the grain, a bit like cutting down a tree.. Barry BarryM attached the following image(s): There's no time like the present.....
|
|
|
Rank: Pro Groups: Registered
Joined: 18/04/2016 Posts: 134 Points: 402 Location: Durban, South Africa
|
Managed to get the Starboard gun ports finished today together with the lanterns..was much easier and quicker than the port side, just got to add a couple of planks onto the inside of the bow section and then a couple more on the stern and then wait for the hull planking to arrive... Barry BarryM attached the following image(s): There's no time like the present.....
|
|
|
Rank: Super-Elite  Groups: Registered
Joined: 16/08/2010 Posts: 2,771 Points: 8,344 Location: Brighton
|
Hi Barry. Very nice clean build. look forward to seeing more. Ian Current builds.Hachettes build the bismark,HMS Victory, HMS Hood.
Finished Builds Corel HMS Victory cross section.
|
|
|
|
|
Lovely work Barry, excellent job on those gun ports....
Regards
Alan
|
|
|
Rank: Pro Groups: Registered
Joined: 02/04/2013 Posts: 174 Points: 534 Location: Bethlehem PA, USA
|
I see you flattened down the front of the bow, looks good. Gun ports are coming along nicely as well. Of course I like the lanterns. I like the .22 shells as housings, very ingenious. They will add a lot for the display. I can't tell from the pics, did you use the flickering candle LED's?
|
|
|
Rank: Pro Groups: Registered
Joined: 18/04/2016 Posts: 134 Points: 402 Location: Durban, South Africa
|
Thanks Gents for your words of inspiration... Glad I'm not building the Victory, don't think I could manage all those gun ports... John..I had some yellow standard LED's in my toy box and started playing with those and the .22 cases, they looked o/k so I bought a few more, never thought about flickering LED's, great idea...too late now though. By the way John, what camera are you using your pics are awesome? Added a little more planking on the inside to bring it up to the correct level.. Barry BarryM attached the following image(s): There's no time like the present.....
|
|
|
Rank: Pro Groups: Registered
Joined: 02/04/2013 Posts: 174 Points: 534 Location: Bethlehem PA, USA
|
BarryM wrote:Thanks Gents for your words of inspiration... Glad I'm not building the Victory, don't think I could manage all those gun ports... John..I had some yellow standard LED's in my toy box and started playing with those and the .22 cases, they looked o/k so I bought a few more, never thought about flickering LED's, great idea...too late now though. By the way John, what camera are you using your pics are awesome? Added a little more planking on the inside to bring it up to the correct level.. 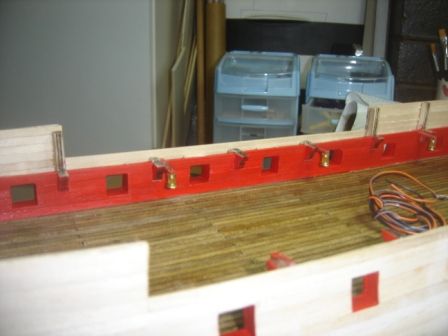 Barry Just using my iPhone 6 huge. I'll break out the Canon 70D when it's time.
|
|
|
Rank: Pro Groups: Registered
Joined: 18/04/2016 Posts: 134 Points: 402 Location: Durban, South Africa
|
The inner hull planking is complete extended up to the bottom of the top deck and the inner bit up at the front.... Waiting on the Hull Planking should be here in a couple of weeks, mean time to keep myself busy I've decided to copper plate the hull after looking at many other builds. I'm going to use self adhesive copper foil after looking at a few "how to do it" pages, couldn't find any 8mm strip down here so had to buy 50mm wide and perform some surgery on it. First made a jig with 1mm holes drilled in it strategic places.. Next roll out the copper foil and cut off a piece.. Attach the foil to the jig with a couple of bits of masking tape with the peel off inner facing the jig.. Using a .7mm marker mark the holes onto the foil backing.. Score the copper side to represent the individual tiles and then cut the strips.. Use a pounce wheel on the edges and a small punch to mark the edges..and presto.. Going to need considerably more, but time on my hands right now.. Barry BarryM attached the following image(s): There's no time like the present.....
|
|
|
|
|
Very nicely done with the copper tiles looking brilliant Barry Rgd Martyn Building ?
Completed. Soliei Royal . Sovereign of the Seas . Virginia . Scotland . San Felipe . Corel vasa , Santisima Trinadad X section , Vasa
Next Build ?
When sailors have good wine, They think themselves in heaven for the time. John Baltharpe
|
|
|
Rank: Super-Elite Groups: Registered
Joined: 16/08/2010 Posts: 2,771 Points: 8,344 Location: Brighton
|
Hi Barry. copper tilling looks great. look forward to seeing on your build. Ian Current builds.Hachettes build the bismark,HMS Victory, HMS Hood.
Finished Builds Corel HMS Victory cross section.
|
|
|
|
|
Hi Barry, Great to see copper tiles. I wasn't confident enough to do them on mine. Hats of to you for going that route. Chris On the bench 1/350 Revell Tirpitz Platinum Edition (Pontos PE and Wooden deck) plus extra Eduard PE set and extra MK1 door sets.
|
|
|
Rank: Pro Groups: Registered
Joined: 18/04/2016 Posts: 134 Points: 402 Location: Durban, South Africa
|
Thank you for the encouragement gents, couldn't resist the copper thing looks really good on some of the builds I've seen but still some way to go before I attempt it. The hull planking...I've read, re read, looked at as many pics as I can find and still apprehensive, I've planked a few RC planes in the past with balsa but I think that was a piece of cake compared to this..keep you posted when I get started. Barry There's no time like the present.....
|
|
|
Rank: Pro Groups: Registered
Joined: 18/04/2016 Posts: 134 Points: 402 Location: Durban, South Africa
|
Got around to a couple of those little jobs that needed doing... Stern planking.. Wiring studs.. And trim the lower decking at the stern.. Barry BarryM attached the following image(s): There's no time like the present.....
|
|
|
Rank: Pro Groups: Registered
Joined: 02/04/2013 Posts: 174 Points: 534 Location: Bethlehem PA, USA
|
Fun drilling down into that keel, isn't it?
|
|
|
|
Guest (2)
|
 US
US

