|
|
|
|
She really is looking fabulous, excellent craftsmanship....
Regards
Alan
|
|
|
 Rank: Vice-Master     Groups: Registered
Joined: 28/05/2014 Posts: 938 Points: 2,823 Location: Milan (Italy)
|
Sunday, June 12, 2016After a few days of training on the usage of the mini lathe PROXXON DB250, when finally I felt ready enough, I started to build a couple of oars which equipped the Viking ship. The starting raw material is a 3mm beech dowel. The kit provides rods of the same diameter of lime wood. I preferred to use the beechwood because during the tests the limewood sometimes broke. This problem never occurred me with a harder wood such as beech. To lathe the handle of the oar (diameter 1.5 mm) and the main part of the oar (diameter 2mm) it takes a lot of patience and care. Once finished with the lathe, to shape the blade I used the belt sander PROXXON BS/E, much more effective than other manual tools such as files and/or sanding blocks. Anyway, to build an oar with this procedure I took about 30 minutes, most of them working at the lathe . . . so far so good but the problem is that I have to build 30 of them !!!! Here below a picture of what the instructions say and two photos of how I interpreted, in my own way, the shape of the oar. Once completed the oar will then be dyed with mordant, even if the idea to paint with dark red or yellow the oar blades is strong . . Cheers, Jack. 01 Oars.jpg  02 20160611_193228.jpg  03 20160611_193155.jpg 
|
|
|
Rank: Vice-Master Groups: Registered
Joined: 28/05/2014 Posts: 938 Points: 2,823 Location: Milan (Italy)
|
Tuesday, June 21th, 2016About 10 days ago I posted my last message where I showed the "first oar" for this ship. The oar was made using a minilathe for wood. Here what happened during these past 10 days: - the first two days I was able to build only three new oars as my limited experience with the lathe led me to break many pieces while using the tool in an unsatisfactory way; - then, slowly and mistake after mistake, I learned the right method and the correct sequence of execution and from that moment I had no more broken pieces; - however, given the repetitive and boring nature of the task and its relative slowness, I set myself the goal to run 5 oars per session, not more. Now it remains to prepare the last five oars and this task will be finally over . . 01 20160621_163446.jpg  In the above picture you will notice that, apart from the three oars at the top, the tip (blade?) is not yet shaped. This will be the next step as soon as the last five will be ready. The temptation to paint the tips with the same yellow color used for the shields is strong. Perhaps, for the rest of the oar, the obvious color should be the same tar brown of the hull but I would prefer a lighter nuance, to add more color effects at the whole model. Cheers, Jack.
|
|
|
Rank: Vice-Master  Groups: Registered
Joined: 26/05/2014 Posts: 912 Points: 2,773 Location: East Sussex UK
|
looks very time consuming Jack but well worth the effort, looking forward to your next update. Regards Paul Building: DelPrado HMS Victory. Building: DeAgostini Sovereign Of The Seas.
|
|
|
Rank: Vice-Master Groups: Registered
Joined: 28/05/2014 Posts: 938 Points: 2,823 Location: Milan (Italy)
|
How I made the ship oars with my wood mini latheSome days ago I was asked to prepare a tutorial about the method I used to prepare the 30+ oars of the Gokstad Viking ship. During the session I build the last five oars still needed I took, after each important step, an image of the work done. This in order to make (I hope) easy to understand how I worked and the correct usage of the lathe for this task. Image 01 shows the raw material I used to build the oar: a rod of beechwood with diameter +/- 4mm. The total length of each rod is in my case 18mm circa and each oar has four segments of 13mm (handle, +/- 1.5-1.7mm diameter), 30mm (not to work on), 82mm (to be reduced at 2.5mm diameter), and the remaining (blade, not to work on for the moment). Each segment is marked on the rod with a pencil before starting to work on the lathe. 01 Tornio/10_zpslvyqlcxx.jpg  The tools used for this task: mini sanding blocks of different grade, chisels of different shapes: everyone will find the better suitable for him or for the task. 02 Tornio/15_zpswkv2wz7r.jpg  Insert the rod into the lathe clamp after having previously drilled a small hole on the tip close to the handle side. Clamp the rod 20mm after the end of the 13+30mm markers. Block the stable tool support as close as possible to the rod. 03 Tornio/20_zps0cdgbgg3.jpg  Position the tailstock with the quill travel, center the small hole on the tip and block it. 04 Tornio/25_zpsfgbeqfhn.jpg  Power on the lathe and reduce the diameter of the rod as shown below with your preferred tool. Personally I use first the chisel and later the sanding blocks to refine. 05 Tornio/30_zpsw25jxosg.jpg  Poweroff the lathe and extract another 2mm rod from the lathe and clamp it again . . 06 Tornio/35_zpsrwk9niuu.jpg  Power on the lathe and restart the diameter reduction for the next 20mm segment . . 07 Tornio/40_zpsoypuqveo.jpg  Repeat the steps until you reach the end of the 82mm. segment. The reason I proceeded working only of 20mm segments is related to the flexibility of the reduced diameter area (about 2.5mm). If you work on longer segments you risk to break the rod and the complete work done is then lost. 08 Tornio/45_zpswnjneuau.jpg  09 Tornio/50_zpsj5xn71tv.jpg  At this point insert the rod into the lathe, close to the oar handle. Clamp the rod and position the tailstock again. 10 Tornio/55_zpsmgdzlrdj.jpg  Lathe the oar handle. The handle should have a diameter of 1.5-1.7mm. 11 Tornio/60_zpsuryuj1gr.jpg  Cut the excess tip, now no more useful and refine with sanding block. 12 Tornio/65_zpsfiqoqsl2.jpg  Extract the oar from the lathe; now this task is over and it remains only to shape the blade . . 13 Tornio/70_zpsgirr6tfm.jpg  All the oars are finished . . although the blade shaped tips are still to be done . . will be a matter for next messages. 14 Tornio/20160621_163501_zpsi2myuze1.jpg  That's all for now . . to the next progress step (blade tips). Regards, Jack.Aubrey.
|
|
|
 Rank: Super-Elite     Groups: Registered, Forum Support Team, Administrators, Global Forum Support Team, Moderator, Official Builds Joined: 09/11/2012 Posts: 8,520 Points: 24,651 Location: East midlands
|
Hi Jack, That`s a great "How To" within a build diary. WTG Regards delboy271155 (Derek) COME BACK GUY FAWKES "YOUR COUNTRY NEEDS YOU"
|
|
|
|
|
Stunning work as always Jase “Whenever you find yourself on the side of the majority, it is time to pause and reflect.”
-Mark Twain
|
|
|
Rank: Vice-Master Groups: Registered
Joined: 28/05/2014 Posts: 938 Points: 2,823 Location: Milan (Italy)
|
Saturday, July 2nd, 2016Second phase of the oars construction: the blades have already been shaped by a specific processing, using, for roughing, the belt sander BS/E from Proxxon fixed on a vise in a inverted position and, for finishing, a normal sandpaper. Then, when the 30+ blades were over, I went further to stain the wood as its natural color, as you can see in the picture 02, is too light. 01 20160629_172404.jpg  02 20160629_172351.jpg  Finally, I painted a) the blades (work still in progress, four coats of paint are needed !!) with the same acrylic yellow used to paint the shields and b) the handle of the oar, painted with the same dark red used for shields too. 03 20160703_171942.jpg  04 20160703_171746.jpg  Their appearance seem now to much new !! Just left the shipyard . . Thinking to another ageing process. To next time, Jack.
|
|
|
 Rank: Master   Groups: Registered
Joined: 08/07/2010 Posts: 1,036 Points: 3,086 Location: Thetford, Norfolk, UK
|
Lovely work on the oars Jack. I agree some sort of aging/weathering would look good. back to the vinegar and wire wool again! lol
Happy building
David
|
|
|
Rank: Vice-Master Groups: Registered
Joined: 26/05/2014 Posts: 912 Points: 2,773 Location: East Sussex UK
|
That was a lot of work Jack and well worth the effort, they look fantastic. Regards Paul Building: DelPrado HMS Victory. Building: DeAgostini Sovereign Of The Seas.
|
|
|
Rank: Vice-Master Groups: Registered
Joined: 28/05/2014 Posts: 938 Points: 2,823 Location: Milan (Italy)
|
Tuesday, July 12, 2016Today I drilled the hull to prepare the oars housings: holes of 3mm diameter to be carefully drilled. In fact I started with a drill bit of 1mm, then 2mm and, finally, 3mm. Subsequently, in order to let the oar blade to pass in the hole, I run a slight lateral incision into the hole so that it lets only pass the blade and not the rest. Obviously the lat incision is made in the right direction for the force applied during the rowing. The finishing is made with a round nail file to remove burrs and a coat of stain to darken the wood thickness that, after the drilling, is clear. Display test for the finished model, with oars inserted in their slots. . what about ? There is a drawback: the greater width of the display case, but on a model of this size this is not a real problem. I'm also thinking that probably it's not the case of aging alchemies for the oars, because the coordinated view with the shields does not seem out of place at all. . Regards, Jack. PS: Thanks to all of you for your positive comments . .01 20160712_125238.jpg  02 20160712_125231.jpg  03 20160712_125223.jpg 
|
|
|
 Rank: Pro  Groups: Registered
Joined: 11/11/2015 Posts: 278 Points: 807 Location: Minneapolis, Minnesota USA
|
She is looking fantastic Jack. Keep up the good work. I admire your attention to detail and your patience to do top notch work. Beautiful model. How close to finished is she? Ron Best Regards,
Ron
On the bench: DeAgostini '67 Ford Shelby Mustang, Hachette Space Battleship Yamato 2202, Agora Models T-800 Terminator
Finished builds: DeAgostini Toyota 2000GT
In the Stash: Losing count...
|
|
|
Rank: Vice-Master Groups: Registered
Joined: 28/05/2014 Posts: 938 Points: 2,823 Location: Milan (Italy)
|
Nytetrain wrote:She is looking fantastic Jack. Keep up the good work. I admire your attention to detail and your patience to do top notch work. Beautiful model. How close to finished is she?
Ron Hi Ron, I don't think there are many things left to do . . Supposing to work on it with regularity I think possible to close the project in a couple of months. But I'm generally too slow and now the summer holidays time is also coming . . Considering that all the single pieces are 99% ready, these are the tasks left to do: - install the rudder - install and rig the mast - build the sail and place it on the yard, rig the whole - (not included into the kit) the seats for the oarmen - the display case (not included in the kit) with a glass or polycarbonate cover May be I forgot something but these should be the main task to achieve. Rgds, Jack.
|
|
|
Rank: Vice-Master Groups: Registered
Joined: 28/05/2014 Posts: 938 Points: 2,823 Location: Milan (Italy)
|
A few more photos to show the visual effect of the oars exposed outboard. This time I tried to put the model into a lower position, using another "building slip", so that the tips of the oars now lie on the hypothetical ground of the case. In this way you can better position the oars, with an aesthetic effect that seems much better to me. But with the positioning of the oars in this way the logic would dictate that the yard/sail should not be mounted. . The mast can stay installed erected but the yard should be exposed, only with the inferred sail rolled up, on special supports amidships. They are three in total but the pictures here show only the middle one, placed on the deck. 01 20160712_181741.jpg  02 20160712_181731.jpg Any Comments ? Jack.
|
|
|
Rank: Super-Elite Groups: Registered
Joined: 27/01/2014 Posts: 5,060 Points: 14,980
|
More beautiful work on display from you Jack.
I'm really looking forward to see her finished with the sail and rigging all in place.
Will you be making a display case yourself?
|
|
|
Rank: Vice-Master Groups: Registered
Joined: 28/05/2014 Posts: 938 Points: 2,823 Location: Milan (Italy)
|
Thursday, July 21, 2016Started the tasks to build the display case basement, to be completed, at the end, with a plexiglass cover . . The basement seen from its natural position: stained with a chestwood colored solution, the groove to hold in the plexiglass cover ready, with the outer frame that will be painted with the same dark red colour I used for the shields. 01 20160721_171211.jpg  The lower part of the basement, with four wooden "feet" already added, to be painted dark red too. 02 20160721_171237.jpg  A detail of the four lower feet (is it the right term ?): I used simple knobs for drawers, easily available in DIY stores. I used a two-component epoxy glue, enforced with an internal metal pin. 03 20160721_171229.jpg 
|
|
|
Rank: Vice-Master Groups: Registered
Joined: 28/05/2014 Posts: 938 Points: 2,823 Location: Milan (Italy)
|
A complex piece made with hard wood from which I got the two brackets to support the hull. They will be placed over the display case basement. 01 20160721_171347.jpg  02 20160721_171328.jpg  With a cut made in the right place, done with the yable saw, I got the two pieces shown here below which will hold the keel on the basement shown in the previous message. Now I have to drill them to accommodate the keel holding screw. Then I'll paint them dark red (same color of the shields). To be finally fixed on the basement in the correct position. 03 20160721_173417.jpg  Cheers, Jack. My personal assistant to check the proper progresses of my work in its strategic role as project supervisor . . 04 20160718_182026.jpg 
|
|
|
Rank: Super-Elite  Groups: Registered
Joined: 31/05/2010 Posts: 5,679 Points: 17,011 Location: Wiltshire
|
Jack That build has come on a treat since i last looked in. Very skilled workmon the oars managing to get them all the same shape - that really is good. Looks like your cat has been "working very hard" and is in need of a rest. Happy Modelling
BUILDING: Hachette Spitfire Mk 1A, Constructo Mayflower
SUBSCRIPTION COMPLETE (Awaiting building): USS Constitution, Sovereign of the Seas, 1:200 Bismarck (Hachette)
COMPLETED: Porsche 911, E-Type Jaguar, Lam Countach
|
|
|
Rank: Pro Groups: Joined: 24/08/2009 Posts: 48,827 Points: -13,348
|
jack.aubrey
03 [url=http://s46.photobucket.com/user/tom-pullings/media/Viking%20Gokstad%20Ship/20160712_125223_zpsunmdxcg9.jpg.html wrote: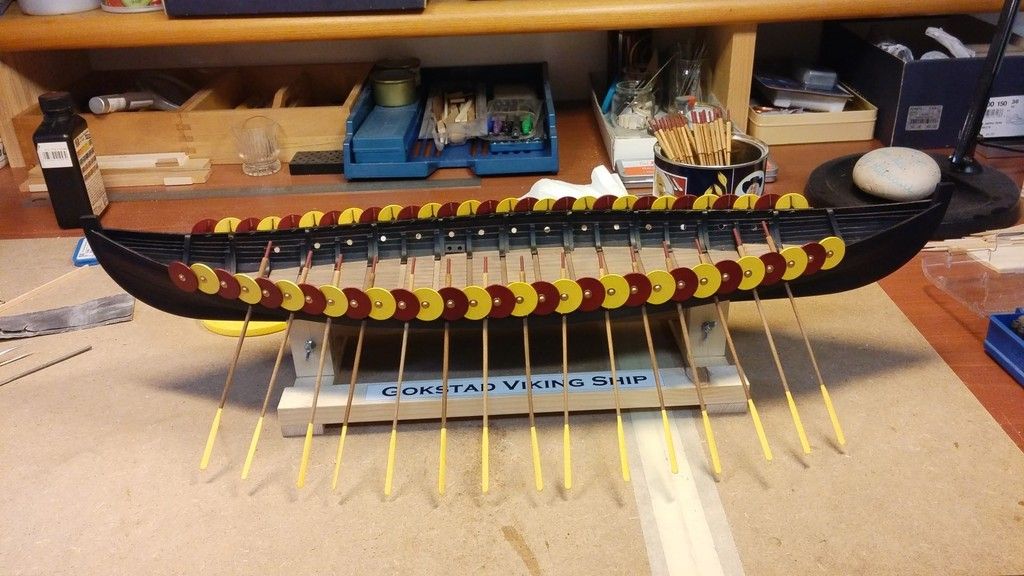 [/url] Fantastic looking model!
Unusual that there are no thwarts for the oarsmen to sit on.
|
|
|
|
|
Superb and a joy to see.... very well done...
Regards
Alan
|
|
|
|
Guest (3)
|
 US
US

