Welcome Guest Search | Active Topics | Log In | Register

10 Pages «<56789>»
LrdSatyr's Millenium Falcon Build Log Options
LrdSatyr8
#121 Posted : 17 August 2016 21:19:48

Rank: Vice-Master
Active Service Medal: 500 post active service MedalBuild-Diary Medal: Build-Diary Medal of Honour
Groups: Registered

Joined: 05/03/2015
Posts: 561
Points: 1,713
Location: South Carolina
OK all... here's the latest updates to my build.  I decided to go with the Paragrafix corridor photoetch kit.  I like them over the 3D printed hallways.  Why?  All the corridors have these little floor slits that emit light.  Here's a reference for ya, notice the edges of the floor have these little slits that are lit from underneath. (PLEASE NOTE: This is a rendering of the interior, not an actual screenshot.)


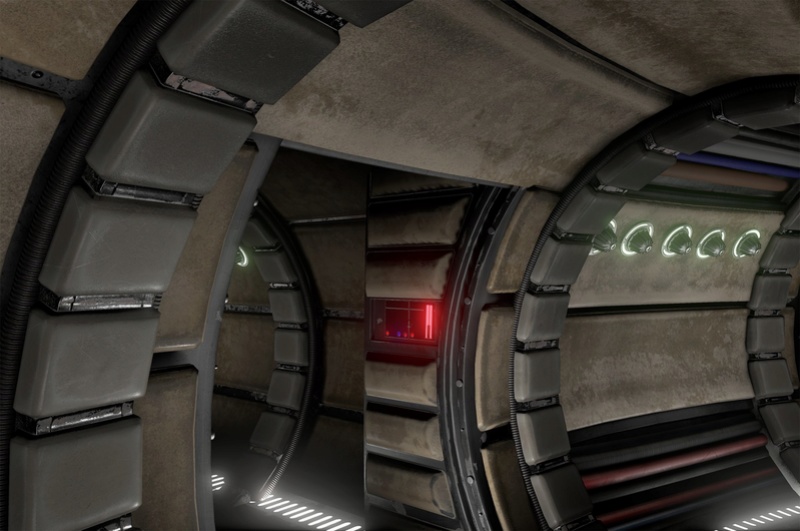
But you have to trim the sides down but leave the spots where the cushion rings fit. That was a major pain in the tush! However... after trimming my floor plates... the first thing I wanted to do was get these floors looking at least somewhat accurate.  That meant gluing, alot of cutting, and repainting.  Here's how they came out.


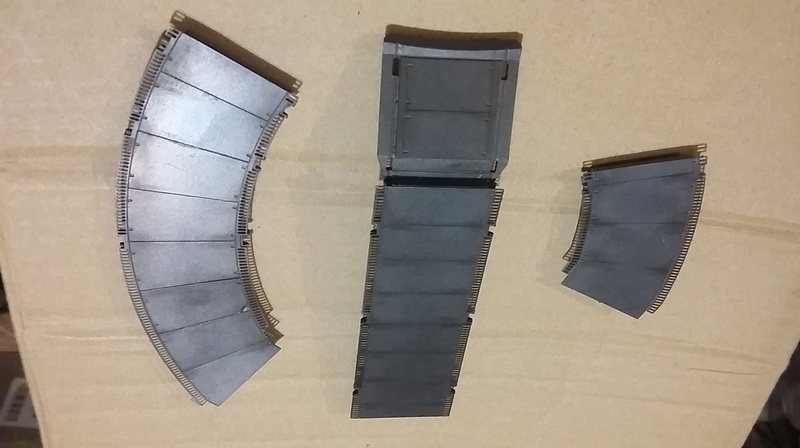
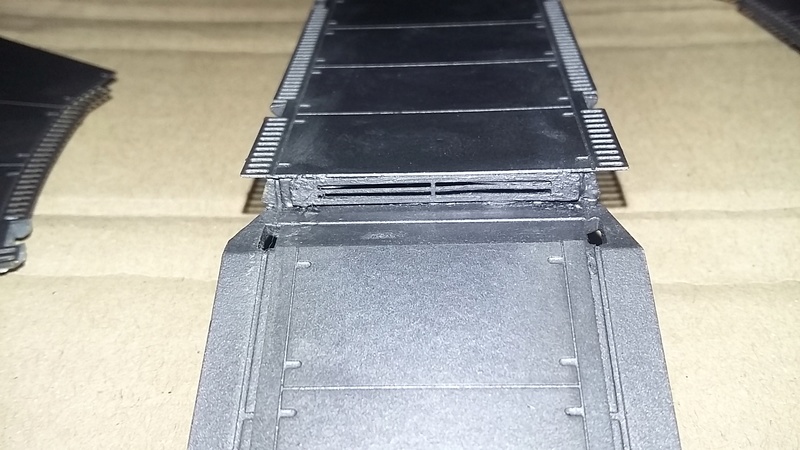
Now, notice the step to the cockpit corridor... this really can't be avoided due to the pit on the bottom of the hull, but this PE kit comes with a nice little plate to put there to light up that section.  It also comes with the "hidden floor comparatments" but I'm not gonna use them at all... I just glued them into place.  Why?  Well... in order to actually do them would mean that I would have to scratch build a little compartment under each floor section, cut out the hole in the floor and then figure out a way to still light up the floor slits an avoid the compartments.  Besides, I don't think they will be seen once everything is together, but those floor slits will be, so they are my priority.
LrdSatyr8
#122 Posted : 17 August 2016 21:25:46

Rank: Vice-Master
Active Service Medal: 500 post active service MedalBuild-Diary Medal: Build-Diary Medal of Honour
Groups: Registered

Joined: 05/03/2015
Posts: 561
Points: 1,713
Location: South Carolina
Ok... so I got a plan.  Now that my floors are all painted and grunged properly, I need to think about how I'm going to put the lights under them.  The first task is to paint the areas under the floors white.  Why white?  I could paint them silver but they wouldn't quite look right and would generate alot of hot spots.  White on the otherhand would disperse the light more evenly with less hot spots and would be more visually appealing.  So I masked off my corridor tubes and started painting.


With that done I had to see just how good the light gets dispersed.  So I tossed a couple of white LEDs on the floor, put the floors over them and VIOLA... I think we've got a winner here.


Of course I won't be using just regular LEDs here... I'm waiting for my LED strips to come in.  So... while I wait for them, I decided it's time to paint these cushion rings to match the rest of my interior.  Of course I'm talking about using the Buffing Metalizer Gun Metal... love this stuff.  Spray it on, wait for it to dry, buff it to a shine and it looks like metal... used it on the floors too with a little bit of weathering powders to dirty them up a bit if you were wondering!


Well that's it for now troopers... more to come... I assure you! :)
Markwarren
#123 Posted : 17 August 2016 23:35:28
Rank: Administration

Publisher Medal: Featured Build of the MonthActive Service Medal: 500 post active service MedalPurple Medal: Super active service medal for 1000 postsTurquoise Medal: Turquoise Medal for model making know-how contributionOutstanding Build: An award for an outstanding buildBuild-Diary Medal: Build-Diary Medal of HonourRed Medal: Red Medal
Groups: Registered, Administrators, Global Forum Support, Moderator, Forum Support Team, Official Builds

Joined: 04/01/2016
Posts: 6,794
Points: 20,699
Location: Northamptonshire, England
Looking excellent, I use the steel metalcote paint a lot, particularly on the more detailed parts, then spay them with with the original hull colour with chipping effect. I reacon I should have shares in the company by now the amount of paint I have purchased.
I have also used strip led!s under my corridor flooring and put aluminium tape to stop any light leakage.
Keep up the good work.
Mark
Regards
Markwarren
(Mark) Admin
LrdSatyr8
#124 Posted : 18 August 2016 19:10:09

Rank: Vice-Master
Active Service Medal: 500 post active service MedalBuild-Diary Medal: Build-Diary Medal of Honour
Groups: Registered

Joined: 05/03/2015
Posts: 561
Points: 1,713
Location: South Carolina
Markwarren wrote:
Looking excellent, I use the steel metalcote paint a lot, particularly on the more detailed parts, then spay them with with the original hull colour with chipping effect. I reacon I should have shares in the company by now the amount of paint I have purchased.
I have also used strip led!s under my corridor flooring and put aluminium tape to stop any light leakage.
Keep up the good work.
Mark


I love aluminum tape! That stuff is awesome and 10x stickier then duct tape!
Gandale
#125 Posted : 18 August 2016 22:05:17

Rank: Super-Elite

Publisher Medal: Featured Build of the MonthActive Service Medal: 500 post active service MedalPurple Medal: Super active service medal for 1000 postsTurquoise Medal: Turquoise Medal for model making know-how contributionOutstanding Build: An award for an outstanding buildBuild-Diary Medal: Build-Diary Medal of HonourRed Medal: Red Medal
Groups: Registered, Global Forum Support, Moderator, Official Builds, Administrators

Joined: 08/09/2012
Posts: 15,172
Points: 46,151
Location: Aberdeen
Looking superb, progressing beautifully....

Regards

Alan
birdaj2
#126 Posted : 18 August 2016 22:19:11

Rank: Super-Elite

Publisher Medal: Featured Build of the MonthActive Service Medal: 500 post active service MedalPurple Medal: Super active service medal for 1000 postsTurquoise Medal: Turquoise Medal for model making know-how contributionBuild-Diary Medal: Build-Diary Medal of HonourRed Medal: Red Medal
Groups: Registered

Joined: 31/05/2010
Posts: 5,679
Points: 17,011
Location: Wiltshire
Those etch parts do look spot on so a very good choice for your build which is looking really good
Happy Modelling

BUILDING: Hachette Spitfire Mk 1A, Constructo Mayflower
SUBSCRIPTION COMPLETE (Awaiting building): USS Constitution, Sovereign of the Seas, 1:200 Bismarck (Hachette)
COMPLETED: Porsche 911, E-Type Jaguar, Lam Countach
LrdSatyr8
#127 Posted : 22 August 2016 14:21:50

Rank: Vice-Master
Active Service Medal: 500 post active service MedalBuild-Diary Medal: Build-Diary Medal of Honour
Groups: Registered

Joined: 05/03/2015
Posts: 561
Points: 1,713
Location: South Carolina
Gandale wrote:
Looking superb, progressing beautifully....


Thanks bro... really trying to make this look as good as I possibly can!

[quote=birdaj2]Those etch parts do look spot on so a very good choice for your build which is looking really good[quote]

Yeah... I really like the way they came out. Gives it just that little extra bit of detail that you'd never notice but register subconsciously! Thanks alot!
LrdSatyr8
#128 Posted : 22 August 2016 14:44:02

Rank: Vice-Master
Active Service Medal: 500 post active service MedalBuild-Diary Medal: Build-Diary Medal of Honour
Groups: Registered

Joined: 05/03/2015
Posts: 561
Points: 1,713
Location: South Carolina
Well weekend is over and even thou I didn't get the panels on, I did complete the top frame!  Yes it's all held together with screws but boy is it solid! That's issues 48 thru 72 on my work bench... yeah it's pretty messy!


There's still quite a bit of parts painting and assembling I have to do yet.  First I ended up getting the SW 3D Printed Nav Computer.  I'll be putting fibers in it soon!


Next I did some work on my seating area... still have more work to do on it (painted areas, fiber optics) but mainly wanted to make sure my seats looked realistic enough.  I used Flat Tan with some Mud pastels to make them look "well used".  Also going to be putting some fibers in my Dajarikk table and up in my upper bunk.  Am going to remove the light above the seats to use my Light Pipe.  Last pic they are just mocked up, not glued together yet.  Starting to look good.  Will work on the lighting and see what I can come up with for these.


Yeah I know... not perfect, but will be! :) Lemme know what you think!
Bill-Devine
#129 Posted : 22 August 2016 17:48:22

Rank: Pro

Build-Diary Medal: Build-Diary Medal of Honour
Groups: Registered

Joined: 13/05/2016
Posts: 130
Points: 386
Location: Murrieta, CA (USA)
Looking really good. This is turning into quite the money pit.
Make things as simple as possible but not simpler... - Albert Einstein
LrdSatyr8
#130 Posted : 22 August 2016 18:16:09

Rank: Vice-Master
Active Service Medal: 500 post active service MedalBuild-Diary Medal: Build-Diary Medal of Honour
Groups: Registered

Joined: 05/03/2015
Posts: 561
Points: 1,713
Location: South Carolina
Bill-Devine wrote:
Looking really good. This is turning into quite the money pit.


Yeah but you got to admit, the look of the printed parts just looks right over the provided ones. The provided bunk above the seats was driving my OCD over the edge. Thanks bro!
davetwin
#131 Posted : 22 August 2016 22:49:46

Rank: Super-Elite
Publisher Medal: Featured Build of the MonthActive Service Medal: 500 post active service MedalPurple Medal: Super active service medal for 1000 postsOutstanding Build: An award for an outstanding buildBuild-Diary Medal: Build-Diary Medal of HonourRed Medal: Red Medal
Groups: Registered

Joined: 27/01/2014
Posts: 5,060
Points: 14,980
LookIng good, you've got to love frame, it's a model in itself.
Markwarren
#132 Posted : 22 August 2016 23:42:58
Rank: Administration

Publisher Medal: Featured Build of the MonthActive Service Medal: 500 post active service MedalPurple Medal: Super active service medal for 1000 postsTurquoise Medal: Turquoise Medal for model making know-how contributionOutstanding Build: An award for an outstanding buildBuild-Diary Medal: Build-Diary Medal of HonourRed Medal: Red Medal
Groups: Registered, Administrators, Global Forum Support, Moderator, Forum Support Team, Official Builds

Joined: 04/01/2016
Posts: 6,794
Points: 20,699
Location: Northamptonshire, England
Looking good, some excellent work there. Looks like your going to be busy putting the hull prices onto the frame.
Regards
Markwarren
(Mark) Admin
LrdSatyr8
#133 Posted : 23 August 2016 16:43:47

Rank: Vice-Master
Active Service Medal: 500 post active service MedalBuild-Diary Medal: Build-Diary Medal of Honour
Groups: Registered

Joined: 05/03/2015
Posts: 561
Points: 1,713
Location: South Carolina
Ok... new update!  I got a few parts from Shapeways and one of them was the electrical room where Han and Leia kissed (otherwise known by my friend and guy who designed it the Kissing Booth).  He did a really good job on it.  Only thing missing were the various wires and pipes that lined the wall randomly.  But I can understand that those are really difficult to print.  So, getting out my trusty epoxy putty, I made some wires and pipes as close to the movie as I could possibly get and added them to the part.  Now I'm not fretting over the paint job because this area won't really be seen very well.  I basically started with a base of Buffing Gun Metal (to tie the color to the rest of my interior) and then did some dry brushing of light gray, dark gray, silver and light tan weathered with pastel mud.  The only lights in this section are on the panel on the wall (still need to add the fibers to it) and the overhead light.  But the effect came out looking pretty phenominal.  I'll let you judge for yourself. (NOTE: The light by the doorway is lit up and ready to go! :))

Wall seen in the movie:


After painting the piping/wires:


Unseen wall:


Room Assembled:


Mocked up in place (Here's how it will look when it's in place):


Needless to say, it's coming together nicely! In the immortal words of George Peppard "I love it when a plan comes together!"
Bill-Devine
#134 Posted : 23 August 2016 17:18:45

Rank: Pro

Build-Diary Medal: Build-Diary Medal of Honour
Groups: Registered

Joined: 13/05/2016
Posts: 130
Points: 386
Location: Murrieta, CA (USA)
Looking good loving the extra details.
Make things as simple as possible but not simpler... - Albert Einstein
Bill-Devine
#135 Posted : 23 August 2016 17:20:25

Rank: Pro

Build-Diary Medal: Build-Diary Medal of Honour
Groups: Registered

Joined: 13/05/2016
Posts: 130
Points: 386
Location: Murrieta, CA (USA)
LrdSatyr8 wrote:
Bill-Devine wrote:
Looking really good. This is turning into quite the money pit.


Yeah but you got to admit, the look of the printed parts just looks right over the provided ones. The provided bunk above the seats was driving my OCD over the edge. Thanks bro!


Yeah I know what you mean about the bunk. It is just totally wrong in the provided part.
The one you have looks correct.
Make things as simple as possible but not simpler... - Albert Einstein
Markwarren
#136 Posted : 23 August 2016 21:19:58
Rank: Administration

Publisher Medal: Featured Build of the MonthActive Service Medal: 500 post active service MedalPurple Medal: Super active service medal for 1000 postsTurquoise Medal: Turquoise Medal for model making know-how contributionOutstanding Build: An award for an outstanding buildBuild-Diary Medal: Build-Diary Medal of HonourRed Medal: Red Medal
Groups: Registered, Administrators, Global Forum Support, Moderator, Forum Support Team, Official Builds

Joined: 04/01/2016
Posts: 6,794
Points: 20,699
Location: Northamptonshire, England
Looks really good, I have been thinking about what to do with that room, nice to see it painted up. Just bought your gunner turret hallway.
I am also scratch building the inside of the gun turret as we have been advised not to screw down the turret as it's easier to lift off the hull pieces, so I thought if it's not fixed I'll build the inside workings of the turret.
Regards
Markwarren
(Mark) Admin
tunko
#137 Posted : 24 August 2016 02:53:29

Rank: Amateur level 2
Build-Diary Medal: Build-Diary Medal of Honour
Groups: Registered

Joined: 24/08/2016
Posts: 45
Points: 138
Location: Maryland
Newbie here. Absolutaly unbelievable build. I love the equipment bay. Breathtaking and droolmaking.
LrdSatyr8
#138 Posted : 24 August 2016 16:53:08

Rank: Vice-Master
Active Service Medal: 500 post active service MedalBuild-Diary Medal: Build-Diary Medal of Honour
Groups: Registered

Joined: 05/03/2015
Posts: 561
Points: 1,713
Location: South Carolina
Markwarren wrote:
Looks really good, I have been thinking about what to do with that room, nice to see it painted up. Just bought your gunner turret hallway.
I am also scratch building the inside of the gun turret as we have been advised not to screw down the turret as it's easier to lift off the hull pieces, so I thought if it's not fixed I'll build the inside workings of the turret.


I saw someone on here do that! That's insane but I love it! :)
LrdSatyr8
#139 Posted : 24 August 2016 16:54:12

Rank: Vice-Master
Active Service Medal: 500 post active service MedalBuild-Diary Medal: Build-Diary Medal of Honour
Groups: Registered

Joined: 05/03/2015
Posts: 561
Points: 1,713
Location: South Carolina
tunko wrote:
Newbie here. Absolutaly unbelievable build. I love the equipment bay. Breathtaking and droolmaking.


Thanks bro! Have been taking my time to get things right! Hoping it all works out soon! Stay tuned... lots more to come!
LrdSatyr8
#140 Posted : 29 August 2016 18:58:58

Rank: Vice-Master
Active Service Medal: 500 post active service MedalBuild-Diary Medal: Build-Diary Medal of Honour
Groups: Registered

Joined: 05/03/2015
Posts: 561
Points: 1,713
Location: South Carolina
And so the painting has begun!  I split the painting into two parts.  The back half I started painting the panels.  The front half I started experimenting with some weathering.  I tried several different methods and if I wasn't happy with the way it came out I would wipe it off and start again.  I finally settled on a Water Color wash of sorts.  

Basically just black water color thinned down to water consistency.  Brushed over the surface and allowed to dry for a short time (enough to let it seep into all the nooks and crannies) then wipe it off with a paper towel.  I used Tamiya Weathering Pastels to makes the oils streaks along the bottom.  I think the effect came out looking pretty good.  What do you think?


Now, on the back half, I decided to do the "hairspray" method for the panels.  I masked each panel off and began by painting each with a coat of hairspray.  The kind I used doesn't matter, its just the bargian bin pump bottle, not the aerosol.  Reason why is that you can unscrew the pump top off and pour the hairspray into your airbrush and use it like paint.  I let it dry completely overnight then started painting each panel the proper color.  I'm using the DOA Falcon Acrylic Paints... great paint set!


Now I let the panels dry completely overnight.  When the paints had cured, I went over each one with a water wet Q-tip and wiped it over each panel.  I let that set for a few moments and then I took a toothpick and gently scratched the edges of the paint off.  Some places were a bit more "weathered" then I liked, so I just touched them up with the same paint and started over.  You can't use a paint brush with this method.  You should only use a airbrush.  Using a paintbrush will cause the hairspray to soften and will gum up the paint and look horrible then you have to start over from scratch (trust me, I KNOW! LOL).  In any event, here's what the panels look like when done!


To be continued...
Users browsing this topic
Guest (3)
10 Pages «<56789>»
Forum Jump  
You cannot post new topics in this forum.
You cannot reply to topics in this forum.
You cannot delete your posts in this forum.
You cannot edit your posts in this forum.
You cannot create polls in this forum.
You cannot vote in polls in this forum.

Powered by YAF | YAF © 2003-2009, Yet Another Forum.NET
This page was generated in 0.295 seconds.
DeAgostini