|
|
 Rank: Pro   Groups: Registered
Joined: 18/04/2016 Posts: 134 Points: 402 Location: Durban, South Africa
|
Thank you gent's...your support made me find more time (got the other nagging things sorted in double time), finally got the hull planking finished (not sanded yet though). The last two planks port & starboard were a tricky little blighters, the good news was that both of them were much the same size and shape, must have got something right.... Barry BarryM attached the following image(s): There's no time like the present.....
|
|
|
Rank: Pro  Groups: Registered
Joined: 29/03/2012 Posts: 108 Points: 327 Location: Gosport
|
Looking Good, I bet you'll be thinking, that it will be a shame to cover it up with copper tiles? ________________________________________________________________________________________ Built Mare Nostrum Google Photo AlbumMatelot (ˈmætləʊ) , Matlo or Matlow
noun
(Nautical Terms) slang chiefly Brit - a sailor
|
|
|
Rank: Pro Groups: Registered
Joined: 18/04/2016 Posts: 134 Points: 402 Location: Durban, South Africa
|
Got to admit the thought has crossed my mind a couple of times but then what would I do with with a box full of copper tiles...nah...copper tiles it is.... Barry There's no time like the present.....
|
|
|
 Rank: Vice-Master   Groups: Registered
Joined: 26/05/2014 Posts: 912 Points: 2,773 Location: East Sussex UK
|
Lovely job on the planking Barry. Regards Paul Building: DelPrado HMS Victory. Building: DeAgostini Sovereign Of The Seas.
|
|
|
 Rank: Super-Elite      Groups: Registered
Joined: 31/05/2010 Posts: 5,679 Points: 17,011 Location: Wiltshire
|
Barry You have done a fantastic job on the hull planking. Very well done Happy Modelling
BUILDING: Hachette Spitfire Mk 1A, Constructo Mayflower
SUBSCRIPTION COMPLETE (Awaiting building): USS Constitution, Sovereign of the Seas, 1:200 Bismarck (Hachette)
COMPLETED: Porsche 911, E-Type Jaguar, Lam Countach
|
|
|
Rank: Pro Groups: Registered
Joined: 30/08/2012 Posts: 336 Points: 857 Location: London
|
She looks fantastic Barry.
Do you have any recommendations on where to look to learn how to do the LED lighting? I've just bought a complete Titanic model from a fellow forum member and i really fancy trying to light her.
|
|
|
Rank: Super-Elite  Groups: Registered
Joined: 27/01/2014 Posts: 5,060 Points: 14,980
|
Really nice job Barry. Rob, try here for LEDs for beginners http://www.instructables...m/id/LEDs-for-Beginners/
|
|
|
Rank: Pro Groups: Registered
Joined: 18/04/2016 Posts: 134 Points: 402 Location: Durban, South Africa
|
Thank's guys, couldn't have done it without your help... Rob...Led lighting is very simple as long as you stick to the basic rules, there are 3 elements... V = Supply voltage I = Current R = Resistance You cannot connect an LED directly to a battery the current has to be limited to around 20ma (0.02A) otherwise you will smoke it and then back to the shop, here's a pic of the wiring and elements required.... As we know the current required (20ma) next we need to know the voltage you're going to use, I'll presume 9V DC (got to be DC i.e. from a battery) lastly what resistor? The voltage drop across the LED will be about 2V so we will need a resistor to drop 9V(supply voltage) - 2V(LED Voltage) = 7V OHM's Law....R = V/I = 7/.02(20ma) = 350ohms (closest std resistor 390ohms) The last thing to consider is the resister Wattage... W = V x I.........= 7 x .02 = .14W 1/4W resisters are o/k. I used 1/2W resistors. Here's a LED Pic... BarryM attached the following image(s): There's no time like the present.....
|
|
|
Rank: Pro Groups: Registered
Joined: 18/04/2016 Posts: 134 Points: 402 Location: Durban, South Africa
|
Eventually after a couple of days of sanding mainly the Stem I managed to get the Keel parts to fit nicely, I was going to glue them in place before sanding the hull but decided it would probably be better to glue them after sanding...maybe glue the stern post in position, a bit more "Sits and Thinks" time..... Barry BarryM attached the following image(s): There's no time like the present.....
|
|
|
|
|
Looking good my friend very nicely done Rgd Martyn Building ?
Completed. Soliei Royal . Sovereign of the Seas . Virginia . Scotland . San Felipe . Corel vasa , Santisima Trinadad X section , Vasa
Next Build ?
When sailors have good wine, They think themselves in heaven for the time. John Baltharpe
|
|
|
Rank: Super-Elite Groups: Registered
Joined: 31/05/2010 Posts: 5,679 Points: 17,011 Location: Wiltshire
|
Very well done.it looks fantastic. Nothing wrong with sitting and thinking to make sure you have that pkan sorted n your head. Looking forward to your next update. Happy Modelling
BUILDING: Hachette Spitfire Mk 1A, Constructo Mayflower
SUBSCRIPTION COMPLETE (Awaiting building): USS Constitution, Sovereign of the Seas, 1:200 Bismarck (Hachette)
COMPLETED: Porsche 911, E-Type Jaguar, Lam Countach
|
|
|
Rank: Pro Groups: Registered
Joined: 18/04/2016 Posts: 134 Points: 402 Location: Durban, South Africa
|
Spent about 3 days sanding the hull still a little way to go yet....I glued the stern post into place to blend the planking in easier, just cover it with a bit of masking tape and it stops it from being sanded as well...just keep replacing the tape if it gets damaged. Just a few places to touch up, used some sapele wood filler, cant see it after final sanding..about 20% left to sand on the port side then on to fitting the stem and keel pieces...should have that finished by this weekend then the copper plating after marking the waterline...I think I might give the hull below the waterline a couple of coats of acrylic metallic copper paint which will camouflage any small gaps there may be in the copper plating... Barry BarryM attached the following image(s): There's no time like the present.....
|
|
|
|
|
Top job, its always nice to see how your hard work looks after sanding back and what looked average turns into something to be proud off. Current builds:-C57,Zero, Lamborghini Countach, Caldercraft HMS Agamemnon,Robi,R2-D2, MFH Cobra .
|
|
|
Rank: Super-Elite  Groups: Registered, Forum Support Team, Administrators, Global Forum Support Team, Moderator, Official Builds Joined: 09/11/2012 Posts: 8,520 Points: 24,651 Location: East midlands
|
Excellent work on the hull Barry. All the effort is worth it in the end. Regards delboy271155 (Derek) COME BACK GUY FAWKES "YOUR COUNTRY NEEDS YOU"
|
|
|
Rank: Super-Elite Groups: Registered
Joined: 31/05/2010 Posts: 5,679 Points: 17,011 Location: Wiltshire
|
Barry Its looking stunning. Hope the build continues to go well. Happy Modelling
BUILDING: Hachette Spitfire Mk 1A, Constructo Mayflower
SUBSCRIPTION COMPLETE (Awaiting building): USS Constitution, Sovereign of the Seas, 1:200 Bismarck (Hachette)
COMPLETED: Porsche 911, E-Type Jaguar, Lam Countach
|
|
|
Rank: Pro Groups: Registered
Joined: 02/04/2013 Posts: 174 Points: 534 Location: Bethlehem PA, USA
|
BarryM wrote:Spent about 3 days sanding the hull still a little way to go yet....I glued the stern post into place to blend the planking in easier, just cover it with a bit of masking tape and it stops it from being sanded as well...just keep replacing the tape if it gets damaged. Just a few places to touch up, used some sapele wood filler, cant see it after final sanding..about 20% left to sand on the port side then on to fitting the stem and keel pieces...should have that finished by this weekend then the copper plating after marking the waterline...I think I might give the hull below the waterline a couple of coats of acrylic metallic copper paint which will camouflage any small gaps there may be in the copper plating... 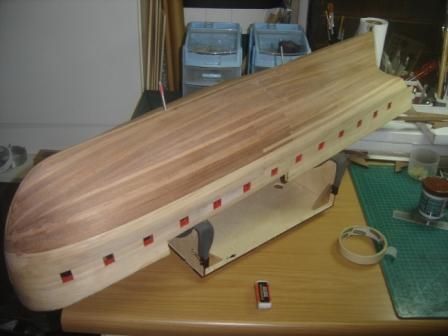 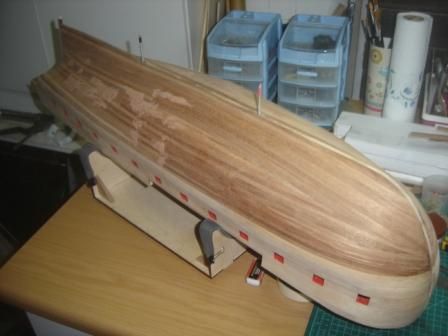 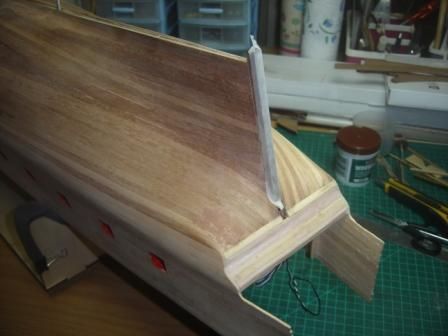 Barry I wouldn't bother going to all that trouble. If you get any gaps you can just throw some paint in the gap and wipe it off with solvent. That's way easier and faster. Also, if you're careful you shouldn't get any gaps. The foil works better than you think. I would however put a couple coats of sealer below the waterline to ensure that the adhesive on the copper foil sticks properly. Don't forget to sand lightly after and then wipe with a damp rag. It will stick like gangbusters.
|
|
|
|
|
Very nicely done on planking the hull Barry . Looking forward to seeing the copper plates go on. I must admit I have never done coopering on a hull as I tend to go for older ships and it certainly looks fiddley. Keep up the good work m8 Rgd Martyn Building ?
Completed. Soliei Royal . Sovereign of the Seas . Virginia . Scotland . San Felipe . Corel vasa , Santisima Trinadad X section , Vasa
Next Build ?
When sailors have good wine, They think themselves in heaven for the time. John Baltharpe
|
|
|
|
|
Cracking job Barry, looking great...
Regards
Alan
|
|
|
Rank: Pro Groups: Registered
Joined: 18/04/2016 Posts: 134 Points: 402 Location: Durban, South Africa
|
Thank's gentlemen...yes amazing how the swan appears from the ugly duckling with a little sanding (or should I say a lot). Managed to get the sanding finished today and the Stem and Keel pieces fitted, just requires a little more sanding towards the stern to blend the keel in a little more. John when you say you used sealer before coppering, was that Sanding Sealer? Marked the waterline this evening, looking at a couple of pics of the real deal the waterline is at 13 feet from the bottom of the keel, converting that into real units relates to about 82mm on the model...looks about right. Lucky me I have a laser level which made things quite simple, once the model was leveled a mark on the Keel post both sides some 5mm plastic tape and presto...waterline, another hurdle overcome.. Barry BarryM attached the following image(s): There's no time like the present.....
|
|
|
Rank: Pro Groups: Registered
Joined: 02/04/2013 Posts: 174 Points: 534 Location: Bethlehem PA, USA
|
BarryM wrote:Thank's gentlemen...yes amazing how the swan appears from the ugly duckling with a little sanding (or should I say a lot). Managed to get the sanding finished today and the Stem and Keel pieces fitted, just requires a little more sanding towards the stern to blend the keel in a little more. John when you say you used sealer before coppering, was that Sanding Sealer? Marked the waterline this evening, looking at a couple of pics of the real deal the waterline is at 13 feet from the bottom of the keel, converting that into real units relates to about 82mm on the model...looks about right. Lucky me I have a laser level which made things quite simple, once the model was leveled a mark on the Keel post both sides some 5mm plastic tape and presto...waterline, another hurdle overcome.. 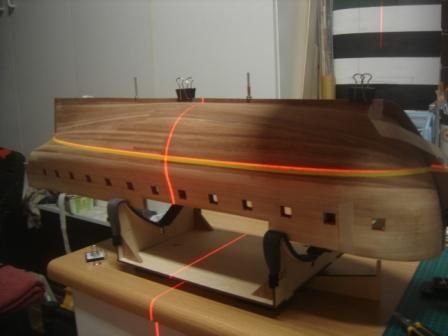 Barry Any clear sealer will work. I used shellac.
|
|
|
|
Guest (3)
|
 US
US

