|
|
 Rank: Beginner Level 3  Groups: Registered
Joined: 22/03/2016 Posts: 22 Points: 69 Location: Luxemburg
|
Markwarren wrote:Nice bit of scratch building going on there. Looking good. It's called scratch ? Oops, corrected that. See, I even learn english while building the Falcon
|
|
|
Rank: Beginner Level 3 Groups: Registered
Joined: 22/03/2016 Posts: 22 Points: 69 Location: Luxemburg
|
Slowly advancing, very slowly. Worked on the bench, fitted a 3mm LED inside to lighten up the photoetch part. The cushions were repainted with Deck Tan. Once I have the holes closed around the photoetch part I'll try some washes, perhaps Citadel Seraphim Sepia and Nuln Oil. Actually, if you look good, the photoetch part is lightened up from the inside LED on this pic. 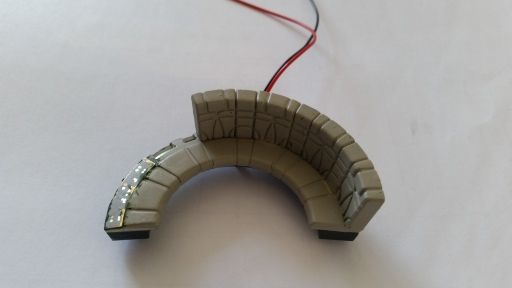 The navigation computer and its wall, trying to scratch built some thing there, but need to get more Evergreen profiles to finish it. 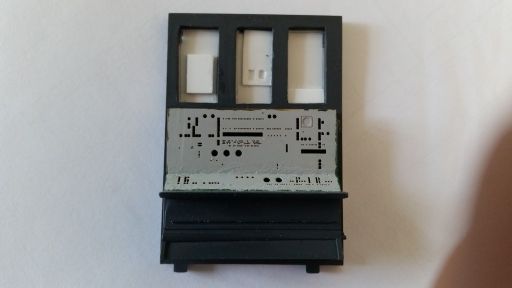 Also started to work on the corridor. Not much to see here yet, need cut away some parts of the floor. 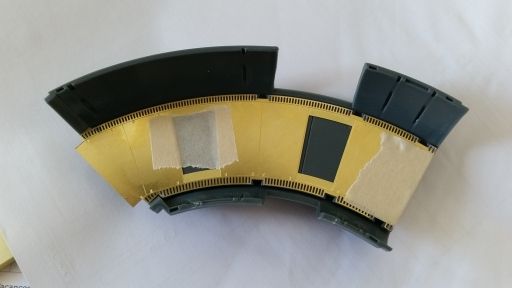 Finished the door rings, put two 0,5mm fibers inside, one painted black and one red, and some silver painted wires inside. The cushions were painted Tamiya Deck Tan and drybrushed Tamiya Khaki Drab to make them look dirty. 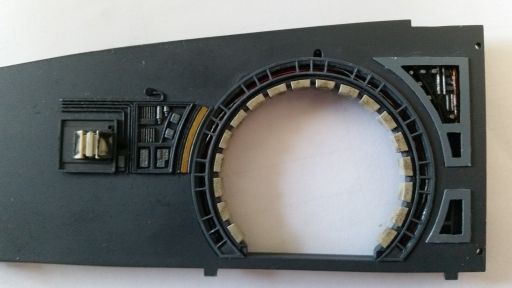 Now I'm working on the different tubings that you see all over this wall. I decided to replace the plastic ones with copper wire, because first, I need more tubes then De Ago gives us, and second, I can form them more closer to the original. The wires are primed with Citadel Chaos Black spray, then painted Citadel Administratum Grey. don't know yet what I will take to paint the different ring markings, and if I'll put on some wash to make it look dirty. 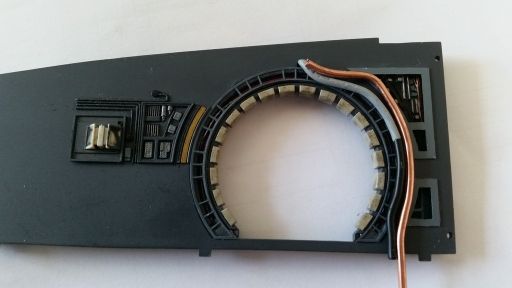
|
|
|
 Rank: Pro  Groups: Registered
Joined: 13/05/2016 Posts: 130 Points: 386 Location: Murrieta, CA (USA)
|
"Still managed to rip the upper decal for the back wall in two (just noticed that you can see the crack on the photo, it's barely visible in real, and I can add some small dip of black to hide it completely)." Looks like a fine time sharpie could fix the issue Make things as simple as possible but not simpler... - Albert Einstein
|
|
|
Rank: Administration        Groups: Registered, Administrators, Global Forum Support, Moderator, Forum Support Team, Official Builds Joined: 04/01/2016 Posts: 7,178 Points: 21,841 Location: Northamptonshire, England
|
coming on very nicely. Regards
Markwarren
(Mark) Admin
|
|
|
Rank: Beginner Level 3 Groups: Registered
Joined: 22/03/2016 Posts: 22 Points: 69 Location: Luxemburg
|
Continuing to work on the corridors. Cutting an filing away pieces of the original floor to lighten up the Paragrafix parts. 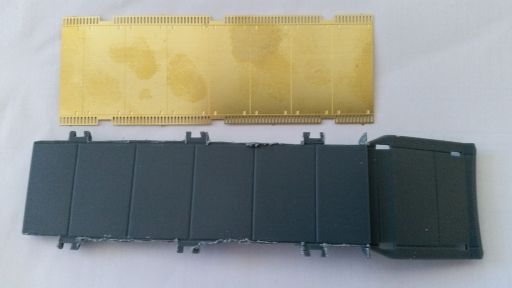 I actually bought a circular saw for my Proxxon, saw it on someone's topic (sorry, I look them all, steal good ideas, but am very bad at remembering names ....) This circular saw is a BEAST. I'm surprised they can sell it without putting tons of warnings around the blister. I think it could easily cut all the way to your finger bones and even a bit into if you don't pay attention for a split second ... or ... like it often happens to me when working with bare hands instead of bench vice (don't have one at home to my shame) slip .... 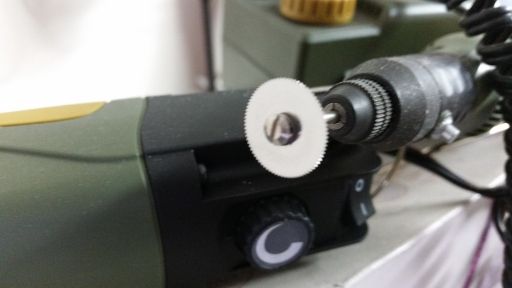 So, the corridor floors ... added a few LEDs to the first part after painting it white (for a little better light reflection). Yes, I know, could have done this nicier, but hey, nobody's gonna see it later.  With the floor in place and the lights connected ... The actual gaps between the floor and the walls won't be visible, as the cushions (or whatever they are) will block line-of-sight. Just need imagine something for the corridor connections .... Oh, was wondering what color to give the lights ... I think white is correct for the ESB Falcon. Looks like yellow in the ANH version .... Please, De Ago, give us an access to the pictures you made from the original model, like Steve Dymszo promised us in his videos (that link is NOT working), I'm so fed up to filter through the few pics you see on the internet, and decide if it's an ANH pic or ESB (I think I saw by now three different layouts for the tubes on the first wall ....) 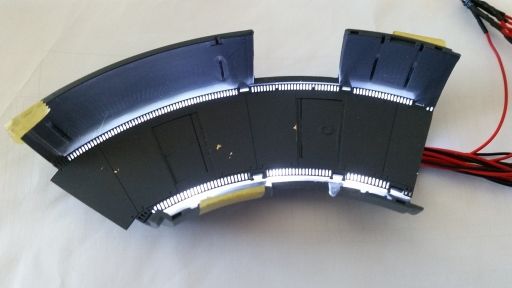 The wall behind the navigation computer is also nearly finished. Oh, by the way, I had to redo the entire corridor ring from the first wall, as the Paragrafix part snapped off when I tried to fit it to the floor. Looks like I glued it in place a little bit too low and the tension that was put on it when I tried to snap the wall and the floor together made it fly off. More work, more work, I'll post a pic when the wall is finally finshed .... the two first tubes are. 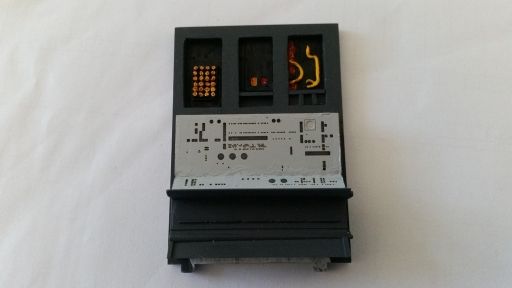 And finally, I tried some colors for the hull. I saw a post where someone did the same, but in the end he selected an ivory colors that's not available in Europe (spray bombs and air delivery .. no no no). From left to right, Tamiya Insignia White spray (the color Steve Dymszo recommends), Vallejo Light Ivory, Citadel Screaming Skull and Hunbrol Ivory (the Citadel and Humbrol colors look exactly the same to me, but think the Citadel color works better with my airbrush). Anyway, both of the first colors are too light, the other two colors are too yellowish. Perhaps I'll try to mix some more of the color for the Fine Molds Falcon ... althou I think it looks more like Tamiya Grey Primer. Don't know, don't know ... 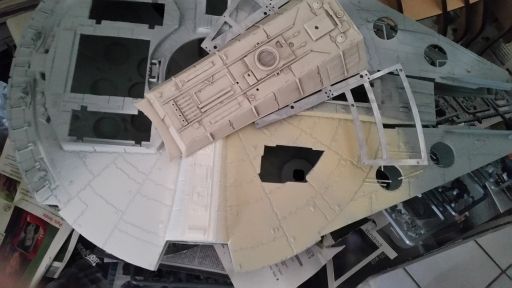
|
|
|
Rank: Administration Groups: Registered, Administrators, Global Forum Support, Moderator, Forum Support Team, Official Builds Joined: 04/01/2016 Posts: 7,178 Points: 21,841 Location: Northamptonshire, England
|
Looking good, lots of work gone into all that, looks like you've got it all spot on. Nice to see the different shading on the various base coats as comparisons. Great work. Regards
Markwarren
(Mark) Admin
|
|
|
Rank: Beginner Level 3 Groups: Registered
Joined: 22/03/2016 Posts: 22 Points: 69 Location: Luxemburg
|
Markwarren wrote:Looking good, lots of work gone into all that, looks like you've got it all spot on. Nice to see the different shading on the various base coats as comparisons. Great work. Thx Mark
|
|
|
 Rank: Vice-Master Groups: Registered
Joined: 05/03/2015 Posts: 561 Points: 1,713 Location: South Carolina
|
Things are looking really good Ark! Love what you're doing so far. Got a suggestion for ya for some good interior references... there are a bunch of good sites online with actual screen caps from the movie in HD... really come in handy for doing all the little details on the inside! PM me for details!
|
|
|
Rank: Beginner Level 3 Groups: Registered
Joined: 22/03/2016 Posts: 22 Points: 69 Location: Luxemburg
|
|
|
|
 Rank: Amateur level 2 Groups: Registered
Joined: 24/08/2016 Posts: 45 Points: 138 Location: Maryland
|
Man, your lighting is looking fantastic. Excellent. And admirable scratch additions. Jealousy here. Keep it up.
|
|
|
Rank: Beginner Level 3 Groups: Registered
Joined: 22/03/2016 Posts: 22 Points: 69 Location: Luxemburg
|
First a pic of the cargo hold so far. Pieces are just stuck together. Think the extra bits on the bunk's side will be next and a few small bits around the hallway. Oh, yes, a pic (even if just made with a smartphone) show so much details you don't see in RL. (Or do I need glasses?) 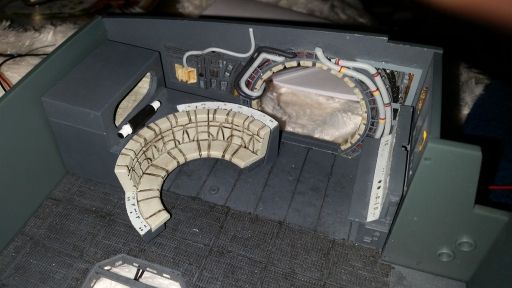 Worked on the cockpit corridor too. LEDs glued to the floor. Floor painted white. Basically the same process like for the main corridor.  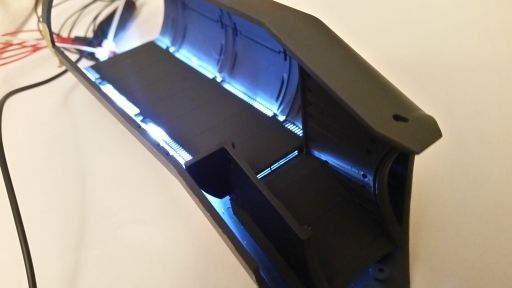 On to the main corridor. The floor got a treatment with Nuln Oil to make it look dirty. And in the movies there are a lot of the "cushions" missing and you see internal tubings and cables. So on to do that ... First I needed to draw a line to show me how much to cut out of the walls, about 2mm less then the cushions' size. 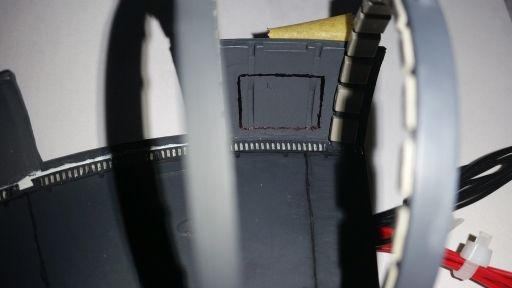  Then I cut out styrene pieces from a 0.4 mm sheet, primed them black and glued small tubes and cables in different colors onto them. Tried to match the movies as closely as possible, but it's impossible, as the corridor size is different. (Oh, yes, the Paragrafix hatches are still missing, so the corridor floor looks weird in these two places. I will later glue them on, will put them straight on top, not showing the open floor like some may do, as it would show the underlying cables and all. I just imagine that showing these hatches open would have ment to do a lot of scratch building, essentially, building a complete smuggling hold) 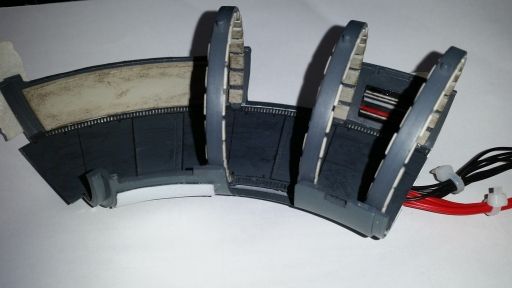 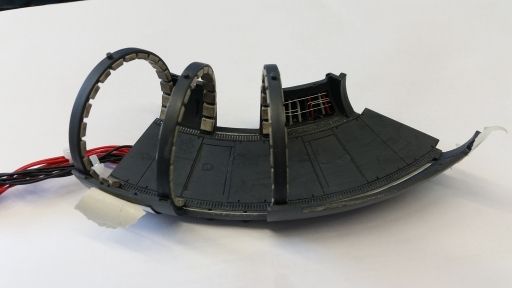 On to the corridor top. Drilled holes for the LEDs ... Tried different sizes and intensities. Went for 3mm 9000mcd ones. I built some kind of bulb sockets for them :-) 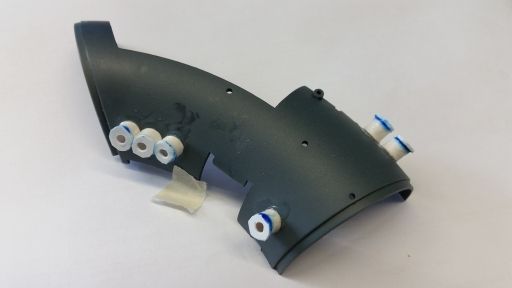 With the LEDs inside: 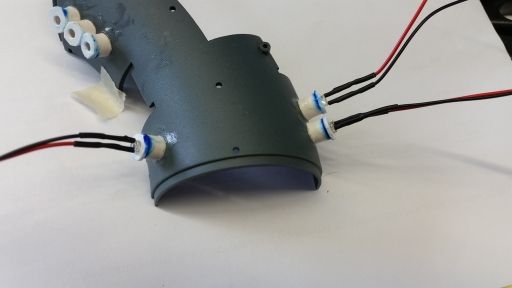 You don't see them from the inside but I still have to built the sconces. 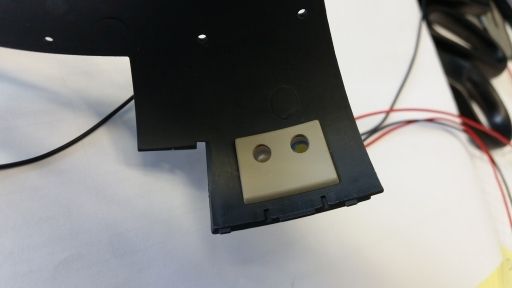 Lit up ... 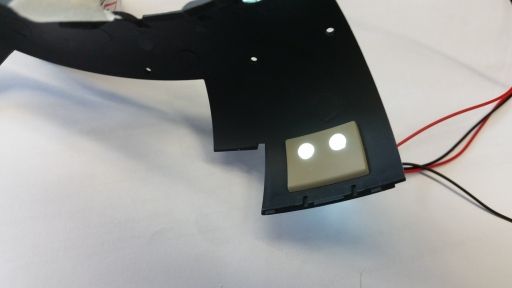 And a series of pics to show you how it looks when stuck in together. First without any lights. 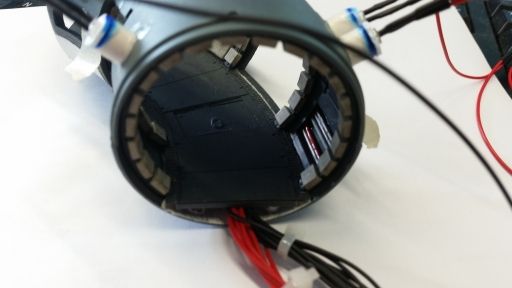 Just ceiling lights on: 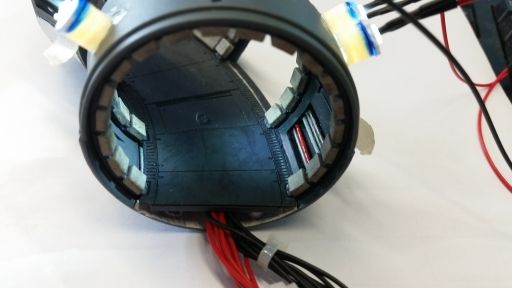 Ceiling and floor lights: 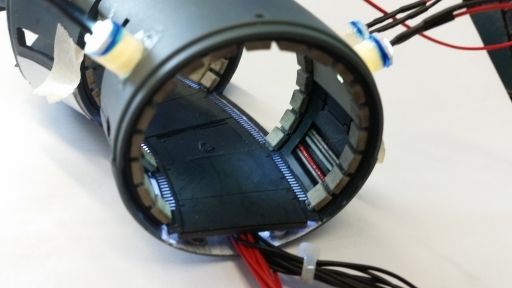 So, what do you think? I like it. Not perfect, but I like it. Now I can add the final pieces to the corridor, but I don't think I can show final pics soon, as the cockpit corridor and the gun turret corridor need to be finished before I can finish this, due to a little gap between the corridor floors that I need to fill with putty or green stuff, else light will shine through them.
|
|
|
Rank: Pro  Groups: Registered
Joined: 16/03/2016 Posts: 122 Points: 381 Location: Layton, Utah
|
Looking really good!  If at first you don't succeed,
maybe you should skip the chainsaw juggling...
|
|
|
Rank: Pro Groups: Registered
Joined: 30/04/2015 Posts: 263 Points: 795 Location: Los Angeles
|
Arkkam. Looking good. I do want to point out one thing which may become an issue for you, which I ran into myself and had to redo. I had regular LEDs going into the walls as well for my sconces, but then the upper hull wouldn't fit over the corridors. I had to remove them and I used SMD LEDs instead because of the extreme low profile. HOWEVER, it was only the straight corridor that was the main issue. You can see in my photo here (from my post #350). Just wanna give you a heads up (and anyone reading) due to personal experience. http://s1056.photobucket...015_zpsbqt5s0xk.jpg.html
|
|
|
Rank: Beginner Level 3 Groups: Registered
Joined: 22/03/2016 Posts: 22 Points: 69 Location: Luxemburg
|
I did read your post about the pieces that are supposed to fix the hold and corridors to the frame, and how you have problems because of the extra work you did for the maintenance hatches in the hold. I didn´t tackle that work yet, exactly because I wanted to know how much place I have before having to redo it all. For my corridors, the highest elevation of the sockets I built is lower then the corridor ceiling, so I hope it will fit in. I really want to use normal LEDs whereever I can because I hate smoldering SMDs, they tend to break apart on the smallest tension I apply (the reason I usually dip them in Krystal Klear). But thanks for the advice because I really hate doing things twice. (Although I think about offering a building service to my friends should the R2 model be released in german)
OTOS, I can´t wait until I have the upper and lower frame, I promised to lend the model to a friend who organizes a Con here in Luxembourg (http://luxcon.lu/) in two years and a half, and if I wait until I have all parts I will never be able to finish in time .... well could start to work on the electronics and presentation table ...sigh ... so much work, why are we doing this :-)
|
|
|
Rank: Pro Groups: Registered
Joined: 30/04/2015 Posts: 263 Points: 795 Location: Los Angeles
|
I did leave my regular LEDs on the curved corridors. I think those areas are fine. It's just the straight one to the cockpit.
|
|
|
Rank: Administration Groups: Registered, Administrators, Global Forum Support, Moderator, Forum Support Team, Official Builds Joined: 04/01/2016 Posts: 7,178 Points: 21,841 Location: Northamptonshire, England
|
Looking good Arkkham.  Regards
Markwarren
(Mark) Admin
|
|
|
Rank: Beginner Level 3 Groups: Registered
Joined: 22/03/2016 Posts: 22 Points: 69 Location: Luxemburg
|
colson wrote:I did leave my regular LEDs on the curved corridors. I think those areas are fine. It's just the straight one to the cockpit. Ok, will wait with the straight corridor's light. Still have much to do with the cockpit and cargo hold anyway. And plan to use an Aduino board. Let´s see if I can get it to work ... I think it has a module for audio ... hmmm, or better a Raspberry? And the Miniature-wonderland in Hamburg (http://www.miniatur-wunderland.de/) has a plane taking off a runway ... Wouldn´t that be cool? Wonder how they did it. Retracting landing gear doesn´t seem possible, I read a blog somewhere from a guy who worked together with an engineer in Robotics on the landing gear, and they didn´t find a way to do it.
|
|
|
Rank: Beginner Level 3 Groups: Registered
Joined: 22/03/2016 Posts: 22 Points: 69 Location: Luxemburg
|
And thx GoofyFoot and MarkWarren.
|
|
|
Rank: Vice-Master Groups: Registered
Joined: 05/03/2015 Posts: 561 Points: 1,713 Location: South Carolina
|
Arkkham wrote:colson wrote:I did leave my regular LEDs on the curved corridors. I think those areas are fine. It's just the straight one to the cockpit. Ok, will wait with the straight corridor's light. Still have much to do with the cockpit and cargo hold anyway. Yeah... the straight cockpit corridor is a monster. The tolerance between the top hull and the top of the corridor tube is very tight and you don't have alot of room whatsoever to fit the large LEDs in there. I am going with the SMDs myself. May actually dig a trench to hold the wires so they aren't a problem either.
|
|
|
Rank: Beginner Level 3 Groups: Registered
Joined: 22/03/2016 Posts: 22 Points: 69 Location: Luxemburg
|
LrdSatyr8 wrote:Arkkham wrote:colson wrote:I did leave my regular LEDs on the curved corridors. I think those areas are fine. It's just the straight one to the cockpit. Ok, will wait with the straight corridor's light. Still have much to do with the cockpit and cargo hold anyway. Yeah... the straight cockpit corridor is a monster. The tolerance between the top hull and the top of the corridor tube is very tight and you don't have alot of room whatsoever to fit the large LEDs in there. I am going with the SMDs myself. May actually dig a trench to hold the wires so they aren't a problem either. Oh, yes, now I see, that corridor isn't under the relatively flat saucer, but under the round top that leads to the cockpit. It's been a hard week at office, my logical thinking is reduced to finding solutions to IT problems. :-(
|
|
|
|
Guest
|
 US
US

