|
|
|
|
Because the entry port brakes up the run of gun ports the eye will stop at that point. So lets make it exciting and add some detail!!  I have cut my new paneled side pieces from a small sheet of 2mm ply (piece of spare deck actually) you will need a 56mm x 22mm tho make the 4 panel sections. the dimensions of the panels themselves is 6mm at the top 9mm at the bottom and 22mm in length.  I marked out where i wanted the panels to be. My measurements were.... back edge of panels in 1mm in from back edge. front edge of panels in 2mm from front edge, this is to allow 1mm to be proud of entry port for sanding smooth once installed. top of upper panel 3.5mm from top edge, this is to allow a 2mm cross member later. bottom line of upper panel 9mm from top edge. top edge of lower panel 11mm from top edge and finally the bottom edge of the lower panel was 19mm from top edge  Using the point of a round needle file I scribed in the panel lines. once done I cut out the panels and then test fitted them to the entry port only trimming the bottom of the panel. Once i was happy they fitted I widened the entry port by .5mm on each side as I was using 2mm ply. The panels were then glued into place.  The cross member should have a rounded radius. I used a piece of 2mm plank scrap cut and sanded to size. next I shaped the bottom edge with a round needle file and the cross member was glued in place  The bottom piece of liner came from the strip supplied for that purpose. once all dried i sanded down smooth with the hull. finally i carefully rounded the edges with a needle file and rubbed smooth with some scotchbright.  My last job was to give the panels a quick lick of walnut paint just to give you an impression of the end result. i will paint and varnish properly at a later date. not difficult to do took me a couple of hours well worth the effort I recon     All Pictures author's collection. see my entry port detail pack for detailed plan. “Whenever you find yourself on the side of the majority, it is time to pause and reflect.”
-Mark Twain
|
|
|
 Rank: Pro Groups: Joined: 24/08/2009 Posts: 48,827 Points: -13,348
|
|
|
|
 Rank: Vice-Master   Groups: Registered
Joined: 25/04/2010 Posts: 748 Points: 2,285 Location: bognor regis
|
nice idea..this will give me more to do today,as my build has stopped until i get the next parts cheers benny
|
|
|
Rank: Pro  Groups: Registered
Joined: 28/03/2010 Posts: 152 Points: 513 Location: Liverpool,England
|
Good Idea. I might just have a crack at that myself.  Nice one Jason. Jimmy L.
current builds : Lancaster 1/32 (Hachette)
Revell USS Kearsarge
Titanic Lifeboat
I started off with nothing and I've still got most of it left.
|
|
|
Rank: Pro  Groups: Registered
Joined: 08/09/2010 Posts: 102 Points: 318 Location: Durban, South Africa
|
I will definitely do that on my model too. Part time modeller, full time biker
Built: Pinta
Belle Poule (plastic)
Endeavour
Scratch build of Pirate ship "Neptune" (Based on cutter "HMS Aldebaran"
Current builds: Victory
|
|
|
Rank: Pro  Groups: Registered
Joined: 25/03/2010 Posts: 472 Points: 1,357 Location: Hyde
|
Looking great mate. Fantastic idea. I might do it myself :)
|
|
|
Rank: Pro  Groups: Registered
Joined: 07/10/2010 Posts: 148 Points: 430 Location: At the back of my sinking boat
|
Definitely a thing to try! Present Build: H.M.S. Victory
H.M. Bark EndeavourPhotobox build albumIt cant be that bad, what do you mean it's sinking
|
|
|
 Rank: Elite     Groups: Registered
Joined: 22/03/2010 Posts: 2,065 Points: 6,295 Location: Gorleston-on-sea
|
 It looks pretty effective jase, I shall be doing the same when I get to that part of my build...is there a certain colour reference to the engraved areas mate...love it... Current Builds: Deagostini HMS Victory: Deagostini HMS Sovereign of the seas. Completed Builds: Del Prado: HMAS Bounty: Hachette: RMS Titanic: Del Prado: Cutty Sark...
|
|
|
|
|
jonny7england wrote:It looks pretty effective jase, I shall be doing the same when I get to that part of my build...is there a certain colour reference to the engraved areas mate...love it... Jonny I have used walnut in the photo's above. but my top coat will be walnut with a hint of burnt sienna to match the original. finally that will be varnished. “Whenever you find yourself on the side of the majority, it is time to pause and reflect.”
-Mark Twain
|
|
|
Rank: Pro Groups: Registered
Joined: 07/10/2010 Posts: 148 Points: 430 Location: At the back of my sinking boat
|
I thought I would give this a try and am pleased with the results. McDonald's wooden coffee stirrers have become an invaluable asst to me as this is what I have made them out of. Venice attached the following image(s): Present Build: H.M.S. Victory
H.M. Bark EndeavourPhotobox build albumIt cant be that bad, what do you mean it's sinking
|
|
|
|
|
Fantastic well done mate  “Whenever you find yourself on the side of the majority, it is time to pause and reflect.”
-Mark Twain
|
|
|
Rank: Vice-Master Groups: Registered
Joined: 25/04/2010 Posts: 748 Points: 2,285 Location: bognor regis
|
hi i used the engraving tool on the dremel,the left hand one is the one i used 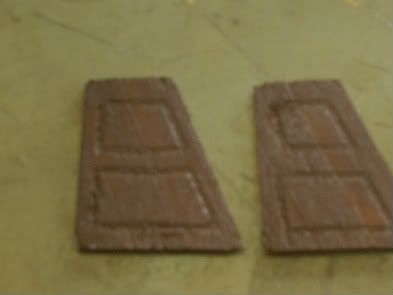 cheers benny
|
|
|
Rank: Vice-Master Groups: Registered
Joined: 25/04/2010 Posts: 748 Points: 2,285 Location: bognor regis
|
and this is a pic of them dry fitted  cheers benny
|
|
|
|
Guest
|
 US
US

