|
|
 Rank: Semi-Pro Level 2   Groups: Registered
Joined: 04/01/2017 Posts: 83 Points: 252 Location: South Witham
|
Well the first bit of my subscription arrived in the post today, starting from issue 2 so here we go on the build Here is what I got in the post Issue 2  Issue 3  If you build it he will come Built - Eaglemoss 3D Printer. Building - R2D2  National league Champions 2017 FA Cup Quarter Finalists 2017
|
|
|
Rank: Semi-Pro Level 2 Groups: Registered
Joined: 04/01/2017 Posts: 83 Points: 252 Location: South Witham
|
I already had done issue 1's parts, so will only put a pic of that on here. It is pretty straight forward to fit, just make sure the plug is plugged in the right way on the connector.  So the first thing to do was to fit the stabiliser to the shoulder plate that came with issue 1. Didn't have an issue here as the holes lined up very well, and the screws were easily fitted - even for someone like me who has pigs tits for fingers. Stabiliser in place in shoulder  Screws holding in Stabiliser, small but not too fiddley  If you build it he will come Built - Eaglemoss 3D Printer. Building - R2D2 National league Champions 2017 FA Cup Quarter Finalists 2017
|
|
|
Rank: Semi-Pro Level 2 Groups: Registered
Joined: 04/01/2017 Posts: 83 Points: 252 Location: South Witham
|
The next two bits are the so called lubrication fittings, these are slotted so are pretty straight forward and cant be put in the wrong way. I wont bother with photo's of fitting them but have shown the completed shoulder piece. Lubrication parts shown fitted  Now to something I didn't expect, and it's something that you all need to get. Parts need to be super glued in place. I have included a pic of the one I use. It is good quality, quick to dry, but best of all it is easy to control to put on small amounts that are required. Loctite super glue with controllable nozzle about £2 from Asda  The piston comes in two parts and must be glued together. It says in the instructions to put a bit of glue in the hole, but I found it better to put the glue on the flat of the D. Remember having good control helps achieve this. 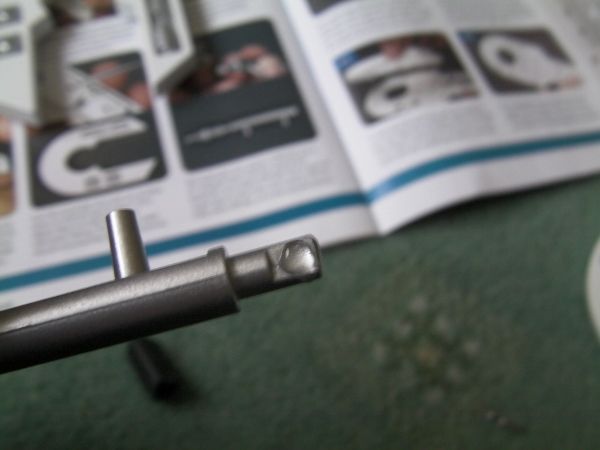 The two glued parts, no glue spillage  Ok next post will be the hydraulic arm coupler - basically a sloted cube, which again need glue  If you build it he will come Built - Eaglemoss 3D Printer. Building - R2D2 National league Champions 2017 FA Cup Quarter Finalists 2017
|
|
|
Rank: Semi-Pro Level 2 Groups: Registered
Joined: 04/01/2017 Posts: 83 Points: 252 Location: South Witham
|
So I had the piston rock steady and glued. I also glued the small slotted cube as why wait for one thing to dry whilst doing nowt, might as well do them both at the same time. Despite by chunky fingers and good control of the super glue, the pin that goes into the cube is quite small, so you need to be careful with it, especially as i did, and got some glue on my fingers. let me tell you that was wiped quicker than The Flash runs. Slotted cube with piston glued in  Once both parts were dry they had to be glued together, again it was pretty easy to do, with the glue I had. I cannot stress enough the need to get a good controllable superglue. Side view of 'cube' on piston  The 'cube' is supposed to be at an angle when it is fitted so don't try and fit it straight. So issue 2 is completed 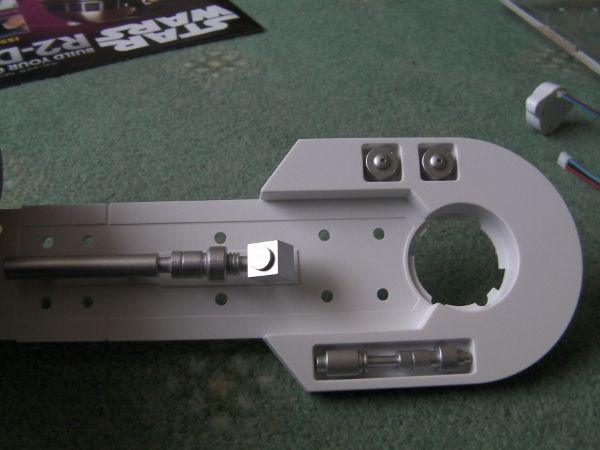 If you build it he will come Built - Eaglemoss 3D Printer. Building - R2D2 National league Champions 2017 FA Cup Quarter Finalists 2017
|
|
|
Rank: Semi-Pro Level 2 Groups: Registered
Joined: 04/01/2017 Posts: 83 Points: 252 Location: South Witham
|
OK so that was issue 2 done and dusted, issue 3 didn't really have much to do, however I will just say that at the end of issue 2 it says you can place the shoulder part onto the arm to see how it looks. Now I did this but found that the plastic pegs were very slightly out so you have to be careful when putting it into the other holes. So issue 3 had the blue outer casing photoreceptor extension , primary photoreceptor lens and control circuit board. Ready to fit outer casing  The outer casing just slots into place over the piston, but again the pegs don't exactly meet up so just be careful. In particular pay attention to the 'cube' fitted in issue 2. if it seems like the pegs aren't going in make sure the casing isn't fouling on the cube. Outer casing in place, no glue or screws yet, it just sits there  With the lens it says in the instructions to remove the protective film and put in place. I did this  But then - as the lens wasn't going to be held in place yet - I put the film back on to save it getting scratched. It's probably best to do this as without it been held in it slips and slides everywhere. The only thing left was to plug in the indicator to the board, ensuring the plug is fitted correctly. Plug in indicator display, note notch in plug  That was it for issue 3, so have this so far 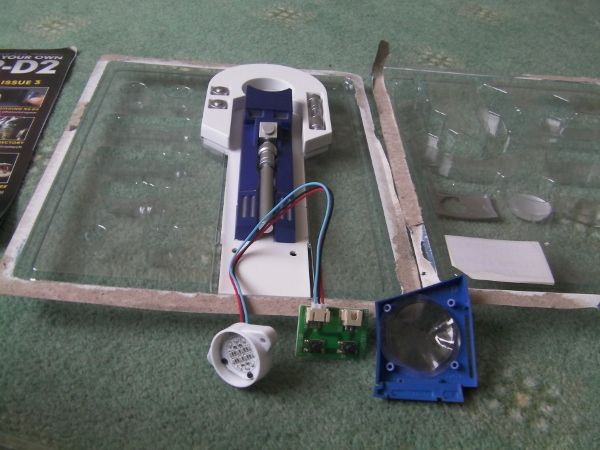 Looking forward to issue 4 as gives us ability to test the indicator lights  If you build it he will come Built - Eaglemoss 3D Printer. Building - R2D2 National league Champions 2017 FA Cup Quarter Finalists 2017
|
|
|
 Rank: Super-Elite     Groups: Registered
Joined: 17/12/2013 Posts: 3,982 Points: 11,974 Location: NY, USA
|
Great start.If you want to have your images appear in the post as opposed to having to download them you need to resize then to 640 by 480 pixels before you attach them
Carl
|
|
|
Rank: Semi-Pro Level 2 Groups: Registered
Joined: 04/01/2017 Posts: 83 Points: 252 Location: South Witham
|
OK thanks for that. Will have to try it on future posts  If you build it he will come Built - Eaglemoss 3D Printer. Building - R2D2 National league Champions 2017 FA Cup Quarter Finalists 2017
|
|
|
Rank: Super-Elite   Groups: Registered, Forum Support Team, Administrators, Global Forum Support Team, Moderator, Official Builds Joined: 09/11/2012 Posts: 8,520 Points: 24,651 Location: East midlands
|
Good to see you have started your R2 build diary.  Resizing your pics will make the diary more interesting and easier to follow. If you have problems resizing them just ask and someone will come to your assistance. Also congrats on your Blue medal for starting your diary.  Regards delboy271155 (Derek) COME BACK GUY FAWKES "YOUR COUNTRY NEEDS YOU"
|
|
|
|
|
Great to see you up and running, will be following your progress.... Regards Alan
|
|
|
Rank: Semi-Pro Level 2 Groups: Registered
Joined: 04/01/2017 Posts: 83 Points: 252 Location: South Witham
|
Thank you, I know now how to post images in the actual post so it should be an improved post in the future. Hope the few tips I gave are of help to builders. The good thing is I have made use of my free R2D2 memory stick by sticking the images I take on that If you build it he will come Built - Eaglemoss 3D Printer. Building - R2D2 National league Champions 2017 FA Cup Quarter Finalists 2017
|
|
|
Rank: Super-Elite  Groups: Registered
Joined: 27/01/2014 Posts: 5,060 Points: 14,980
|
Great start With glue I empty a small amount into an empty contact lense case, I use daily disposables so have lots, I then use a cocktail stick to apply the glue, this method may help with small parts
|
|
|
Rank: Semi-Pro Level 2 Groups: Registered
Joined: 04/01/2017 Posts: 83 Points: 252 Location: South Witham
|
Thanks for that tip, the last thing I want to do is 'over' glue something  If you build it he will come Built - Eaglemoss 3D Printer. Building - R2D2 National league Champions 2017 FA Cup Quarter Finalists 2017
|
|
|
|
|
Hi Impman, have sent you a PM... Regards Alan
|
|
|
Rank: Semi-Pro Level 2 Groups: Registered
Joined: 04/01/2017 Posts: 83 Points: 252 Location: South Witham
|
Images now sorted, should make better sense If you build it he will come Built - Eaglemoss 3D Printer. Building - R2D2 National league Champions 2017 FA Cup Quarter Finalists 2017
|
|
|
 Rank: Pro  Groups: Registered
Joined: 27/02/2016 Posts: 138 Points: 429 Location: milton keynes
|
Great start .. Good to see another build underway Current builds: Eaglemoss DeLorean, Deagostini R2 D2 Build
|
|
|
Rank: Pro  Groups: Registered
Joined: 16/04/2011 Posts: 328 Points: 998 Location: Anglesey
|
All the best with your build Darren
Have an AWSOME day and may the Force be with you always 😉 Building: Millennium Falcon https://forum.model-spac...sts&t=14381&p=7 - Building: BTTF Delorean - Building: Dom's Dodge Charger - Building : X-Wing https://forum.model-spac...aspx?g=posts&t=34899
|
|
|
Rank: Semi-Pro Level 2 Groups: Registered
Joined: 04/01/2017 Posts: 83 Points: 252 Location: South Witham
|
Thanks and with yours. If you build it he will come Built - Eaglemoss 3D Printer. Building - R2D2 National league Champions 2017 FA Cup Quarter Finalists 2017
|
|
|
|
|
Nice start Current builds:-C57,Zero, Lamborghini Countach, Caldercraft HMS Agamemnon,Robi,R2-D2, MFH Cobra .
|
|
|
Rank: Pro Groups: Registered
Joined: 16/04/2011 Posts: 328 Points: 998 Location: Anglesey
|
Hi dave, check this website out if you already haven't http://starwarsscreencap...om/category/the-movies/
Saves you watching the films and pausing Darren
Have an AWSOME day and may the Force be with you always 😉 Building: Millennium Falcon https://forum.model-spac...sts&t=14381&p=7 - Building: BTTF Delorean - Building: Dom's Dodge Charger - Building : X-Wing https://forum.model-spac...aspx?g=posts&t=34899
|
|
|
Rank: Semi-Pro Level 2 Groups: Registered
Joined: 04/01/2017 Posts: 83 Points: 252 Location: South Witham
|
Thanks Darren, that is awesome, don't know how you stumbled across the site put great link. As you say stops freeze framing films, and it gives an endless supply of images to get the weathering you want. As it's such a good idea, I am going to copy link and post it into the Weathering thread. Giving you full credit of course. If you build it he will come Built - Eaglemoss 3D Printer. Building - R2D2 National league Champions 2017 FA Cup Quarter Finalists 2017
|
|
|
|
Guest (2)
|
 US
US

