|
|
 Rank: Semi-Pro Level 1 Groups: Registered
Joined: 09/07/2016 Posts: 59 Points: 181 Location: Biloxi, MS
|
Yeah Colson. I saw someone had already attached the side panels on the mandibles using magnets. Might not have even been this forum and no idea where I saw it being done.
|
|
|
 Rank: Pro  Groups: Registered
Joined: 30/04/2015 Posts: 263 Points: 795 Location: Los Angeles
|
TheKraken wrote:Yeah Colson. I saw someone had already attached the side panels on the mandibles using magnets. Might not have even been this forum and no idea where I saw it being done. The mandibles I glued, because there's no reason to take them apart. I was going to magnetize the front lights in place so those could be pulled out easily if need be. But I think I just found my ideal solution. Just got back from Hobby Lobby and bout this extremely thin (maybe .25mm) peel and stick on magnet sheet. Easy to cut. I'm waiting for my next pack (24) to get in which has the side panels, but I think this will work out really well. HOPEFULLY.
|
|
|
 Rank: Pro  Groups: Registered
Joined: 30/04/2015 Posts: 263 Points: 795 Location: Los Angeles
|
|
|
|
Rank: Administration         Groups: Registered, Administrators, Global Forum Support, Moderator, Forum Support Team, Official Builds Joined: 04/01/2016 Posts: 7,062 Points: 21,493 Location: Northamptonshire, England
|
I too have glued the mandible side pieces in and magnetised the front light section. Again I am using small round disc magnets similar to the ones supplied with the detachable hull section for the side panels, for maintenance purposes should I need too. I have also used them in the turret, so it's easily detachable to show the inner workings I've made. I have magnetic tape, but found the small disc easier to use. Regards
Markwarren
(Mark) Admin
|
|
|
 Rank: Pro  Groups: Registered
Joined: 30/04/2015 Posts: 263 Points: 795 Location: Los Angeles
|
ARGH!! Frustrating. pack 24 still on back order and it was charged to me a month ago. Now 25 has been charged and it's on backorder. Oh well, still have lots of other things to do in the meantime.
|
|
|
 Rank: Pro  Groups: Registered
Joined: 30/04/2015 Posts: 263 Points: 795 Location: Los Angeles
|
So I got more done to my display table. I have now purchased a gloss black plexi piece for the top that I cut to size. I then glued a sheet of 3/4" wood which I painted the edges of, black, and attached to the bottom of the plexi. 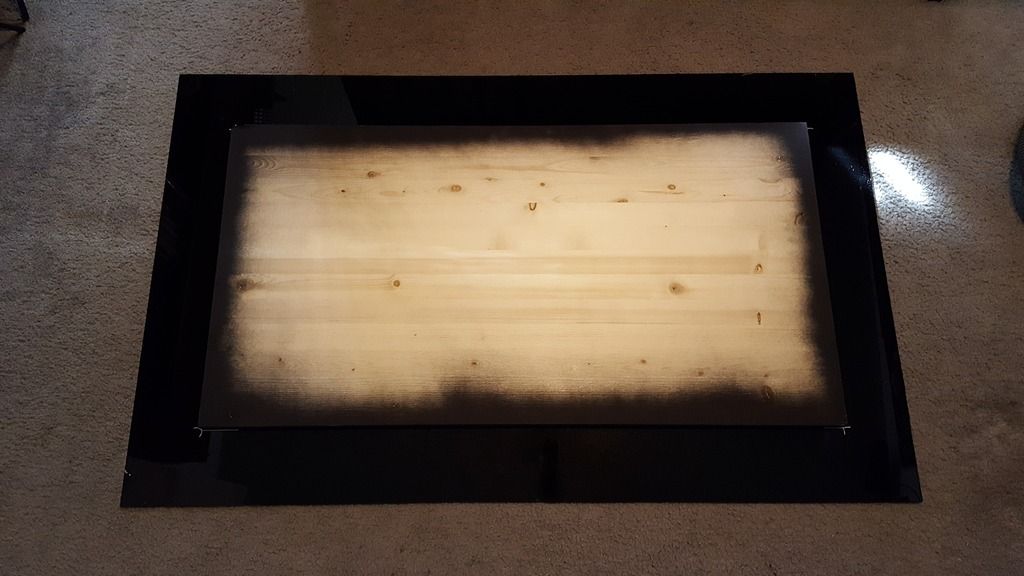 I then ran a strip of RGB LED around the bottom of the plexi along the edge of the wood. 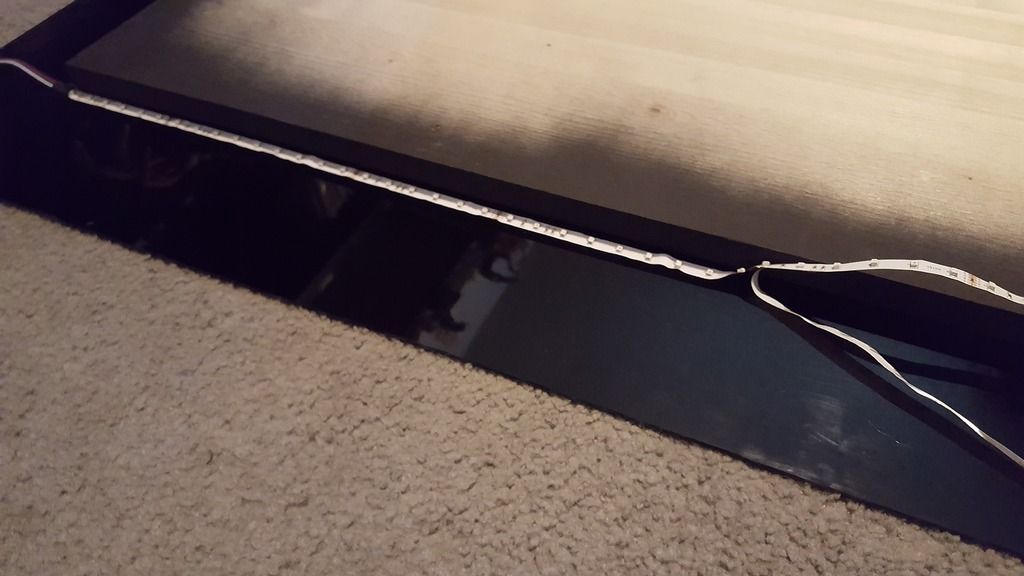 I also have colored switches that I've attached to the front edge on either side of the monitor to turn on the table lights, Falcon lights, monitor, etc. So here we have an almost completed table. All that will be needed after this is a glass case to cover the Falcon once completed. So far, turning out like I had originally planned from my concept on my first post in the forum. 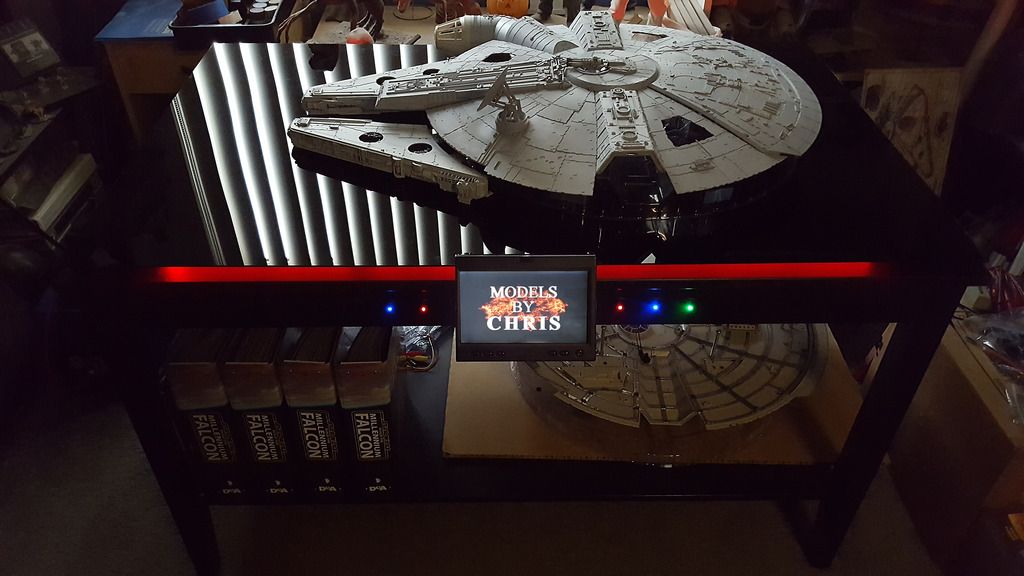 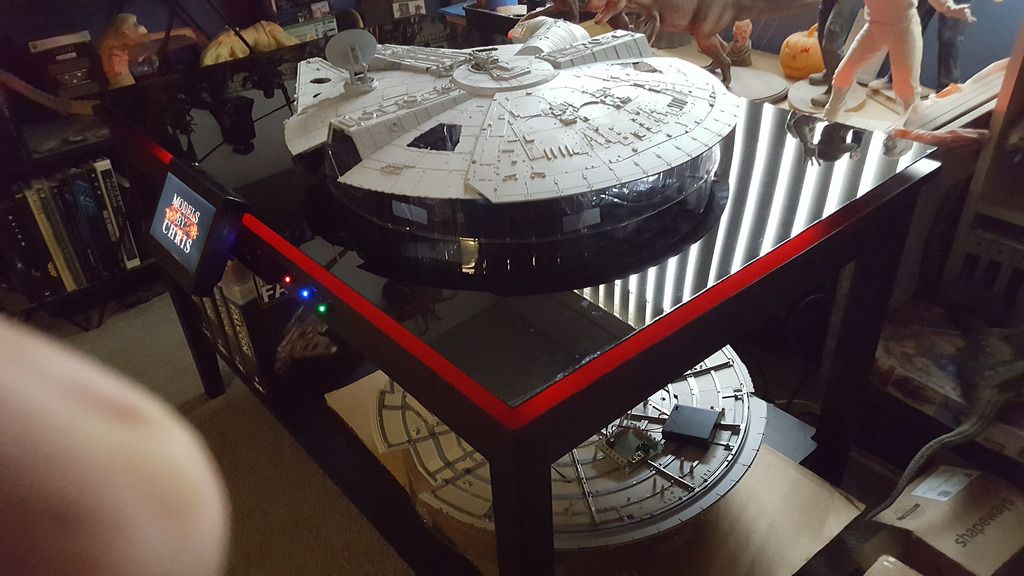 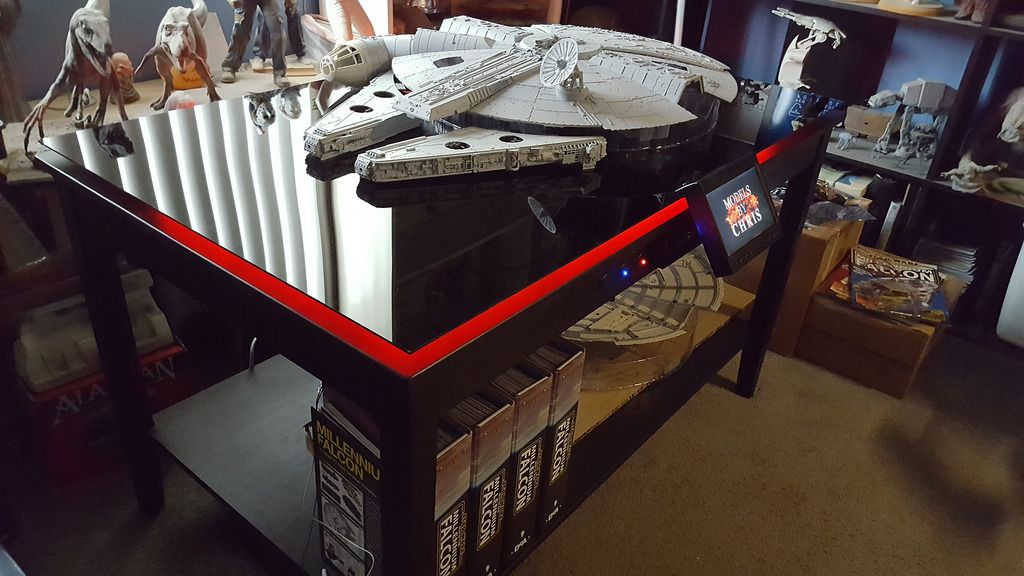
|
|
|
Rank: Administration         Groups: Registered, Administrators, Global Forum Support, Moderator, Forum Support Team, Official Builds Joined: 04/01/2016 Posts: 7,062 Points: 21,493 Location: Northamptonshire, England
|
That table is just something else, great work Chris. Regards
Markwarren
(Mark) Admin
|
|
|
 Rank: Amateur level 2  Groups: Registered
Joined: 29/09/2015 Posts: 41 Points: 123 Location: USA
|
Ya, that table is fantastic. Great job.
|
|
|
 Rank: Semi-Pro Level 2 Groups: Registered
Joined: 08/05/2016 Posts: 79 Points: 251 Location: Perth, W.Australia
|
Nice ' Empirish ' colour scheme for your terrific falcon mate. 
|
|
|
 Rank: Pro  Groups: Registered
Joined: 30/04/2015 Posts: 263 Points: 795 Location: Los Angeles
|
Well, one more little thing knocked off my list of additions to the kit. I got my first (oops 2nd, first was the nav chair) 3D printed piece. The cockpit door. I've been trying to stay away from 3D printed stuff and make my own where I can, but I didn't just want the door sticker. So I painted the door, added a couple red fibers to it and there ya go. It's interesting, to the eye, the door just looks like gray metal, but the camera picks up flecks in the paint. On to the next additions. I don't want to post anything on it until I've completed it. But I think it's gonna be really nice.   
|
|
|
|
|
Love the personal touches you're adding to your build, very nice work.....   Regards Alan
|
|
|
Rank: Administration         Groups: Registered, Administrators, Global Forum Support, Moderator, Forum Support Team, Official Builds Joined: 04/01/2016 Posts: 7,062 Points: 21,493 Location: Northamptonshire, England
|
Very nice Chris, coming together very nicely.  Regards
Markwarren
(Mark) Admin
|
|
|
 Rank: Super-Elite       Groups: Registered
Joined: 27/01/2014 Posts: 5,060 Points: 14,980
|
I'm really loving what you've with the table Chris 
|
|
|
 Rank: Pro  Groups: Registered
Joined: 30/04/2015 Posts: 263 Points: 795 Location: Los Angeles
|
Been a while since I've done any updates. Still chugging along. A little upset, cause I've been waiting on pack 25 for 3 months now. They're still on backorder. Anyway, just designed and figured out how I'm going to mount my Falcon. So I started out with a piece of 1/4" thick by 1" wide aluminum. Using a miter saw, I then cut it down to size to fit over the center ring of the bottom hull frame and filed down the rough edges.    I then placed the cut piece over the circular frame and marked where I was going to drill and screw it down.    I then used the drill through the holes of my plate to drill into the Falcon frame and then used a 4-40 tap so that my plate could be screwed down to the frame.    And a test fitting.  Next up, I got a rod of 1" diameter ABS (same diameter as the center gunner port window frame). I cut off a piece approximately 3/8" thick. Kinda like a little hockey puck.    Then drilled out the center of the disc and tapped it for a 1/4" standard camera mount screw.    And the disc fits nice and snug under the aluminum plate I attached to the frame.   So now I drill through the plate and into the disc so that I can screw them together for a solid attachment.    Then reattach the plate to the frame...  Then screwed the camera mount that I got into the disc through the gunner window. The plastic ring of the camera mount securely pinches the window frame between itself and the disc so I now have good support of the part itself, as well as plenty of strength to support the model because of the aluminum plate being attached to the frame of the Falcon. I actually did a bit of testing while holding the model by the camera mount and tipping back and forth, slightly shaking, etc., and it is very secure and strong.  I was trying to design a way to mount the Falcon with the most unobtrusive mounting I could, leaving as much of the model exposed for viewing, without doing any cutting or drilling into any of the parts. And the mount has a tilt pan head, so I can have the Falcon slightly tipped and angled upward for a flying motion.
|
|
|
 Rank: Super-Elite       Groups: Registered
Joined: 27/01/2014 Posts: 5,060 Points: 14,980
|
Very nice work with the stand Colston   I must admit when I first start reading I did wonder if the Aluminium plate and camera mount would be strong enough as this is very heavy when finished. Sounds like you've got it all under control though after all those tests you did. Will look great when the top is on 
|
|
|
 Rank: Semi-Pro Level 1  Groups: Registered
Joined: 25/05/2015 Posts: 66 Points: 204 Location: Minneapolis
|
Great solution! Very elegant. It's the one part of this kit that seems poorly designed - displaying the Falcon in flight. The supplied TV stand looks terribly clunky. You've found a great way around the problem - looking forward to seeing how it looks when complete.
|
|
|
 Rank: Pro  Groups: Registered
Joined: 30/04/2015 Posts: 263 Points: 795 Location: Los Angeles
|
davetwin wrote:Very nice work with the stand Colston   I must admit when I first start reading I did wonder if the Aluminium plate and camera mount would be strong enough as this is very heavy when finished. Sounds like you've got it all under control though after all those tests you did. Will look great when the top is on  That was one thing I was a little concerned about as well, was supporting the weight. I did lay the top on to test for weight also. I think being braced to the frame of the model itself makes it very strong. And because the part it's attached to is circular and thicker, there's no flexing or anything. I've seen others where a mount is just secured to the bottom of the gunner port itself, and the weight is all supported by the part alone. That I wasn't too sure of, and I wanted to be totally sure.
|
|
|
 Rank: Vice-Master   Groups: Registered
Joined: 05/03/2015 Posts: 561 Points: 1,713 Location: South Carolina
|
Very nicely done! Looks like a cool solution to the stand problem!
|
|
|
Rank: Administration         Groups: Registered, Administrators, Global Forum Support, Moderator, Forum Support Team, Official Builds Joined: 04/01/2016 Posts: 7,062 Points: 21,493 Location: Northamptonshire, England
|
Very nicely done.  Regards
Markwarren
(Mark) Admin
|
|
|
 Rank: Super-Elite      Groups: Registered
Joined: 17/12/2013 Posts: 3,982 Points: 11,974 Location: NY, USA
|
Looks great Colson.I know many studio scale modelers use the camera mounts for their models.I have one for my Y wing.
FYI month 25 should be shipping shortly.
Carl
|
|
|
|
Guest (5)
|