|
|
 Rank: Semi-Pro Level 1  Groups: Registered
Joined: 02/05/2010 Posts: 67 Points: 201 Location: Staffordshire
|
Hi all.
I didnt know that this section was still here. Here are a few pictures of my build so far.
I have only just started the build. I wanted to wait until I have a good stock of issues before
I began.
I think I am probably the only one out there who is only just beginning. But I thought I would
share a few pics anyway. Cos I am quite proud of how well I did with the launch. With having
only a little experience of boat building.
If I had realised the diary was still here I would have taken more photos.
I have always wanted to build a masted ship. Ever since I was a kid and my parents took me to
see the Victory at Portsmouth. I remember being so impressed by the models there. The cost of
buying a Victory kit has always put me off. Because obviously I only wanted to build one once,
so didnt want to go for a cheap one.
So when this kit came along, it was a perfect opportunity to start. Kind of like buying a kit
with phenomenal instructions on HP.
Anyway. I am waffling.
Here is a picture of the 68 pounder.

It is a bit tatty looking in the photo. But it actually
looks quite nice actual size. I am pleased with it.
And as for the launch. I found this a little daunting. Just a bag of strips of wood and brass
and a frame. But it was quite enjoyable to do. God knows how many hours I have spent on it
though.


The amount of detail in the launch is impressive. It looks
as though the Victory iteslf is going to be very impressive
if the launch is anything to go by.

Here is the finished launch. Very proud of it. The only problem I had was trying to get the
black stripe neat. The masking tape I have doesnt quite cut it. I ended up finishing the edges
with a very fine permanent marker. I will get some more tape and edge it propper at some point.
Finally for now, here is a pic of the beast itself. Cant believe
how big it actually is. Dont know what I am going to do with it
when finished. Will have to build an extension!!!

Thanks for looking.
|
|
|
 Rank: Pro  Groups: Registered
Joined: 07/10/2010 Posts: 148 Points: 430 Location: At the back of my sinking boat
|
Looking good! Present Build: H.M.S. Victory
H.M. Bark EndeavourPhotobox build albumIt cant be that bad, what do you mean it's sinking
|
|
|
 Rank: Pro Groups: Joined: 24/08/2009 Posts: 48,827 Points: -13,348
|
Great start Jimbobuk05 and thanks for sharing your build with us 
|
|
|
 Rank: Pro  Groups: Registered
Joined: 20/03/2010 Posts: 278 Points: 833 Location: Nottingham
|
Well done matey looks like you are off to a great start!  Pam's shipyard is closed for now no more room!
|
|
|
 Rank: Semi-Pro Level 1  Groups: Registered
Joined: 02/05/2010 Posts: 67 Points: 201 Location: Staffordshire
|
|
|
|
 Rank: Pro   Groups: Registered
Joined: 25/03/2010 Posts: 472 Points: 1,357 Location: Hyde
|
Great build Jim. I'm sure you enjoy build as I do :) Happy building and keep posting.
|
|
|
 Rank: Pro Groups: Joined: 24/08/2009 Posts: 48,827 Points: -13,348
|
Hi Jim!  Nice work mate!  I like the pen holder!  It feels like years since I was at that stage, but that's down to me double planking the whole hull. As you are about to start fairing your hull before planking, remember take your time it will make all the difference to the finished hull. Check the curve of the hull with a spare plank and shape each rib so you get a maximum contact with the plank over the ribs. If you get stuck just ask we are here to help!
|
|
|
 Rank: Semi-Pro Level 1  Groups: Registered
Joined: 02/05/2010 Posts: 67 Points: 201 Location: Staffordshire
|
Hi Darron, Thanks for the advice. Yeah, I will take my time. I am anticipating lots and lots of time spend sanding carving, and cursing. Getting covered in dust. And when that is done, I have the planking to look forward to.    Thanks Jim
|
|
|
 Rank: Pro Groups: Joined: 24/08/2009 Posts: 48,827 Points: -13,348
|
|
|
|
 Rank: Pro  Groups: Registered
Joined: 07/01/2011 Posts: 399 Points: 1,212 Location: Penhill Estate, Western Cape, ZA
|
Looking good Jim, we're at the same level of progress. Just waiting on the next set of parts to continue (Hopefully they will include part 31)!
|
|
|
 Rank: Amateur level 2 Groups: Registered
Joined: 10/09/2010 Posts: 43 Points: 129 Location: Kempton P ark South Africa
|
Hi Jim
Looking good so far. I am doing the same as you building up a nice stock of issues before starting. In South Africa we are far behind the UK.
What part of Staffordshire are you from? I was born and bred in Stoke-on-Trent.
Regards
Ray
|
|
|
 Rank: Semi-Pro Level 1  Groups: Registered
Joined: 02/05/2010 Posts: 67 Points: 201 Location: Staffordshire
|
Hi Ray, I wanted to have a stock so I wasnt waiting for the postman every fre weeks. Been stocking them for almost a year now, so about time I started. I am a few miles north of Stoke. In Leek. Been here 5 years now. Lovely place.  Thanks Jim
|
|
|
 Rank: Semi-Pro Level 1  Groups: Registered
Joined: 02/05/2010 Posts: 67 Points: 201 Location: Staffordshire
|
hi all,
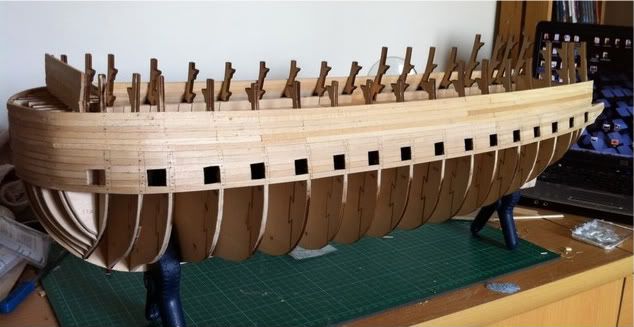
Here is my latest post.
First off here are a couple of pics of my first
six rows of planking.
I spent hours and hours sanding. But then again,
everyone else here has done the same, so I am
preaching to the converted.


What I did after planking this was to paint over the
planks with a watered down glue, to make sure that
it soaked into any small gaps, so the planks were
solid once dried.
Also, while still wet, I left the hull standing upside
down with a heavy weight on it. This combated a
problem I had been having with a slight twist to the
hull. All sorted and solid now.
And finally, I have now cut out my first row of gun ports
on both sides. Took longer and was more fiddly than I
thought it was going to be.


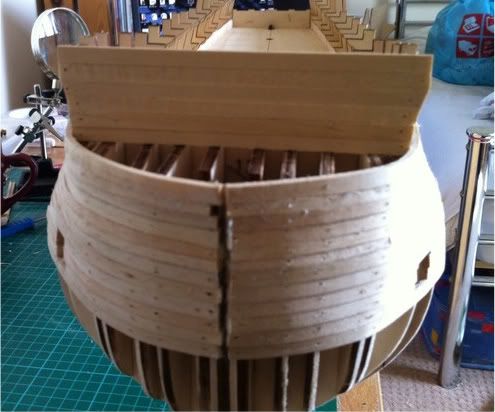
This last picture shows my sanding at the stern. I am quite
pleased with it. I inserted some balsa there, to make planking
easier. And I am really happy with the shaping of parts 34.
Oh and I actually found the plank benders included in the kit
to be useful. The first tool in there which really works!!!!!
Thanks
Jim
|
|
|
 Rank: Pro  Groups: Registered
Joined: 07/01/2011 Posts: 399 Points: 1,212 Location: Penhill Estate, Western Cape, ZA
|
|
|
|
 Rank: Pro Groups: Joined: 24/08/2009 Posts: 48,827 Points: -13,348
|
Jim,
Are the two halves of the final frame actually flush with the keel that runs between, if not then they need to be.
|
|
|
 Rank: Semi-Pro Level 1  Groups: Registered
Joined: 02/05/2010 Posts: 67 Points: 201 Location: Staffordshire
|
Hi Mr T, They arent Quite flush. Couldnt judge how they needed to be from the pics in Magazine. More sanding methinks.  thanks Jim NB: thanks Stefan
|
|
|
 Rank: Pro Groups: Joined: 24/08/2009 Posts: 48,827 Points: -13,348
|
They need to be flush otherwise you'll end up with a hump
|
|
|
 Rank: Semi-Pro Level 1  Groups: Registered
Joined: 02/05/2010 Posts: 67 Points: 201 Location: Staffordshire
|
Hi all.
Here is my latest post.
I have got the next six rows of planking on.
And trimmed everything that needs to be trimmed.
I am enjoying the planking at the moment. But not
looking forward to doing the next row of cannon ports.
Looks like they will be easy to get wrong.


Thanks for looking guys.
Jim
|
|
|
 Rank: Semi-Pro Level 1  Groups: Registered
Joined: 02/05/2010 Posts: 67 Points: 201 Location: Staffordshire
|
Hi all,
I have now finished the next row of
gun ports. All went smoothly enough.
The two at the front were a bit of a
pig. And think the instructions are
becoming less and less clear as they
progress. Good job there are build
diaries on here to look at otherwise
I would've been lost.


Thanks for looking.
Jim
|
|
|
 Rank: Pro  Groups: Registered
Joined: 31/03/2010 Posts: 194 Points: 446 Location: Gloucestershire
|
Hi Jim, If i was you i would start taking tablets now because you will need them later in the planking process ha.      . Best of luck with your build. Glen Roger the Cabin Boy
|
|
|
|
Guest
|