|
|
 Rank: Amateur Level 1  Groups: Registered
Joined: 04/09/2010 Posts: 38 Points: 94 Location: cape town, south africa
|
Hi all, my 1st post - a question. I've just finished the first 6 rows of planking..starting at the correct position. The planks are all of equal width BUT according to all the illustrations, they should now be level with the TOP of the Galley Supports. BUT... they are about TWO planks lower?? When i put the supports in I made sure they were completely pushed down. Do I just extend the next TWO layers or what??? Help!?  benni attached the following image(s): Built: HMS Victory
|
|
|
 Rank: Pro Groups: Joined: 24/08/2009 Posts: 48,827 Points: -13,348
|
Hi benni!  The bad news is part 31 has court the top of the keel instead of going down it's slot so you will need to remove the planks then remove rib 31 and refit it at the correct place. If you have used PVA glue you can soak the stern in water to soften the glue, the points of rib 30 & 31 are almost line when 31 is in the correct place if you have issue 18 go to page 12 step 10 shows how the stern ribs look or go to Tomick Official Build link is below:- http://forum.model-space...s&m=11580#post11580
|
|
|
 Rank: Vice-Master   Groups: Registered
Joined: 25/04/2010 Posts: 748 Points: 2,285 Location: bognor regis
|
i agree with son of bulwark also 34 needs to be sanded flush with the keel see the same link as darron put on his post and scroll down..you seem to have a bulge which needs to be flattened cheers benny
|
|
|
Rank: Pro Groups: Joined: 24/08/2009 Posts: 48,827 Points: -13,348
|
Just to ditto both of the above 
|
|
|
Rank: Pro  Groups: Registered
Joined: 20/03/2010 Posts: 219 Points: 585 Location: Faversham
|
The same thing happened to me, luckily I noticed it while fairing the stern. Jay _____________________________________
Currently building:-
Deagostini HMS Victory
Amati Black Pearl
Mamoli HMS Victory 1:90 Scale
Caldercraft HMS Victory 1:72
|
|
|
Rank: Amateur Level 1 Groups: Registered
Joined: 04/09/2010 Posts: 38 Points: 94 Location: cape town, south africa
|
 Thanks to all who have come to my rescue,especially Son of Bulwark, with his simple explanation. I hope i can soak this off without doing too much damage elsewhere. I think i know how this happened... somehow here in south Africa, the issue that should have carried part 31 ( the galley frame to which all the supports attach) was not included and a duplicate of part 30 was inside in its stead. I see from previous threads, others in South Africa also had this problem. In my haste to continue the build, instead of waiting for DeAgostini's local agents to sort it out, which they eventually did, i decided to carry on with the fairing and planking, thinking icould add this later.. with these dreadfull consequences, which i now hope i can rectify later in the week if i can make some time. Thanks all again. I will let you know how it goes. benni. Built: HMS Victory
|
|
|
Rank: Amateur level 2  Groups: Registered
Joined: 20/06/2010 Posts: 47 Points: 144 Location: Northfleet
|
Hi Benni Welcome to the nut house... I also had the same problem with frame 30. It occured when I turned her over!! to apply the watered down glue to the joints. Without realising; frame 30 had dropped about 3-4mm, and it was not noticed until I started to line up the frames to check for 'doddgy alignment'. The solution was frustrating, but not daunting. I did not need to dunk her ladyship arse end into a bucket of water; just applied loads of water with a brush, working it into the relevant joints. Scrape the 'softening' glue away from the joints with a point/bradawl, and add more water. After applying a bit of pressure to each joint; and working one side at a time; frame 30 came free after about 10 minutes of paitent work. At this stage, I had not fitted frame 31, which is probably why frame 30 slipped. You will have to remove frames 34 (both halves), and frame 31 to gain full access to 30. Frustraing I know, but easily resolved with a bit of paitence. As a footnote - I managed to break off the tip of the false keel during the 'repair'. But again, this was no big shakes. Good luck, and keep us all posted. See Ya.  One eye.
|
|
|
Rank: Amateur Level 1 Groups: Registered
Joined: 04/09/2010 Posts: 38 Points: 94 Location: cape town, south africa
|
Hi Capt. One Eye... thanks for replying. I do have it sorted now. Last night i ran a basin of water, as suggested by Bulwark, and did turn her Ladyship upside down, without sinking her or any lives being lost. I put her in up to frame 30/31 and left her overnight. In the morning these slid out easily. I then put all out in the sun (which we have plenty of down here generally) to dry out. This evening i tried to re-fit frame 31, but she still would not slide down!!! I looked carefully and then noticed that the gap on the cut-out for her to slide into was "too narrow". Out with ye old knife and i pared the wood off this and presto! She slid into place. I have now begun re-fairing the back of the hull to accomodate this new position. Just ONE other question:I notice that the keel is flush at the top, but about 5mm 'in' at the bottom. Does this matter??? Does it need to be flush all the way down?? Thanks again. benni attached the following image(s): Built: HMS Victory
|
|
|
Rank: Pro  Groups: Registered
Joined: 21/03/2010 Posts: 270 Points: 837 Location: Nr. Dartford,
|
Hi Shipmates I had the same problem and solved it with a razor saw and some balsa. Just cut the supports off and glued 'em back at the right level. I thought I posted it somewhere but can't find it now. It all looks good now and no further probs. Ca la vie  Laury
|
|
|
Rank: Pro Groups: Joined: 24/08/2009 Posts: 48,827 Points: -13,348
|
Hi benni! The transom needs to be flush with the false keel, yours is flush at the top so you need to sand the rest so it is flush all the way down the keel. There should be no gap, the ribs shouldn't go past the keel so match the angle of the keel, you will find that you have removed most of the thickness of transom ribs at the bottom.
|
|
|
Rank: Vice-Master Groups: Registered
Joined: 25/04/2010 Posts: 748 Points: 2,285 Location: bognor regis
|
hi..like this 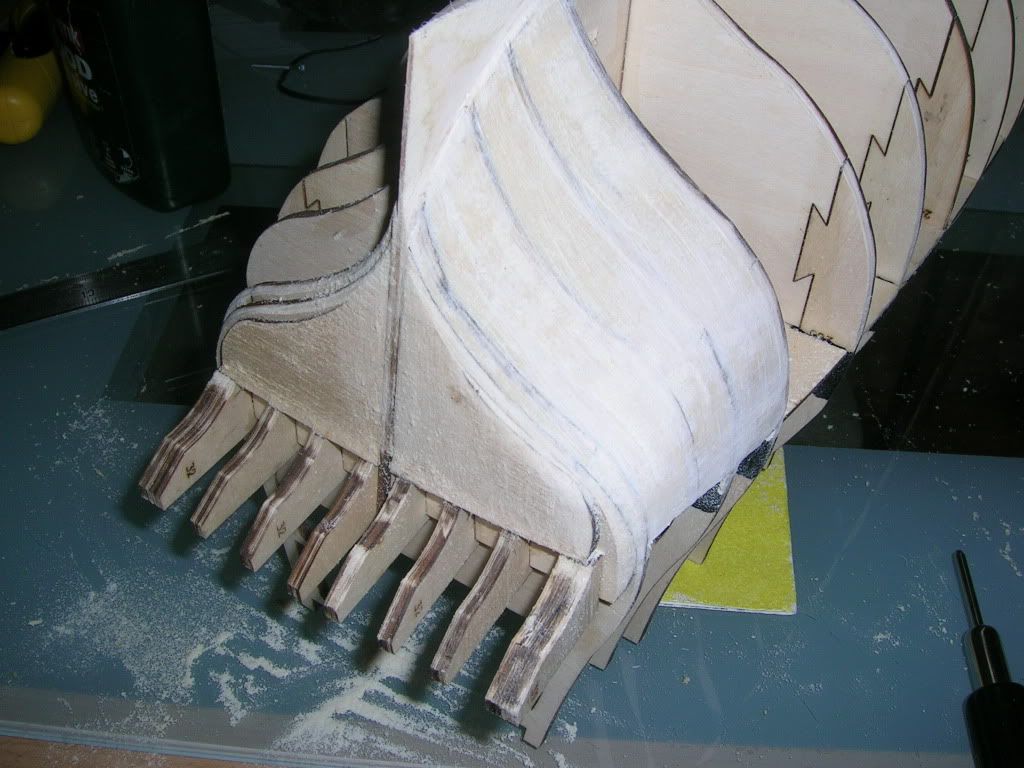 cheers benny
|
|
|
Rank: Amateur Level 1 Groups: Registered
Joined: 04/09/2010 Posts: 38 Points: 94 Location: cape town, south africa
|
Looks like there's still some work ahead...some heavy sanding. Actually to speed it up i am using a file. I WILL get it flush!!! And a HUGE thanks to you all for the posts which have been very encouraging. I now know, that before i head like a bull into a china-shop next time... and i have any doubts.. i,ll post. benni. Built: HMS Victory
|
|
|
Rank: Vice-Master Groups: Registered
Joined: 25/04/2010 Posts: 748 Points: 2,285 Location: bognor regis
|
hi it will be quicker with a rasp cheers benny
|
|
|
Rank: Pro Groups: Registered
Joined: 07/01/2011 Posts: 399 Points: 1,212 Location: Penhill Estate, Western Cape, ZA
|
even quicker with an electric sander ;)
|
|
|
Rank: Amateur Level 1 Groups: Registered
Joined: 04/09/2010 Posts: 38 Points: 94 Location: cape town, south africa
|
Thanks 'mateys'. I don't kno where my rasp is, but i CAN dig my drill out and attach a sanding disc! Good thing i haven't had time to touch it tonite! benni Built: HMS Victory
|
|
|
Rank: Pro  Groups: Registered
Joined: 24/01/2011 Posts: 206 Points: 614 Location: halifax
|
benni wrote:Thanks 'mateys'. I don't kno where my rasp is, but i CAN dig my drill out and attach a sanding disc! Good thing i haven't had time to touch it tonite! benni i use my dremmel multitool with a sanding disc on it saves time just have to very very carefull not to go too far i alose use same tool for putting the chamfer on the planks
|
|
|
Rank: Pro Groups: Registered
Joined: 21/03/2010 Posts: 270 Points: 837 Location: Nr. Dartford,
|
Sounds a bit drastic to me Cal. I find the old David's plane best for the planks and a file for the bulkheads as it covers several at once. This way its not so quick to make a mistake,and I don't have so long to wait for the next bundle of parts. Of course there's always the grinding wheel at the end of the bench if you are in a serious hurry.  Laury
|
|
|
|
Guest
|
 US
US

