|
|
 Rank: Beginner Level 3 Groups: Registered
Joined: 08/09/2015 Posts: 27 Points: 74 Location: Mudgee, NSW, Australia
|
Hi,
Of the areas in the boot that the primer colour can be seen, would these have body colour on them?
I see that P-Lother's used look build has had thee primer covered with body colour but no one elses build has done this.
So, how did they leave the factory?
regards
Peter
|
|
|
 Rank: Amateur level 2  Groups: Registered
Joined: 28/01/2016 Posts: 46 Points: 131 Location: Pennsylvania, U.S.
|
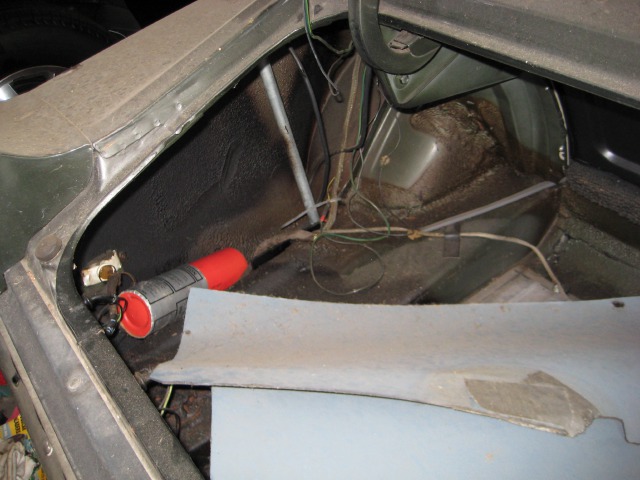
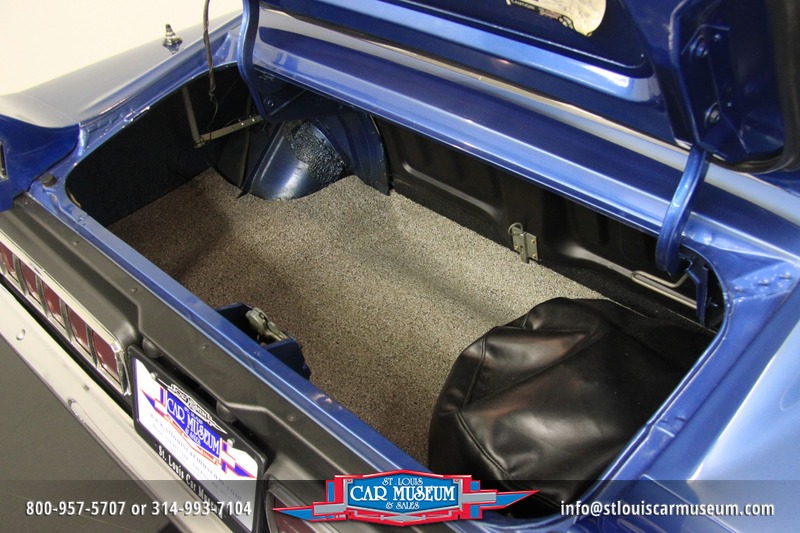
Peter, of those areas in the kit chassis that are painted the red oxide primer, the fenderwells should be body color definitely on the inside as well as the outside somewhat as you're looking at the car with its rear wheels off. As the car was coming down the assembly line, the workers that were painting the bodies would have gotten quite a bit of paint in these areas as hinge supports and whatnot would have also been painted.
While these pics I have are '69 models, the painting process would have been about the same. The first pic is a car that was a 'barn find' so it's pretty much as it was when it was built. The second pic looks to be a restored car, but as far as I can see is pretty faithful to the original appearance.
Hope this helps!
 
|
|
|
 Rank: Beginner Level 3 Groups: Registered
Joined: 08/09/2015 Posts: 27 Points: 74 Location: Mudgee, NSW, Australia
|
Thanks MrObsessive. I have ordered a can of Nightmist to be made up by one of the local car places in town (A$34 for a 500ml spray can). Interestingly I drive a Land Rover in Loire Blue and it is almost the same Blue as Night Mist!! The paintref.com website samples look the same but the ones I have found as touchup paints are a bit different:  Loire Blue on the left
|
|
|
 Rank: Amateur level 2  Groups: Registered
Joined: 28/01/2016 Posts: 46 Points: 131 Location: Pennsylvania, U.S.
|
The car companies back in those days (even today) did a lot of mixing and matching as far as car colors. Especially among divisions, they just called it something else even though it was pretty much the same color.
Like you, I have someone local that can mix that color up for me. It might be a bit much, but I can always use what's leftover for a 1/25 scale AMT '67 Shelby kit I have but never touched.
Glad I could be of help!
|
|
|
 Rank: Beginner Level 3 Groups: Registered
Joined: 08/09/2015 Posts: 27 Points: 74 Location: Mudgee, NSW, Australia
|
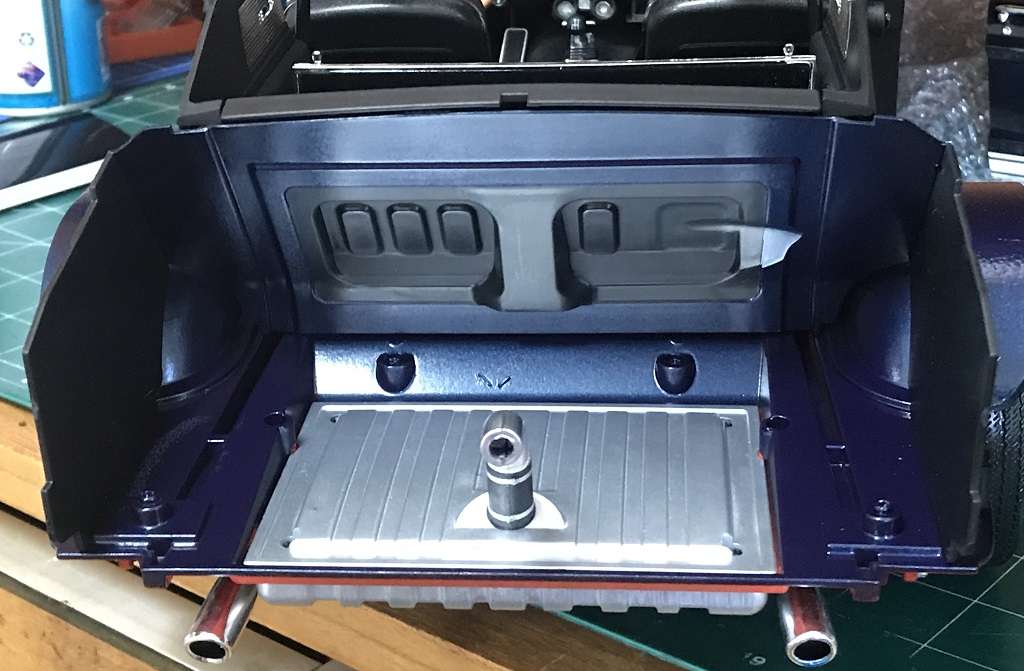
Here is my recolouring of the boot (trunk) to look like it should (I hope).
Can you tell me if the Trunk side panels were a optional extra as not too many pictures on the web seem to have them in place? Maybe restored cars don't have them, or they were removed as they ate up some space....?
|
|
|
 Rank: Amateur level 2  Groups: Registered
Joined: 28/01/2016 Posts: 46 Points: 131 Location: Pennsylvania, U.S.
|
That's a good question and one I don't really have an answer to, except that back in those days a lot of things were dealer installed and Ford sent them the info/parts for them to do such.
That is looking VERY nice and a lot more realistic than just having the primer color for the rear wheel wells.
I'm about to go to the auto paint place myself and see about getting some Nightmist Blue paint mixed up. I also need some self etching black primer as the grilles even though they're done in PE should be black. DeAgostini does not call that out in the instructions, but every 1965-70 Shelby I've ever seen (I've got TONS of photos of all years) shows the grille being blacked out.
Keep up the great work!
|
|
|
 Rank: Beginner Level 3 Groups: Registered
Joined: 08/09/2015 Posts: 27 Points: 74 Location: Mudgee, NSW, Australia
|
Yes, I also painted the grill with a exterior spray on Black primer. BUT it rubs off easily when handled and so I had to overcoat it with a flat clear coat which seems to have worked. Perhaps you should give the grills a gentle sand first to remove the Chrome to allow the Black to adhere better?
|
|
|
 Rank: Amateur level 2  Groups: Registered
Joined: 28/01/2016 Posts: 46 Points: 131 Location: Pennsylvania, U.S.
|
I did get the "self etching primer" in black. The thing to do is yes, sand down the surface with perhaps 600 grit sandpaper and then paint. This will give the surface some "teeth" for the paint to bite into.
Probably overcoating it with a flat clear wouldn't hurt, but that stuff is pretty stout once it's applied to a well prepped metal surface.
I also got the paint I was looking for to paint the insides of the wheel wells the proper way. It'll look MUCH better as yours does instead of that red oxide primer staring at you each time you open the trunk! 
|
|
|
|
Guest
|