|
|
 Rank: Amateur level 2  Groups: Registered
Joined: 28/01/2016 Posts: 46 Points: 131 Location: Pennsylvania, U.S.
|
Hi All, I've haven't posted here in quite some time until today as I posted about the type of screws that are used in the DeAgostini 1/8 Shelby Mustang. My question was answered and they asked if I was going to post the build here.
I figured sure, why not as I do post rather prolifically on another board here, and why not share here what I'm doing there?
For those of you especially in the UK, this will be old hat to you. For the fellows in the States that may just now be catching onto this beast, they can follow along as I do this, and if there's any questions, please ask away. I may not have an answer, but I'm sure eventually those that have tackled this will.
So here we go.....
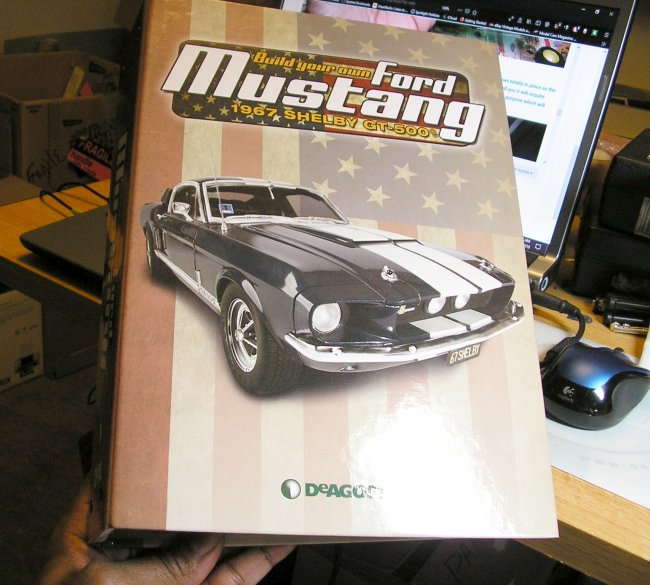
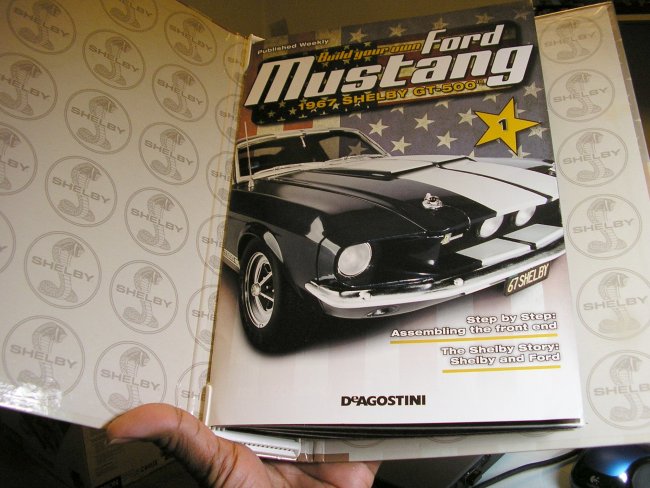
While this is a scale I have not built in a very long time (since the early '80's), I absolutely could not resist jumping on the subscription for this when it was announced a couple years ago. As if I didn't have enough to build, I decided to just keep collecting the parts for it and then when I have all the parts and the mood strikes, I'd go ahead and jump right in.
Well, the mood hit me as I got the last box of parts about a week ago and looking over some of the build threads I've seen on ModelSpace, I figured it wouldn't hurt to build this a wee bit at a time. I'm already to the limit as far as how much I can build and how often. As far as this, updates well be VERY far and VERY few in between. I expect this to probably take as long as it took to get the parts which was about two years.
So, here's what's up...................
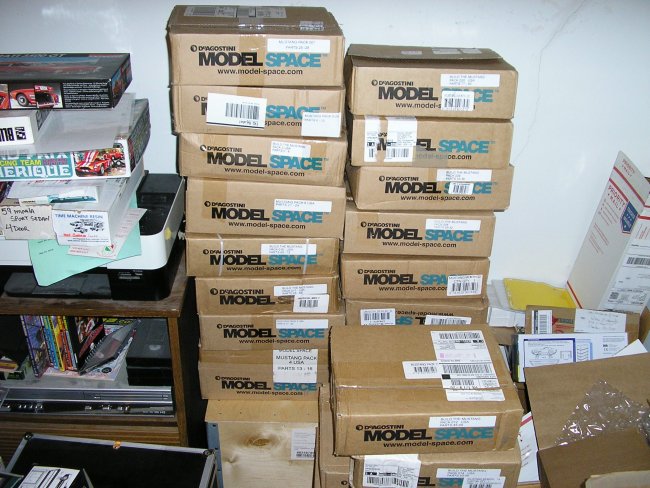
Not all are pictured, but here are most of the boxes I've gotten over the past two years with all the parts to build the car.
I received the last box just the other day which holds the parts to finish it up which will be a loooooong time from now.
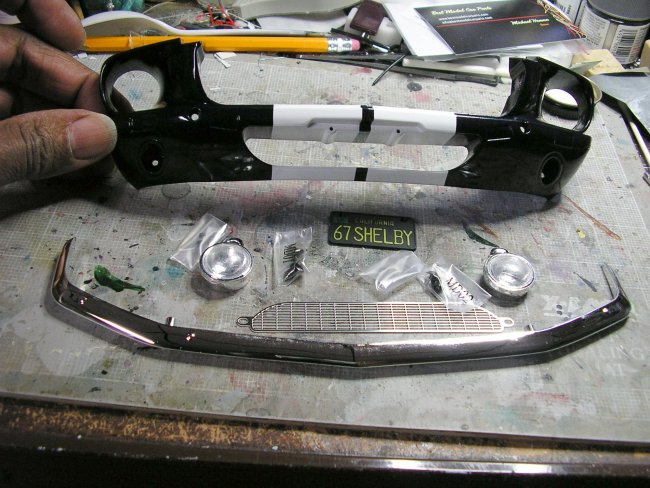
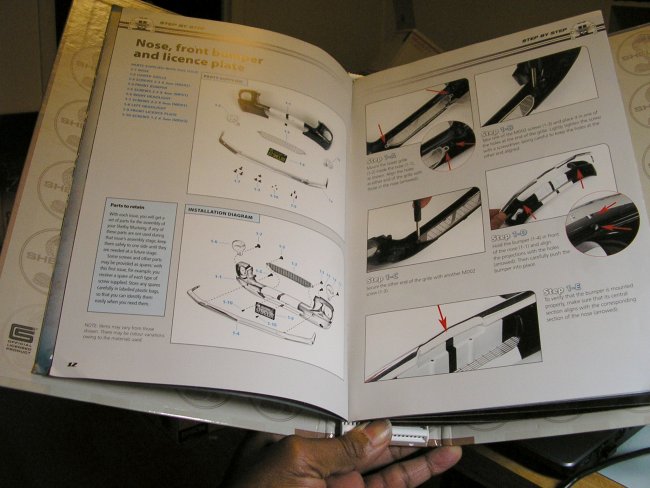
The first parts pack is quite simple in its build sequence. You're just simply putting in the lower grill (PE), headlights, front bumper, and license plate.
This is mostly a screw together job and they do provide you with a tiny Phillips Head screwdriver.
I'm not crazy about it as while it useful for getting the screws started, you don't have enough 'leverage' to get the screws totally in place as the holes in the front fascia are not tapped. You're essentially threading the holes while you're turning the screws and I'll tell you it will require some elbow grease to make sure they're mostly seated. I have a several sizes of screwdrivers in my arsenal for just this purpose which will make it easier to get this together.

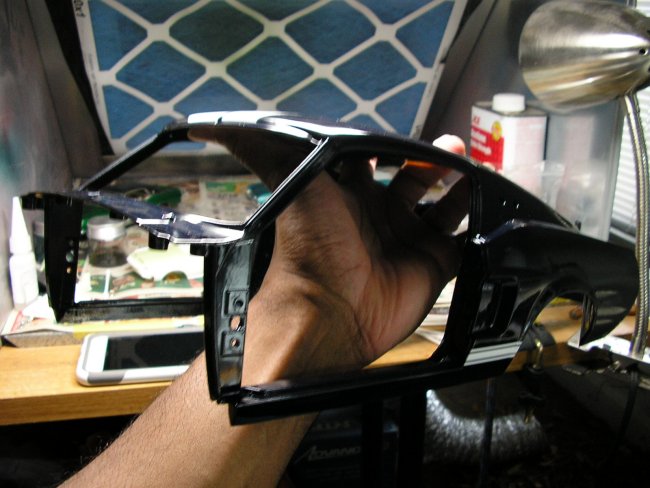
I posted this on another thread a while back, but one of the boxes I got about four months ago contained the body. As you can see this is a BIG BEAST!
I can imagine when this is all built that it certainly will be no lightweight as the chassis and wheels are also solid metal.
One thing I found out when building up the front end is that there was a heavy coat of clear applied to the body parts. While I can see why they did this, it's yielded a somewhat orange peeled finish.
My curiosity got the best of me, so in a hidden area on the lower front fascia, I got out the polishing cloths and wet sanded a tiny area. I see none of the color is rubbing off, so what I'll do is as I go along and before I assemble a particular body part, I'll wet sand those parts and give it a real nice shine.
Should go a long way to making this stand out, and not just another factory painted product.
So that's it for now! Looking at the instructions in the next parts pack, it looks like there's assembly of one of the brake rotors and steering knuckles and I'm going to use some artistic license on this as I can see some inaccuracies as far as the wheels are concerned, as one of them is to be mounted on the tires (or 'tyres')  . .
BTW, I'll try to build this exactly in the order that DeAgostini sent them to me. So at times while it may seem that there's no rhyme are or reason in how this is being built, for the benefit of those that may want to get into this, I'm going to demonstrate in what sequence this is being built.
Thanks in advance for tuning in and as I mentioned, updates will be quite sparse at times.
|
|
|
Rank: Amateur level 2 Groups: Registered
Joined: 28/01/2016 Posts: 46 Points: 131 Location: Pennsylvania, U.S.
|
But wait there's more!
I want to mention one cool item that ModelSpace gives you is a couple neat binders to place all of your magazines you get with each issue.
Roughly four magazines come in each box and with as many boxes as I got, those binders will certainly fill up!

|
|
|
|
|
Great to see you've decided to create a diary for all of us to follow. Looks like you're off to a great start and I look forward to following your progress and seeing her develop.... Good luck with the build....  .. I've also sent you a PM... Regards Alan
|
|
|
|
|
Hi If your looking for Mini Tap n Die sets these may be of use to you, there off the UK fleabay web page but will give you an idea of what to look for- https://www.ebay.co.uk/s...d+die+sets&_sacat=0
Andy Current builds:-C57,Zero, Lamborghini Countach, Caldercraft HMS Agamemnon,Robi,R2-D2, MFH Cobra .
|
|
|
 Rank: Superelite      Groups: Registered
Joined: 10/05/2010 Posts: 2,608 Points: 7,519 Location: Lincolnshire
|
Hi Bill, and welcome to the forum. Great build so far, keep it coming  Regards Grays
|
|
|
Rank: Amateur level 2 Groups: Registered
Joined: 28/01/2016 Posts: 46 Points: 131 Location: Pennsylvania, U.S.
|
Thanks for the warm welcome fellas!
@Gandale.........I went ahead and resized the pics. On the other message board their software automatically resizes it so that there'e no reshuffling one has to do. I made a separate album on Fotki for this board with the pics resized so there's no difficulty here. 
@arpurchase............Thanks so much for the link! I'll definitely be checking 'em out as I'm on eBay quite frequently!
|
|
|
|
|
MrObsessive wrote:Thanks for the warm welcome fellas!
@Gandale.........I went ahead and resized the pics. On the other message board their software automatically resizes it so that there'e no reshuffling one has to do. I made a separate album on Fotki for this board with the pics resized so there's no difficulty here.
@arpurchase............Thanks so much for the link! I'll definitely be checking 'em out as I'm on eBay quite frequently! Looks much better, thanks for correcting your pics... appreciated.... Regards Alan
|
|
|
Rank: Administration     Groups: Registered, Administrators, Global Forum Support, Moderator, Forum Support Team, Official Builds Joined: 04/01/2016 Posts: 7,220 Points: 21,967 Location: Northamptonshire, England
|
Great start, and looking good.  Mark Regards
Markwarren
(Mark) Admin
|
|
|
Rank: Super-Elite  Groups: Official Builds, Administrators, Moderator, Global Forum Support, Registered Joined: 04/06/2011 Posts: 5,610 Points: 16,982 Location: ipswich
|
If you fancy adding any twiddly bits to the engine etc, my build thread is here too. It might be of help - or not...lol.
It's a great kit - have fun building it.
Roy.
|
|
|
Rank: Amateur level 2 Groups: Registered
Joined: 28/01/2016 Posts: 46 Points: 131 Location: Pennsylvania, U.S.
|
Thanks Roy! I in fact saved ALL of the pages on your build thread. I also got from you via eBay the engine bay decals a while back.
VERY NICE! Your build has given me a lot of inspiration of what further I might do to the Shelby. I was a little disappointed that even though the model was advertised with "working windows" I assumed that indeed the windows did roll up and down like the 1:1.
Well no............the windows are fixed and that is one change that I'm seriously considering. Actual roll up windows with regulators and all.
I've done it before-----take a look at this vid below. It's a '57 'Vette I built back in the early '00's with working windows and all.
https://youtu.be/AJHD19xCiKQ
@Andy, I did get a mini tap set off the 'Bay early this morning. Hopefully I'll have 'em in a few days so that getting those screws in won't be so crazy making! Thanks again for the info leading me to them.
|
|
|
|
|
Glad to be of help I have had one of those sets for a while now and it has prooved invaluable for tapping screw holes Current builds:-C57,Zero, Lamborghini Countach, Caldercraft HMS Agamemnon,Robi,R2-D2, MFH Cobra .
|
|
|
Rank: Amateur level 2 Groups: Registered
Joined: 28/01/2016 Posts: 46 Points: 131 Location: Pennsylvania, U.S.
|
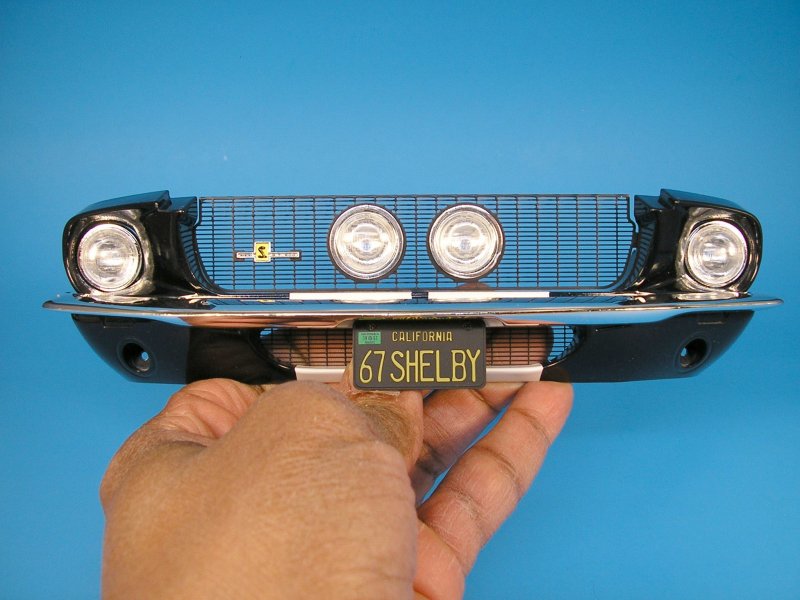
We left off the last time with the front end in pieces. Here it's mostly together with the exception of the turn signals. The middle fog lamps and the Shelby emblem were a press and fit type. I'm not so sure about the stability of this so I'm going to take a tiny bit of epoxy and put it behind the fog lights and emblem.
Interesting that DeAgostini does not say anything about painting the PE grille. Every 1965-70 Shelby I've ever seen has a blacked out grille but the instructions say nothing about it.
Not trusting regular primer to stay put without eventually chipping, I went to my local paint guy and I got a can of self etching black primer. I then scuffed up the upper and lower grille with 600 grit sandpaper and sprayed on the primer.
I let it sit overnight and the results came out pretty well as you can see. Now I can handle the front end when getting it on the main body down the road and not worry about trying to fix a paint chip which you know is bound to happen.
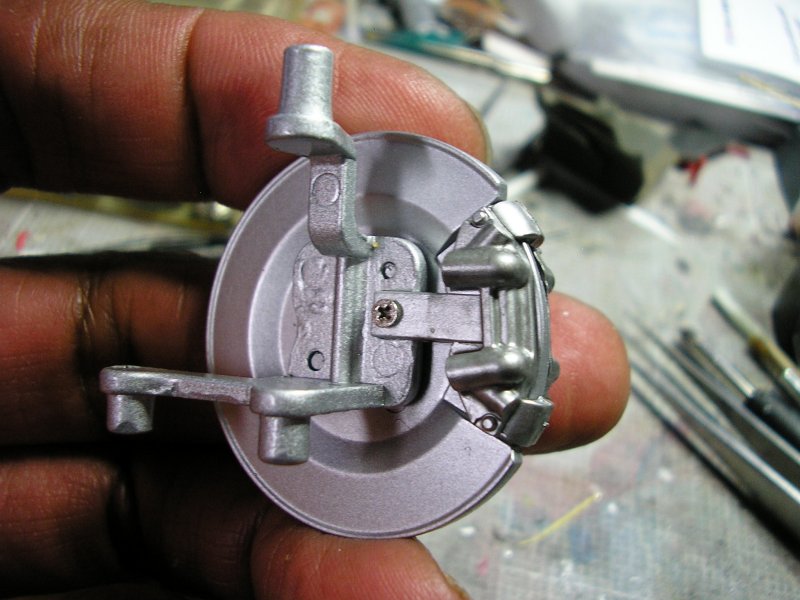
OK, moving on to the next step, they want you to assemble the one brake rotor and caliper assembly together and then put this in the Shelby Magstar wheel.
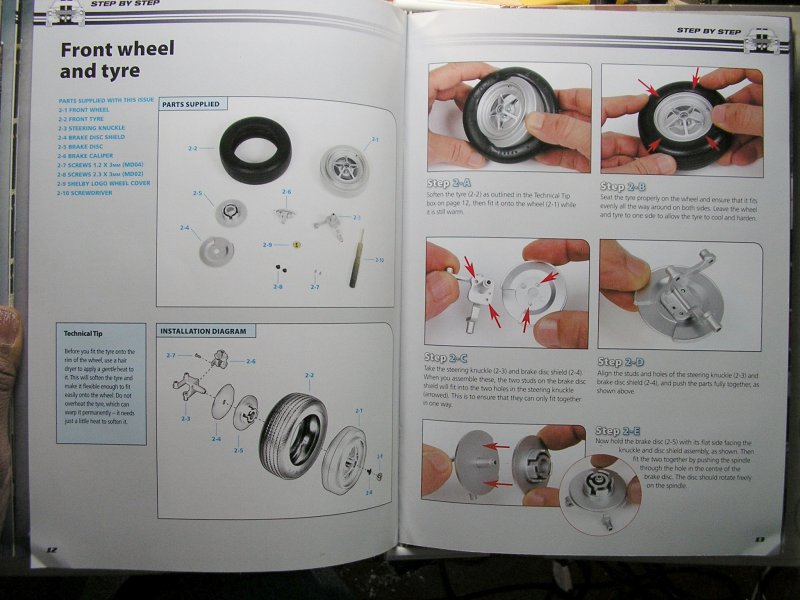
Here are the parts for that..........

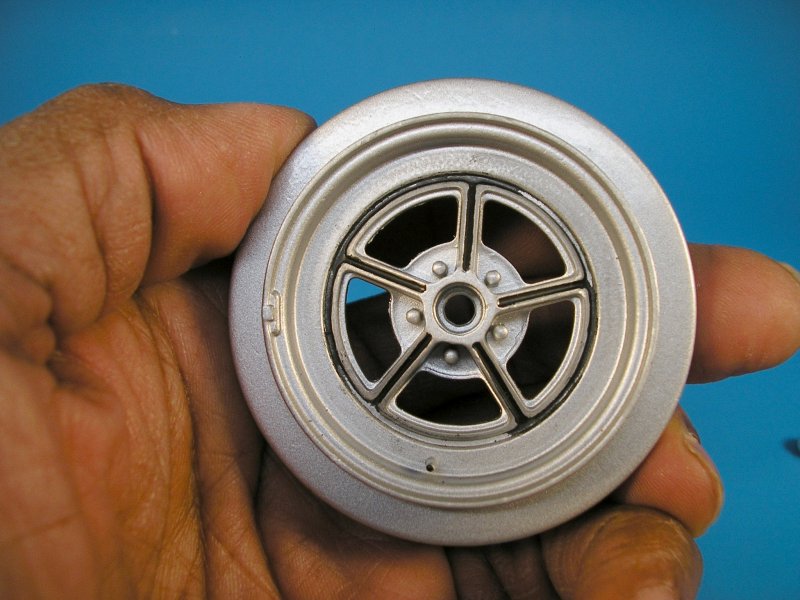
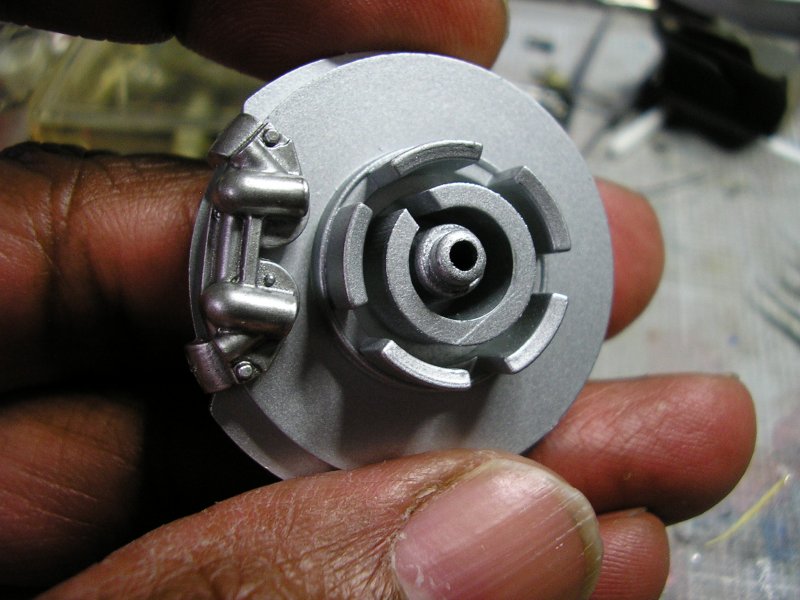
Here's the wheel and here's where I'm sorta stopped in my tracks. I don't like the finish of the wheels at all! Waaaay too dull! It looks like DeAgostini used some kind of aluminum paint over the wheels and then clearcoated over it.
That's all well and good, but it's also dulled the aluminum finish giving it to my sight a bland look. Shelby wheels according to memory and with definite period correct pics have very bright almost chrome like wheels.
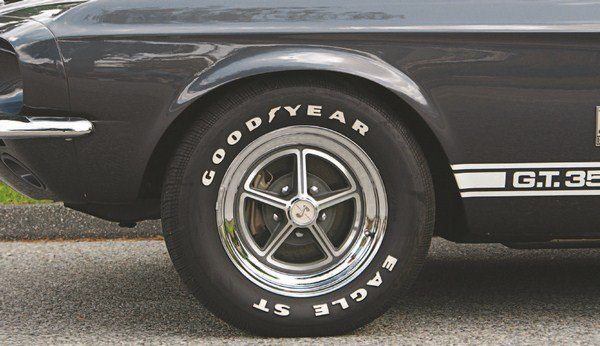
Here is the proper appearance for 1967 Shelby Magstar wheels.
Sooooo.............I'm VERY tempted to either rub out the wheels with the polishing cloths and airbrush Molotow chrome paint over them, or strip them down to bare metal and totally redo them.
Then there's the daunting task of painting that inner circle which was one of the reasons I bought a circle compass. I'm going to try and paint that as my attempt at painting it were a bit less than successful.
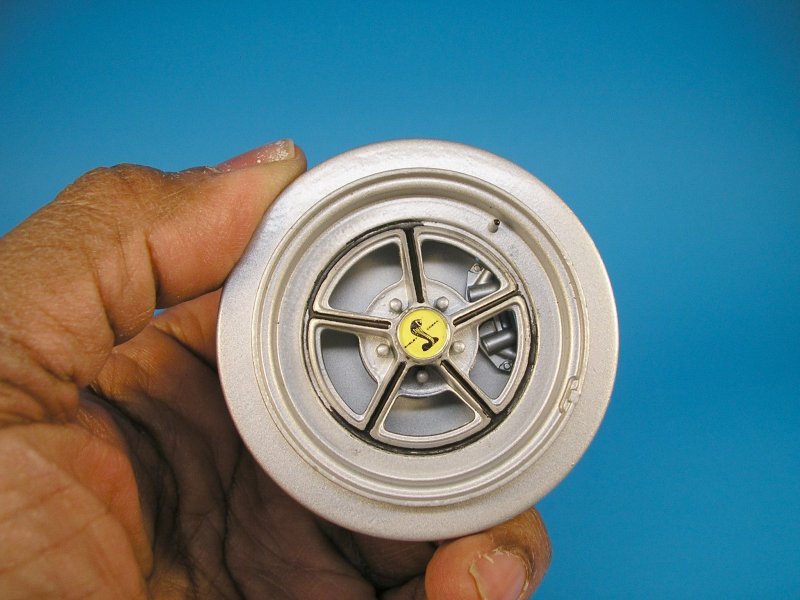
Here are the parts mocked up for the time being. I'm not crazy about the whole appearance of the brake rotors inside the wheels. Too 'plastic' looking with some better contrast between the caliper and the rotor.
Gotta get out the airbrush and paint those too.
And for the final test of my patience with this whole step...............getting the wheel to fit inside the tire. This tire is HARD AS A ROCK! They want you to heat up the tire with either a hair dryer (low heat) or put the tire in hot but not boiling water to soften it up.

I'm very tempted to simply put the tire in my dehydrator with the temp set to 110° and let the heat do its thing. I also have to be careful to NOT rub off the paint on the rim trying to get the wheel inside.
I sure hope I can get through this without much drama.
That's it for now folks...........as I mentioned this will be a VERY slow build as my primary focus is 1/24-25th scale. Also on the burner is a '68 Revell Corvette that I'm restoring, so that's got my attention mostly.
Thanks for looking!
|
|
|
Rank: Administration Groups: Registered, Administrators, Global Forum Support, Moderator, Forum Support Team, Official Builds Joined: 04/01/2016 Posts: 7,220 Points: 21,967 Location: Northamptonshire, England
|
Looking good, some nice touches. Mark Regards
Markwarren
(Mark) Admin
|
|
|
Rank: Superelite Groups: Registered
Joined: 10/05/2010 Posts: 2,608 Points: 7,519 Location: Lincolnshire
|
Great diary Bill -think this will turn out quite special
|
|
|
|
|
Coming on nicely and a very descriptive build diary !
Malc.
|
|
|
Rank: Amateur level 2 Groups: Registered
Joined: 28/01/2016 Posts: 46 Points: 131 Location: Pennsylvania, U.S.
|
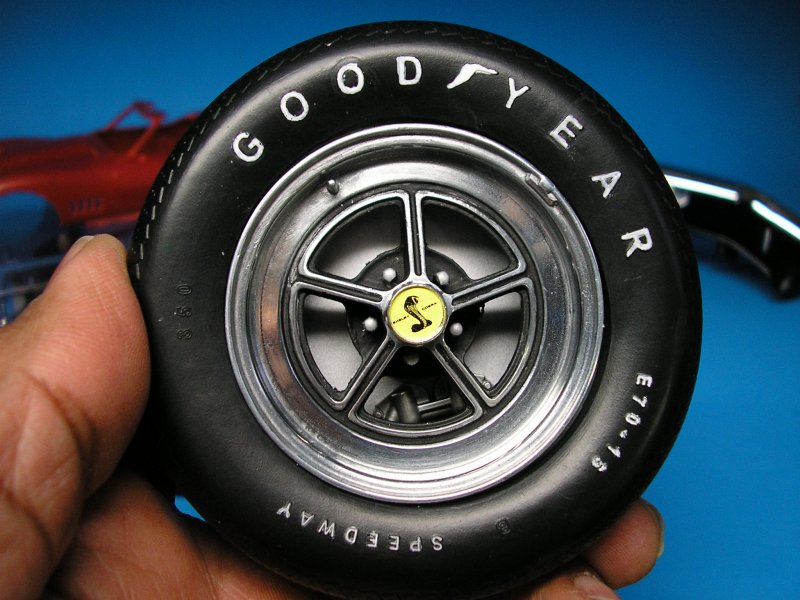
OK, after some brainstorming I decided to take a different tack with the wheels. I figured the paint I want to use to liven things up with may not survive all the wrestling and wrangling to get it in the tire.
I gotta tell ya............This was some TOUGH paint! I tried using Easy Off (Yellow Can) Oven Cleaner to take off the paint and it WOULD NOT TOUCH IT! Same thing with brake fluid......some success, but waaaay too slow.
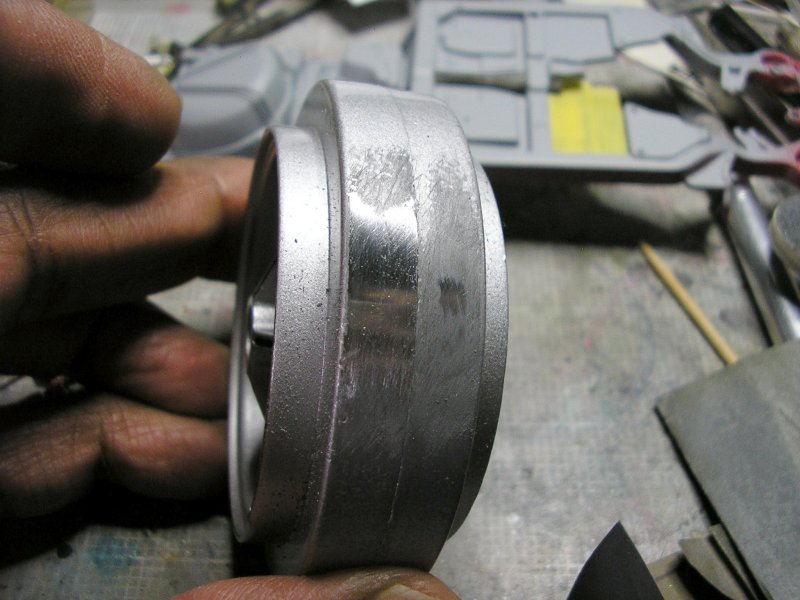
Soooo, I got the idea to start sanding away at the finish and see what exactly was underneath. I was seeing nice and bright, shiny metal! I then got out the Acetone and dunked the entire wheel in a metal can.
After much peeling away of the paint, I got out my polishing cloths starting with 1800 grit and worked all the way up to 12,000. Some constant washing of the cloths was needed as of course, this is some dirty stuff!

I did paint the brake caliper just a bit with some Alclad Magnesium to give just a bit of contrast with the rotor. As you can see here they give you this teeny-tiny screw to fasten the caliper to the rotor.
I did have to put the tire in my dehydrator set at 130°F for roughly 15 minutes at a time. After several tries I FINALLY got the wheel inside the tire, but this was NOT without some cursing along the way! 
Here's the wheel and tire all nice and lettered up........something I haven't done in a very long time. And to think I get to do this THREE MORE TIMES!
I can hardly wait. 
Later on down the line, I'm considering adding brake and fuel lines. I have a Mustang shop manual which shows things like this as to where the fitting would go on the calipers and I want to be able to do this without things looking 'out of scale'. I have to keep reminding myself this IS 1/8 scale.
For now, it's back to my 1/25 '68 Corvette I've been working on. Getting this tire together was a bit of a workout and I have to say it's not for the faint of heart.
Thanks for looking guys and thanks for the nice words! 
|
|
|
 Rank: Master  Groups: Registered
Joined: 25/11/2018 Posts: 1,284 Points: 3,878 Location: Southeast UK
|
|
|
|
|
Guest
|
 US
US

