|
|
Rank: Administration         Groups: Registered, Administrators, Global Forum Support, Moderator, Forum Support Team, Official Builds Joined: 04/01/2016 Posts: 7,178 Points: 21,841 Location: Northamptonshire, England
|
I hope everyone has had a good Christmas and got lots of goodies to build.
Well, to further my electronic skills, I have delved into learning how to code Arduino boards so I can start with some more elaborate projects in the future. I know we have some very talented members here that make it look oh so simple, but it does take some getting your head around to start with. I have had a couple of eureka moments when it suddenly clicks at what you are trying to do, so that gave me some encouragement as well. I have had a couple of eureka moments when it suddenly clicks at what you are trying to do, so that gave me some encouragement as well.
On top of all of that, I have also taken the plunge into the world of 3D printing. Again, this is something that I have no knowledge on as well. Welcome to the 21st century Mark.
My next project was to piece all these new skills into making a Star Wars Thermal Detonator, minus the blowing up bit.
The 3D model I have shown is a file I found readily available on the internet to have a go at printing. I have downloaded a 3D modelling program on my computer, so I can delve at making and designing my own models.
I will still be scratch building models as I really enjoy that side of modelling, however the 3D printer is to enable me to make parts that need a little precision and making such items would otherwise be difficult.
Anyway, to the project. I have finally after several days, loaded up a code to the Pro mini board to operate the sound and lighting. The board I chosen had to be small to fit into the model on its final assembly. I was going to use an Arduino nano, similar in size and easier to load the code, but found it would not handle the sound effects as it doesn’t have a DAC on board, Digital to Analog Convertor, whereas the pro mini does. If this sounds all to complicated, believe me, it was all gobbledegook to me too, but I learn fast.
The pictures show the board and the final test setup once the code was uploaded up to the Pro mini. I have also put a small video clip of it working.
Printer arrives tomorrow, so I’ll post more after I have it all up and running. Might be a few days though.
More soon
Mark
Thermal Detonator Electronics TestMarkwarren attached the following image(s): Regards
Markwarren
(Mark) Admin
|
|
|
 Rank: Semi-Pro Level 1  Groups: Registered, Forum Support Team Germany, Official Builds, Tech Support, Moderator, registriert, Administrators Joined: 27/09/2016 Posts: 73 Points: 209 Location: Berlin
|
Hello Mark, a very nice project and welcome to the world of 3D printing and microcontrollers.  This Detonator is printed with a Ender 3pro 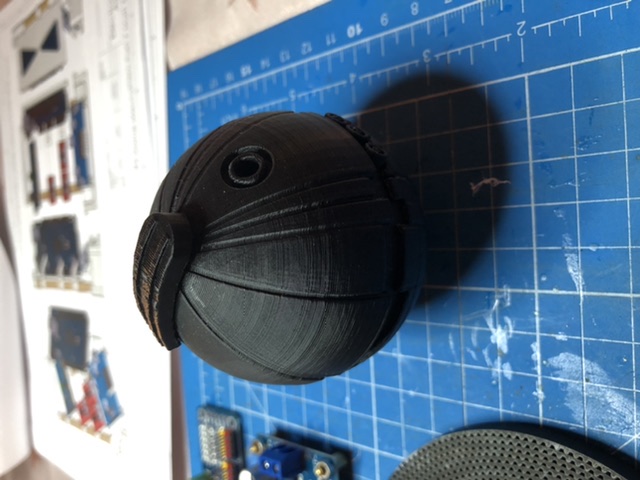 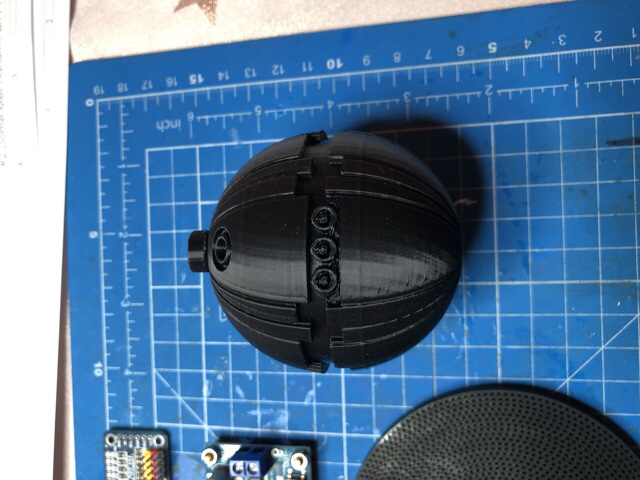 Greetings Stefan Alle Berichte sowie alle Fotos unterliegen dem Urheberrecht. Verwendung außerhalb dieses Forums bedürfen schriftlicher Genehmigung/Zustimmung meinerseits. © StefanForum Support Teamhttp://www.model-space.com/de/
https://m.youtube.com/watch?v=qIC4f1LE86w
MfG Stefan 
|
|
|
 Rank: Pro  Groups: registriert
Joined: 13/03/2012 Posts: 306 Points: 847 Location: Germany
|
That's great Mark. Now all you have to do is get your 3D printer. It's nice when you can make everything for yourself after you've learned the new techniques. That was also my idea, so I got the sets and experimented. Above all, you make your own boards and don't always have to buy them for a lot of money. Add to that a 3 D printer that you can master, then you don't need anything more. You can make everything yourself for little money.Forum Support Team
http://www.model-space.com/de/
|
|
|
Rank: Administration Groups: Registered, Administrators, Global Forum Support, Moderator, Forum Support Team, Official Builds Joined: 04/01/2016 Posts: 7,178 Points: 21,841 Location: Northamptonshire, England
|
Wabie wrote:Hello Mark, a very nice project and welcome to the world of 3D printing and microcontrollers. This Detonator is printed with a Ender 3pro Greetings Stefan Thanks Stefan Believe or not they delivered my printer late this afternoon, a day earlier than expected. Nice to see your print of it with the Ender 3pro, I bought the Creality CR-6 SE, Upgraded Design with self levelling table. Just thought it would make life easier for me. See how I get on tomorrow when I take it out the box. Mark Regards
Markwarren
(Mark) Admin
|
|
|
Rank: Administration Groups: Registered, Administrators, Global Forum Support, Moderator, Forum Support Team, Official Builds Joined: 04/01/2016 Posts: 7,178 Points: 21,841 Location: Northamptonshire, England
|
Andreas wrote:That's great Mark. Now all you have to do is get your 3D printer. It's nice when you can make everything for yourself after you've learned the new techniques. That was also my idea, so I got the sets and experimented. Above all, you make your own boards and don't always have to buy them for a lot of money. Add to that a 3 D printer that you can master, then you don't need anything more. You can make everything yourself for little money. Thanks Andreas I’ve been looking at taking my electronics to the next level for some time. I then looked at 3d printing cost to get a third party to print for me, so took the plunge. At least it will keep me busy for a while.  Mark Regards
Markwarren
(Mark) Admin
|
|
|
 Rank: Super-Elite Groups: Registered
Joined: 17/12/2013 Posts: 3,982 Points: 11,974 Location: NY, USA
|
This looks like a really interesting project. My brother has a creality printer and he loves it.Very easy to set up and it produces really nice prints.
Carl
|
|
|
Rank: Administration Groups: Registered, Administrators, Global Forum Support, Moderator, Forum Support Team, Official Builds Joined: 04/01/2016 Posts: 7,178 Points: 21,841 Location: Northamptonshire, England
|
Happy New Year everyone.
I have now made up the 3d printer and spent a day and a half sorting out the software to use after a little guidance from Andreas. I made some 3d prints from the memory stick that came with the printer to make sure I had everything setup okay. Then I decided to have ago myself through the software I downloaded. First, was a test print of baby Yoda (Grogu) from the Mandalorian. This was printed at a third of the original sized file. I couldn’t resist painting him afterwards and even added some hair from a cotton bud. Picture attached.
Anyway, as I said in my last post, I acquired some STL files for the thermal detonator after looking at all the different variants that are around.
It has taken a couple of days to print and I separated all the individual pieces on the original file as I thought it best to print them separately.
So, the detonator is all printed up, just some sanding down to make it very smooth, but first impressions are that the print quality is excellent.
Next, I will now attempt to design the inside to hold all the electronic in place and to hold a 9v rechargeable battery via USB.
More soon.
Mark
Markwarren attached the following image(s): Regards
Markwarren
(Mark) Admin
|
|
|
Rank: Pro Groups: registriert
Joined: 13/03/2012 Posts: 306 Points: 847 Location: Germany
|
Happy new year to all off you guys. May we all receive a better one!!!
Hi Mark,
nice to see the progress going forwards. We should have had that when we were younger. But we never stop learning .Forum Support Team
http://www.model-space.com/de/
|
|
|
|
|
I can see you're going to have a lot of fun with your new found modelling interest and I look forward to seeing how it all pans out for you. Think this is going to be an interesting topic to follow.... Well done Mark, looking good....  Regards Alan
|
|
|
Rank: Administration Groups: Registered, Administrators, Global Forum Support, Moderator, Forum Support Team, Official Builds Joined: 04/01/2016 Posts: 7,178 Points: 21,841 Location: Northamptonshire, England
|
Many thanks Adreas and Alan for looking in. I am still learning different techniques.
I have now started sanding down the domes. They will need a lot more sanding to be very smooth as these will be painted a nice shiny chrome colour. Before doing all of that, I have been designing some internal parts to fit all the electronics in. I wanted it all to fit neatly as well as being able to access the battery to change or re-charge. After drawing and measuring, I came up with these as shown in the pictures below. The speaker is on the bottom of the battery box and a kill switch on the side, this is to stop the battery draining when not in use. The top part is to hold the Arduino board in place as well as being removable to access the battery. One thing I did have to do was to dremel the locking taps out as the internal parts got in the way. It shouldn’t have an effect on the two halve fitting together as they are quite a tight fit anyway.
Now to start sanding the domes down to their nth degree.
More soon.
Mark
Markwarren attached the following image(s): Regards
Markwarren
(Mark) Admin
|
|
|
Rank: Superelite  Groups: Registered
Joined: 10/05/2010 Posts: 2,608 Points: 7,519 Location: Lincolnshire
|
Hi Mark I just LOVE your builds! Where do you get all your ideas from This new hobby of your looks thoroughly absorbing to someone like me who doesn't understand the process. 'Great start have you made' (said in Yoda's voice ). That little Grogu is just ACE! I hope you do one of your videos when it's finished, showing all it's bells and whistles but in the mean time i will be watching with great interest. Regards Gray
|
|
|
Rank: Administration Groups: Registered, Administrators, Global Forum Support, Moderator, Forum Support Team, Official Builds Joined: 04/01/2016 Posts: 7,178 Points: 21,841 Location: Northamptonshire, England
|
Thanks Gray Yes, I’ll be doing a full video of all the tools I used and information on where to get all the parts and files. I have been sanding down the domes this evening and they are pretty smooth, ready for its first coat of primer. I have also drilled out the LED holes as I didn’t like the printed parts of those, ready to put some real chrome bezels in their place. The 3D printing is great, but I can’t help myself looking at ways to improve and just to make it look a bit more realistic as you would with any other kits. I’ve also got 1/2 scale Grogu and 1/8 scale Mandalorian files to print at some stage, both are very detailed.  Mark Regards
Markwarren
(Mark) Admin
|
|
|
Rank: Pro Groups: registriert
Joined: 13/03/2012 Posts: 306 Points: 847 Location: Germany
|
|
|
|
Rank: Super-Elite Groups: Registered
Joined: 17/12/2013 Posts: 3,982 Points: 11,974 Location: NY, USA
|
great progress.I would consider getting yourself a resin 3d printer.You can make parts with much more detail and you wont have to do any sanding of the prints.
Carl
|
|
|
Rank: Administration Groups: Registered, Administrators, Global Forum Support, Moderator, Forum Support Team, Official Builds Joined: 04/01/2016 Posts: 7,178 Points: 21,841 Location: Northamptonshire, England
|
|
|
|
Rank: Administration Groups: Registered, Administrators, Global Forum Support, Moderator, Forum Support Team, Official Builds Joined: 04/01/2016 Posts: 7,178 Points: 21,841 Location: Northamptonshire, England
|
darbyvet wrote:great progress.I would consider getting yourself a resin 3d printer.You can make parts with much more detail and you wont have to do any sanding of the prints.
Carl
Lol, already been looking a week ago. Just get my man cave sorted and will probably look at getting one. I think that is the way to go with action figures with all the detail. I’ll make my own UV curer. Mark Regards
Markwarren
(Mark) Admin
|
|
|
Rank: Administration Groups: Registered, Administrators, Global Forum Support, Moderator, Forum Support Team, Official Builds Joined: 04/01/2016 Posts: 7,178 Points: 21,841 Location: Northamptonshire, England
|
I have decided that the existing lights on the bottom dome didn’t look right to me, so I have sanded them off with a Dremel and made the holes larger. I will then insert some real metal chrome bezels that will give a more realistic feel and more accurate to the original screen version.
As you can see, I have been tinkering with the electronics holder. The battery compartment is version 4, now to accommodate a rechargeable battery that I will be using. The top cap now has locking tabs to hold everything in place. See the pictures below.
The main dome parts have had their initial sanding down and primed to see the areas that need filling. Shouldn’t need too much as the domes are pretty smooth already.
More soon.
Mark
Markwarren attached the following image(s): Regards
Markwarren
(Mark) Admin
|
|
|
Rank: Semi-Pro Level 1 Groups: Registered, Forum Support Team Germany, Official Builds, Tech Support, Moderator, registriert, Administrators Joined: 27/09/2016 Posts: 73 Points: 209 Location: Berlin
|
Hello Mark, a wonderful piece of a thermal detonator. very nice details i'm excited, your electronics work too, great Greetings from Berlin, Stefan Alle Berichte sowie alle Fotos unterliegen dem Urheberrecht. Verwendung außerhalb dieses Forums bedürfen schriftlicher Genehmigung/Zustimmung meinerseits. © StefanForum Support Teamhttp://www.model-space.com/de/
https://m.youtube.com/watch?v=qIC4f1LE86w
MfG Stefan
|
|
|
Rank: Pro Groups: registriert
Joined: 13/03/2012 Posts: 306 Points: 847 Location: Germany
|
Great Job Mark.
I have downloaded the files so far, only currently a 16-hour print job is running for the Laferrari. Print a complete fair lighting. So it is time for the 2nd printer to arrive. Forum Support Team
http://www.model-space.com/de/
|
|
|
|
|
Great to see all the hours of planning and experimenting working out for you Mark. Wonderful results and credit to your bravery for taking on a new challenge.... There are no limits to what you can achieve now..... Regards Alan
|
|
|
|
Guest
|
 US
US

