Welcome Guest Search | Active Topics | Log In | Register

11 Pages «<56789>»
Porsche 911 RS 1972.......Turbo conversion 1/8 Options
frah2o
#121 Posted : 03 November 2023 09:26:12

Rank: Vice-Master
Publisher Medal: Featured Build of the MonthActive Service Medal: 500 post active service MedalBuild-Diary Medal: Build-Diary Medal of HonourRed Medal: Red MedalOutstanding Build: An award for an outstanding build
Groups: Registered

Joined: 05/04/2016
Posts: 707
Points: 2,124
Location: Ferrara
goddo wrote:
Hi Francesco,
Your build is just amazing. Congratulations on your skills.
Chris


Many Thanks Chris Blushing


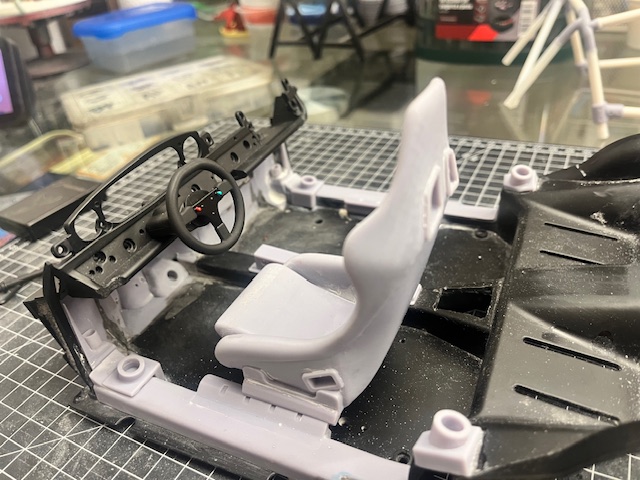
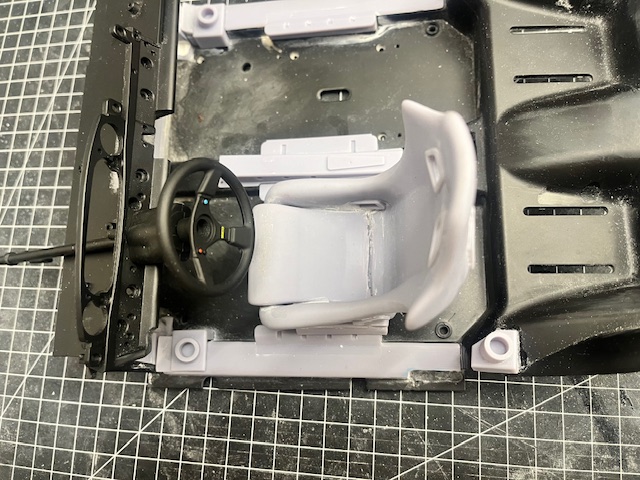
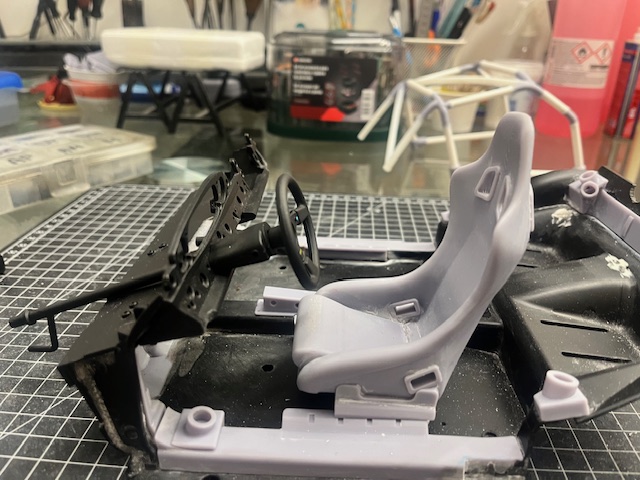
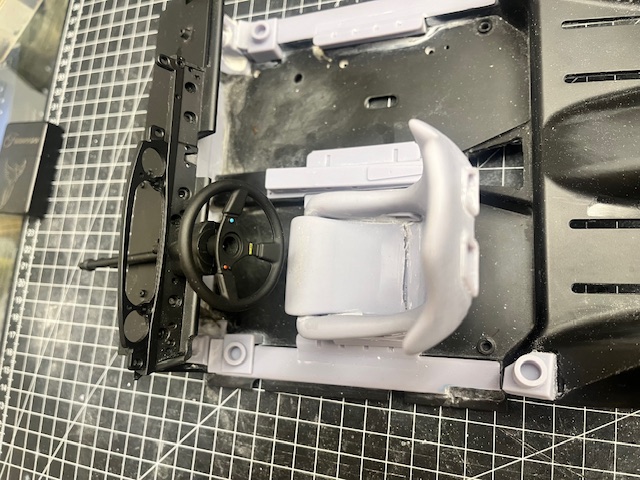
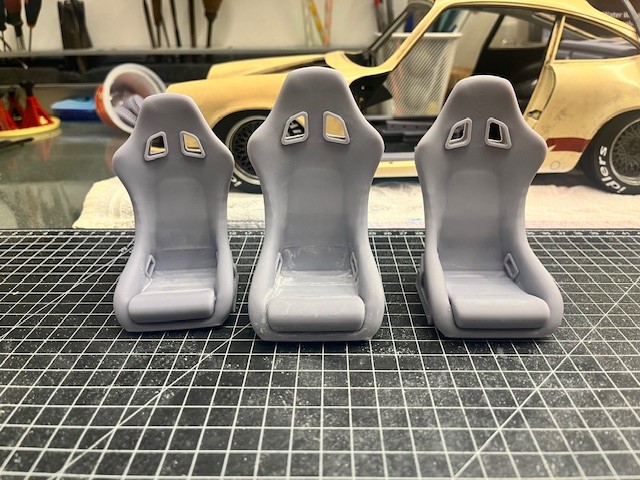
The third attempt is the good one....is right one in teh first pics.

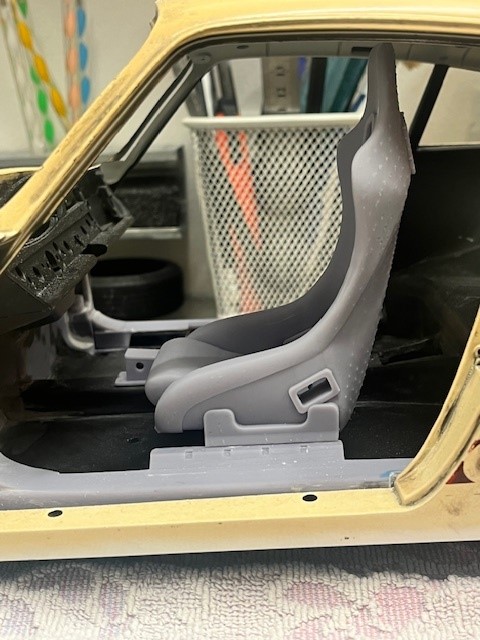
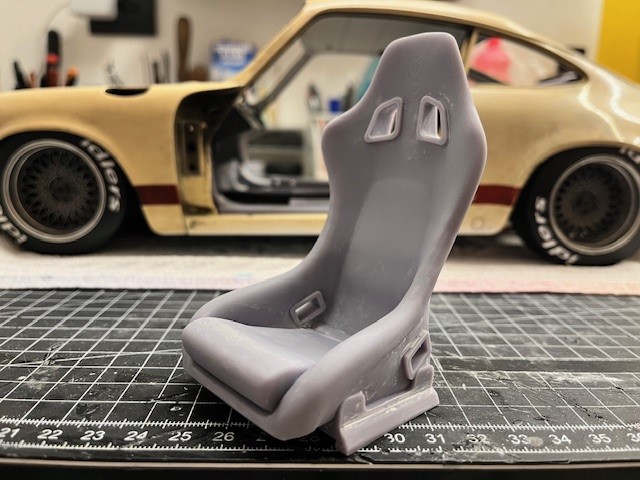
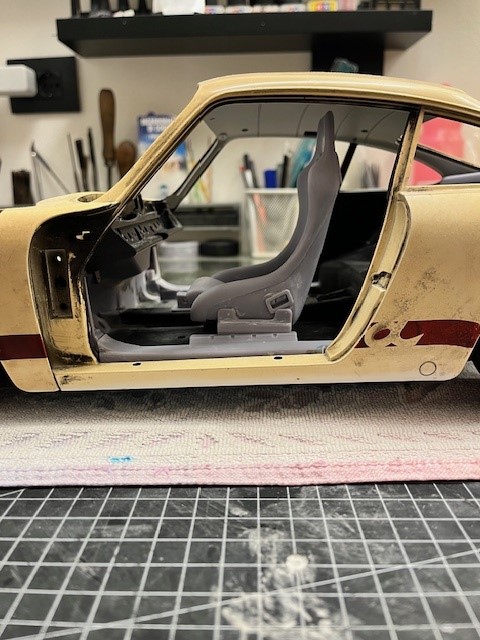
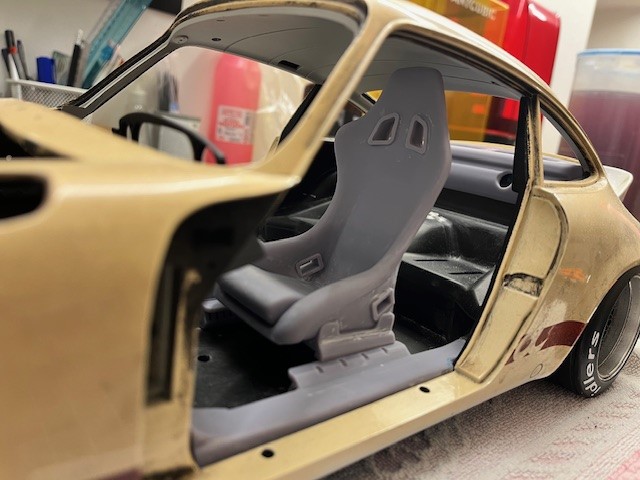
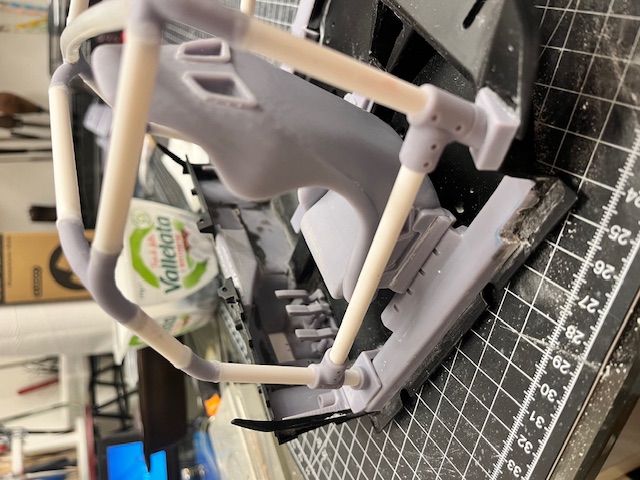
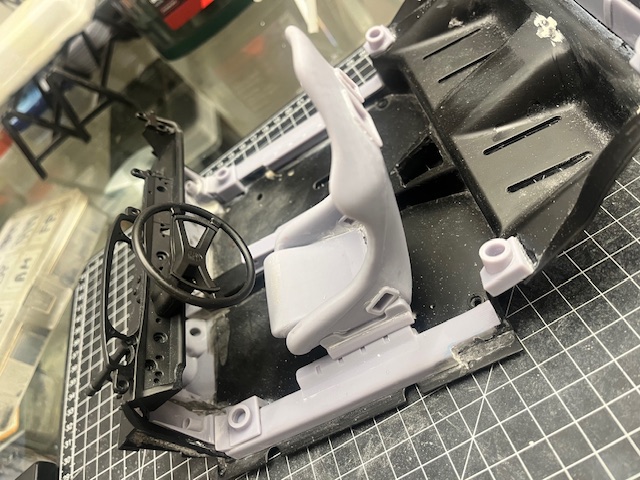
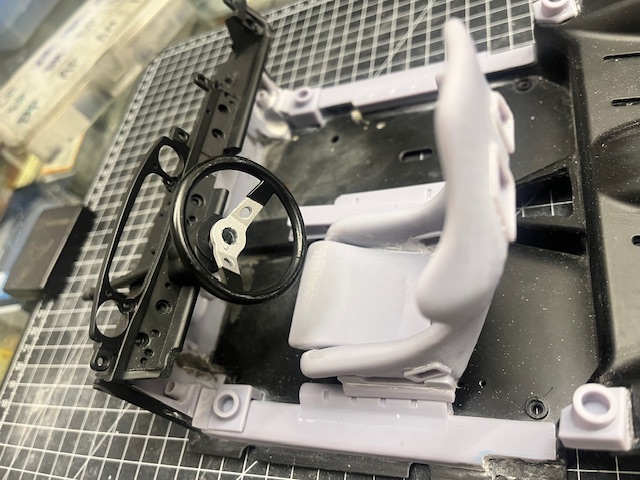
After scaling it to 108% of the source file, I found the right size for my seat. Checking photos on the 911 network which, use the Recaro and Sparco ssport bucket seat, I verified that with the three sizes (X,Y,Z) I have now found the correct scale.

Not being able to convert this STL into an editable body, I solved the problem working on the brackets of the seat the seat to the floor.

Slightly inclined and directly fixed to the seat.
Now I will print the other one too and finally I will be able to start with the roll vcage.... starting from the bases of the various tubes.


Collection active: Lotus 97T, Audi Quattro A2, Vw Maggiolino '60

Work in progress: Porsche 911 RS Turbo

Completed model: Delta WRC Martini, Mclaren MP4/4, Golf GTI 1/8 Tuned
Markwarren
#122 Posted : 03 November 2023 09:56:23

Rank: Super-Elite

Publisher Medal: Featured Build of the MonthActive Service Medal: 500 post active service MedalPurple Medal: Super active service medal for 1000 postsTurquoise Medal: Turquoise Medal for model making know-how contributionOutstanding Build: An award for an outstanding buildBuild-Diary Medal: Build-Diary Medal of HonourRed Medal: Red Medal
Groups: Registered, Administrators, Global Forum Support, Moderator, Forum Support Team, Official Builds

Joined: 04/01/2016
Posts: 6,482
Points: 19,760
Location: Northamptonshire, England
The seat looks brilliant.Love Love

Mark
frah2o
#123 Posted : 25 November 2023 08:40:12

Rank: Vice-Master
Publisher Medal: Featured Build of the MonthActive Service Medal: 500 post active service MedalBuild-Diary Medal: Build-Diary Medal of HonourRed Medal: Red MedalOutstanding Build: An award for an outstanding build
Groups: Registered

Joined: 05/04/2016
Posts: 707
Points: 2,124
Location: Ferrara
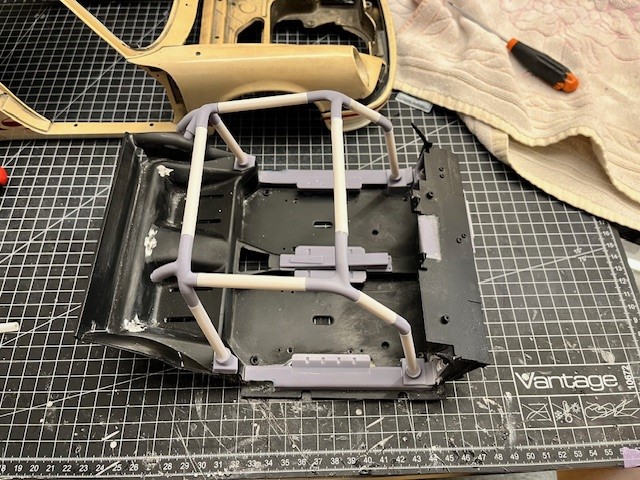
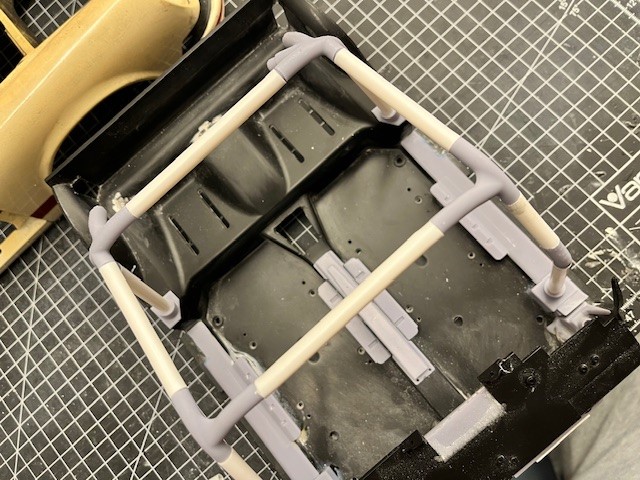
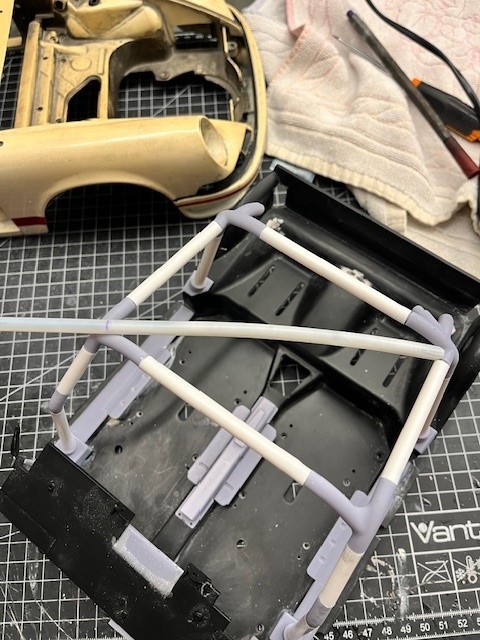
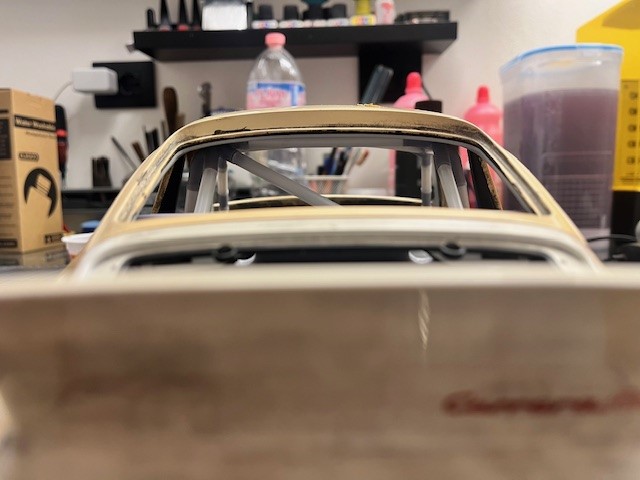
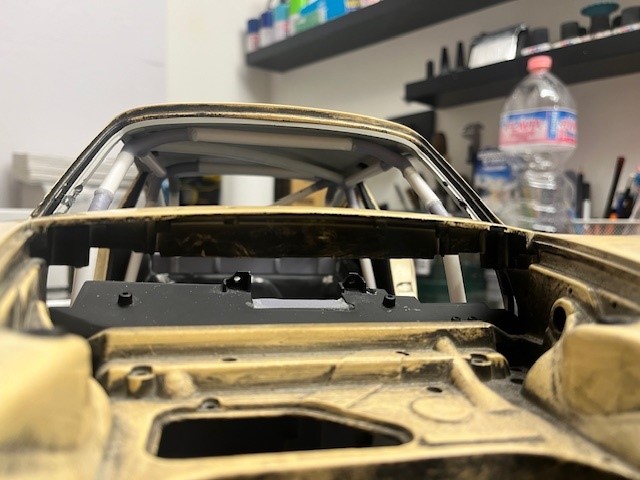
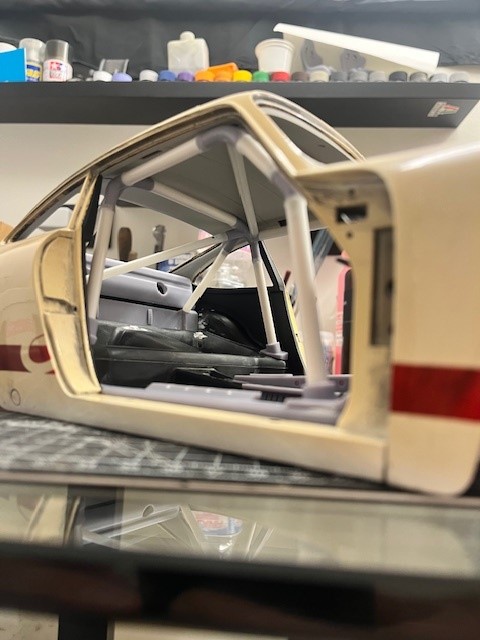
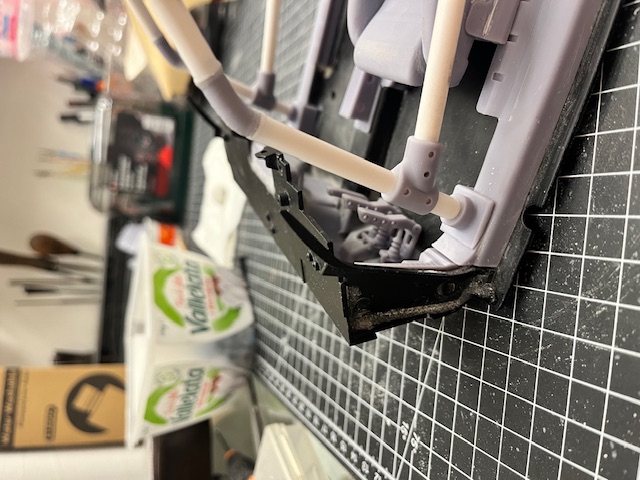
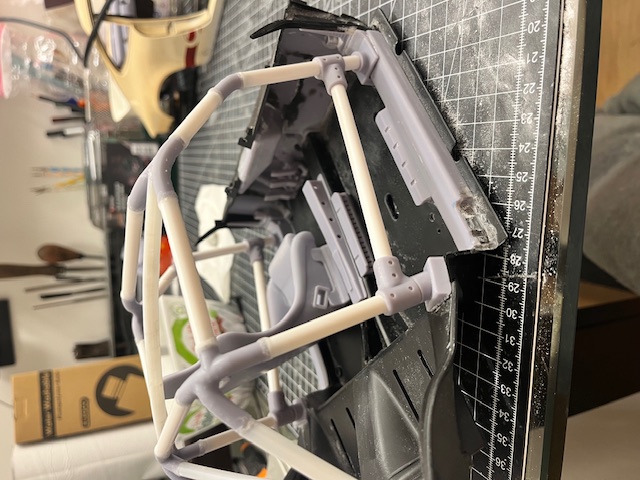
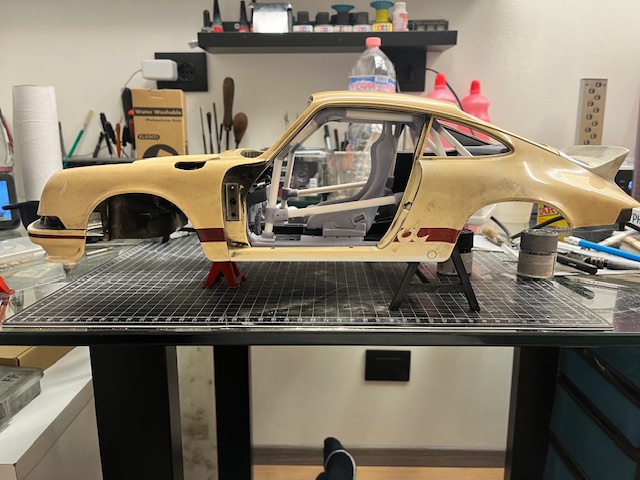
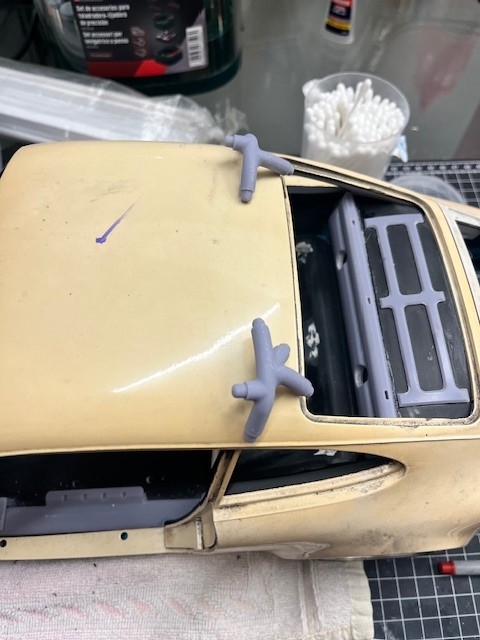
With the first part of the roll cage consolidated, I moved on to designing the more complicated piece.

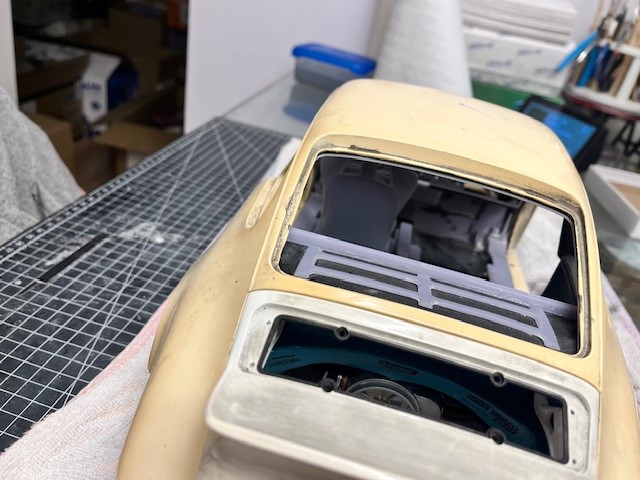
The upper junction must connect: roof side tube coming from the front pillar; central vertical upright, upper connection tube between the two central uprights, rear upright tubes that will connect in the lateral area of ​​the firewall/internal fenders and finally lateral crosspiece that starts from the upper left central upright and which will anchor on the firewall/right rear mudguard ....in short, a "nice" headache to make come back.

After 3 attempts and adjustments they succeeded.

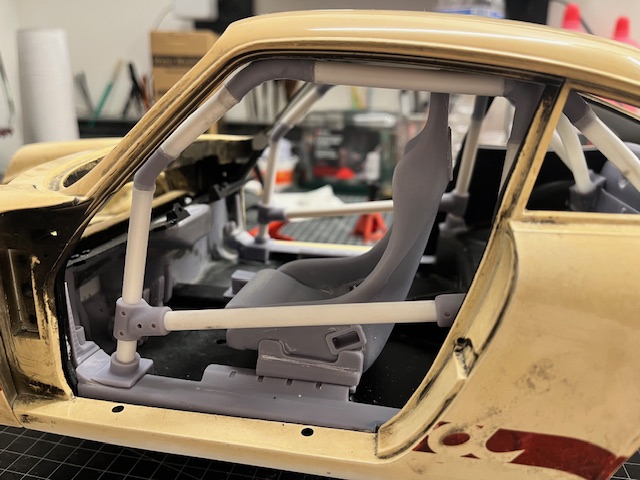
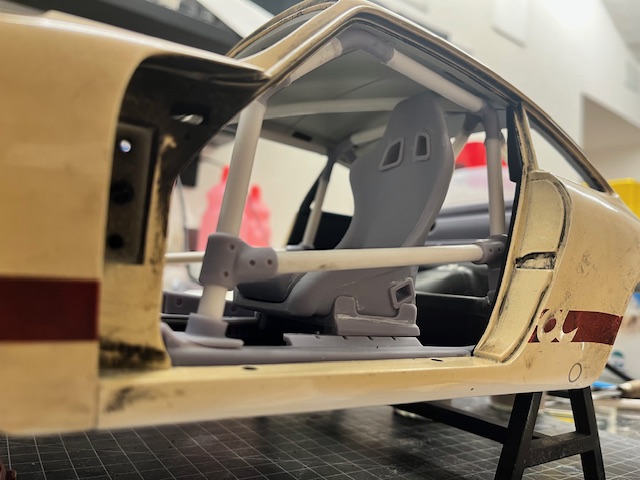
I assembled everything dry with the body fixed so as not to have any future surprises.
With ciano glue and bicarbonate I gave some "solder points" so as not to lose the positioning.
I disassembled the body and finally welded the upper "square" of roll cage.

I then fixed the cross tube onto the roof square by bending it to follow the curvature of the roof pavilion

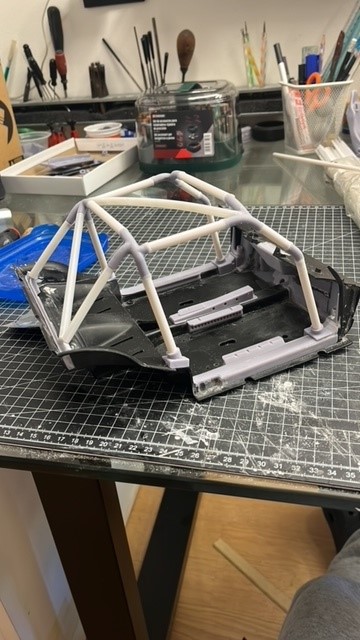
Once everything has been fixed, the last part is missing: the rear.
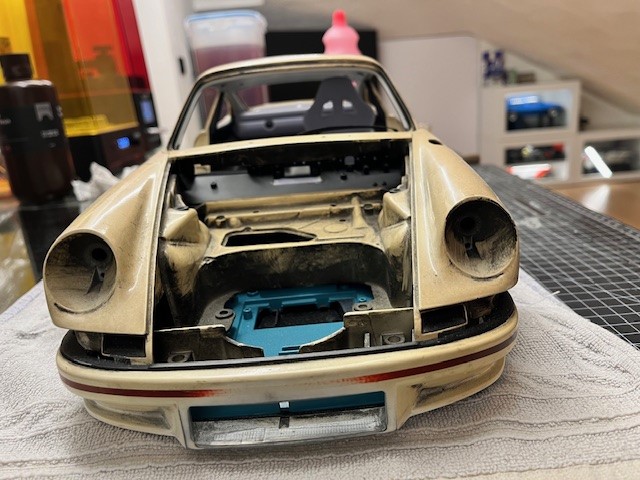
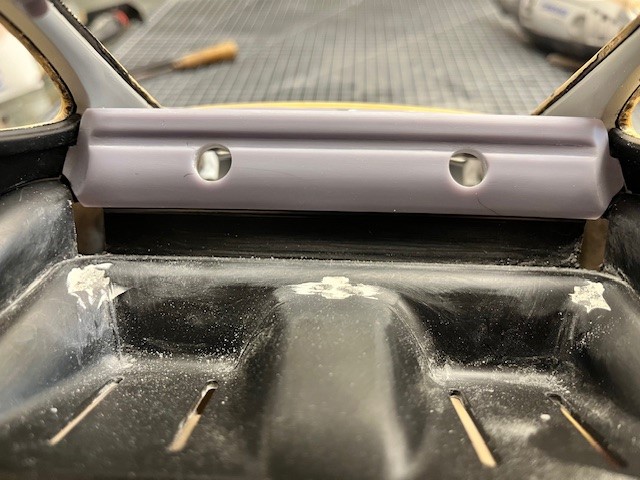
I designed the lower part of the firewall that I was missing and where the last pipes will be anchored with the relative plates which are almost ready.... meanwhile in the first part of the firewall I have arranged the holes for the future intercooler pipes .

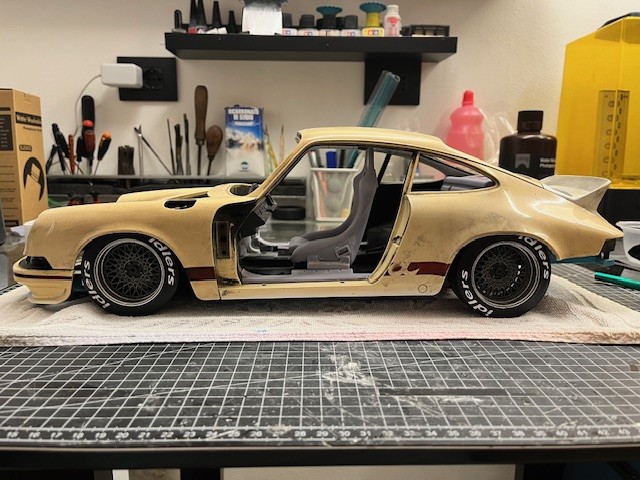
I reassembled the bodyshell and everything comes back as estimated and assembled.


Collection active: Lotus 97T, Audi Quattro A2, Vw Maggiolino '60

Work in progress: Porsche 911 RS Turbo

Completed model: Delta WRC Martini, Mclaren MP4/4, Golf GTI 1/8 Tuned
frah2o
#124 Posted : 25 November 2023 08:43:44

Rank: Vice-Master
Publisher Medal: Featured Build of the MonthActive Service Medal: 500 post active service MedalBuild-Diary Medal: Build-Diary Medal of HonourRed Medal: Red MedalOutstanding Build: An award for an outstanding build
Groups: Registered

Joined: 05/04/2016
Posts: 707
Points: 2,124
Location: Ferrara
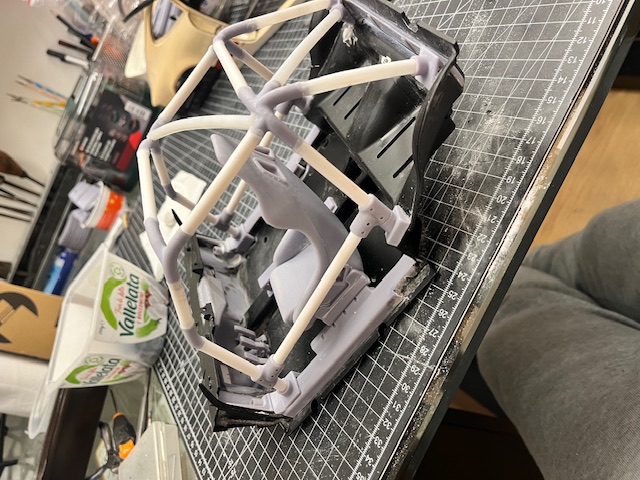
I haven't posted in a while but I've moved on

Finished the final work on the cage such as the anti-intrusion side bars, and then found a Wilwood pedal set that blends well into the project. I like the latest odds checks and the general context

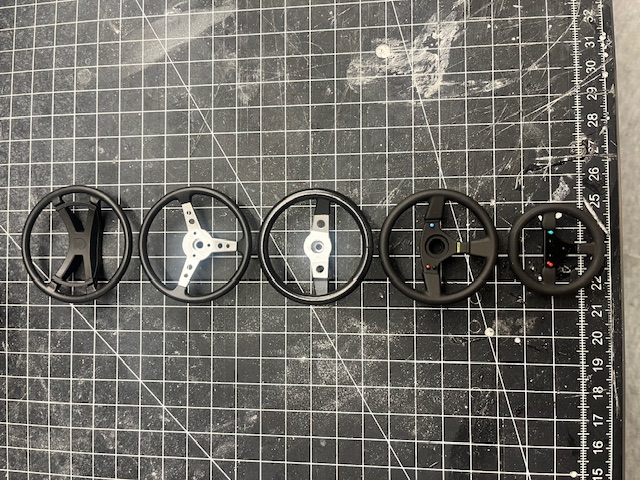
I then moved on to choosing a suitable steering wheel.
In stock I had:
- Porsche
- Miura
-Stratos
- Impreza
- Mp4/4

After various tests and scale correlations, the best in shape and size is the Sparco of the Impreza.


Collection active: Lotus 97T, Audi Quattro A2, Vw Maggiolino '60

Work in progress: Porsche 911 RS Turbo

Completed model: Delta WRC Martini, Mclaren MP4/4, Golf GTI 1/8 Tuned
frah2o
#125 Posted : 25 November 2023 08:50:59

Rank: Vice-Master
Publisher Medal: Featured Build of the MonthActive Service Medal: 500 post active service MedalBuild-Diary Medal: Build-Diary Medal of HonourRed Medal: Red MedalOutstanding Build: An award for an outstanding build
Groups: Registered

Joined: 05/04/2016
Posts: 707
Points: 2,124
Location: Ferrara
Once the steering column was fixed I designed and printed the collapsible steering wheel hub.

I took as a reference the various Raid / Sparco / Momo around

I calculated the interference dimensions to mount the hub inside the steering column cover and finally positioned the steering wheel in its place.


Collection active: Lotus 97T, Audi Quattro A2, Vw Maggiolino '60

Work in progress: Porsche 911 RS Turbo

Completed model: Delta WRC Martini, Mclaren MP4/4, Golf GTI 1/8 Tuned
frah2o
#126 Posted : 25 November 2023 08:54:42

Rank: Vice-Master
Publisher Medal: Featured Build of the MonthActive Service Medal: 500 post active service MedalBuild-Diary Medal: Build-Diary Medal of HonourRed Medal: Red MedalOutstanding Build: An award for an outstanding build
Groups: Registered

Joined: 05/04/2016
Posts: 707
Points: 2,124
Location: Ferrara
I started to think about the dashboard, I eliminated the radio and in its place i fitted a pods for pressure gauges:
- oil pressure
- oil temperature
- turbo pressure

Under the ashtray drawer I placed a shelf that will serve as a support for:
- small handle to operate fixed fire extinguisher
- emergency stop button


I then created the fire extinguisher with relative brackets, 3-way connection with pressure gauge and handle which will be operated by a rope which will connect to the handle located under the ashtray drawer.

The fire extinguisher (as seen on various 911s) was placed on the rear center tunnel.


Collection active: Lotus 97T, Audi Quattro A2, Vw Maggiolino '60

Work in progress: Porsche 911 RS Turbo

Completed model: Delta WRC Martini, Mclaren MP4/4, Golf GTI 1/8 Tuned
frah2o
#127 Posted : 25 November 2023 08:57:56

Rank: Vice-Master
Publisher Medal: Featured Build of the MonthActive Service Medal: 500 post active service MedalBuild-Diary Medal: Build-Diary Medal of HonourRed Medal: Red MedalOutstanding Build: An award for an outstanding build
Groups: Registered

Joined: 05/04/2016
Posts: 707
Points: 2,124
Location: Ferrara
Before proceeding to paint the floor I filled the last points with milliput, especially in the area of ​​the rear plate attachments and in the lower area of ​​the front pillar.

I then refined the positioning of the pedal board by creating a plate which serves both to raise the pedal board itself and to allow correct positioning.

Again taking inspiration from various 911s found online, I created some boxes that will be used to channel the oil pipes (right side) and fuel pipes (right side) inside the door sills.


Collection active: Lotus 97T, Audi Quattro A2, Vw Maggiolino '60

Work in progress: Porsche 911 RS Turbo

Completed model: Delta WRC Martini, Mclaren MP4/4, Golf GTI 1/8 Tuned
frah2o
#128 Posted : 25 November 2023 09:00:45

Rank: Vice-Master
Publisher Medal: Featured Build of the MonthActive Service Medal: 500 post active service MedalBuild-Diary Medal: Build-Diary Medal of HonourRed Medal: Red MedalOutstanding Build: An award for an outstanding build
Groups: Registered

Joined: 05/04/2016
Posts: 707
Points: 2,124
Location: Ferrara
Another job that was waiting for me and I started while the floorboard was drying was the covering of the dashboard with self-adhesive jeweller's flock, very fine flock, not very thick and quite workable.

I coated:
- upper dashboard
- lower dashboard
- eyelid instrumentation


Collection active: Lotus 97T, Audi Quattro A2, Vw Maggiolino '60

Work in progress: Porsche 911 RS Turbo

Completed model: Delta WRC Martini, Mclaren MP4/4, Golf GTI 1/8 Tuned
frah2o
#129 Posted : 25 November 2023 09:04:48

Rank: Vice-Master
Publisher Medal: Featured Build of the MonthActive Service Medal: 500 post active service MedalBuild-Diary Medal: Build-Diary Medal of HonourRed Medal: Red MedalOutstanding Build: An award for an outstanding build
Groups: Registered

Joined: 05/04/2016
Posts: 707
Points: 2,124
Location: Ferrara
I Painted the floor (from which I however removed the tunnel raiser to repaint it in matt black)

I have prepared the templates for the flocking but it will not be integral.
With flock I used a coarser grained felt as then on the true 1:1 compared to the Alcantara of the dashboard.

I coated everything except the top of the rear firewall, all the roll cage attachment plates, the center tunnel, the pedal riser plate, the door sills and finally the front firewall.


Collection active: Lotus 97T, Audi Quattro A2, Vw Maggiolino '60

Work in progress: Porsche 911 RS Turbo

Completed model: Delta WRC Martini, Mclaren MP4/4, Golf GTI 1/8 Tuned
Markwarren
#130 Posted : 25 November 2023 11:37:15

Rank: Super-Elite

Publisher Medal: Featured Build of the MonthActive Service Medal: 500 post active service MedalPurple Medal: Super active service medal for 1000 postsTurquoise Medal: Turquoise Medal for model making know-how contributionOutstanding Build: An award for an outstanding buildBuild-Diary Medal: Build-Diary Medal of HonourRed Medal: Red Medal
Groups: Registered, Administrators, Global Forum Support, Moderator, Forum Support Team, Official Builds

Joined: 04/01/2016
Posts: 6,482
Points: 19,760
Location: Northamptonshire, England
I am speechless. Just stunning work.Love Love Love i am just loving this build, tuning in to your build diary to see just what else you’ve done. Love Love

Mark
frah2o
#131 Posted : 02 December 2023 08:23:29

Rank: Vice-Master
Publisher Medal: Featured Build of the MonthActive Service Medal: 500 post active service MedalBuild-Diary Medal: Build-Diary Medal of HonourRed Medal: Red MedalOutstanding Build: An award for an outstanding build
Groups: Registered

Joined: 05/04/2016
Posts: 707
Points: 2,124
Location: Ferrara
Markwarren wrote:
I am speechless. Just stunning work.Love Love Love i am just loving this build, tuning in to your build diary to see just what else you’ve done. Love Love

Mark


Thanks Mark Blushing


Collection active: Lotus 97T, Audi Quattro A2, Vw Maggiolino '60

Work in progress: Porsche 911 RS Turbo

Completed model: Delta WRC Martini, Mclaren MP4/4, Golf GTI 1/8 Tuned
frah2o
#132 Posted : 02 December 2023 08:27:08

Rank: Vice-Master
Publisher Medal: Featured Build of the MonthActive Service Medal: 500 post active service MedalBuild-Diary Medal: Build-Diary Medal of HonourRed Medal: Red MedalOutstanding Build: An award for an outstanding build
Groups: Registered

Joined: 05/04/2016
Posts: 707
Points: 2,124
Location: Ferrara
I Paint the main ECU and the ECU that manages the ignition and finally place them on the shelf which also acts as a cable gland from where both the wiring from the engine compartment and those leading to the front area arrive underneath it.

After painting the fixed fire extinguisher, I proceeded with some light detail work on the fire extinguisher by applying the pressure gauge base and pressure gauge glass with acetate. I then completed everything by finishing the work on the control with the rope, bolts and decal.

Placed everything in its place

I then added some 400 sandpaper to the brake and clutch pedals to mimic the anti-slip pads.


Collection active: Lotus 97T, Audi Quattro A2, Vw Maggiolino '60

Work in progress: Porsche 911 RS Turbo

Completed model: Delta WRC Martini, Mclaren MP4/4, Golf GTI 1/8 Tuned
frah2o
#133 Posted : 02 December 2023 08:31:12

Rank: Vice-Master
Publisher Medal: Featured Build of the MonthActive Service Medal: 500 post active service MedalBuild-Diary Medal: Build-Diary Medal of HonourRed Medal: Red MedalOutstanding Build: An award for an outstanding build
Groups: Registered

Joined: 05/04/2016
Posts: 707
Points: 2,124
Location: Ferrara
I proceed with some carbon details such as:

- Cover on the tunnel raiser which eliminates the handbrake and the various levers
- Dashboard moldings and glowbox door
- Cover of the tunnel well where there is access to the clutch cable, gear shift rod, gas cable and fuel pipes

I then moved on to the pedal box work by fixing the gas pedal of the 911 on the Wilwood

Finally, after the decals rested for 24 hours, I sealed everything with clear glossy


Collection active: Lotus 97T, Audi Quattro A2, Vw Maggiolino '60

Work in progress: Porsche 911 RS Turbo

Completed model: Delta WRC Martini, Mclaren MP4/4, Golf GTI 1/8 Tuned
frah2o
#134 Posted : 02 December 2023 08:33:53

Rank: Vice-Master
Publisher Medal: Featured Build of the MonthActive Service Medal: 500 post active service MedalBuild-Diary Medal: Build-Diary Medal of HonourRed Medal: Red MedalOutstanding Build: An award for an outstanding build
Groups: Registered

Joined: 05/04/2016
Posts: 707
Points: 2,124
Location: Ferrara
I Painted the remaining parts of the gear lever: turret, boot and gear lever

I added an aluminum die on the steering wheel cover to remember the sliding track of the contacts on the steering wheel for the horn and other buttons on the steering wheel itself.

I finished the flocking work on the ashtray door and applied the shelf that will hold the fire extinguisher and emergency engine stop controls.

Mounted everything in place and finished the final details on the fire extinguisher


Collection active: Lotus 97T, Audi Quattro A2, Vw Maggiolino '60

Work in progress: Porsche 911 RS Turbo

Completed model: Delta WRC Martini, Mclaren MP4/4, Golf GTI 1/8 Tuned
frah2o
#135 Posted : 02 December 2023 08:39:35

Rank: Vice-Master
Publisher Medal: Featured Build of the MonthActive Service Medal: 500 post active service MedalBuild-Diary Medal: Build-Diary Medal of HonourRed Medal: Red MedalOutstanding Build: An award for an outstanding build
Groups: Registered

Joined: 05/04/2016
Posts: 707
Points: 2,124
Location: Ferrara
Finally I printed some through nuts with bolts and finished the last details on the tunnel and pedals before the final fixing.

I designed, printed and painted the link for the throttle cable to be fixed on the pedal


Collection active: Lotus 97T, Audi Quattro A2, Vw Maggiolino '60

Work in progress: Porsche 911 RS Turbo

Completed model: Delta WRC Martini, Mclaren MP4/4, Golf GTI 1/8 Tuned
Markwarren
#136 Posted : 03 December 2023 11:24:20

Rank: Super-Elite

Publisher Medal: Featured Build of the MonthActive Service Medal: 500 post active service MedalPurple Medal: Super active service medal for 1000 postsTurquoise Medal: Turquoise Medal for model making know-how contributionOutstanding Build: An award for an outstanding buildBuild-Diary Medal: Build-Diary Medal of HonourRed Medal: Red Medal
Groups: Registered, Administrators, Global Forum Support, Moderator, Forum Support Team, Official Builds

Joined: 04/01/2016
Posts: 6,482
Points: 19,760
Location: Northamptonshire, England
The bolts look amazing, it looks. Like you're building a full size car. Excellent stuff.

Mark
delboy271155
#137 Posted : 08 December 2023 19:16:33
Rank: Administration

Publisher Medal: Featured Build of the MonthActive Service Medal: 500 post active service MedalPurple Medal: Super active service medal for 1000 postsTurquoise Medal: Turquoise Medal for model making know-how contributionBuild-Diary Medal: Build-Diary Medal of HonourRed Medal: Red Medal
Groups: Registered, Forum Support Team, Administrators, Global Forum Support Team, Moderator, Official Builds

Joined: 09/11/2012
Posts: 8,251
Points: 23,841
Location: East midlands
This level of detail is amazing. Cool Cool Cool

Keep it coming.


Regards
delboy271155
(Derek) Admin
COME BACK GUY FAWKES "YOUR COUNTRY NEEDS YOU"


roymattblack
#138 Posted : 09 December 2023 11:08:02

Rank: Super-Elite

Publisher Medal: Featured Build of the MonthActive Service Medal: 500 post active service MedalPurple Medal: Super active service medal for 1000 postsOutstanding Build: An award for an outstanding buildBuild-Diary Medal: Build-Diary Medal of HonourRed Medal: Red Medal
Groups: Official Builds, Administrators, Moderator, Global Forum Support, Registered

Joined: 04/06/2011
Posts: 4,466
Points: 13,555
Location: ipswich
Just superb.
It goes to show what can be done with these kits to take them to another level.
frah2o
#139 Posted : 22 December 2023 15:17:00

Rank: Vice-Master
Publisher Medal: Featured Build of the MonthActive Service Medal: 500 post active service MedalBuild-Diary Medal: Build-Diary Medal of HonourRed Medal: Red MedalOutstanding Build: An award for an outstanding build
Groups: Registered

Joined: 05/04/2016
Posts: 707
Points: 2,124
Location: Ferrara
Many many many thanks mate for yours kind word and appreciation. Today I'll post some progress on my Turbo. Hope you'll enjoy Blushing
Collection active: Lotus 97T, Audi Quattro A2, Vw Maggiolino '60

Work in progress: Porsche 911 RS Turbo

Completed model: Delta WRC Martini, Mclaren MP4/4, Golf GTI 1/8 Tuned
frah2o
#140 Posted : 22 December 2023 15:19:58

Rank: Vice-Master
Publisher Medal: Featured Build of the MonthActive Service Medal: 500 post active service MedalBuild-Diary Medal: Build-Diary Medal of HonourRed Medal: Red MedalOutstanding Build: An award for an outstanding build
Groups: Registered

Joined: 05/04/2016
Posts: 707
Points: 2,124
Location: Ferrara
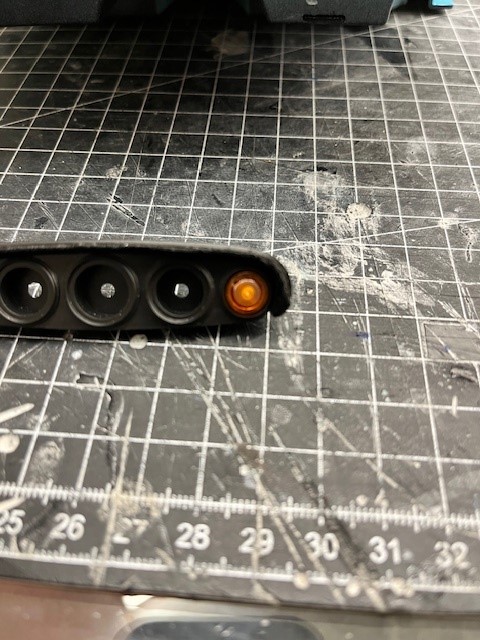
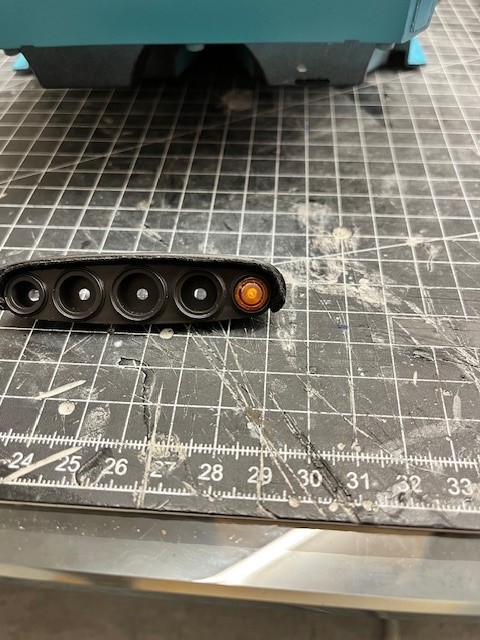
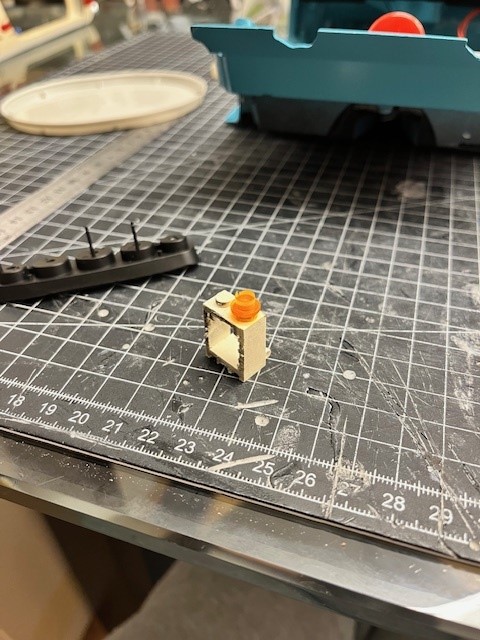
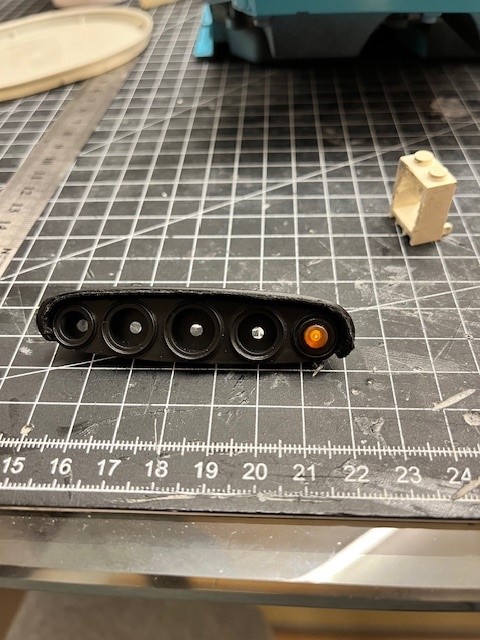
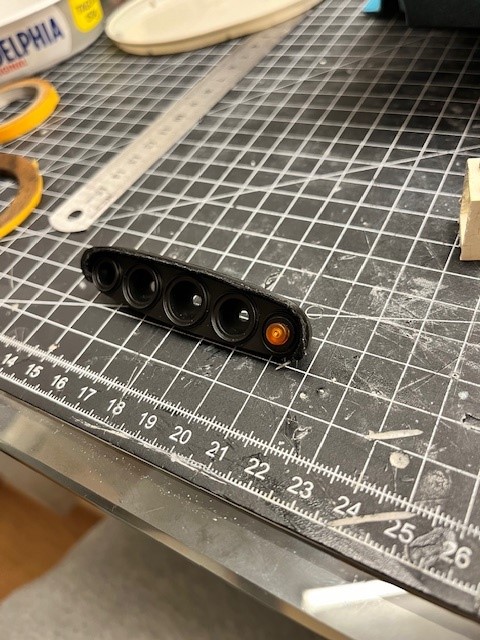
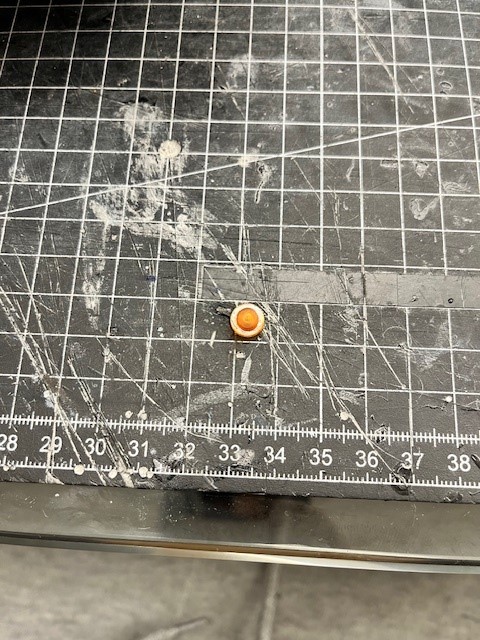
I was forgetting about the oil pressure light.

I wanted to print it with transparent resin (to be bought at the moment just for this piece)... then the irrepressible instinct to go and put my hands in the Lego bin.

The round mono brick fits into the seat of the former clock with very slight interference and the diameter is perfect to the tenth. It seems to be done on purpose so what to do?

I sanded away the logo, passed the compound to leave a semi-matt effect and painted the external crown in semi-gloss black.

For me, perfect effect with minimal expense and maximum yield


Collection active: Lotus 97T, Audi Quattro A2, Vw Maggiolino '60

Work in progress: Porsche 911 RS Turbo

Completed model: Delta WRC Martini, Mclaren MP4/4, Golf GTI 1/8 Tuned
Users browsing this topic
Guest (2)
11 Pages «<56789>»
Forum Jump  
You cannot post new topics in this forum.
You cannot reply to topics in this forum.
You cannot delete your posts in this forum.
You cannot edit your posts in this forum.
You cannot create polls in this forum.
You cannot vote in polls in this forum.

Powered by YAF | YAF © 2003-2009, Yet Another Forum.NET
This page was generated in 0.330 seconds.
DeAgostini