|
|
 Rank: Super-Elite      Groups: Registered
Joined: 24/04/2010 Posts: 5,787 Points: 17,662 Location: Stafford, United Kingdom
|
Hi Bernd, you have done an awesome Job of my enhancement, I always new it would come out well in natural wood builds as as well as painted ships. Your work is exceptional,I became quite emotional when I saw your Gallery enhancement build while I was on Vacation thank you for your photos Sincere Best wishes Mike MWG BUILD DIARIES: HMS VICTORY, SOVEREIGN OF THE SEAS, SAN FRANCISCO II, HMS HOOD, HMS ENDEAVOUR LONGBOAT, HMS VICTORY X-SECTION, 007 DB5, NISSAN GTR, CUTTY SARK, RB7, AKAGI, BARK HMS ENDEAVOUR, HUMMER H1, MITSUBISHI ZERO.
|
|
|
 Rank: Pro Groups: Registered
Joined: 31/12/2011 Posts: 123 Points: 369 Location: Graz, Austria
|
Thanks, Mike, for those nice words! Sorry, I know you asked to wait until your return for building it together. But, as mentioned before, it is now my turn to go on vacation and even afterwards I will not have much time for my Victory, and when I saw the high quality of those parts  I simply had to try...
|
|
|
 Rank: Super-Elite      Groups: Registered
Joined: 24/04/2010 Posts: 5,787 Points: 17,662 Location: Stafford, United Kingdom
|
Bernd wrote:Thanks, Mike, for those nice words! Sorry, I know you asked to wait until your return for building it together. But, as mentioned before, it is now my turn to go on vacation and even afterwards I will not have much time for my Victory, and when I saw the high quality of those parts  I simply had to try... It is not a problem Bernd, you have a nice Vacation kind regards Mike MWG BUILD DIARIES: HMS VICTORY, SOVEREIGN OF THE SEAS, SAN FRANCISCO II, HMS HOOD, HMS ENDEAVOUR LONGBOAT, HMS VICTORY X-SECTION, 007 DB5, NISSAN GTR, CUTTY SARK, RB7, AKAGI, BARK HMS ENDEAVOUR, HUMMER H1, MITSUBISHI ZERO.
|
|
|
 Rank: Pro Groups: Registered
Joined: 31/12/2011 Posts: 123 Points: 369 Location: Graz, Austria
|
Hi, shipmates! This time, I want to tell you about my solution for the bow of the victory. Here I made several modifications in comparison with the official build. For example, I changed the stem reinforcements to give them smoother curvature 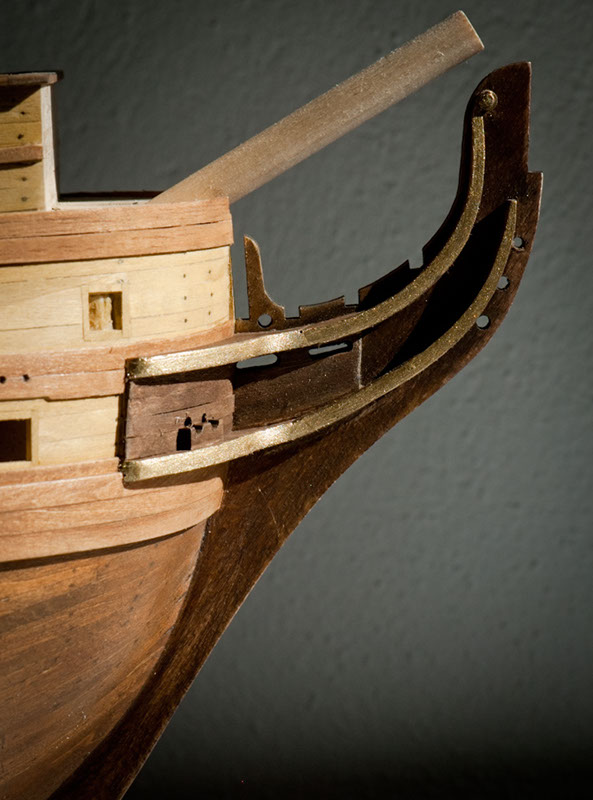 Later on, I decided to do a scratch build of the beakhead. I did not like the position of the beakhead rails. But when I tried to modify the frame parts I ran into desaster.  So, I created new frame parts from birch plywood. Here is the first one 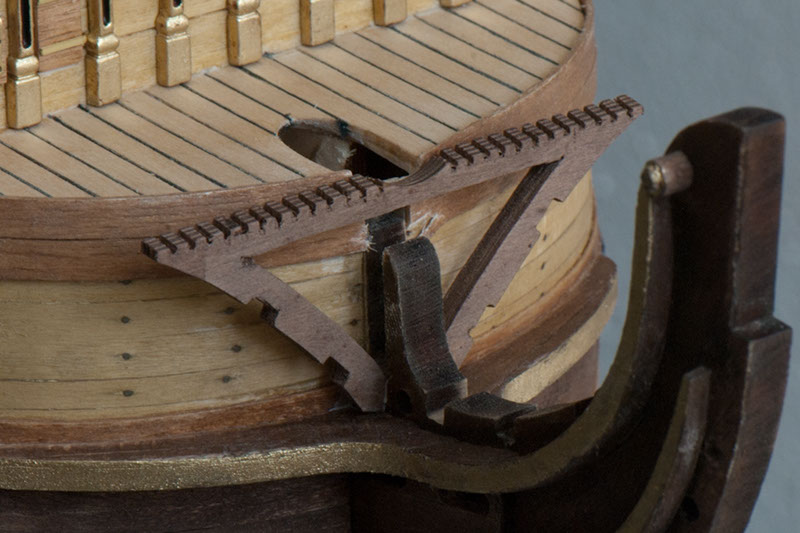 Notice the slits on top of the frame. They help to position little boxwood strips 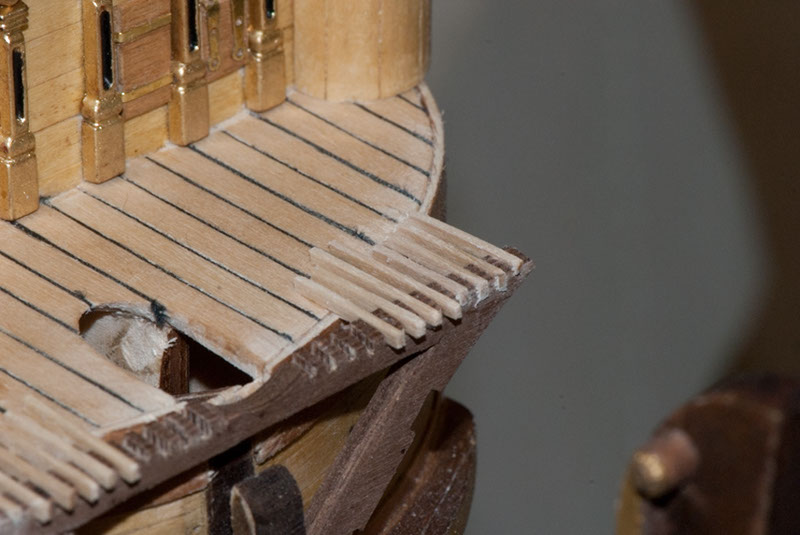 When the glue was dry I shortend the boxwood strips and used a thin strip of walnut to clean up the front 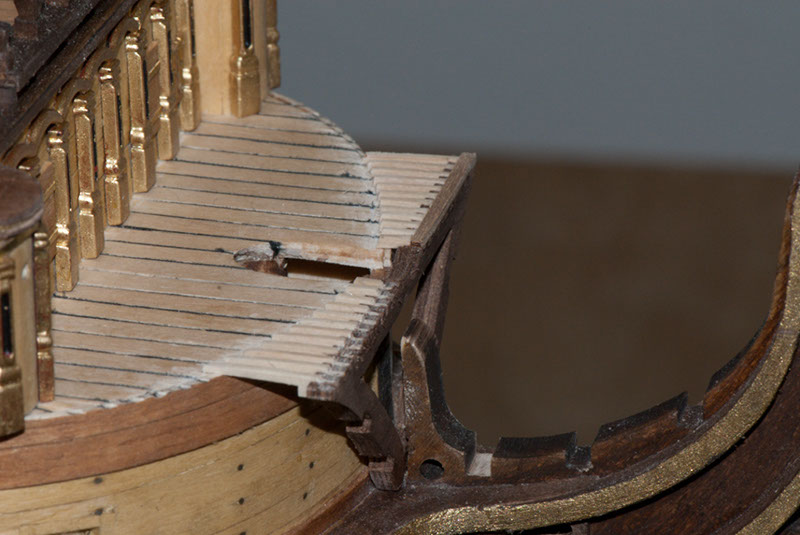 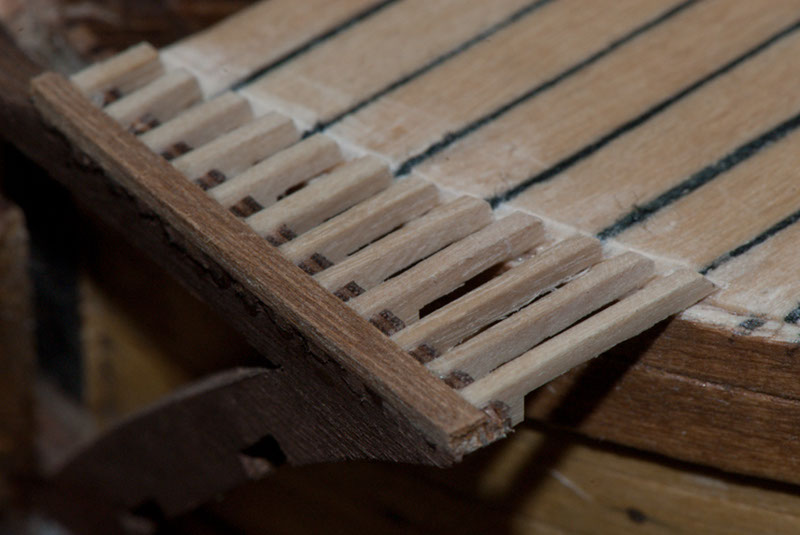 and another one for the backside: 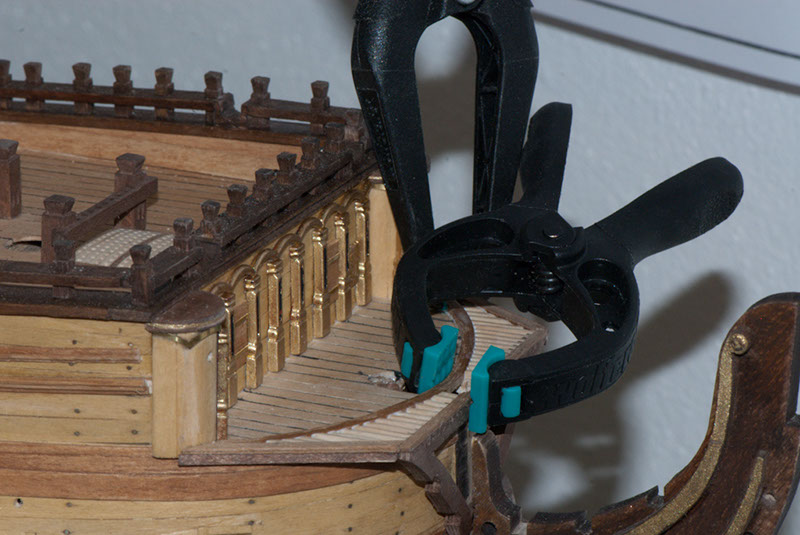 Finally, I put new plancks on the bowdeck to create a level surface 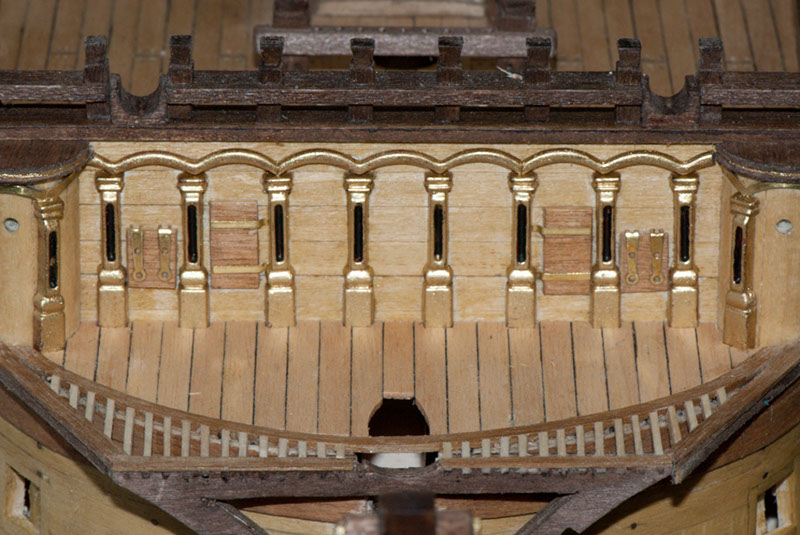 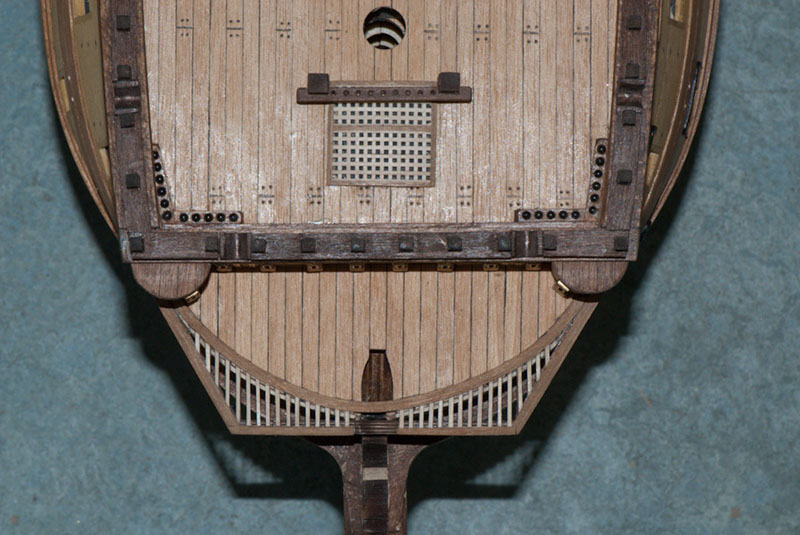 BTW, the little boxwood strips are made from elements of a 30x30mm grating kit. I used these smaller gratings everywhere on my build, because they are more to scale than the ones provided. Now I have finally obtained a flat bowdeck without steps, as in the original, for the little sailors to walk around comfortably. 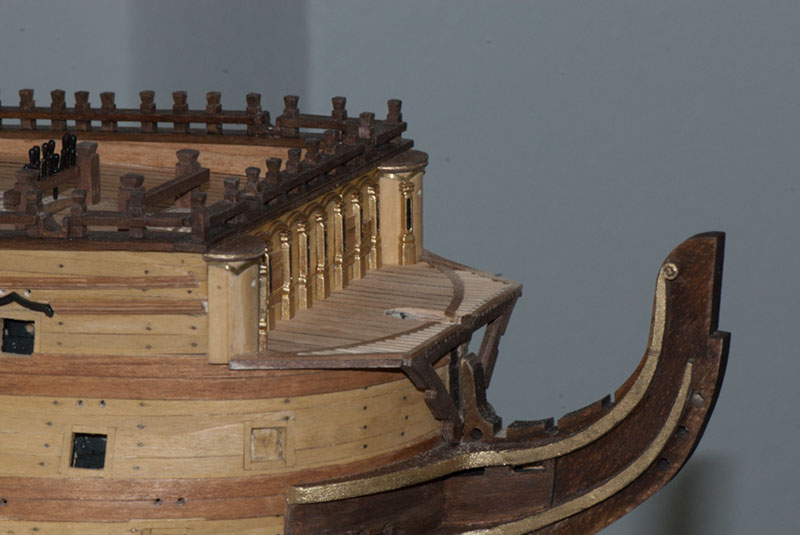 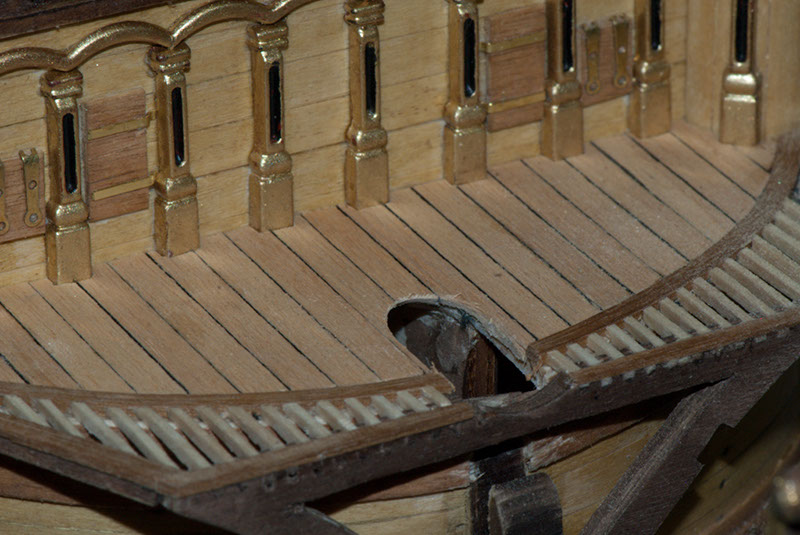 That's all for today.
|
|
|
 Rank: Master        Groups: Registered
Joined: 20/09/2011 Posts: 1,312 Points: 4,126 Location: Austria
|
Hallo Bernd, absolut fantastische Arbeit! Kann man nur den Hut ziehen. LG, WAlter Greetings,
Walter
Present builds:
Revell B-24D Liberator 1:48
On the shelf:
Italeri "Fiat Mefistofele", Italeri "Moto Guzzi California", Fokker "Red Baron", Revell Bismarck, Revell Tirpitz, Arab Dow, Stage Coach, .....
Completed builds:
McLaren MP4/4, D-51 Steam Locomotive, HMS Victory, GWH F-15D Eagle, St. Stephen`s Cathedral (cardboard), Solar-powered paddle Steamer (little project with my son), HMS Victory X-section, "Geli" Phantom II (cardboard)
|
|
|
 Rank: Pro Groups: Registered
Joined: 31/12/2011 Posts: 123 Points: 369 Location: Graz, Austria
|
Danke Walter, thank you Steve! Steve, my main motivation for using the gallery enhancement parts was to get rid of the yellow-green windows, which I didn't like. And although I am not a historical-correctness freak, the magazine's balusters just didn't look right to me. Having only limited time for hobby, I decided against a scratch build, and then MWG's gallery enhancement was the best way to go. Greetings from Austria.. Bernd
|
|
|
 Rank: Super-Elite      Groups: Registered
Joined: 24/04/2010 Posts: 5,787 Points: 17,662 Location: Stafford, United Kingdom
|
Hi Bernd, your build is awesome!! to me there is simply no comparison between the kit Gallery and my enhancement, they are like chalk and cheese. As you say my enhancement delivers correct scale ballustrades, and windows not to mention the correct design as on Victory. I love what you have done with the beakhead bulkhead  FAB-U-LOUS Kind regards Mike P.S. I have noted your PM thank you MWG BUILD DIARIES: HMS VICTORY, SOVEREIGN OF THE SEAS, SAN FRANCISCO II, HMS HOOD, HMS ENDEAVOUR LONGBOAT, HMS VICTORY X-SECTION, 007 DB5, NISSAN GTR, CUTTY SARK, RB7, AKAGI, BARK HMS ENDEAVOUR, HUMMER H1, MITSUBISHI ZERO.
|
|
|
 Rank: Pro   Groups: Registered
Joined: 23/03/2010 Posts: 205 Points: 598 Location: West Midlands
|
Bernd wrote:Thank you, shipmates, for the nice comments. Glad you like my work!  Greetings from Austria, Bernd Hi Bernd, Just had a look at your build diary, it is fantastic. I notice that you have used a metallic lead paint for the entry port roof and quarter gallery top panels, can you give details of this paint, and either manufactures colour/number as all I can find are many shades of grey. Many thanks and enjoy your build.
|
|
|
 Rank: Pro Groups: Joined: 24/08/2009 Posts: 48,827 Points: -13,348
|
Indeed an impressive build Bernd, and I'm loving all of your enhancements 
|
|
|
 Rank: Pro   Groups: Joined: 04/05/2012 Posts: 362 Points: 1,089
|
Hi Bernd You`re doing a very great job here, Especialy al the modifications 
|
|
|
 Rank: Pro Groups: Registered
Joined: 31/12/2011 Posts: 123 Points: 369 Location: Graz, Austria
|
Thanks everybody for the nice comments. @CMB: The metallic lead paint is an acrylic color, called "Gerstaecker Studio Bronze". Its number is 812. Best regards, Bernd
|
|
|
 Rank: Pro Groups: Registered
Joined: 31/12/2011 Posts: 123 Points: 369 Location: Graz, Austria
|
I took the following picture of the beakhead when visiting the Victory in Portsmouth in 2011  I used this photo and frame parts of deAgo to plan my changes. Masking tape helped me to outline the position of the beakhead rails and to design the new shape of the framework parts accordingly 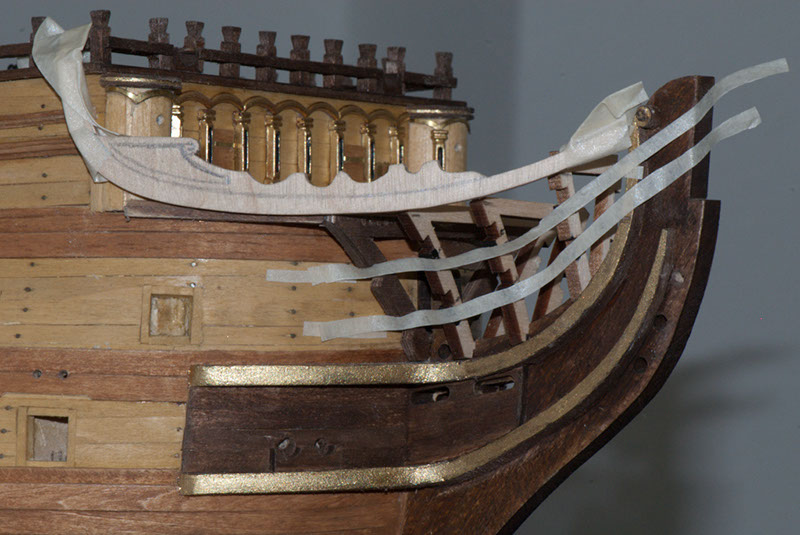 Here are the de Ago parts on the left side and the new ones on the right 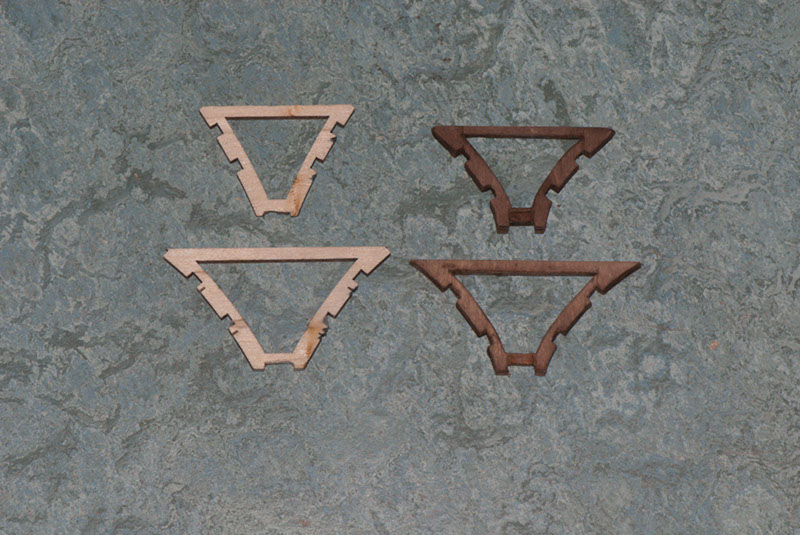 Next I fitted the new beakhead frame parts in place and built the beakhead grating. 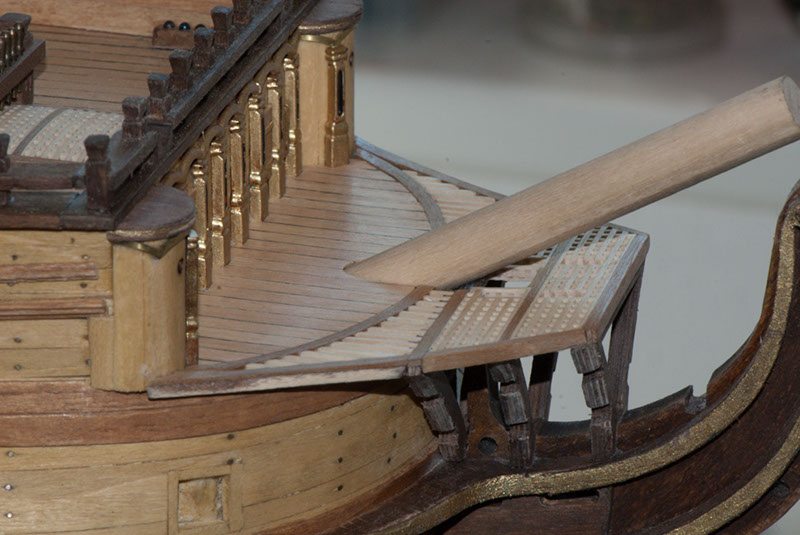 I used a grating kit with 1x1 mm holes instead of the one provided (where the holes are thrice as large and are likely to break the leg of a 2cm sailor) 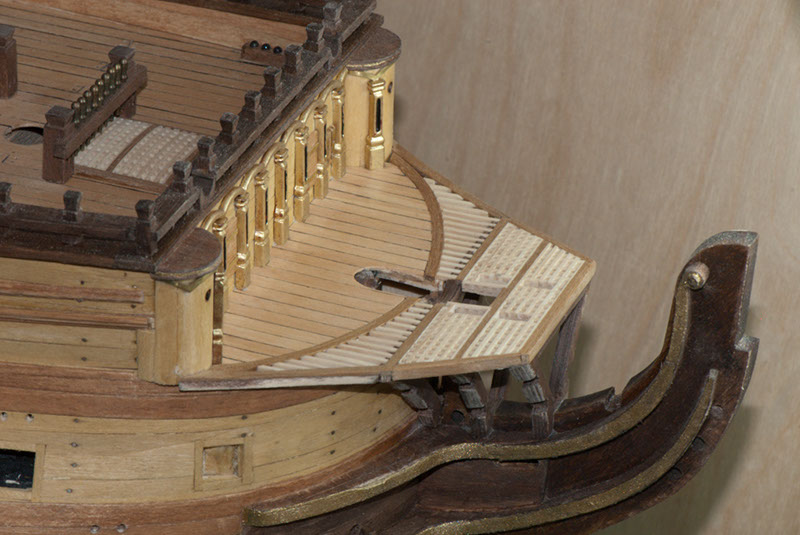 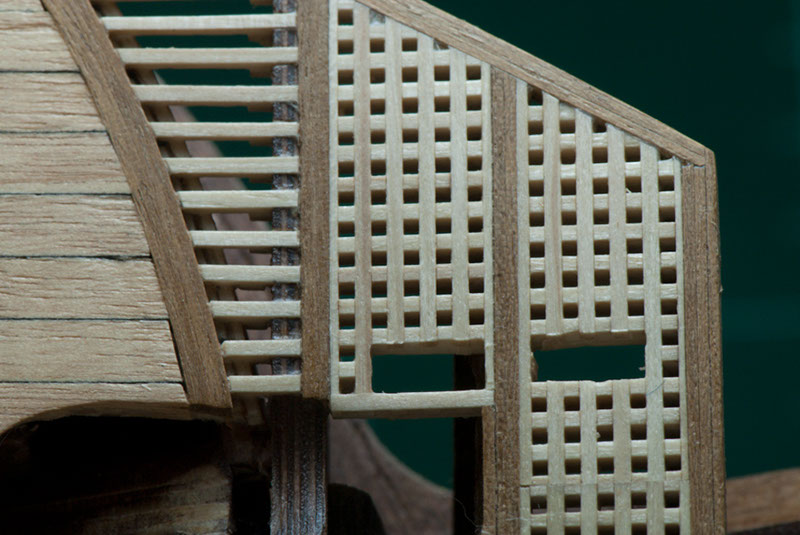
|
|
|
 Rank: Pro Groups: Registered
Joined: 31/12/2011 Posts: 123 Points: 369 Location: Graz, Austria
|
There is an occasion to improve the corners of the bow bulwark. Instead of glueing additional timberheads against the ones already in place, I totally removed the timberheads at the corners. 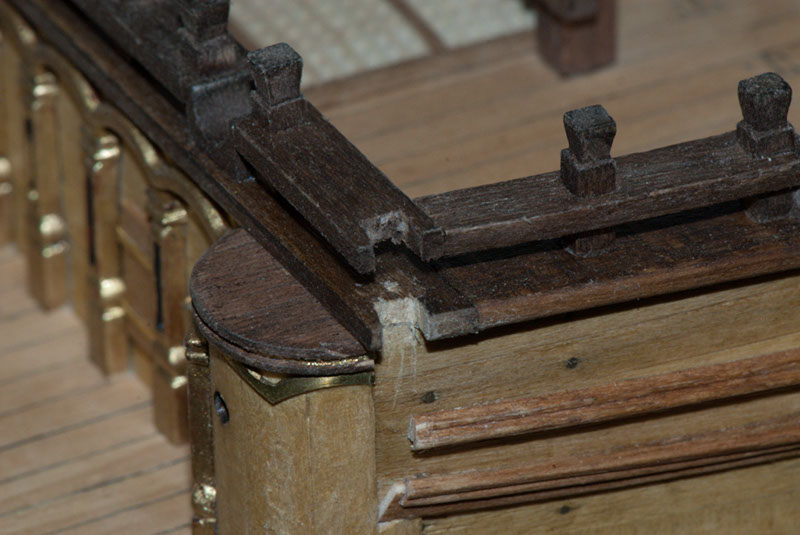 Then I formed the main beakhead rail from a 3x3 strip of pear wood 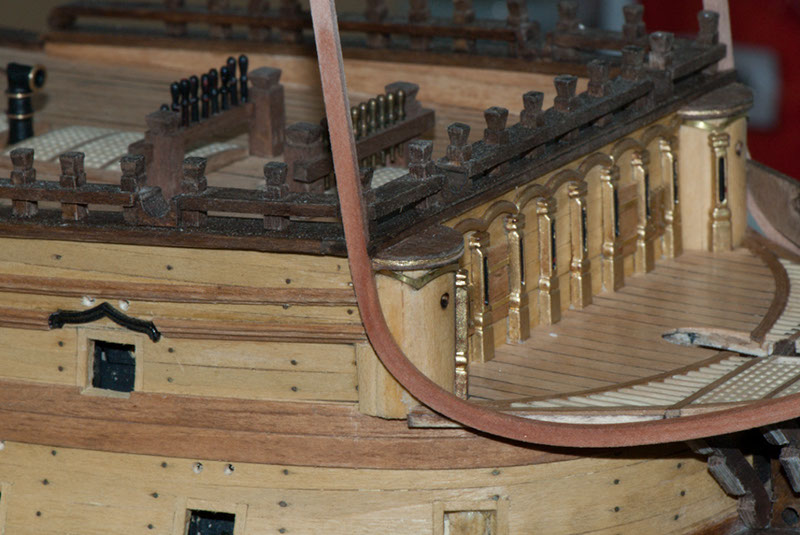 and a broad timberhead was attached to it's rear end 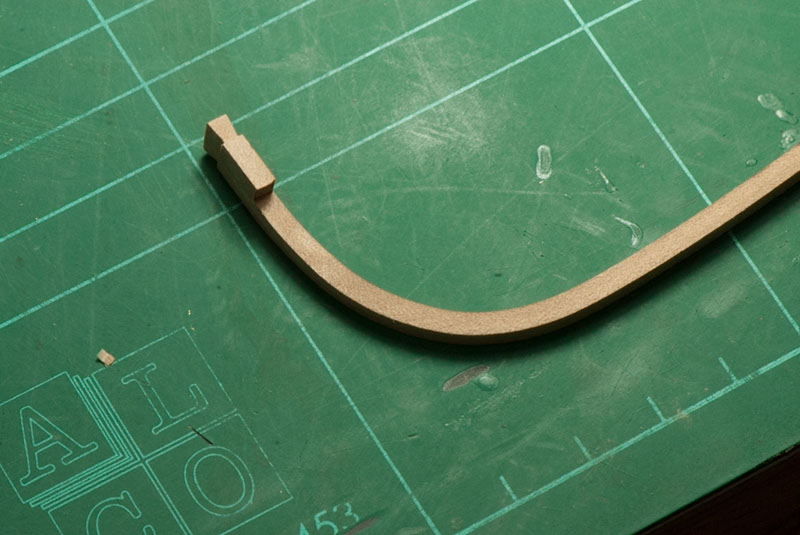 Next, I engraved some decoration 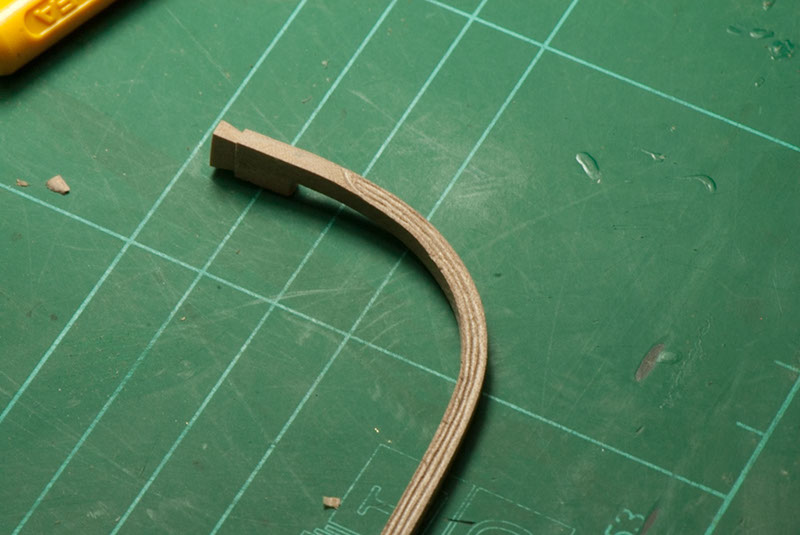 and attached the rail to the bow 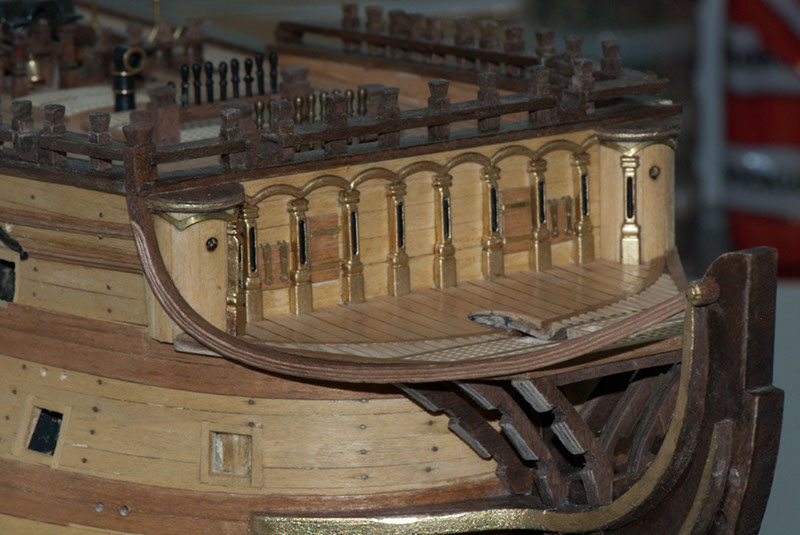 Finally I painted it gold. 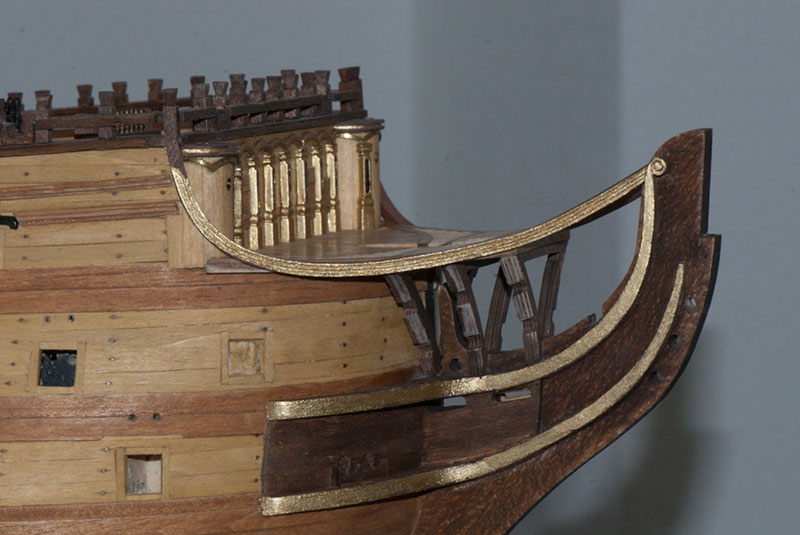 The next images show everything in place, with main beakhead rail and corner-timberhead forming a single unit, as in the original: 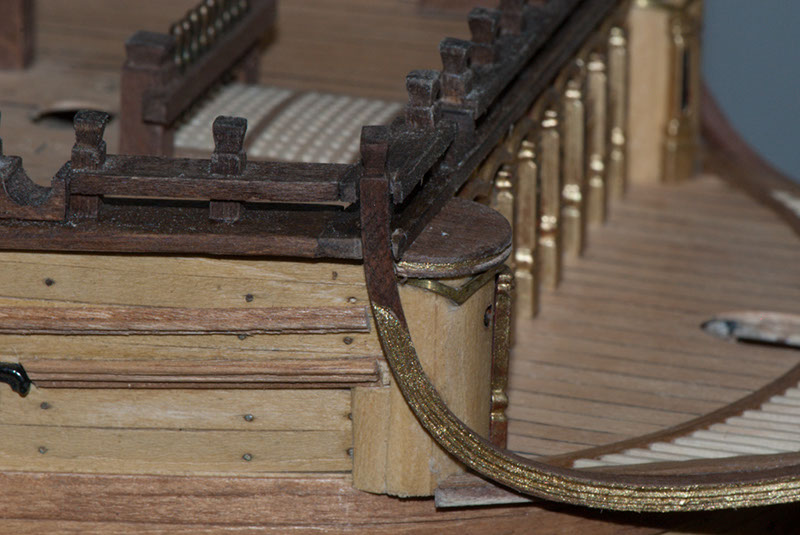 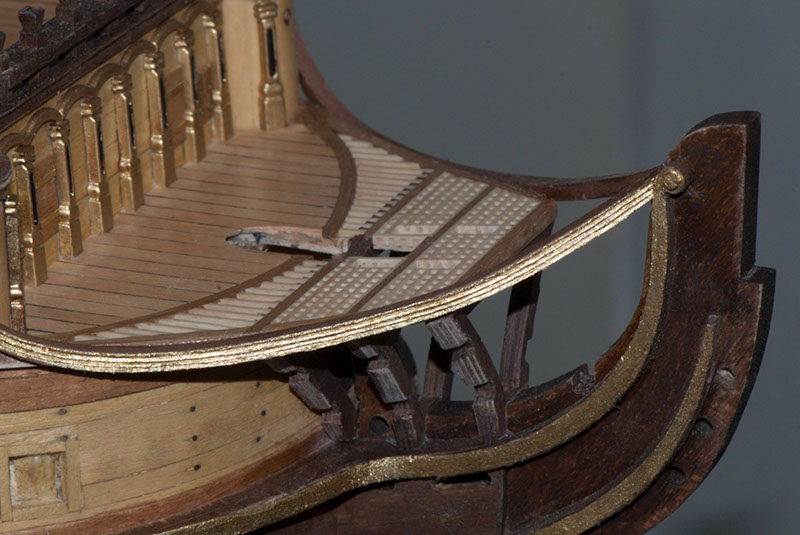 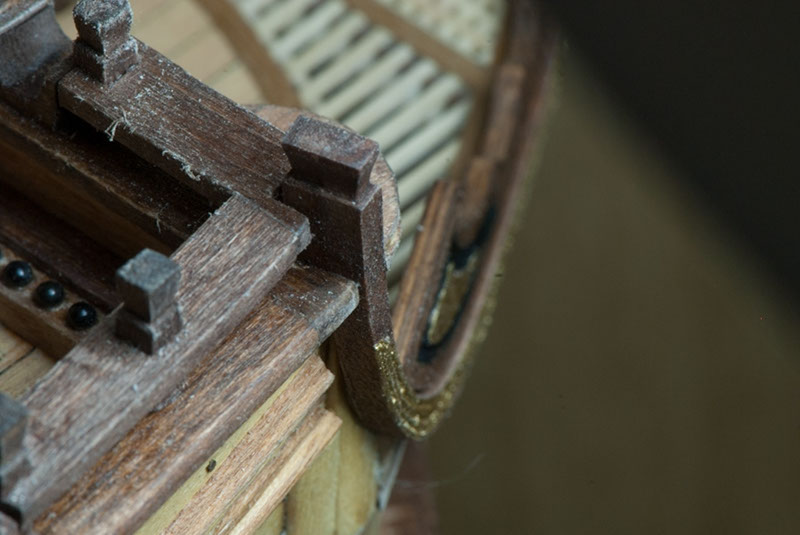 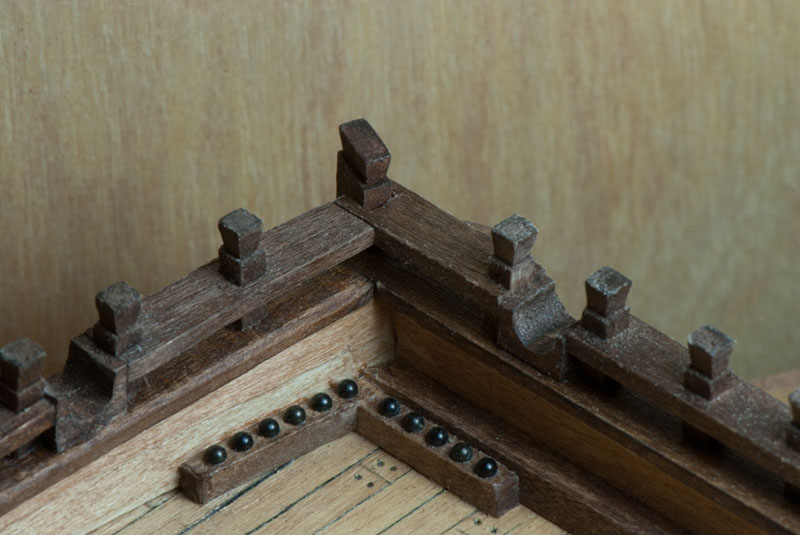
|
|
|
 Rank: Pro Groups: Registered
Joined: 31/12/2011 Posts: 123 Points: 369 Location: Graz, Austria
|
This is the tool I use for engraving the lines into the beakhead rails. I do this free-handedly 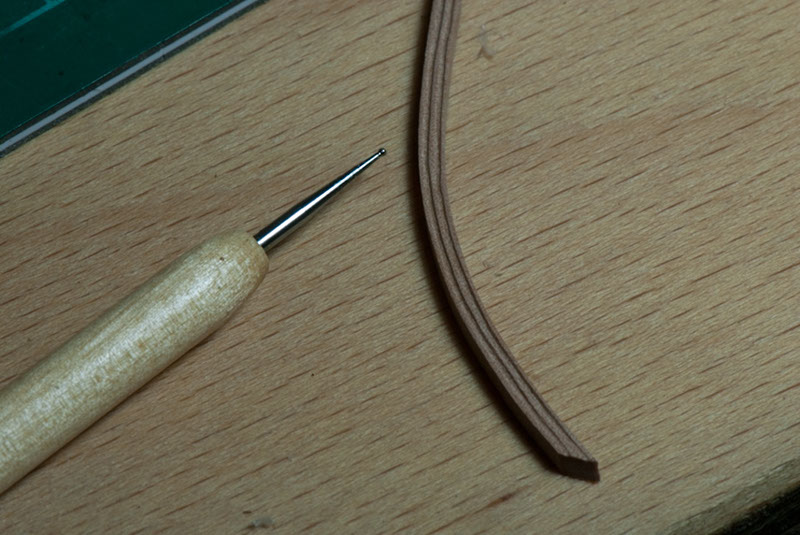 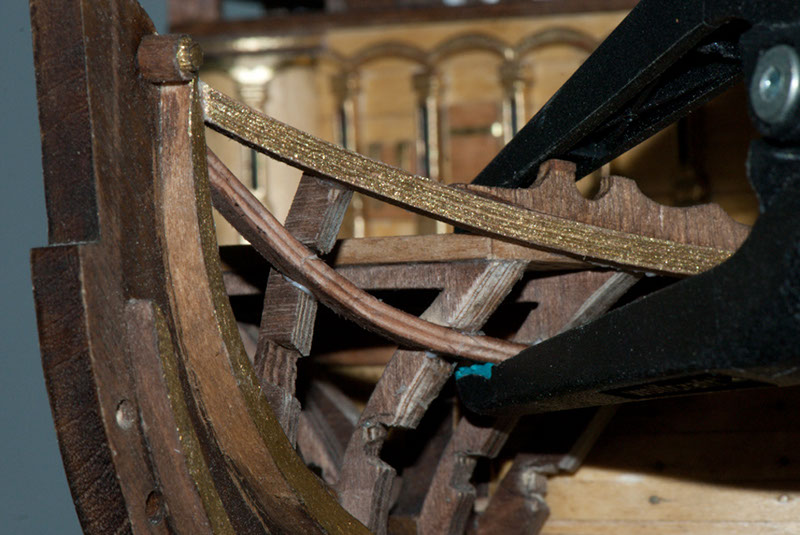 My work was not as precise as I had hoped, I had to rework some of the slits in the frame parts 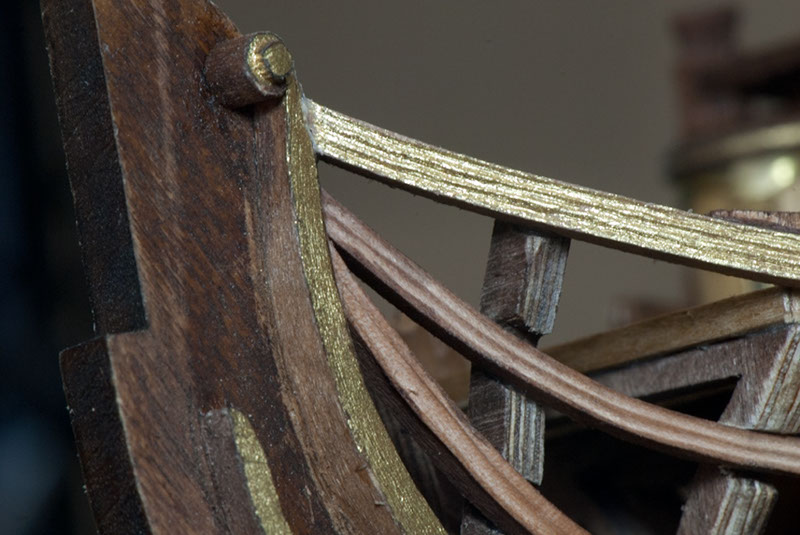 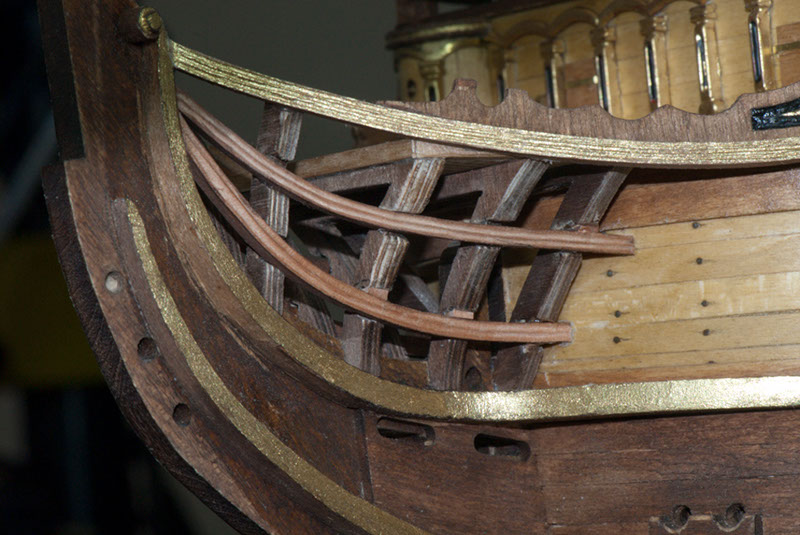 The boomkin supports are custom made to fit the curvature of the main beakhead rail. Notice that I changed the colors of the decoration (just to show that I am not going for a one-to-one copy of the original ship  ) 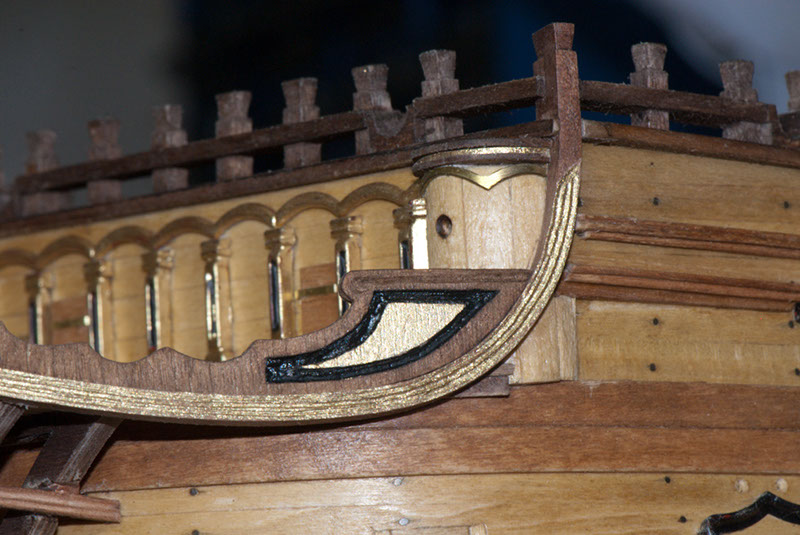
|
|
|
 Rank: Pro Groups: Registered
Joined: 31/12/2011 Posts: 123 Points: 369 Location: Graz, Austria
|
|
|
|
 Rank: Pro Groups: Registered
Joined: 31/12/2011 Posts: 123 Points: 369 Location: Graz, Austria
|
|
|
|
|
|
|
|
|
 Rank: Master      Groups: Registered
Joined: 30/03/2011 Posts: 1,344 Points: 4,079 Location: Bryanston, Johannesburg. RSA
|
Some absolute quality workmanship there Bernd. Well done. keep the pics coming. Rgds, Hans
"It's okay to make mistakes. mistakes are our teachers - they help us to to learn, even if it is painfully"
Current Build:
Endeavour Cross section,D51
Completed: HMS Victory
Under the bench: Endeavour x 2,Sovereign of the Seas, Akagi and The Black Pearl!HMS Victory Cross Section
|
|
|
 Rank: Semi-Pro Level 2  Groups: Registered
Joined: 02/09/2012 Posts: 81 Points: 252 Location: Kingston upon Hull
|
Outstanding workmanship Bernd well done you've given me so much food for thought brilliant build  Cheers Chris Builds in progress: DeAgostini HMS VictoryDeAgostini McLaren MP4-23 " If it looks right then it is right "
|
|
|
 Rank: Pro   Groups: Joined: 04/05/2012 Posts: 362 Points: 1,089
|
Hi Bernd Your Build is fantastic 
|
|
|
|
Guest (2)
|