|
|
 Rank: Vice-Master    Groups: Registered
Joined: 09/02/2012 Posts: 569 Points: 1,675 Location: Scotland
|
Next its on to the windlass, I detached the timbers from the card, but when trying to seperate them I broke 5 of them.
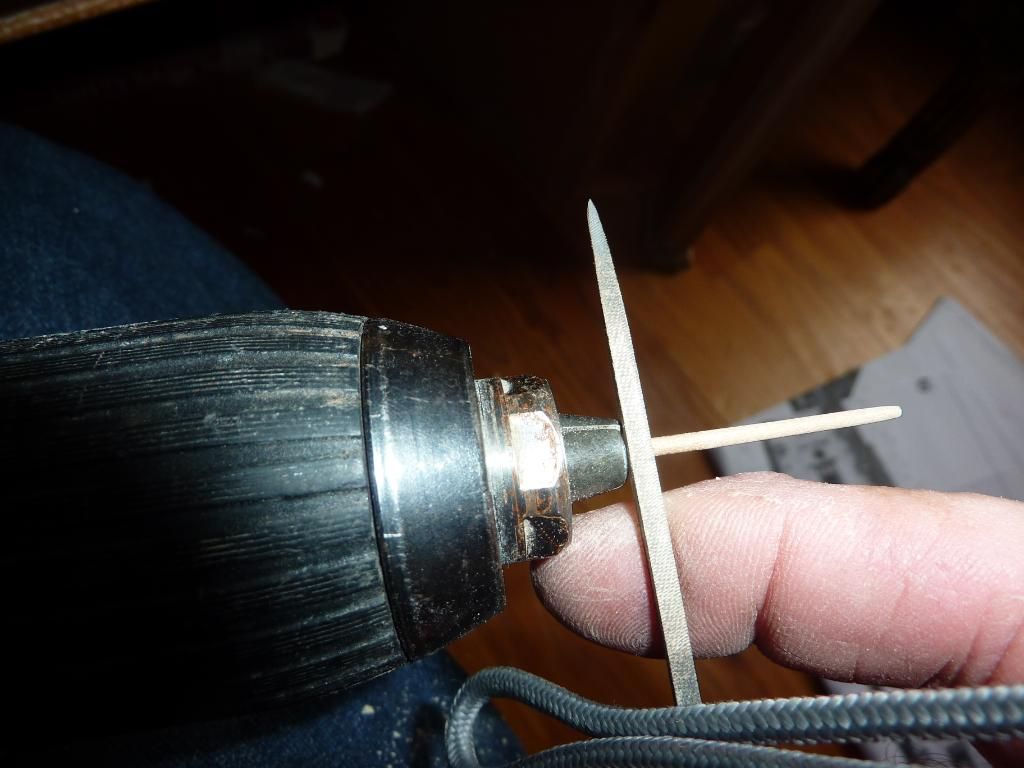
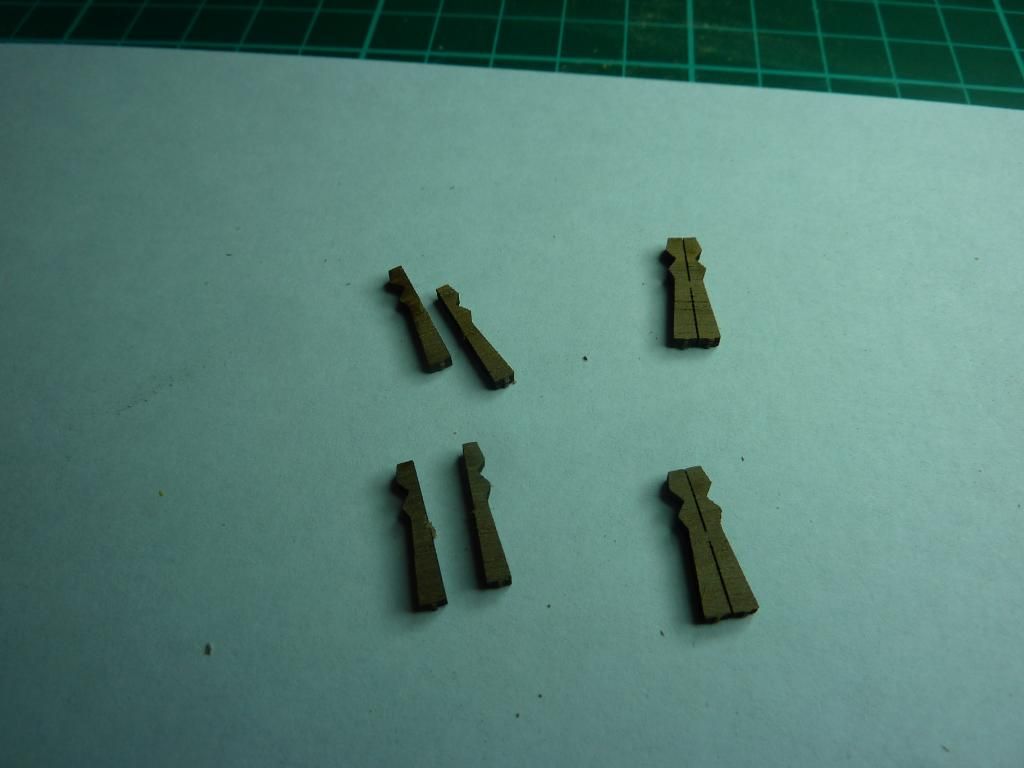  I got all the bits required together. 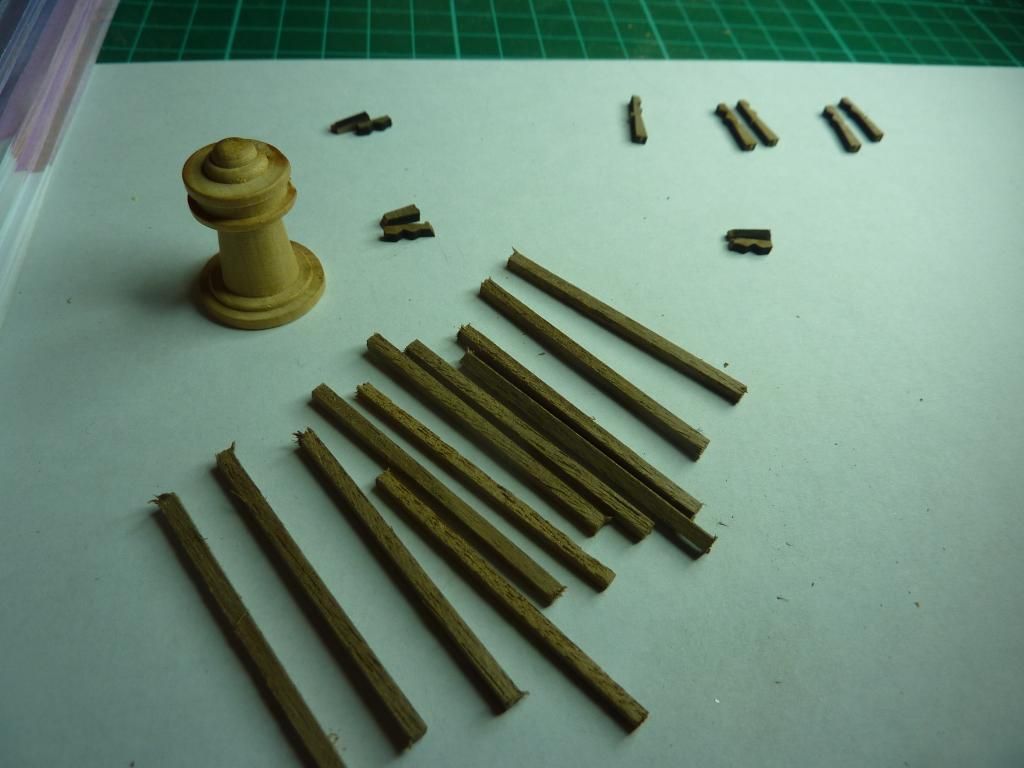 I repaired the bits that broke and glued the timber on to the windlass. I repaired the bits that broke and glued the timber on to the windlass. I then had to try and make the handles for the windlass, all 12 of them. I cut the timbers to lenght, 45mm I think, I then marked 10mm in from the end, I then put this in the chuck of my power driver, with the pencil mark on the end of the chuck jaws, I then had to try and make the handles for the windlass, all 12 of them. I cut the timbers to lenght, 45mm I think, I then marked 10mm in from the end, I then put this in the chuck of my power driver, with the pencil mark on the end of the chuck jaws,  Then I sanded the taper, thiner to the outside point, ( Watch the friction burns to your fingers. )I then used a file, hard against the jaws of the chuck, to form the joint between the round section and the square section of the handle. Then I sanded the taper, thiner to the outside point, ( Watch the friction burns to your fingers. )I then used a file, hard against the jaws of the chuck, to form the joint between the round section and the square section of the handle.
<a href="http://s1251.photobucket.com/albums/hh548/mosurprise/?action=view&current=P1020381.jpg" target="_blank"><img src="http://i1251.photobucket.com/albums/hh548/mosurprise/P1020381.jpg" border="0" alt="Photobucket"></a> Mo
|
|
|
Rank: Vice-Master Groups: Registered
Joined: 09/02/2012 Posts: 569 Points: 1,675 Location: Scotland
|
 I used a file hard against the jaws of the chuck to form the joint between the round section and the square section.I bored holes in the windlass, and started to glue in the handles. I used a file hard against the jaws of the chuck to form the joint between the round section and the square section.I bored holes in the windlass, and started to glue in the handles. Mo Mo Mo
|
|
|
 Rank: Pro Groups: Joined: 24/08/2009 Posts: 48,827 Points: -13,348
|
I had the same problem with them windlass timbers Mo, I broke a few but luckily I had a few spare. I am going to try cocktail sticks for the handles. Tesco ones cos they are good quality  .
|
|
|
Rank: Vice-Master Groups: Registered
Joined: 09/02/2012 Posts: 569 Points: 1,675 Location: Scotland
|
And the finished windlass on the deck  Mo MoMo
|
|
|
Rank: Vice-Master Groups: Registered
Joined: 09/02/2012 Posts: 569 Points: 1,675 Location: Scotland
|
|
|
|
|
|
 comming together nicely Mo  Current builds:-C57,Zero, Lamborghini Countach, Caldercraft HMS Agamemnon,Robi,R2-D2, MFH Cobra .
|
|
|
Rank: Pro  Groups: Registered
Joined: 17/03/2010 Posts: 301 Points: 941 Location: fife
|
thats a fine looking model mo, a credit to your skills current builds
victory,endeavour,thermoplye,constitution
|
|
|
Rank: Pro  Groups: Registered
Joined: 27/08/2012 Posts: 104 Points: 312 Location: Brome Lake Quebec
|
Very nice work on the guns. Congratulations
John
|
|
|
Rank: Vice-Master Groups: Registered
Joined: 09/02/2012 Posts: 569 Points: 1,675 Location: Scotland
|
Next on the list is the grating and base for the windlass. The base for the windlass, on page 32 of the instruction it tells you to use walnut battens to form the base, but on page 35 it tells you there is a base supplied with the kit, I opted to use the base supplied. I cut out the center piece for the windlass to sit in, But thinking about it I should have left it in, because after you cut the hole in the deck the windlass will fall through, as you hev cut the floor out, So I have glued it back in. The base for the windlass, on page 32 of the instruction it tells you to use walnut battens to form the base, but on page 35 it tells you there is a base supplied with the kit, I opted to use the base supplied. I cut out the center piece for the windlass to sit in, But thinking about it I should have left it in, because after you cut the hole in the deck the windlass will fall through, as you hev cut the floor out, So I have glued it back in. 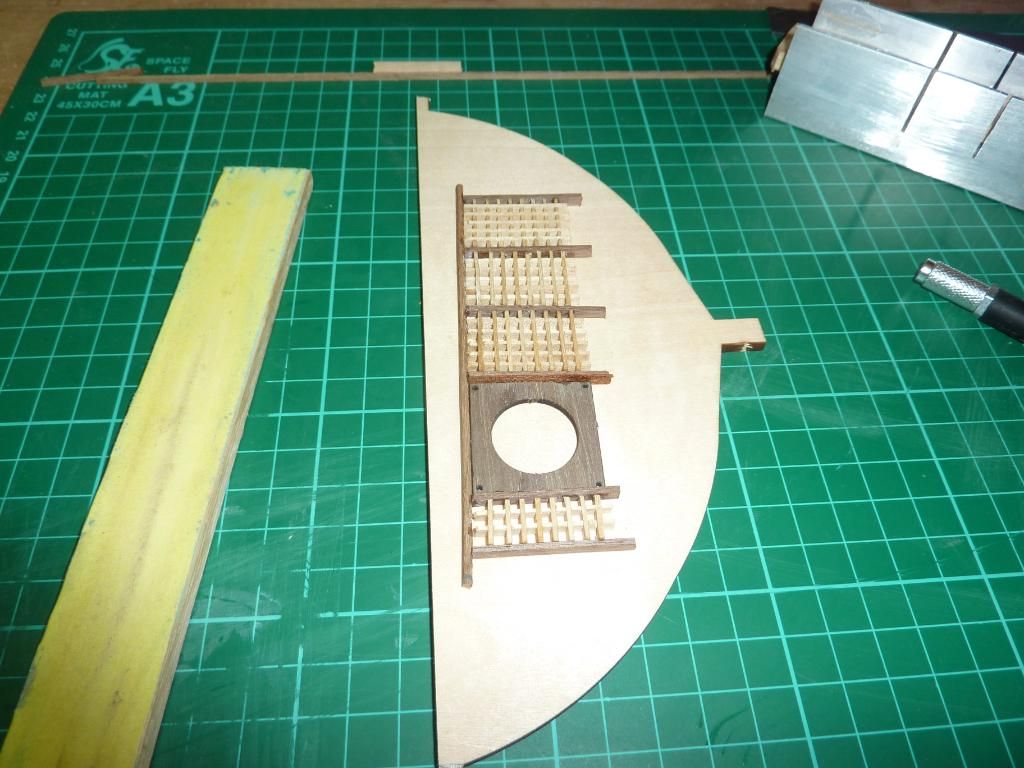 Once complete, its time to mark out the deck, again I used masking tape, and positioned the gratings and marked round them with a pencil, I then bored holes through the deck in the inside corners of the gratings, this will give me the required corners for the cut out, allowing a 2mm margin for the parts to sit on. Once complete, its time to mark out the deck, again I used masking tape, and positioned the gratings and marked round them with a pencil, I then bored holes through the deck in the inside corners of the gratings, this will give me the required corners for the cut out, allowing a 2mm margin for the parts to sit on.  All I have to do now is get 4 brass pins for the corners of the windlass base. All I have to do now is get 4 brass pins for the corners of the windlass base.  Mo MoMo
|
|
|
 Rank: Semi-Pro Level 2 Groups: Registered
Joined: 02/09/2012 Posts: 81 Points: 252 Location: Kingston upon Hull
|
Nice work Mo. The windlass looks very good . Cheers Chris Builds in progress: DeAgostini HMS VictoryDeAgostini McLaren MP4-23 " If it looks right then it is right "
|
|
|
Rank: Vice-Master  Groups: Registered
Joined: 20/10/2010 Posts: 511 Points: 1,459 Location: Loughborough
|
|
|
|
Rank: Vice-Master Groups: Registered
Joined: 09/02/2012 Posts: 569 Points: 1,675 Location: Scotland
|
Just about there with the deck furniture, I have now rounded the gratings as per the instructions, and they look good and feel very smooth, 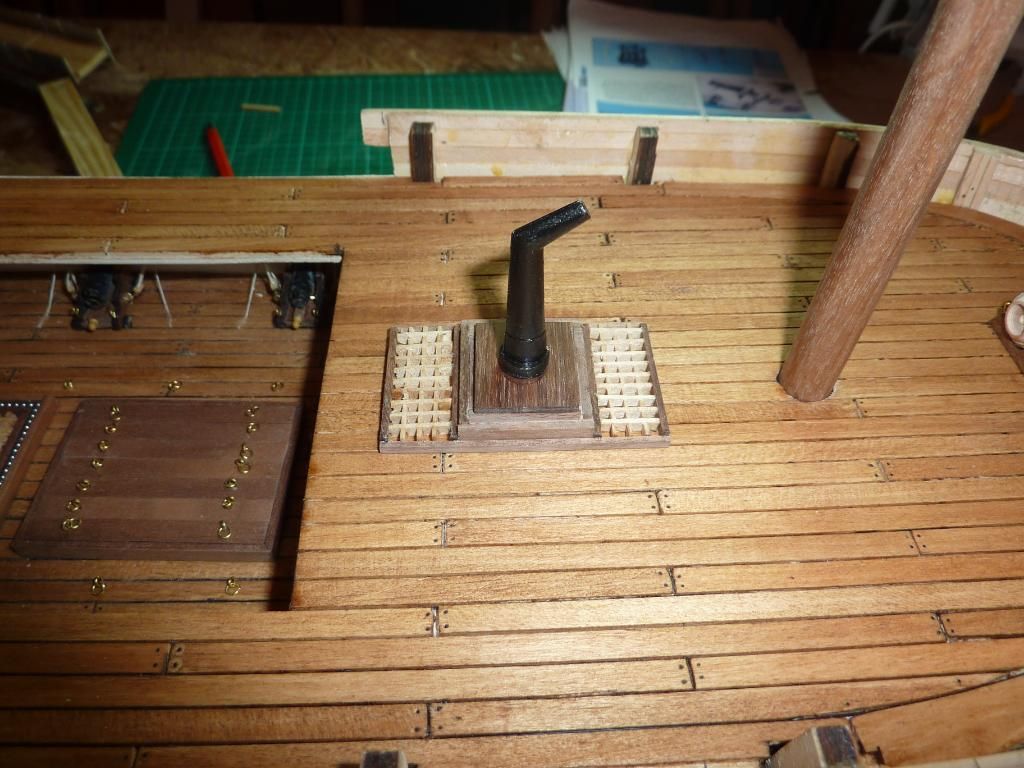  I am going to leave the pin rails till later, I am now trying to finish the lower deck so as I can get the top deck fixed in place and do the bulwarks to the top deck. I have also painted the stove with a second coat of black paint, once dry I with give a light ghosting with silver paint to highlight some of the area's. I am going to leave the pin rails till later, I am now trying to finish the lower deck so as I can get the top deck fixed in place and do the bulwarks to the top deck. I have also painted the stove with a second coat of black paint, once dry I with give a light ghosting with silver paint to highlight some of the area's.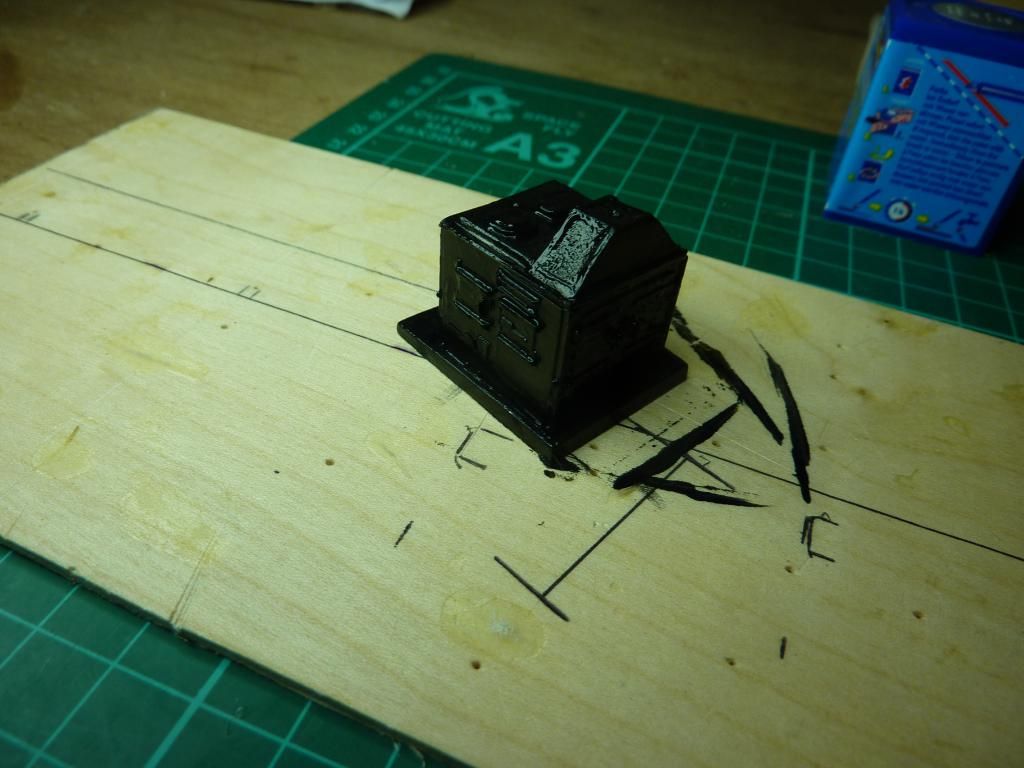 I am not going to make pumps for my model, but I have 2 elm tree pumps made, I need some help with how to make the rope coils, can anyone help, how do you actually make them, what is the procedure,, Any help would be appreciated. I am not going to make pumps for my model, but I have 2 elm tree pumps made, I need some help with how to make the rope coils, can anyone help, how do you actually make them, what is the procedure,, Any help would be appreciated.
Mo  Mo
|
|
|
Rank: Vice-Master Groups: Registered
Joined: 09/02/2012 Posts: 569 Points: 1,675 Location: Scotland
|
Dont know how the pictures did not come out, will try again.
MoMo
|
|
|
Rank: Vice-Master Groups: Registered
Joined: 09/02/2012 Posts: 569 Points: 1,675 Location: Scotland
|
Mo
|
|
|
Rank: Pro Groups: Joined: 24/08/2009 Posts: 48,827 Points: -13,348
|
Your doing a top notch job there mate. I reckon you should have no problem making them bags yourself
|
|
|
Rank: Vice-Master Groups: Registered
Joined: 09/02/2012 Posts: 569 Points: 1,675 Location: Scotland
|
|
|
|
 Rank: Beginner Level 3  Groups: Registered
Joined: 31/08/2012 Posts: 22 Points: 56 Location: London
|
Great job there Mo, its comming along great, keep the pictures comming Building
HMS Surprise
HMS Victory
HMS Sovereign of the Seas
Built
EL cano
Christan Radich
HMS Bounty
|
|
|
Rank: Vice-Master Groups: Registered
Joined: 09/02/2012 Posts: 569 Points: 1,675 Location: Scotland
|
Its been work work busy busy chop chop bang bang in the boatyard today, First of all I made the last cut out on the top deck foe the grating , the one with the chimney in it.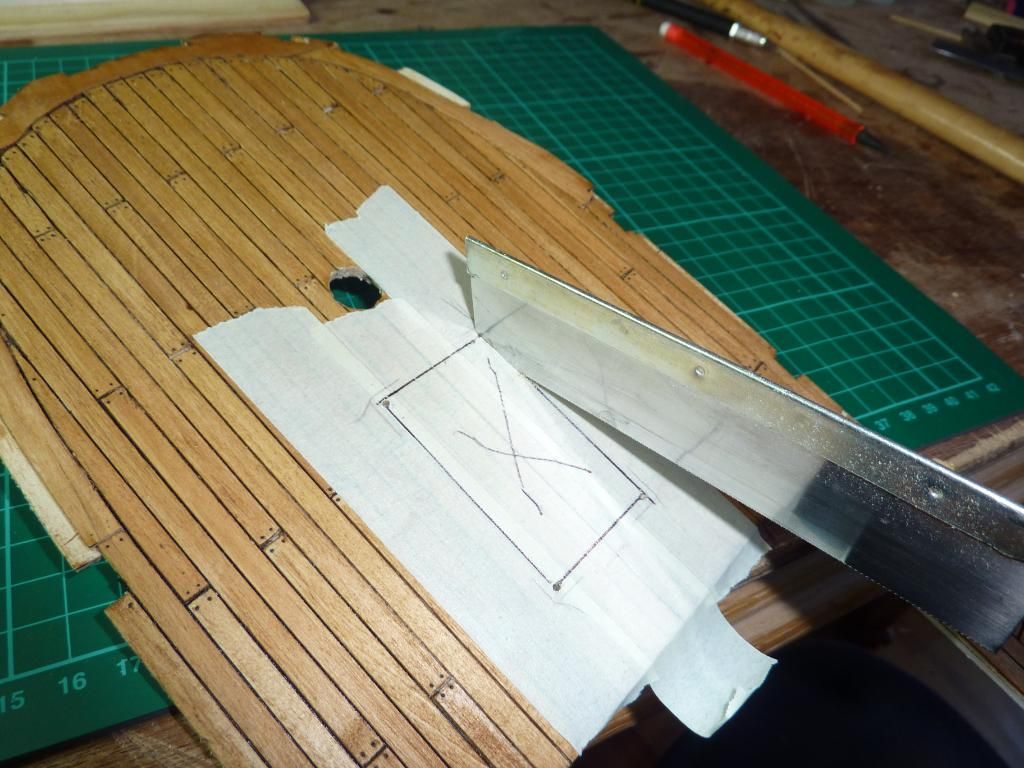 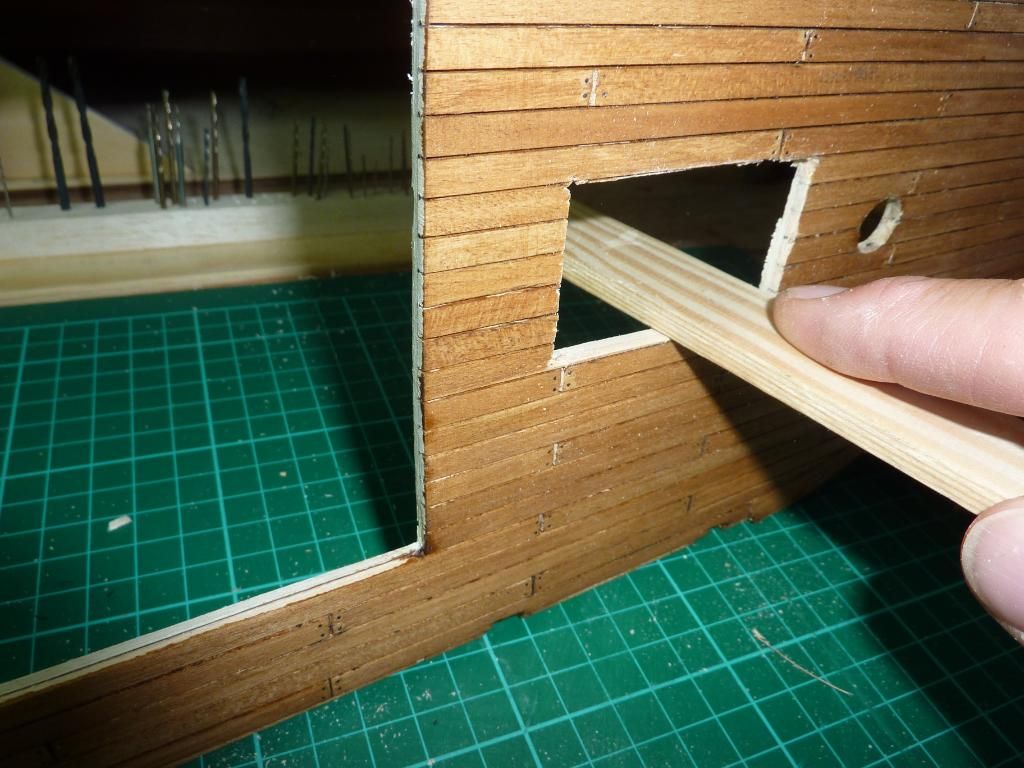  I then gave all the deck furniture, on both decks a Coat of danish oil, It makes quite a differance, brings the colour out of the wood, I then gave all the deck furniture, on both decks a Coat of danish oil, It makes quite a differance, brings the colour out of the wood, 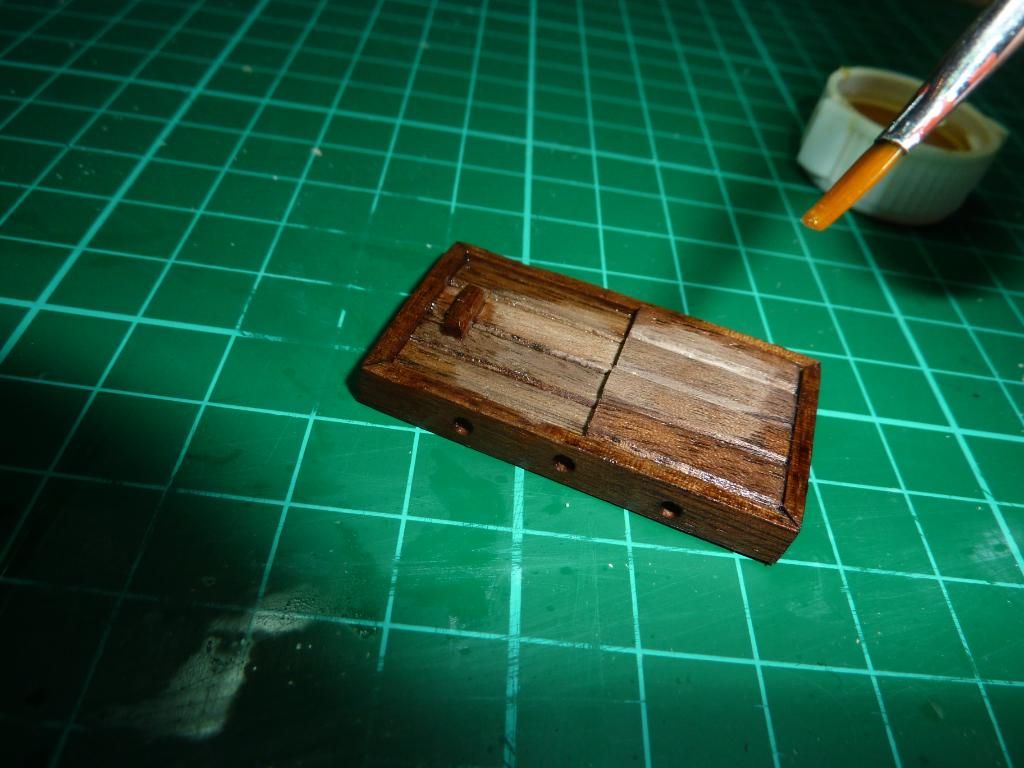  I have been looking at the mast drawing's lately, my big problem is I don't have a full size 1 : 1 scale drawing. The disc I got with the kit has the drawing's on it, but I have been to 2 copying shops and no one can do a full size 1 : 1 drawing. I have sent a pm to admin for there advice. If any one can help I would really apprieciate it. I have started on the crows nest's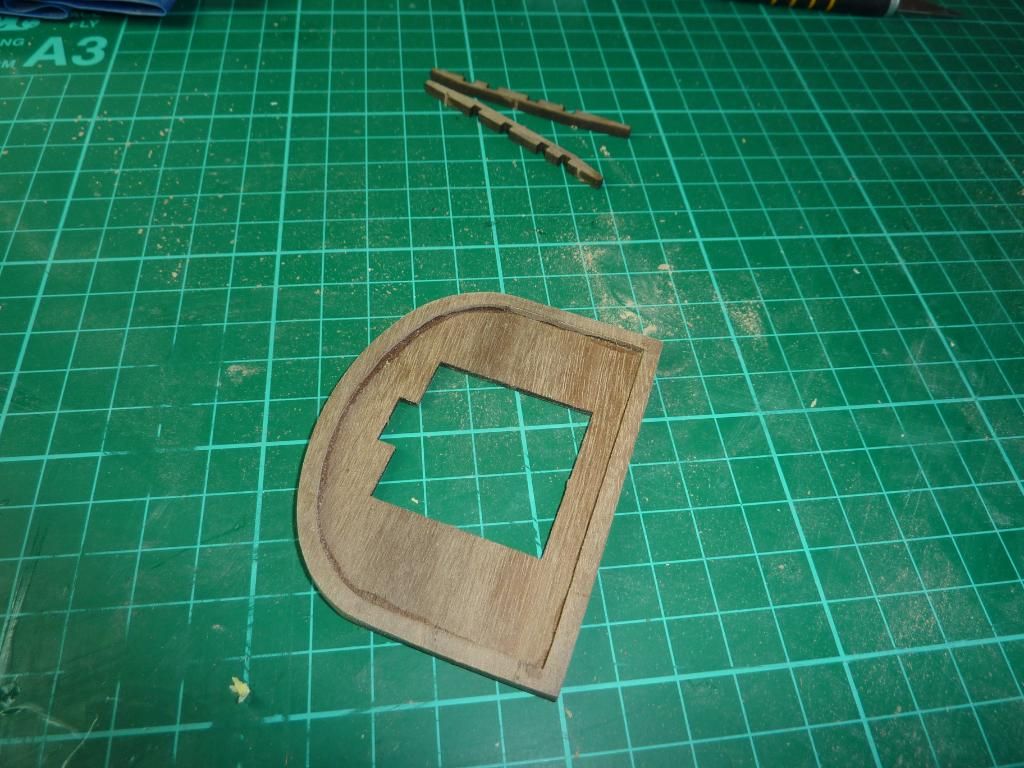     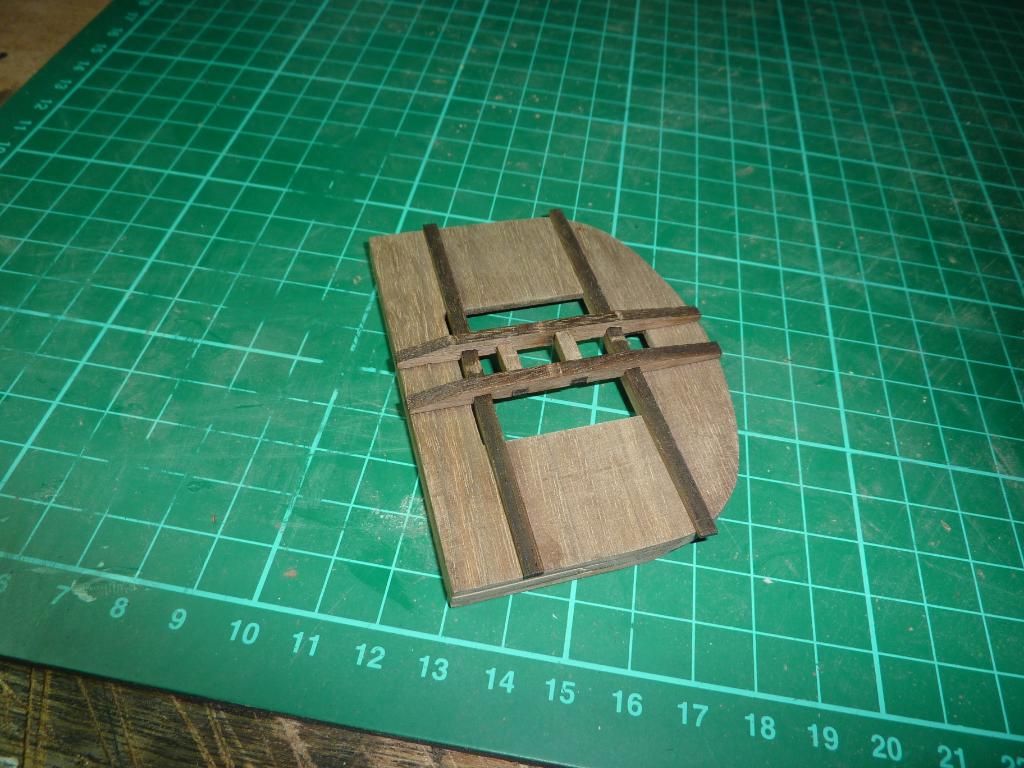 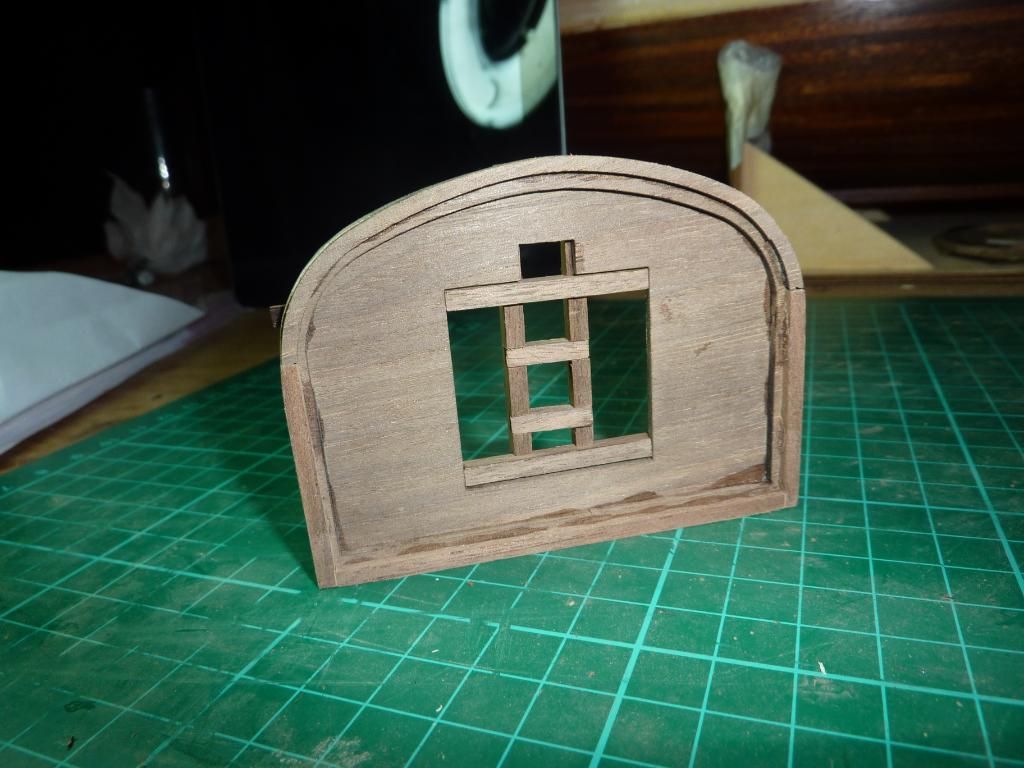 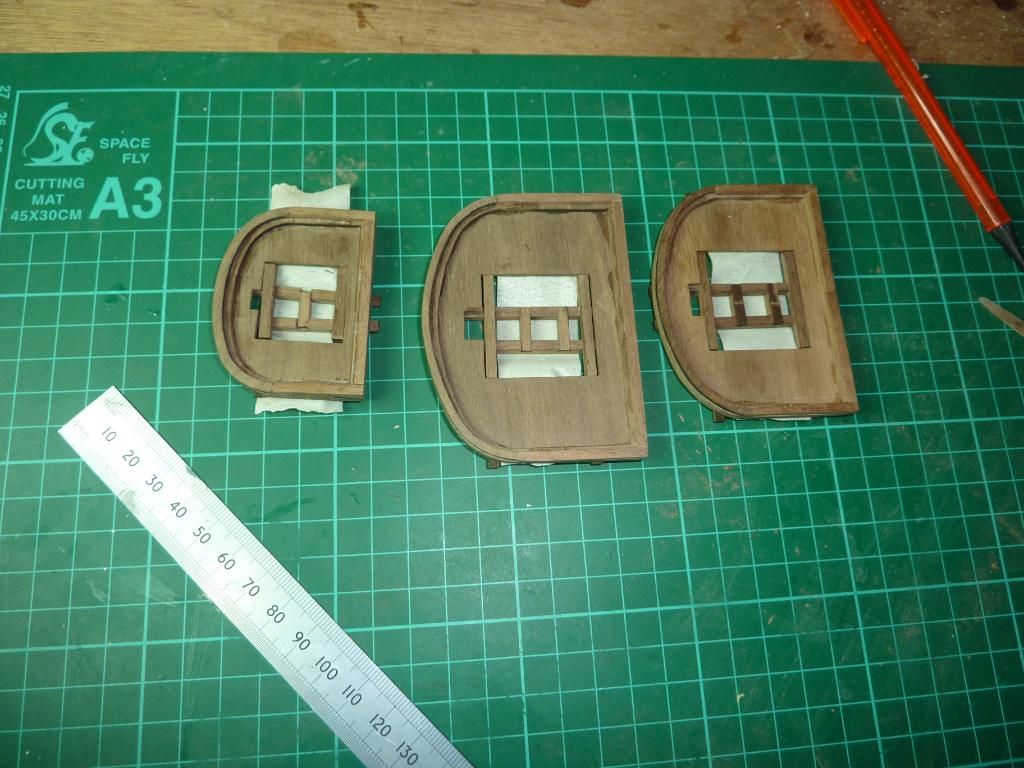 Quite a bit of work involved here, sanding and fileing to get things all fitting properly. I have not glued the cross rails together yet as I need to check the sizes, I will be giving all the timber a coat of Danish oil eventually. Quite a bit of work involved here, sanding and fileing to get things all fitting properly. I have not glued the cross rails together yet as I need to check the sizes, I will be giving all the timber a coat of Danish oil eventually.
Over and out for now.
Mo Mo
|
|
|
Rank: Vice-Master Groups: Registered
Joined: 09/02/2012 Posts: 569 Points: 1,675 Location: Scotland
|
|
|
|
Rank: Vice-Master Groups: Registered
Joined: 09/02/2012 Posts: 569 Points: 1,675 Location: Scotland
|
I have now glued and sanded the foretops, very happy,  I am doing a lot of things in the wrong order, I am on the masts before I have finished the lower deck, But I was worried I did not have the skills to do the masts, with all that tapering and changing from round to square half way up the masts, so it was something I just had to do, I have done the lower main mast and dry fitted the foretop and I am happy with the out come. I am doing a lot of things in the wrong order, I am on the masts before I have finished the lower deck, But I was worried I did not have the skills to do the masts, with all that tapering and changing from round to square half way up the masts, so it was something I just had to do, I have done the lower main mast and dry fitted the foretop and I am happy with the out come. 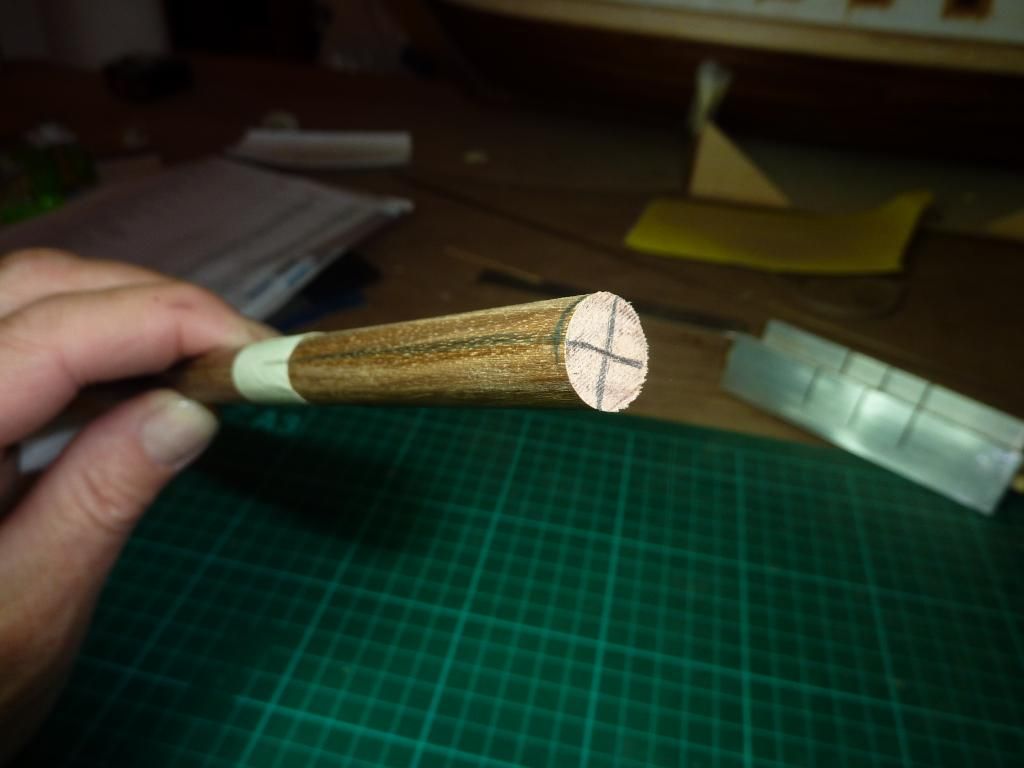 This is how I marked the four corners, to change from round to square. This is how I marked the four corners, to change from round to square. I then filed the dowel to the lines, this gave me a square profile, I kept checking the size against the hole in the foretop timbers, until the square section fitted the foretop. I then filed the dowel to the lines, this gave me a square profile, I kept checking the size against the hole in the foretop timbers, until the square section fitted the foretop.  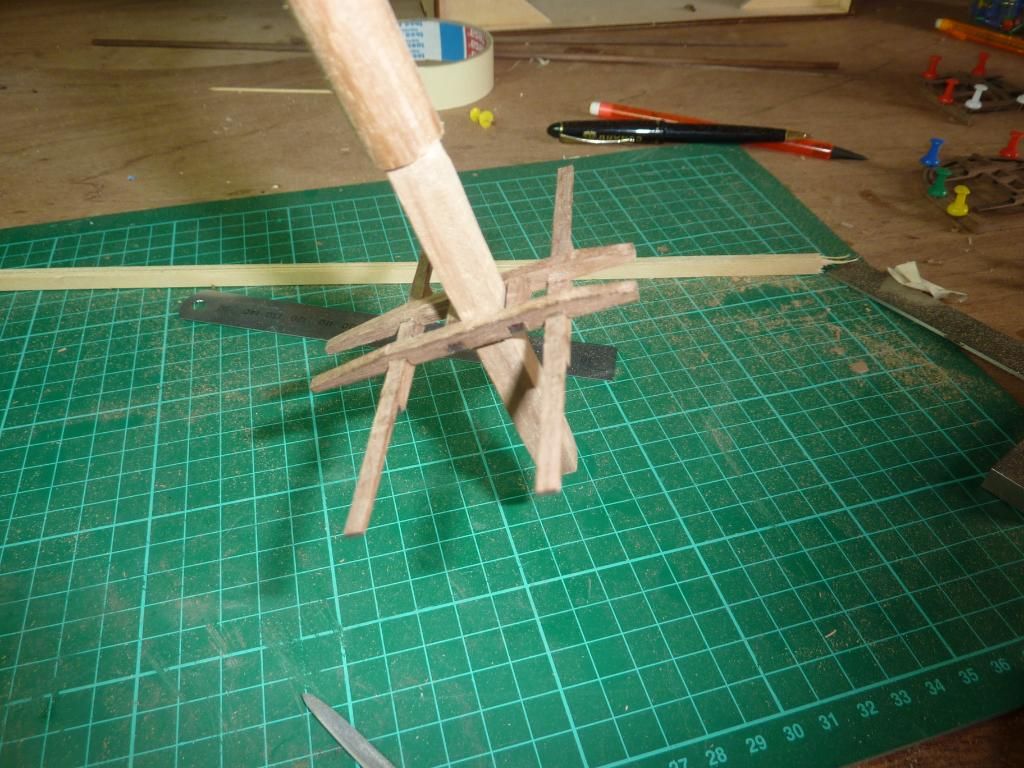 I have also shaped the middle section of the main mast, into a hexagonal section and dry fitted it to the main mast. I have also shaped the middle section of the main mast, into a hexagonal section and dry fitted it to the main mast. 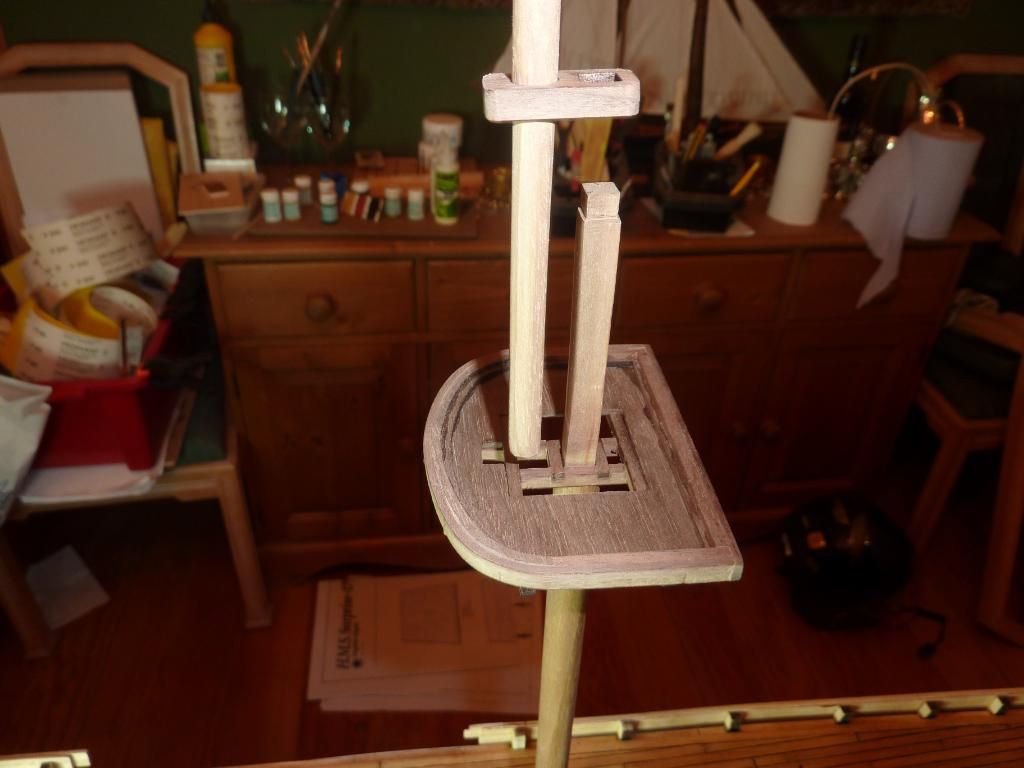  I can now relax knowing that I am able to do the work to the masts, I will carry on and take all 3 masts up to the same level. I can now relax knowing that I am able to do the work to the masts, I will carry on and take all 3 masts up to the same level.
MoMo
|
|
|
|
Guest (2)
|
 US
US

