|
|
 Rank: Vice-Master     Groups: Registered
Joined: 30/01/2011 Posts: 865 Points: 2,410 Location: Cambs
|
the caps look great mo.  i used an electric drill and sandpaper for turning victories masts. i got an cheap oven glove and used double-sided carpet tape to hold the sandpaper. then wrap some masking tape round the bottom end of the mast and put it into the drill chuck, then you just fire up the drill and sand away, just be carefull that you don't grip the sandpaper onto the mast too tightly or you can break the mast. a question for you, are those the supplied tops for the masts or did you make your own, as the walnut looks good. Come on you Jimmies
|
|
|
Rank: Vice-Master  Groups: Registered
Joined: 09/02/2012 Posts: 569 Points: 1,675 Location: Scotland
|
If your talking about the foretops for the masts, yes they were supplied with the kit. If you look at my post No 244 You can see the mast has had a coat of oak stain, and the foretops have not, But in the later posts you can see the foretops have also had a coat of oak stain, I am going to give all the walnut on the masts and yards a coat of oak stain, I really like the colour too.
MoMo
|
|
|
Rank: Vice-Master Groups: Registered
Joined: 09/02/2012 Posts: 569 Points: 1,675 Location: Scotland
|
|
|
|
 Rank: Pro  Groups: Registered
Joined: 27/08/2012 Posts: 104 Points: 312 Location: Brome Lake Quebec
|
Beautiful work on the catheads Mo. This is going to be a cracker.
John
|
|
|
Rank: Pro Groups: Registered
Joined: 06/08/2011 Posts: 480 Points: 1,421 Location: Galway
|
Looks like she will be a model to be proud of 
|
|
|
Rank: Vice-Master  Groups: Registered
Joined: 13/01/2012 Posts: 605 Points: 1,630 Location: Bucks
|
Been watching for a while now Mo and I reckon you are doing a first class job there. Nice piece of geometry on the catheads, well worked out. I have made up my mind bout coppering an I am going to have ago. I have laid down the waterline in wood to take the first line and am ready to start but need to build a jig to get the thing upside down, any ideas? Also can you give a measurement on the mainmast from the upper deck to the platform level cos it seems to be a height that does not look to be in scale but yours looks ok. Maybe it is just me but it is hard to scale things looking at build pictures  HMS Surprise
HMS Snake
HMS Bounty
HMS Royal Caroline
HMS Victory rebuild
HMS Supply
|
|
|
Rank: Vice-Master Groups: Registered
Joined: 30/01/2011 Posts: 865 Points: 2,410 Location: Cambs
|
Mo wrote:If your talking about the foretops for the masts, yes they were supplied with the kit. If you look at my post No 244 You can see the mast has had a coat of oak stain, and the foretops have not, But in the later posts you can see the foretops have also had a coat of oak stain, I am going to give all the walnut on the masts and yards a coat of oak stain, I really like the colour too.
Mo they look good both stained and unstained. cat heads looking good Come on you Jimmies
|
|
|
Rank: Vice-Master Groups: Registered
Joined: 09/02/2012 Posts: 569 Points: 1,675 Location: Scotland
|
Moriarty,
I have a size on my drawing which goes like this. Main Mast, ( the middle one ) 65 mm from bottom of mast to top of the upper deck, 360 mm from the bottom of the mast ( again the very bottom of the mast, where it goes below the level of the lower deck ) to where the square section starts to accommodate the foretop. Giving you a size of 295 mm from top of upper deck, to underside of foretop. Hope this makes sense.
Mo Mo
|
|
|
Rank: Vice-Master Groups: Registered
Joined: 09/02/2012 Posts: 569 Points: 1,675 Location: Scotland
|
Thanks all for your encouragement, I have really Surprised myself at the level of detail I have been able to turn out, So if anyone else thinks they might " not be able " it is amazing what you can do, if you put the hours and commitment into something. Don't want to say much more, I am a long way from finishing this project, the rigging I think will really test my witt's
MoMo
|
|
|
Rank: Vice-Master Groups: Registered
Joined: 13/01/2012 Posts: 605 Points: 1,630 Location: Bucks
|
Cheers Mo, it does make sense. I was about 55mm outfor some reason. must have got distracted and forgot all about it. HMS Surprise
HMS Snake
HMS Bounty
HMS Royal Caroline
HMS Victory rebuild
HMS Supply
|
|
|
Rank: Pro   Groups: Registered
Joined: 25/01/2010 Posts: 459 Points: 1,367 Location: Bridlington
|
|
|
|
Rank: Vice-Master Groups: Registered
Joined: 09/02/2012 Posts: 569 Points: 1,675 Location: Scotland
|
Still on the anchor davits, I have painted the rosettes, 3 coats, and painted the cleat things. 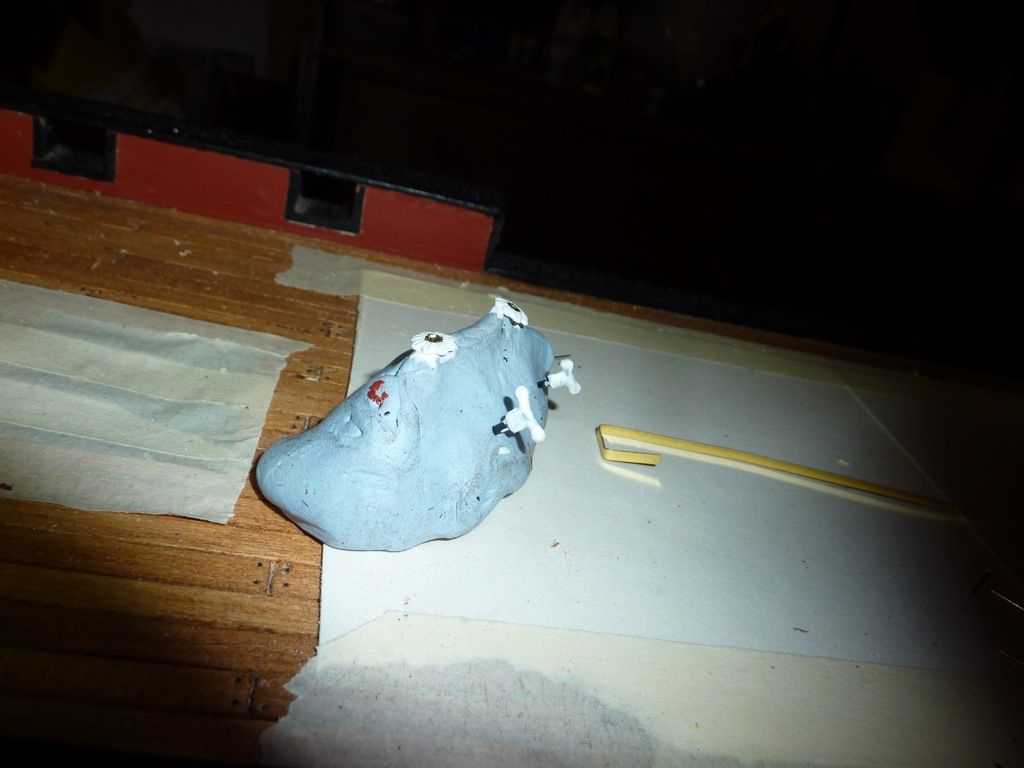 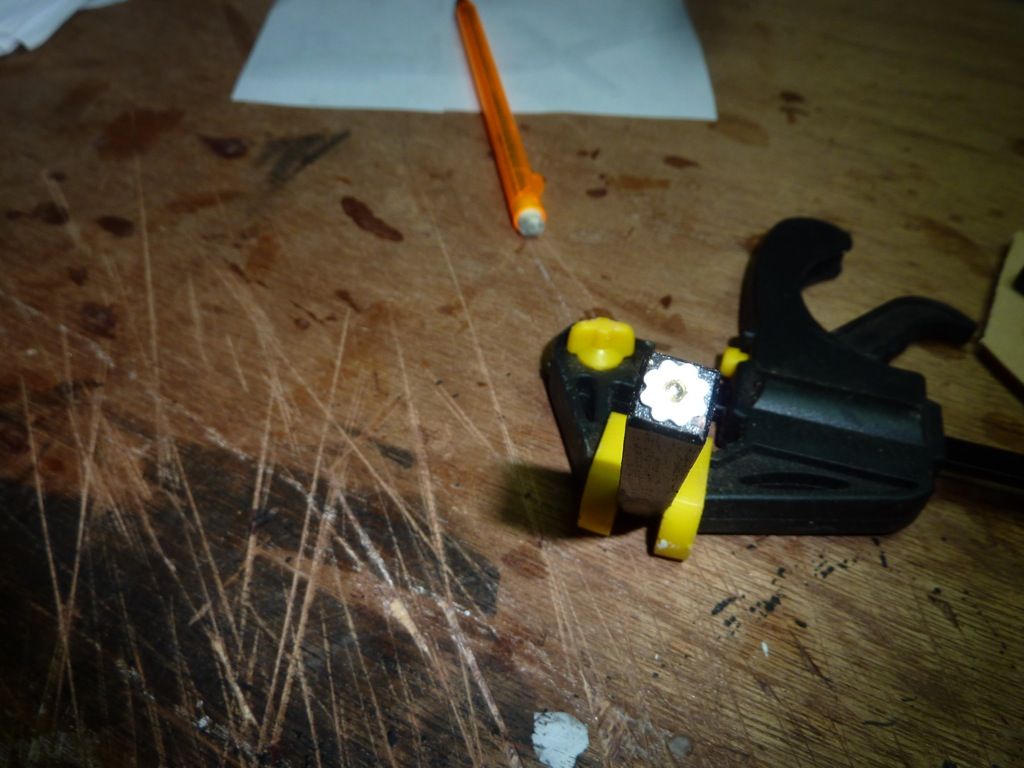 I have also bought a dremel drill jig, I needed this to bore the elongated holes in the timbers, I read a couple of bad reports about the jig, but all in all its fit for purpose, I would say. I have also bought a dremel drill jig, I needed this to bore the elongated holes in the timbers, I read a couple of bad reports about the jig, but all in all its fit for purpose, I would say. 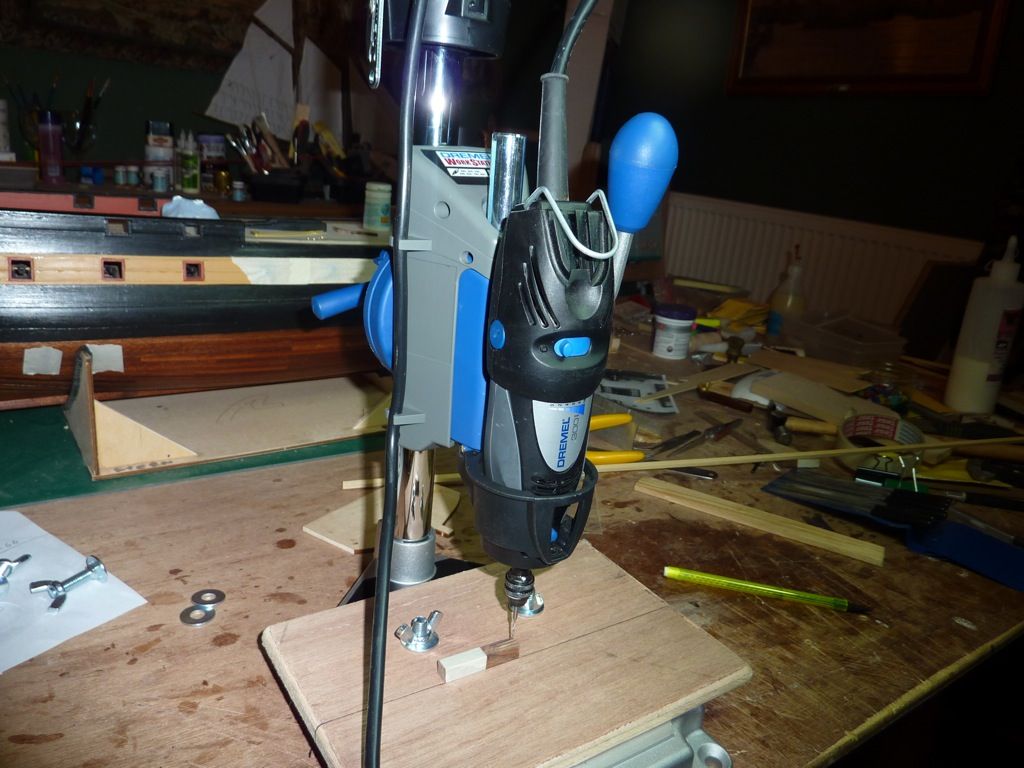 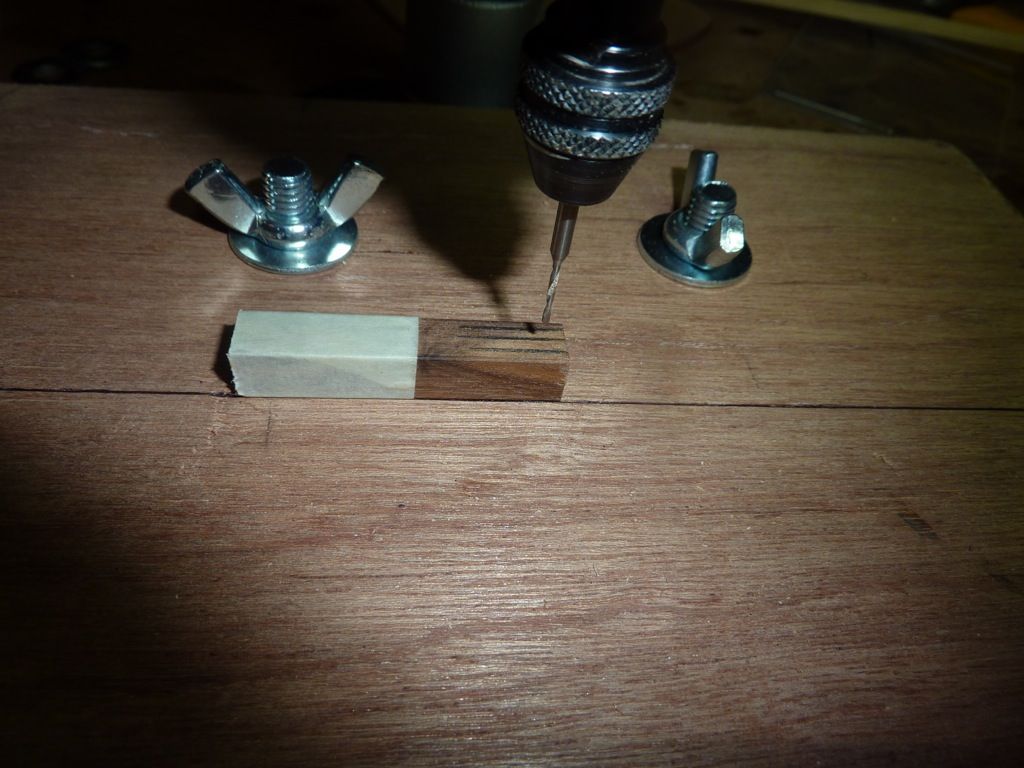 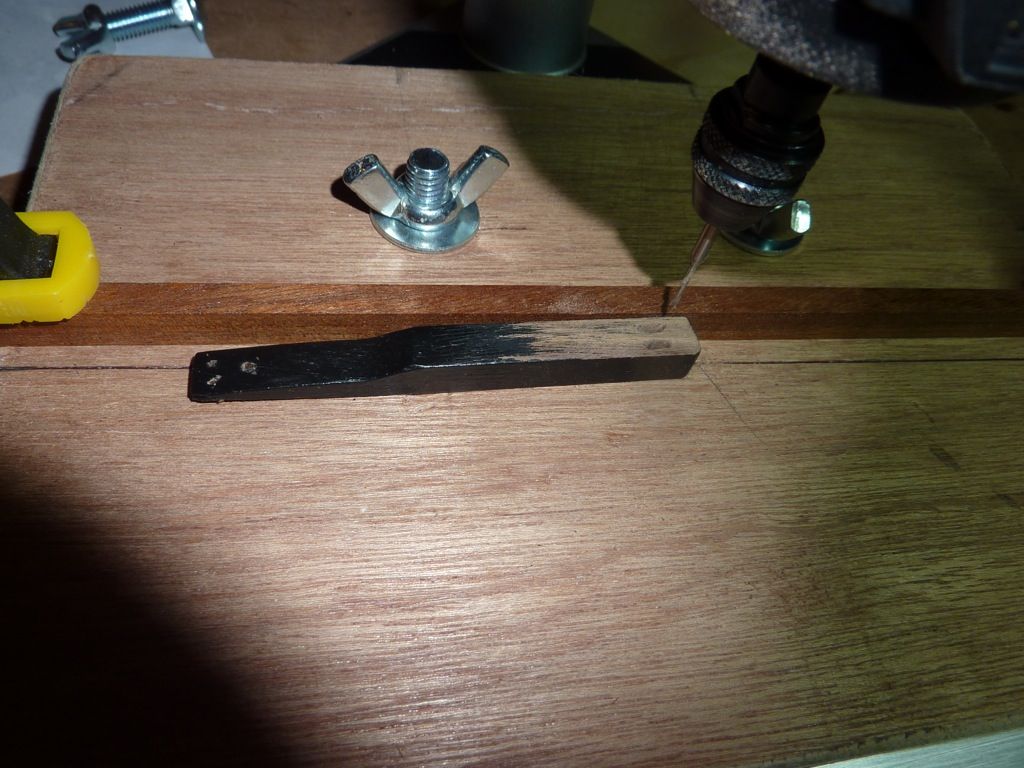 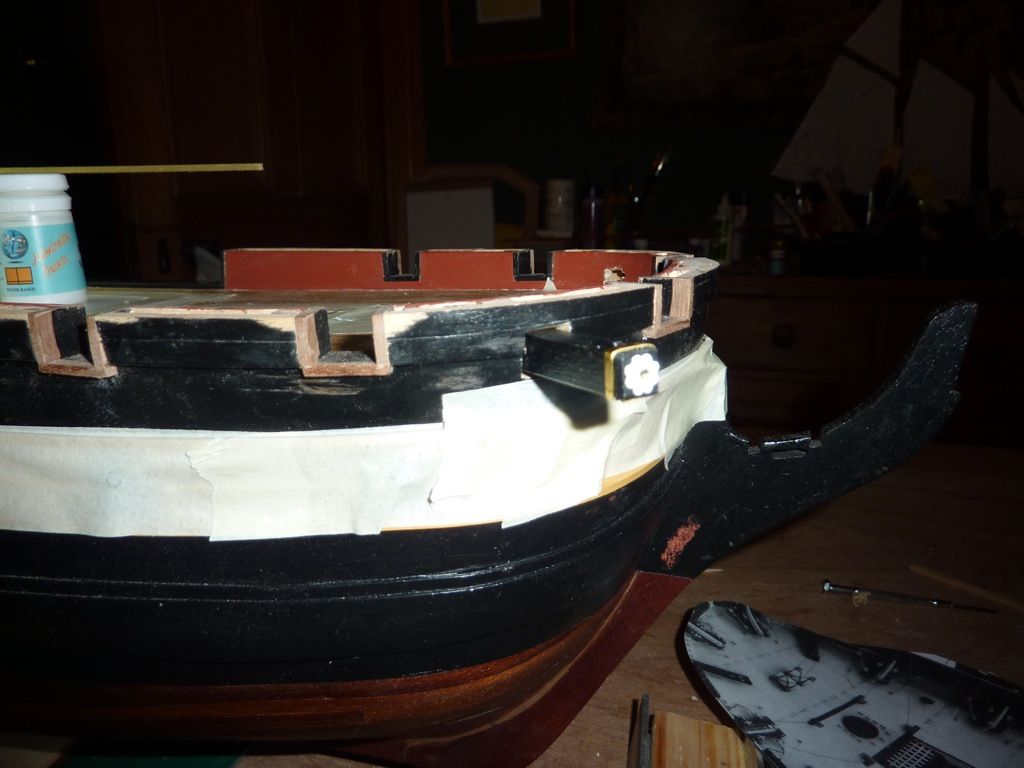 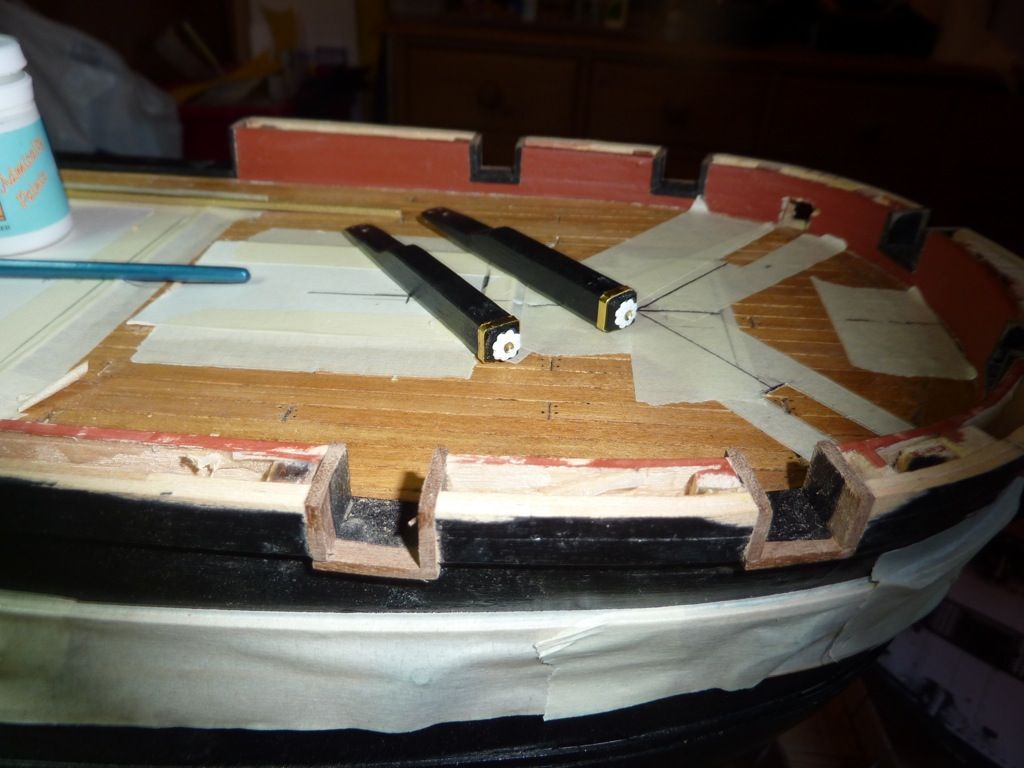 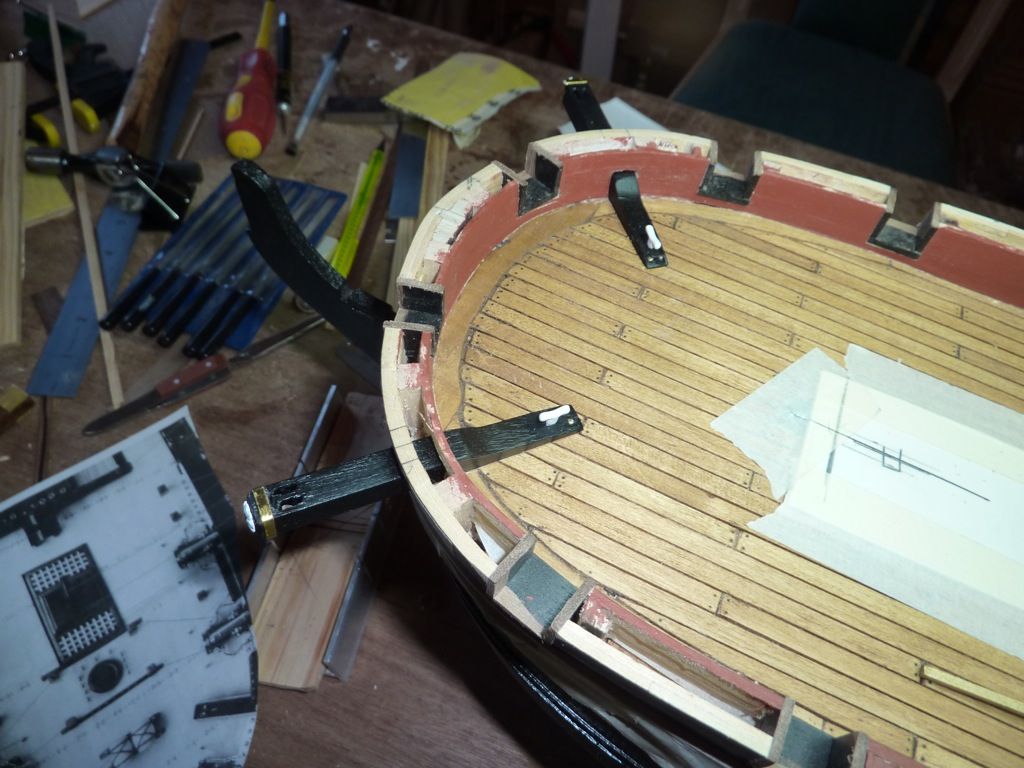 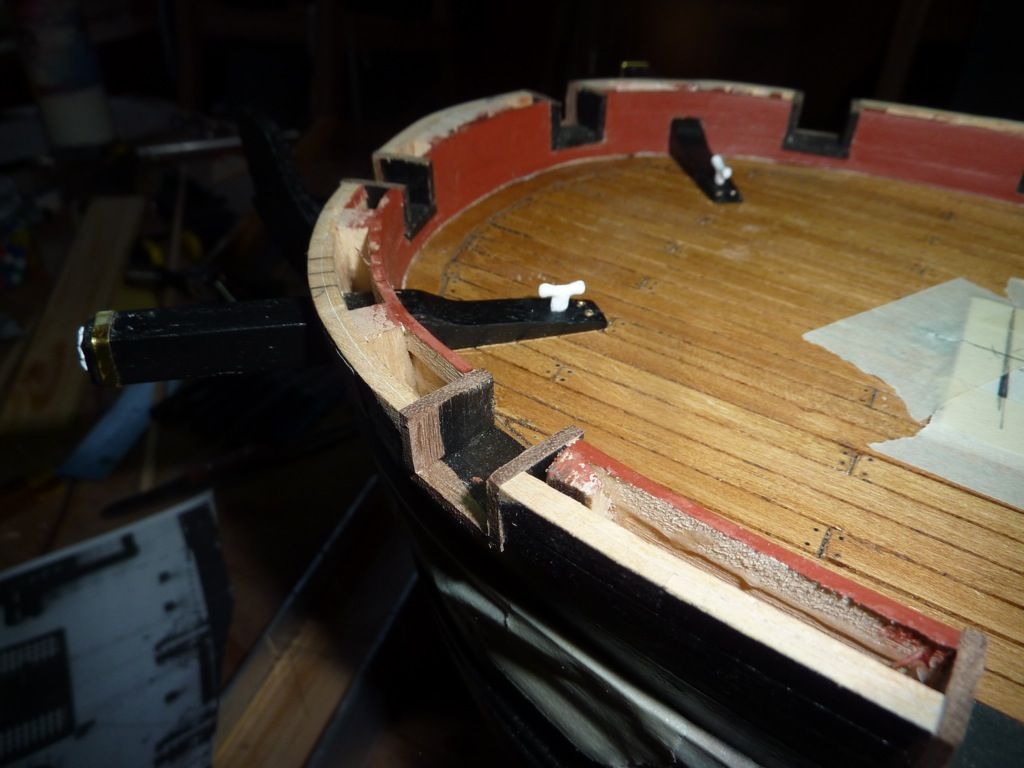 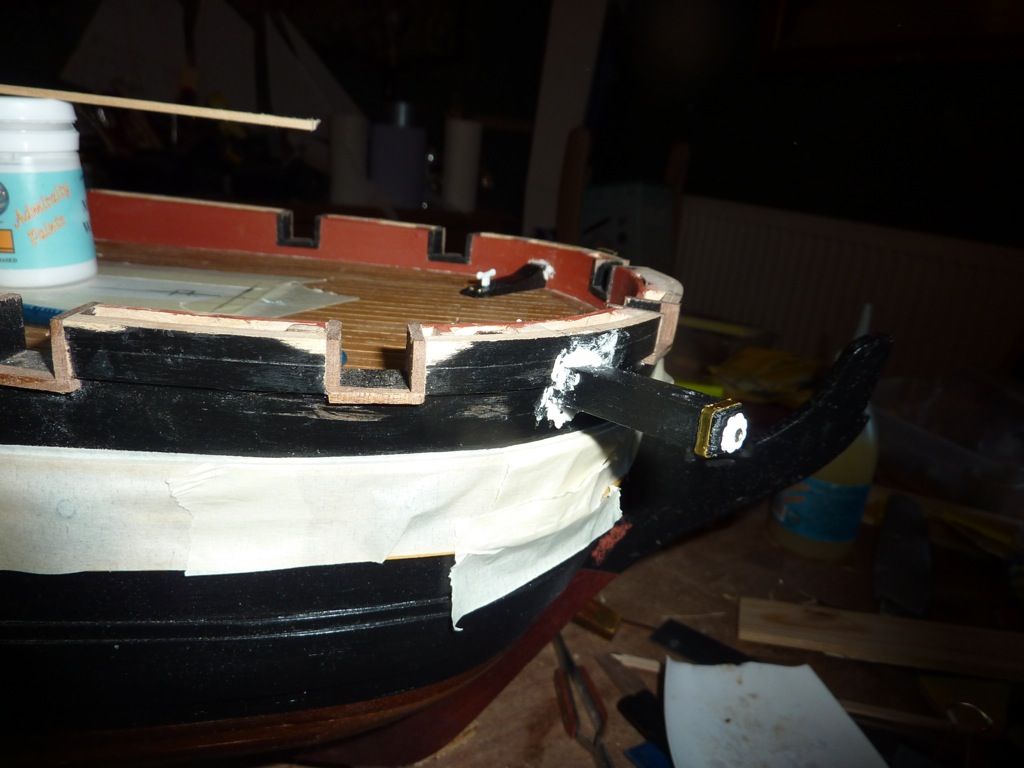 The timbers are all painted and fitted now, I have also filled the holes around the cut outs to tidy them up and will paint, I am going to stick to the front of the ship now for a while, try to do the funny shaped bits. The timbers are all painted and fitted now, I have also filled the holes around the cut outs to tidy them up and will paint, I am going to stick to the front of the ship now for a while, try to do the funny shaped bits.
MoMo
|
|
|
Rank: Vice-Master Groups: Registered
Joined: 20/10/2010 Posts: 511 Points: 1,459 Location: Loughborough
|
|
|
|
Rank: Vice-Master   Groups: Registered
Joined: 17/11/2012 Posts: 863 Points: 2,608 Location: Gohfeld (Germany)
|
Nice progress, go on this way! Regards, Bernd
|
|
|
Rank: Vice-Master Groups: Registered
Joined: 09/02/2012 Posts: 569 Points: 1,675 Location: Scotland
|
The Anchor davits are looking of now, filled and sanded and painted. Mo
|
|
|
Rank: Vice-Master Groups: Registered
Joined: 09/02/2012 Posts: 569 Points: 1,675 Location: Scotland
|
The Anchor davits are all looking ok now, filled, sanded and painted.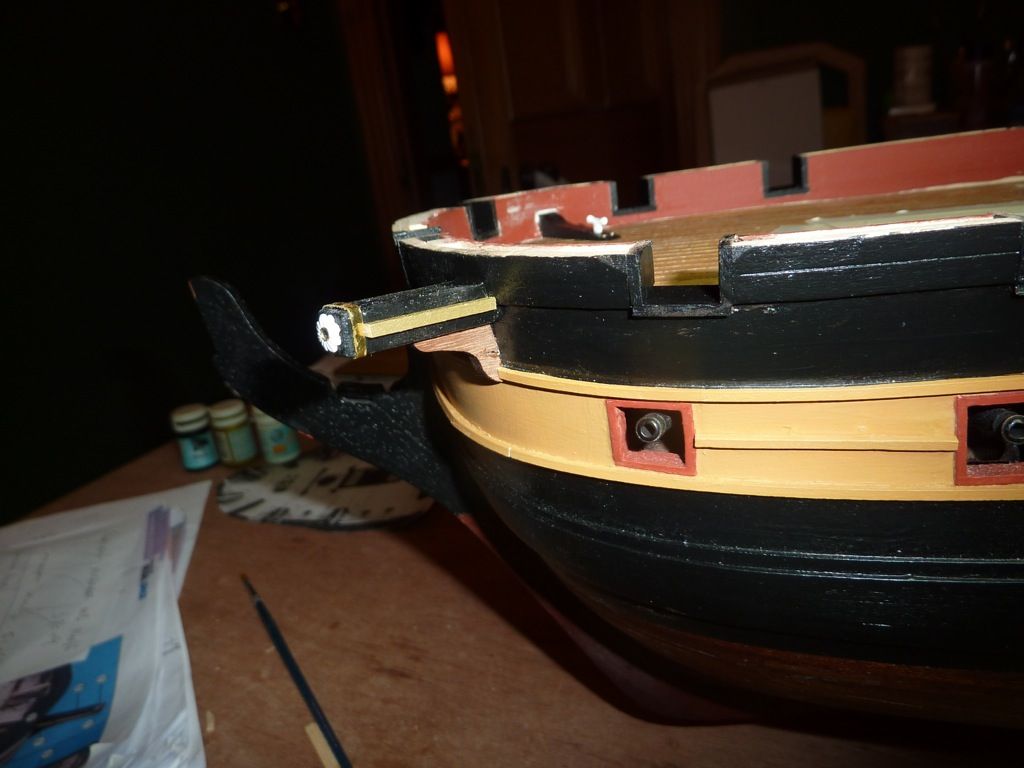 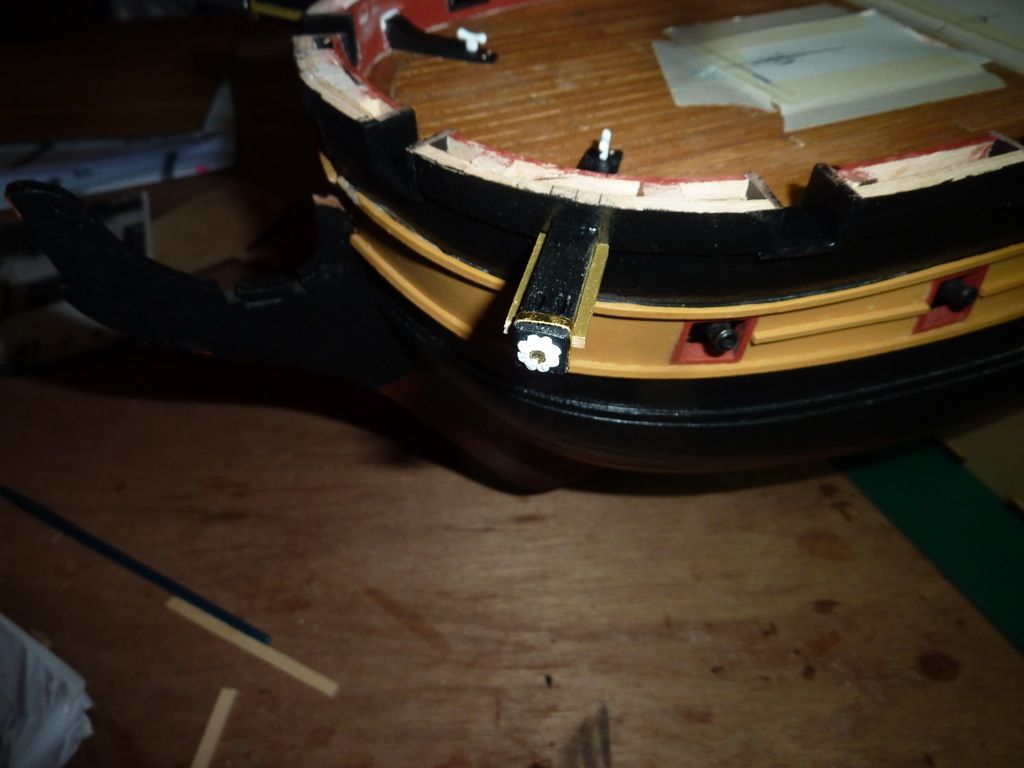 I am sticking to the front of the boat for the next while, I am going to try and copy James Choi's build, the fancy detail around the bowsprit, His work is outstanding. I am sticking to the front of the boat for the next while, I am going to try and copy James Choi's build, the fancy detail around the bowsprit, His work is outstanding.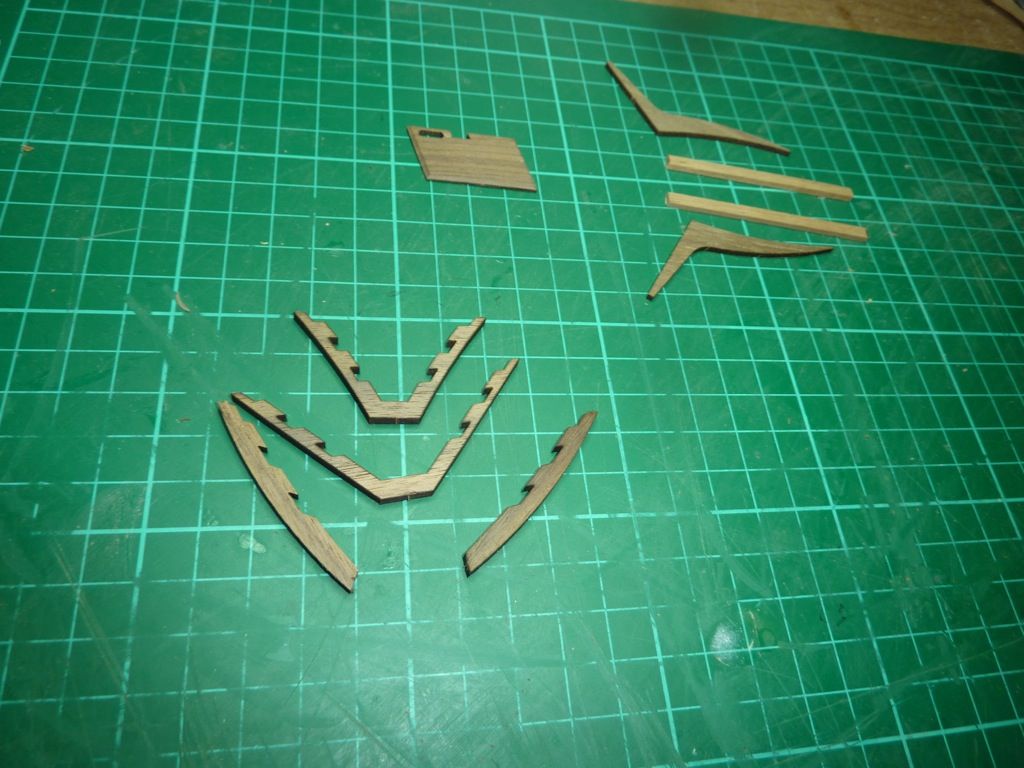 I have looked out all the pieces for this area, Studied the drawings and instructions, lol. I have looked out all the pieces for this area, Studied the drawings and instructions, lol.  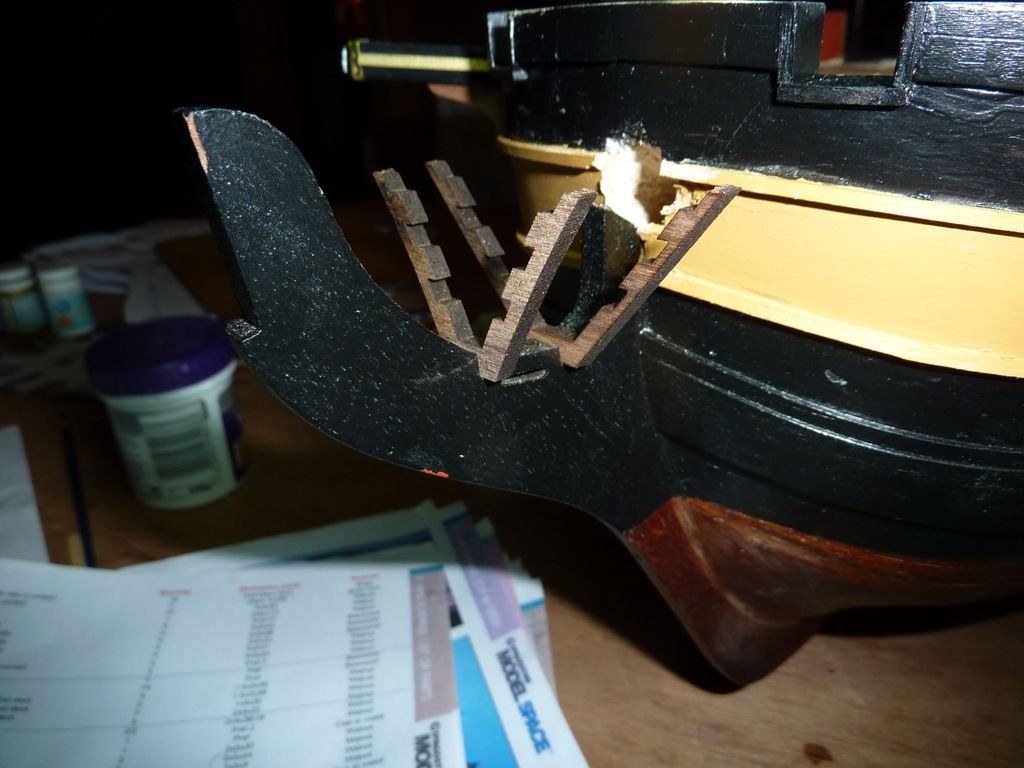 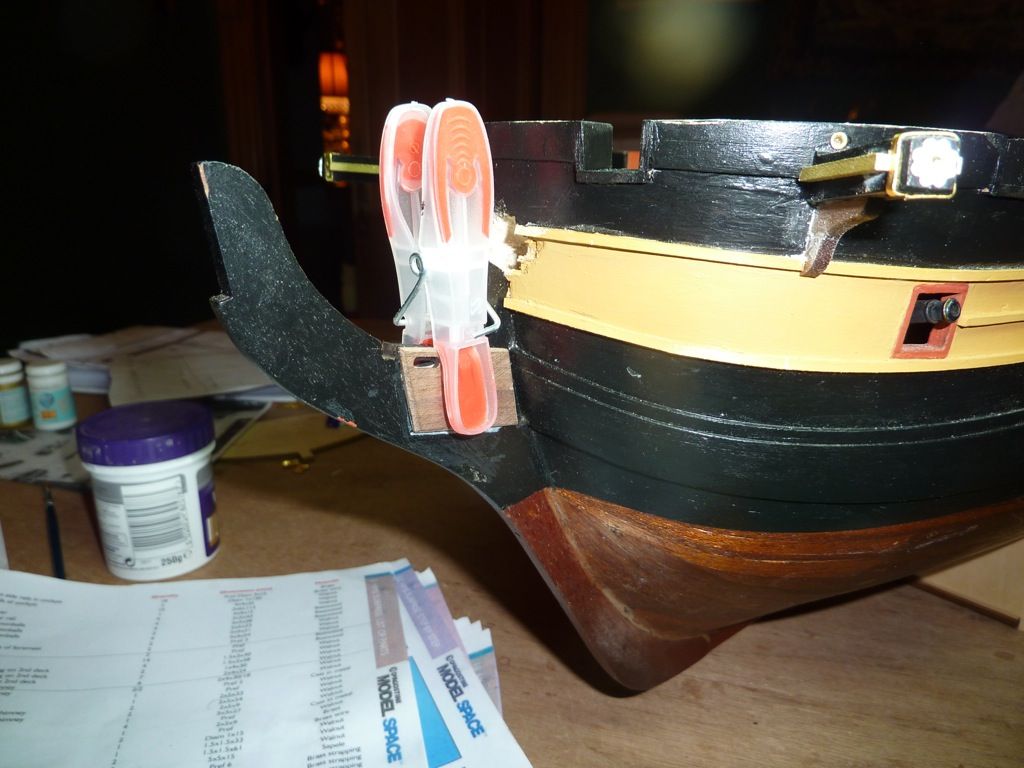 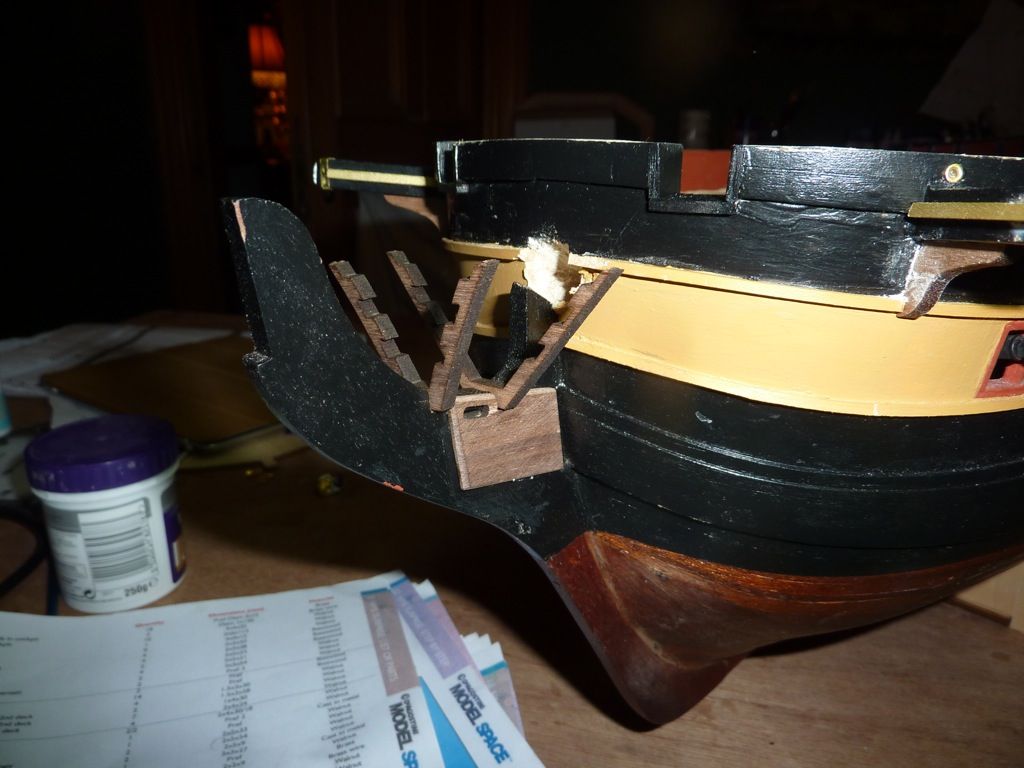 I am dry fitting first, just to make sure things look ok, and I will be painting before glueing in place. I am dry fitting first, just to make sure things look ok, and I will be painting before glueing in place.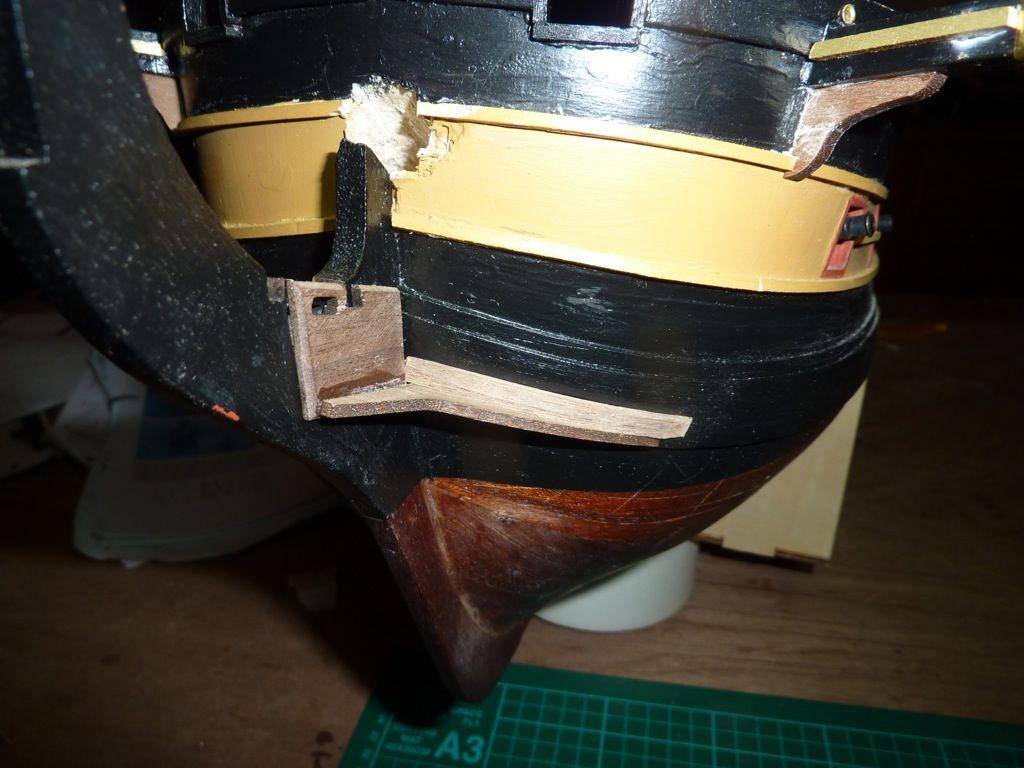 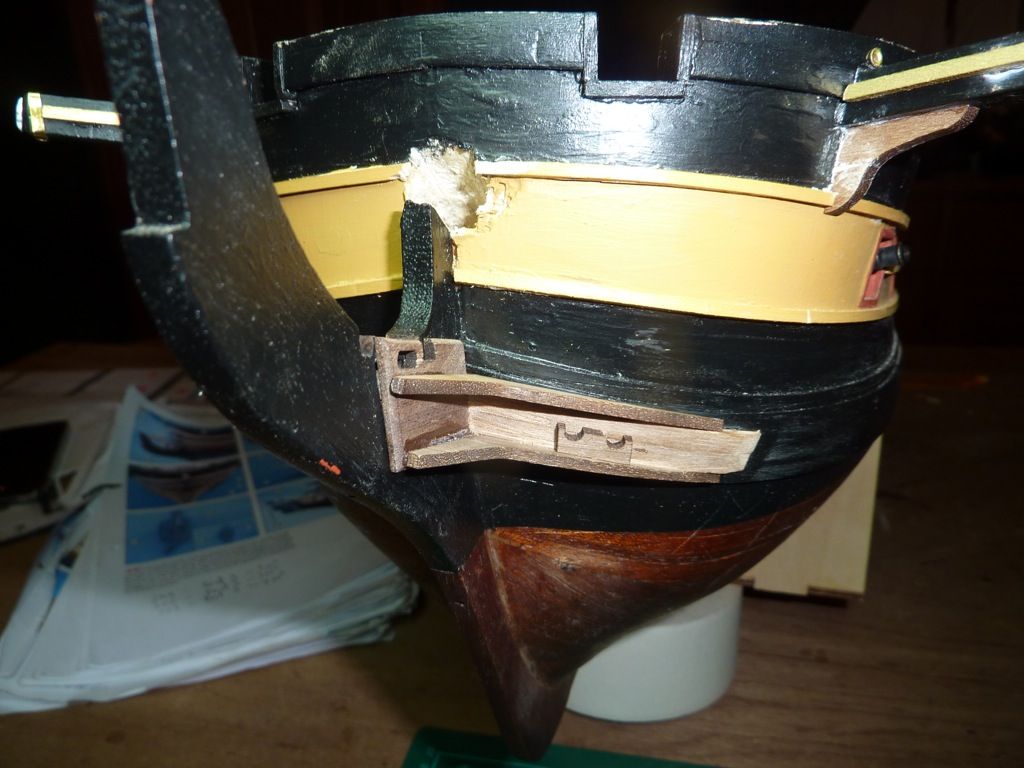 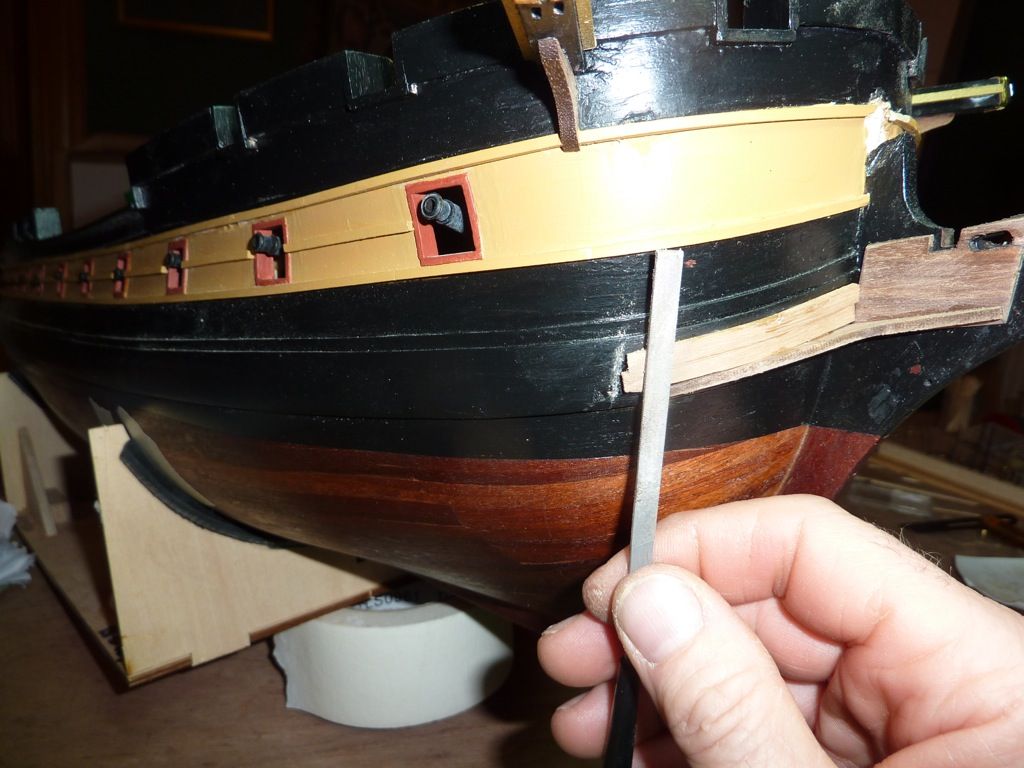  This area around the bow is tricky, a lot of different colours of paint meeting here,Not going to drink to much this weekend, will need a steady hand for this task. This area around the bow is tricky, a lot of different colours of paint meeting here,Not going to drink to much this weekend, will need a steady hand for this task.
MoMo
|
|
|
Rank: Vice-Master Groups: Registered
Joined: 17/11/2012 Posts: 863 Points: 2,608 Location: Gohfeld (Germany)
|
Uups, a real challange and a lot of hard work to be done! Regards, Bernd
|
|
|
Rank: Vice-Master Groups: Registered
Joined: 09/02/2012 Posts: 569 Points: 1,675 Location: Scotland
|
Yes indeed, Bernd, But we just have to take our time, and we will work it all out, I never really thought I could do such intricate work. Its coming up to the holiday period and should get quite a bit done over the next few weeks, I treat every small area as a project of it's own.
Mo 🚣 ⚓ 🍺 Mo
|
|
|
Rank: Vice-Master Groups: Registered
Joined: 09/02/2012 Posts: 569 Points: 1,675 Location: Scotland
|
Things seem to be taking an age just now, Can't see myself getting much done, anyway, I have had some remedial's to do, to the timber adjacent to the hole I bored for the bowsprit, As I was boring the hole some splinters came of and I have to cut out the broken bit and replace with a new bit. I have also fitted the timber painted red, to a position of about 5mm above the timber to the top side of the gun ports, 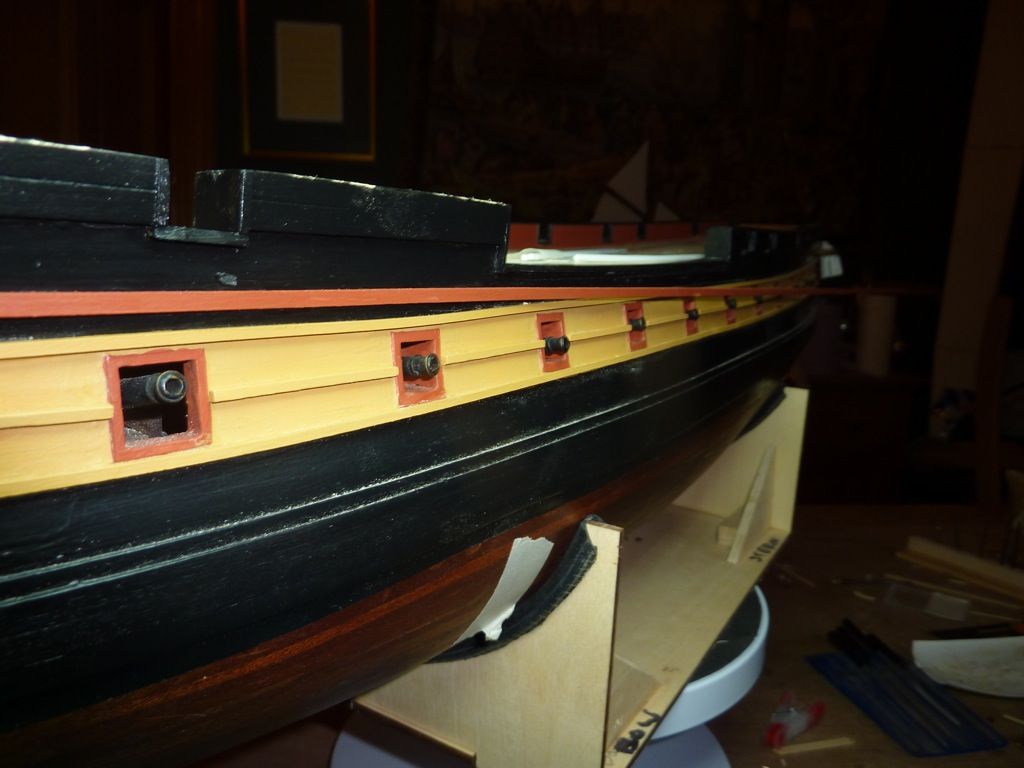 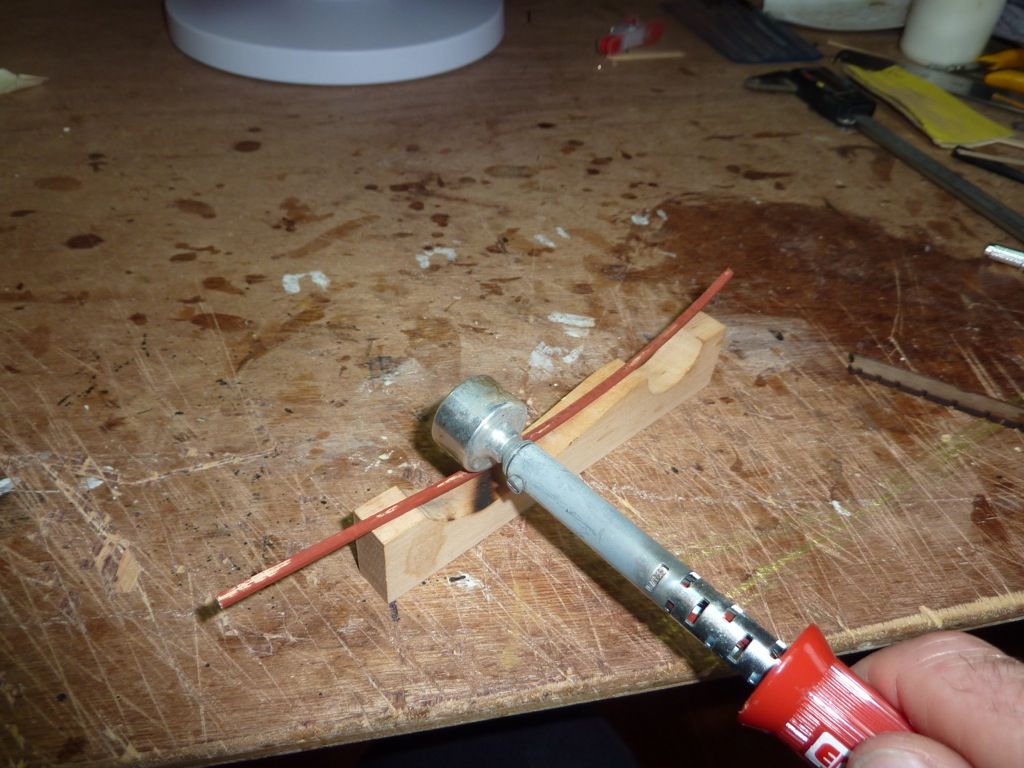 Thank goodness for the electric plank bender. Thank goodness for the electric plank bender.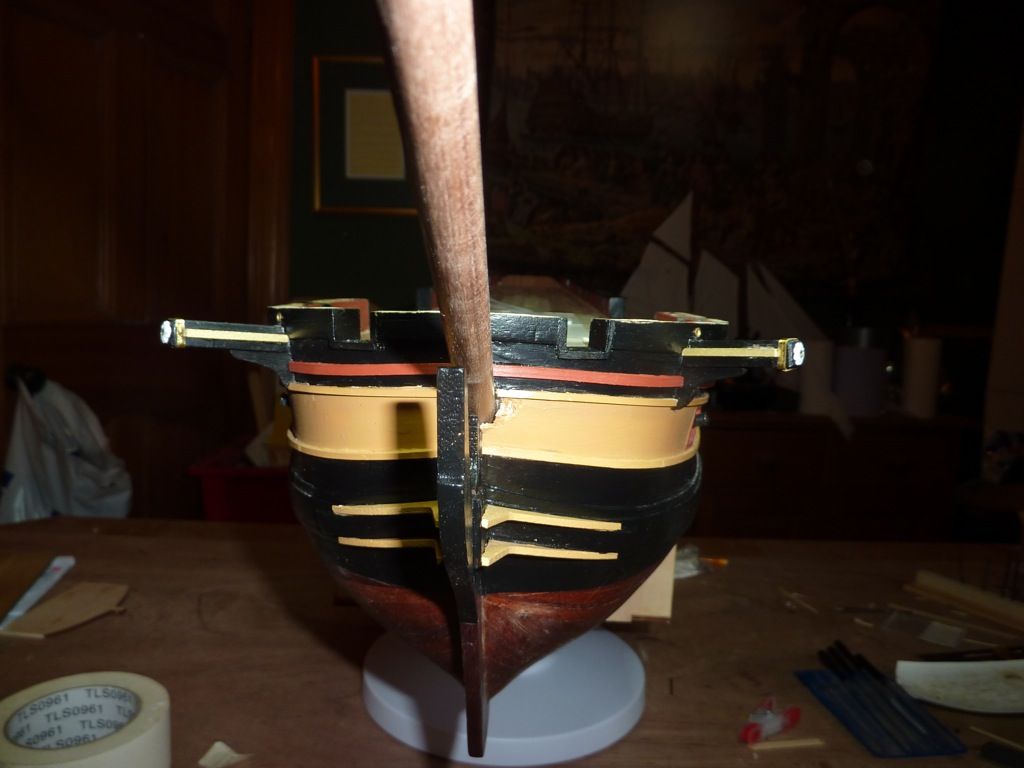 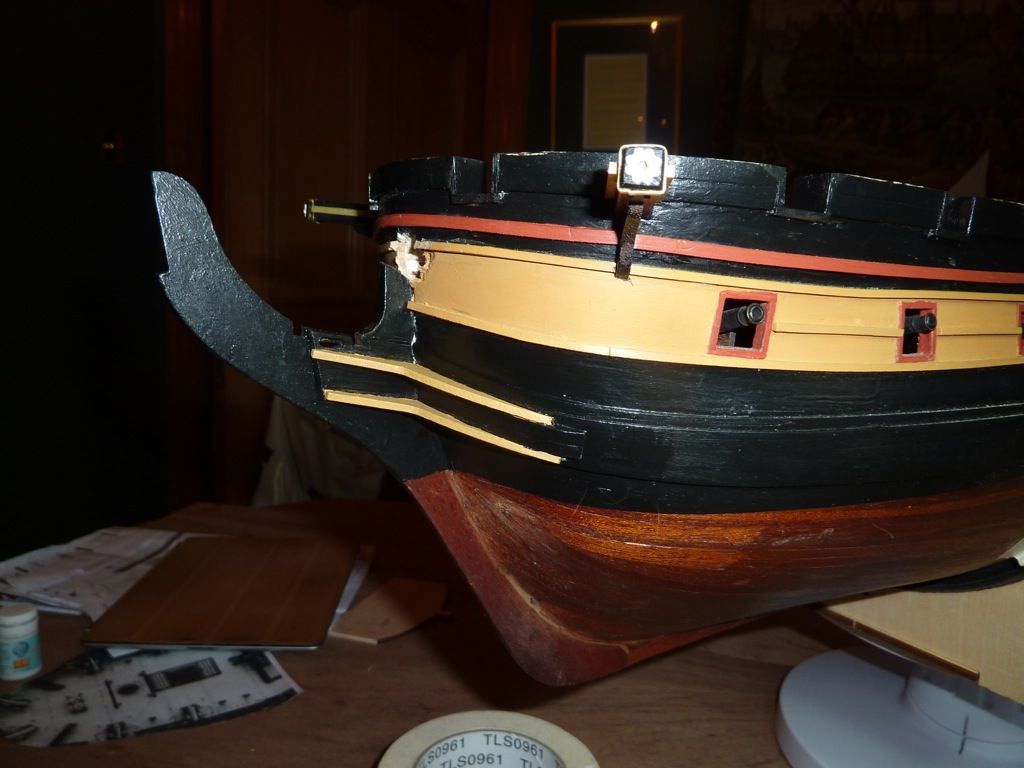 I have also bought a revolving cake stand, this is enabling me to turn the model around, just by spinning the cake stand. ( yet another great idea I found on this forum, ) I have also bought a revolving cake stand, this is enabling me to turn the model around, just by spinning the cake stand. ( yet another great idea I found on this forum, )  I have also been completing the timbers to the centre line of the gunports, I had not done the front ones, as the bowsprit was not bored at the time of fitting. I have also been completing the timbers to the centre line of the gunports, I had not done the front ones, as the bowsprit was not bored at the time of fitting.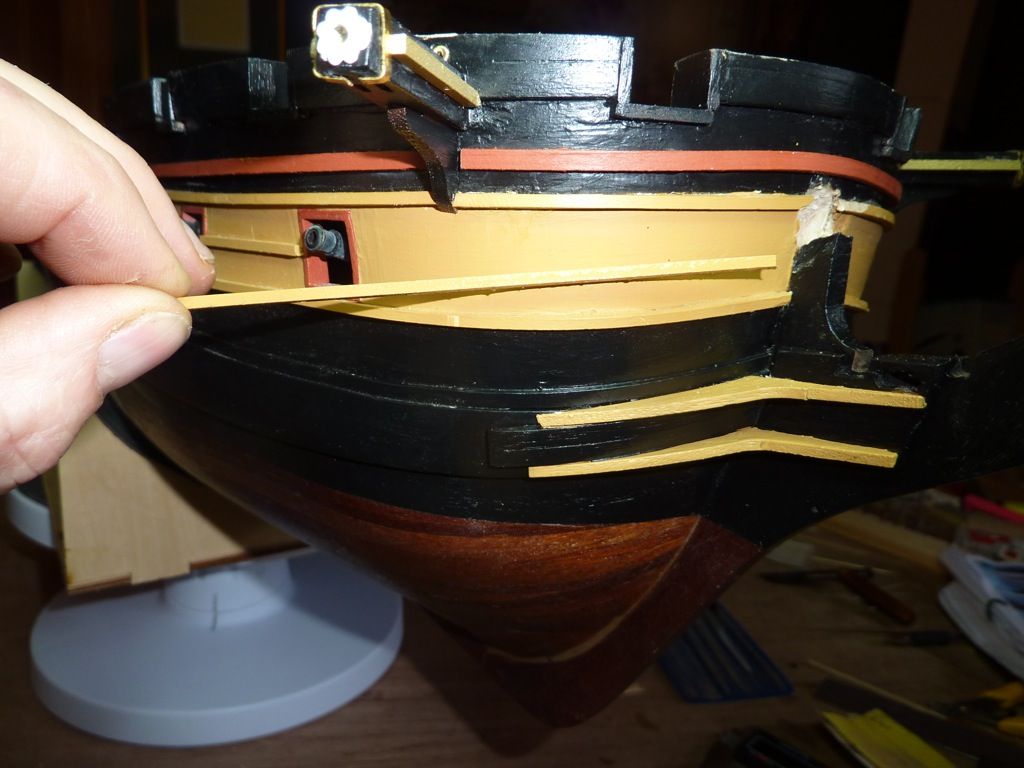 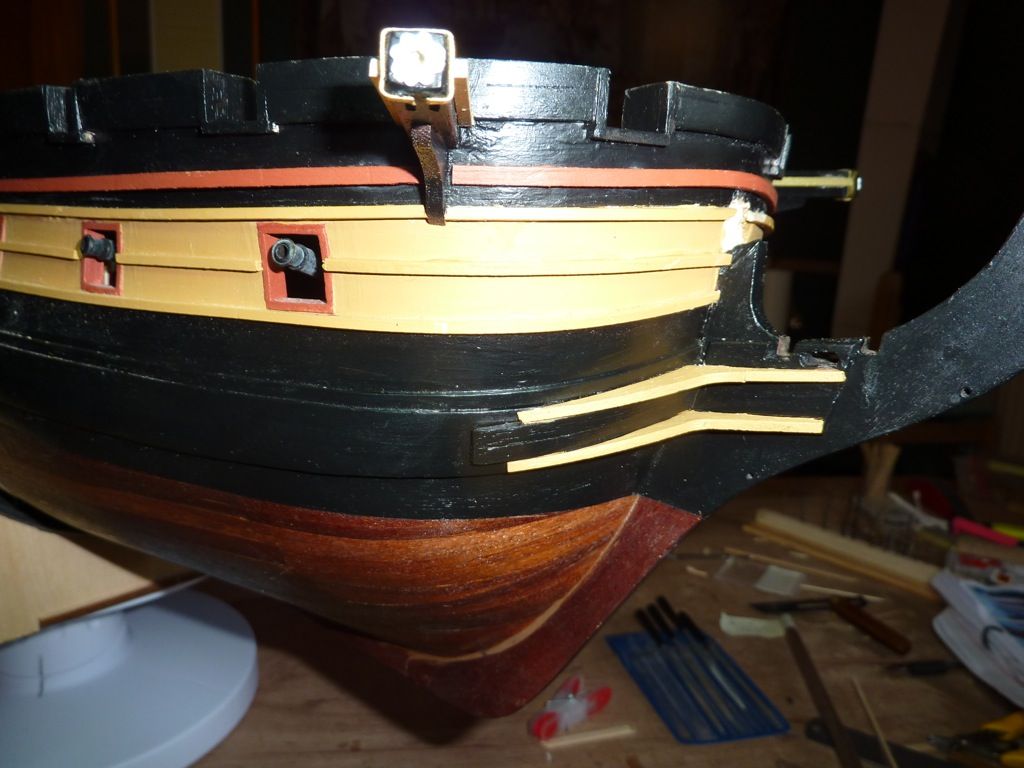  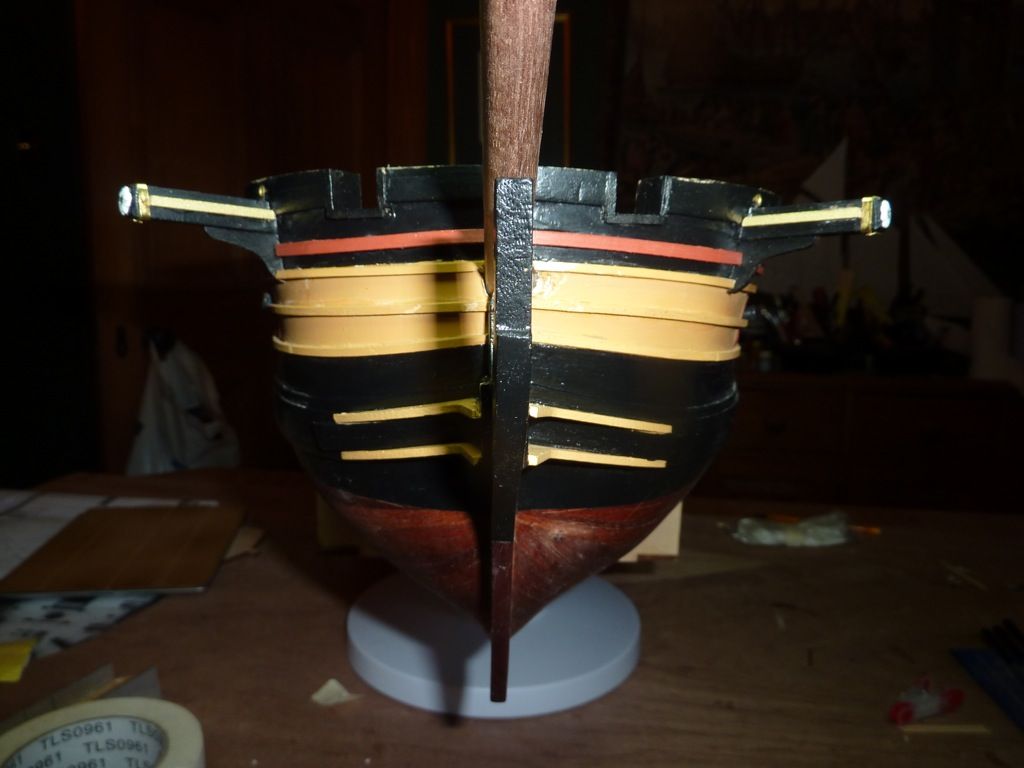 There was also little pieces of timber to be fitted to the front, turning upwards, This again was very fiddly, and were had made and shaped to suit, I again have choosen to paint them Yellow Ochre. There was also little pieces of timber to be fitted to the front, turning upwards, This again was very fiddly, and were had made and shaped to suit, I again have choosen to paint them Yellow Ochre.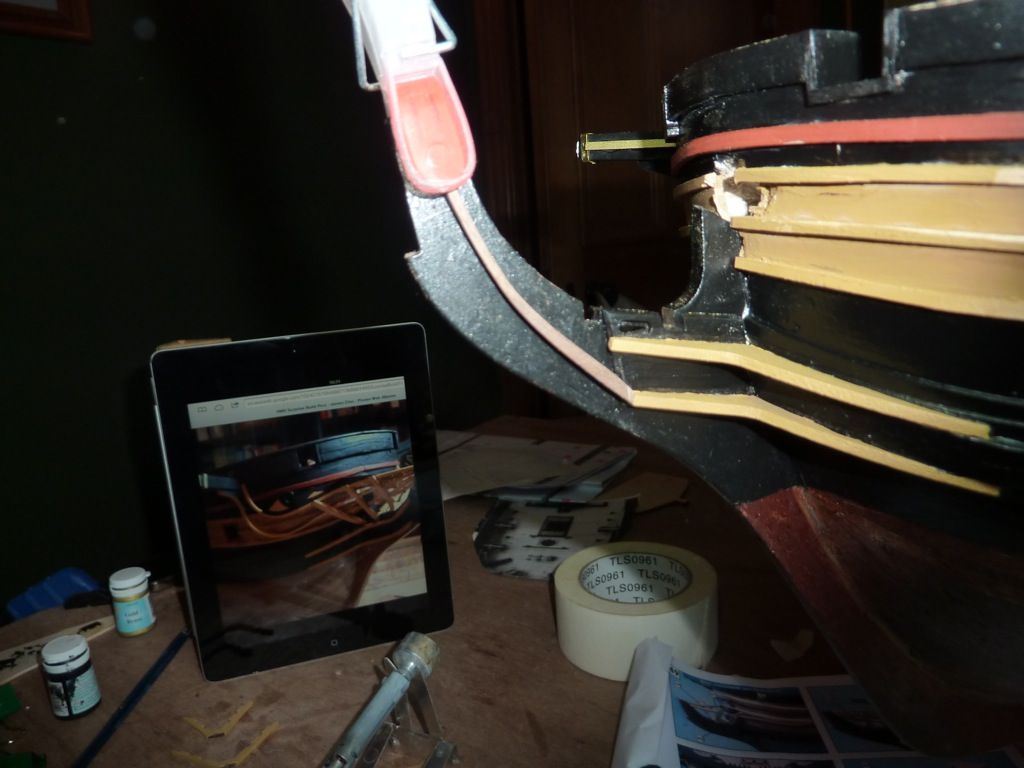 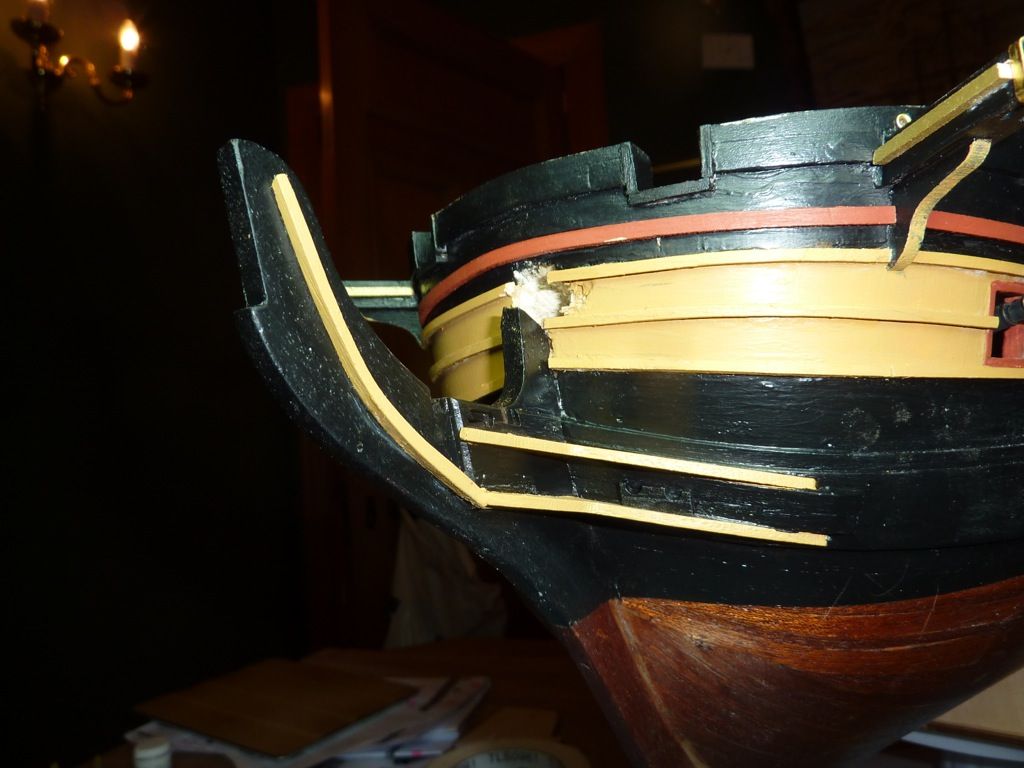 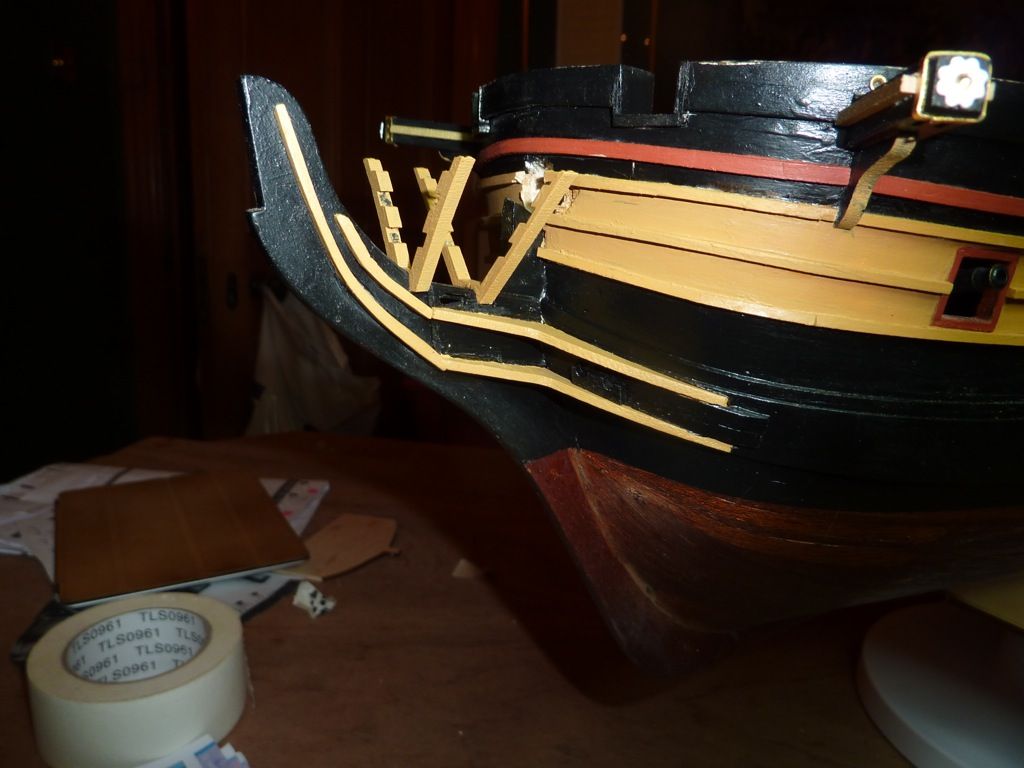 Now comes the really really fiddly bit, These curved timbers to the bow, I am taking Moriaity's advice here and I am going to use Plastic, I have picked up some 2mm x 2mm pieces of plastic, So here goes. Now comes the really really fiddly bit, These curved timbers to the bow, I am taking Moriaity's advice here and I am going to use Plastic, I have picked up some 2mm x 2mm pieces of plastic, So here goes.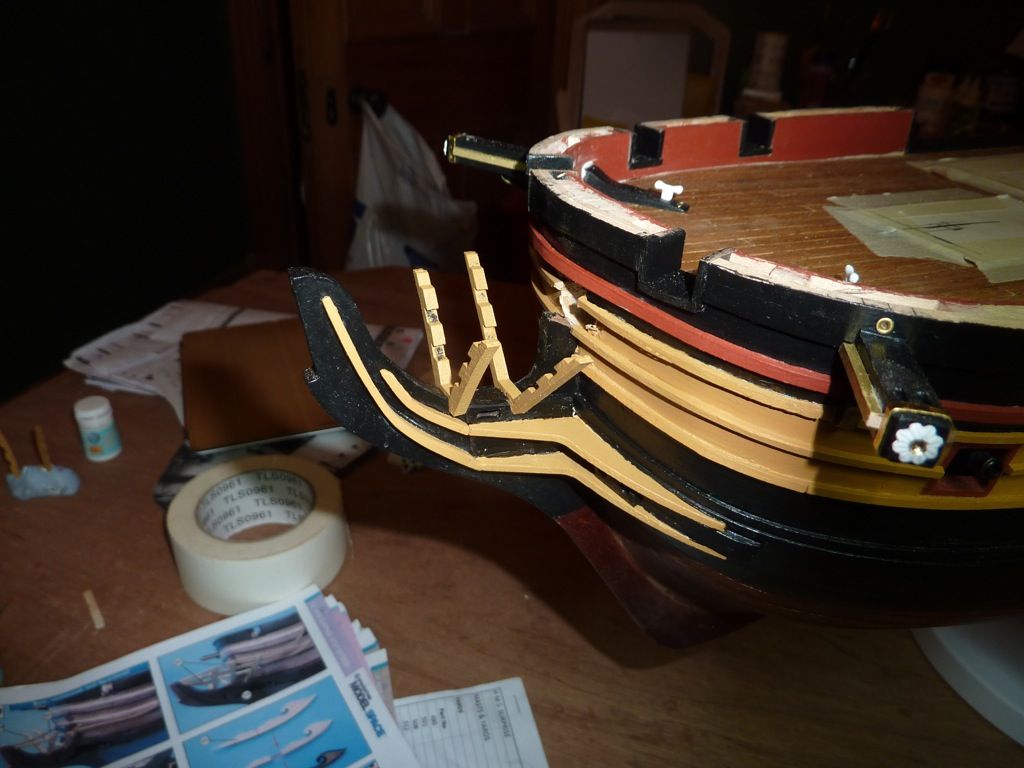 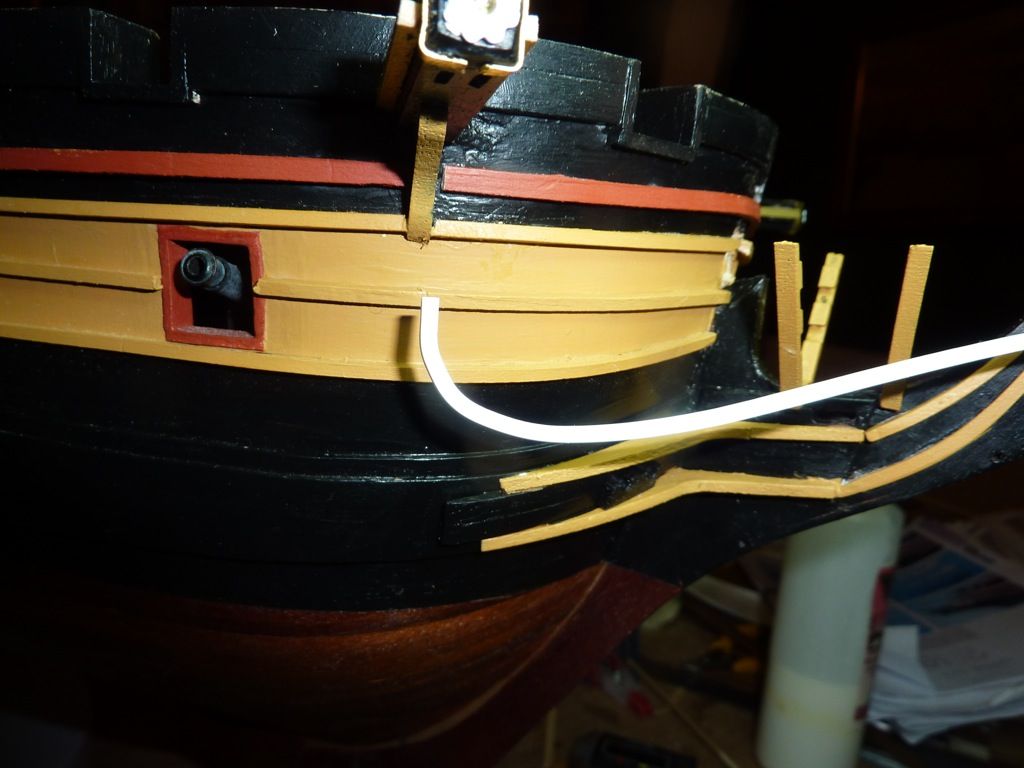 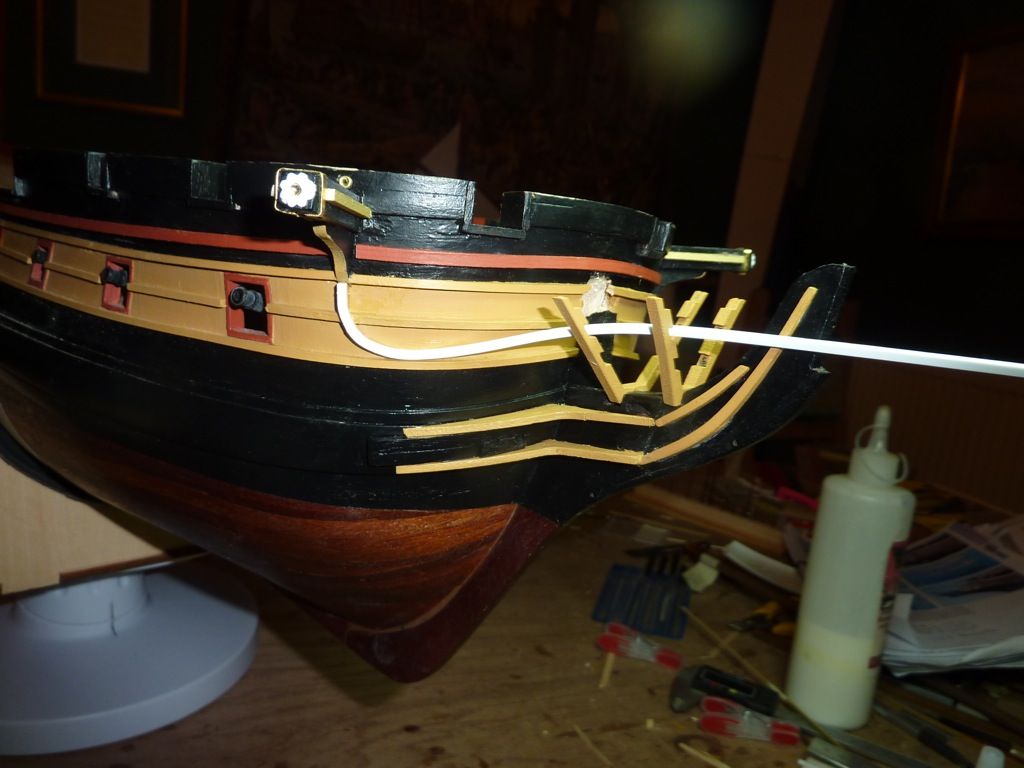 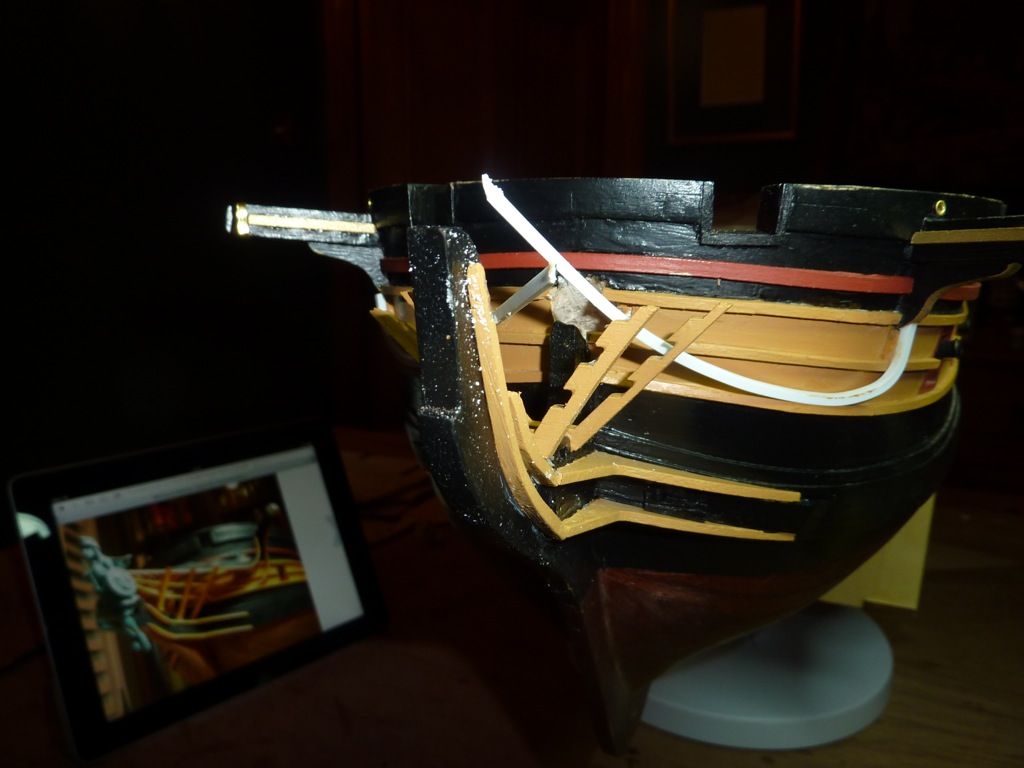 The plastic is bending very well, and the superglue is sticking well also, Will report back later with more developments. The plastic is bending very well, and the superglue is sticking well also, Will report back later with more developments.
Mo 📐 ⚓ Mo
|
|
|
Rank: Vice-Master Groups: Registered
Joined: 30/01/2011 Posts: 865 Points: 2,410 Location: Cambs
|
looking good mo, i've seen the plastic used before, and it can really look good. the one thing that i have noticed with this kit is the different woods. i wish the victory had come with walnut, sapele and other woods. it does not make much difference if you paint your models, but as i have said before my paint skills are terrible, so i like plain wood. i am not sure if the actual a/l victory kit comes with the various woods or not, but i certainly wish the partwork had been like the surprise. keep up the good work, sometimes each area does seem like a kit in itself, but you are certainly doing a good job. Come on you Jimmies
|
|
|
|
Guest (16)
|
 US
US

