|
|
 Rank: Pro    Groups: Registered
Joined: 24/09/2012 Posts: 491 Points: 1,452 Location: London
|
Tomick wrote:Well done and looking really good  Thanks tomick :) Processing - Progressing
Previous builds: HMS Victory
Current build: HMS Sovereign of the seas
|
|
|
Rank: Pro Groups: Registered
Joined: 24/09/2012 Posts: 491 Points: 1,452 Location: London
|
Gandale wrote:Progressing very nicely Admiral, really starting to take shape now....
Regards
Alan Sure is alan, shouldn't be long before we have a complete hull, thanks :) Processing - Progressing
Previous builds: HMS Victory
Current build: HMS Sovereign of the seas
|
|
|
Rank: Pro Groups: Registered
Joined: 24/09/2012 Posts: 491 Points: 1,452 Location: London
|
Plymouth57 wrote:Hi Admiral looking great! I was thinking about your adding a switch problem, I have no idea of the deck layout on the Sovereign but I wondered, does she have a capstan on the main deck? if so you could fit the capstan axle with a thin brass bolt down through the deck with a brass contact arm underneath and a couple of wires to your battery. Turning the capstan would then be able to turn the lights on and off. Best of Luck Robin Hey robin, thanks! sounds like a great idea, bit advanced for me, but as far as i know i dont think there is a capstan on any of the decks, im thinking of just putting a button or small switch near the bottom of the hull for easy access. Processing - Progressing
Previous builds: HMS Victory
Current build: HMS Sovereign of the seas
|
|
|
Rank: Pro Groups: Registered
Joined: 24/09/2012 Posts: 491 Points: 1,452 Location: London
|
arpurchase wrote: Nice work on the planking thank you Processing - Progressing
Previous builds: HMS Victory
Current build: HMS Sovereign of the seas
|
|
|
|
|
Hi again Admiral. Another bright idea!  Does the Sovereign have a row or two of dummy barrel cannons glued into a black painted false 'wall' behind the gun port like the Victory? If so you could try this approach with the small push switches below. You would just need to drill out the false wall big enough to take the shaft of the switch which would then be secured in place by its own little nuts (then painted matt black) and then, (the sneaky bit) drill a hole into the actual push button (probably better before fixing the switch in!  ) just big enough to take the pin on the back of the cannon barrel, then epoxy the barrel into that hole. All you need to do to switch the lighting on and off is to push that particular cannon in. (If you do use a push switch make sure you get a 'locking' one.ie, stays off or on after pushing it, 'momentary' switches only stay on as long as the switch is kept pushed in!) Probably more silly ideas to follow! Robin PS these switches were about £1.80 in Maplins Plymouth57 attached the following image(s): First wooden ship: The Grimsby 12 Gun 'Frigate' by Constructo Second: Bounty DelPrado Part Works Third: HMS Victory DelPrado Part Works 1/100 scale Diorama of the Battle of the Brandywine from the American Revolutionary War Diorama of the Battle of New Falkland (unfinished sci-fi), Great War Centenary Diorama of the Messines Ridge Assault Index for the Victory diary is on page 1
|
|
|
Rank: Pro Groups: Registered
Joined: 24/09/2012 Posts: 491 Points: 1,452 Location: London
|
Thanks robin, infact i have one of those very switches. I think that idea was brought up in another post or something, great idea too would be perfect! though by the time we get the cannons most of the ship would already be covered up, i think im looking for a solution i can get covered before we finish the hull :) because by then theres no going back on other solutions seeing as thats where all the wires are my most possible solution would to simply paint the switch white and hope its camouflaged with the hull, and seeing as there will be a second layer to the lower hull it may not stick out as far. Processing - Progressing
Previous builds: HMS Victory
Current build: HMS Sovereign of the seas
|
|
|
|
|
Hi Admiral I see what you mean about getting the solution done before the hull is finished. If you have one of those switches how about fixing it in place on the lowest deck on the centre line pointing straight down with a small (1/8"?) hole drilled through the keel to allow a 1/8" brass rod to pass up to the switch button. A scrap wood conduit could keep it lined up or you could still drill out the push button and fix the rod in place, it would only need to protrude about 5mm from the keel to push the switch on and off. Told you more silly ideas would follow! Robin First wooden ship: The Grimsby 12 Gun 'Frigate' by Constructo Second: Bounty DelPrado Part Works Third: HMS Victory DelPrado Part Works 1/100 scale Diorama of the Battle of the Brandywine from the American Revolutionary War Diorama of the Battle of New Falkland (unfinished sci-fi), Great War Centenary Diorama of the Messines Ridge Assault Index for the Victory diary is on page 1
|
|
|
Rank: Pro Groups: Registered
Joined: 24/09/2012 Posts: 491 Points: 1,452 Location: London
|
You're full of great ideas robin. Something like that would also be a good idea, though i noticed on the push button i have, it doesn't stick in (springs back out/off) but i found on the back on an xbox cooling fan(which i dont use anymore) there's a perfect sized white switch which i've hooked up. 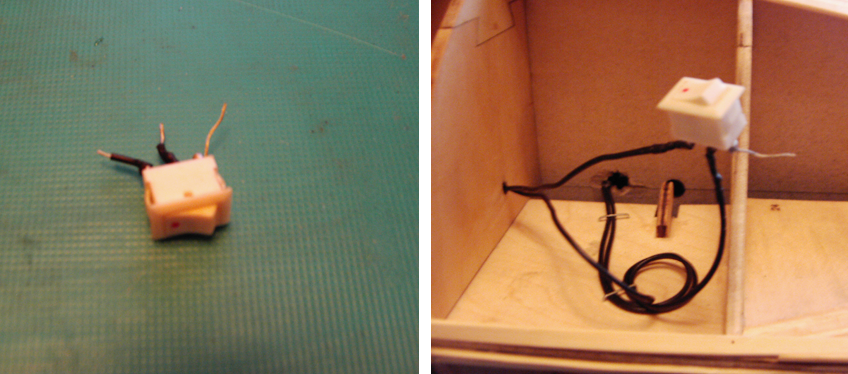 It should be fine with the white hull but it does have a red dot which i may paint over. Without having to drill more holes in the deck this is the easiest solution i have ready, a button would be better as you've suggested but i also like the idea of a switch, it may take away from the realism of the ship but its also a nice feature. Thanks for all your great ideas they may be useful in other future ship builds, i particular like the capstan idea! Processing - Progressing
Previous builds: HMS Victory
Current build: HMS Sovereign of the seas
|
|
|
|
|
That switch should be fine Admiral, by the sound of it your push button switch is a 'momentary push to make' type so it wouldn't have been suitable for an on/off. If you are mounting that switch on a lower deck you could make up some sacks of grain from cloth and cotton wool and hide it under them! Glad to be of some help and good luck with it....(I really wish I'd decided to light up my Victory now!!)  Robin First wooden ship: The Grimsby 12 Gun 'Frigate' by Constructo Second: Bounty DelPrado Part Works Third: HMS Victory DelPrado Part Works 1/100 scale Diorama of the Battle of the Brandywine from the American Revolutionary War Diorama of the Battle of New Falkland (unfinished sci-fi), Great War Centenary Diorama of the Messines Ridge Assault Index for the Victory diary is on page 1
|
|
|
 Rank: Super-Elite      Groups: Registered
Joined: 04/04/2010 Posts: 3,955 Points: 11,809 Location: uk
|
hi admiral,I was going to keep quiet 'bout my lighting my mk.2 vic,but some of my ideas may help,as you are just starting the wiring,I'm having led's in my gun bays and throughtout the decks, cabins ect.I'm thinking of using un prewired leds.the main wiring is going to be .05mm brass wire,channeled along the gun port reinforcement beams,a 3mm.hole drilled at the side of the gun port,and the termination soldered onto the brass wires,I can then run the brass wire all around the decks and terminate anywhere I choose, probably down to the rear keel and into the base stand,where i'll mount the switch or transformer socket. i will then put contact points on the stand,so that the ship can be moved.hope this give you some ideas.I've yet to get the led's and ebay do a vast range. Current builds: SotS, USS Consitution, San Felipe, D51 loco, HMS Surprise, RB7, Arab Dhow, Jotika HMS Victory Completed builds: HMS Pickel, Thermopylae, Mississipi river boat, Mary Rose, Cutty Sark, San Francisco II, HMS Victory x5, Titanic Lifeboat, Panart HMS Victory Launch, Hachette Titanic, Virginia Schooner, Endeavour Longboat. http://www.model-space.com/gb/
|
|
|
Rank: Pro Groups: Registered
Joined: 24/09/2012 Posts: 491 Points: 1,452 Location: London
|
That sounds like a mighty plan you have there karl! hope it all works out as planned, the connection points sounds like a smart idea. Possibly more thought of wiring and placement would of made it easier for me to undertake this job, but this is my first led installation and im pleased with it. I'll probably take all the great information and advice given to me by you guys to my future builds :) Processing - Progressing
Previous builds: HMS Victory
Current build: HMS Sovereign of the seas
|
|
|
Rank: Pro Groups: Registered
Joined: 24/09/2012 Posts: 491 Points: 1,452 Location: London
|
Small update, started on the base of the hull again, though mainly at the stern, i'd rather get this switch sorted and in place, though i think i might need to find a glue gun somewhere just to make extra sure the switch wont move. This is the look so far.  hopefully not much more to go, somehow i feel sanding down the hull will be fun so i cant wait to finish this and move onto laying the sapele strips, but.. must.. be.. patient!  Processing - Progressing
Previous builds: HMS Victory
Current build: HMS Sovereign of the seas
|
|
|
|
|
Tut tut tut..... patience, patience, patience my friend.....  ...... Looking good Admiral, love to see it all lit up.... Keep the good work going .... Regards Alan
|
|
|
Rank: Pro Groups: Registered
Joined: 24/09/2012 Posts: 491 Points: 1,452 Location: London
|
Thanks Alan, getting pictures of it lit up is hard because it doesn't focus as good, though i would love a new camera. Gone pretty far ahead with the planking to get the switch in place, fits perfectly, added some support where the gap for the switch is, though i may need to add some weight because pushing the switch almost capsizes the ship (all hands abandon ship) though when in a stand that might change. Looks messy but when sanded and filled should be nice, smooth and clean.  From now i'll start as normal and catch up on the other side of the hull. Thats all for now :) Processing - Progressing
Previous builds: HMS Victory
Current build: HMS Sovereign of the seas
|
|
|
Rank: Pro Groups: Registered
Joined: 24/09/2012 Posts: 491 Points: 1,452 Location: London
|
Small update I wont post many pictures until there's more to do which probably wont be for a while, so for now its 2 images at a time. Planking at the stern gets a bit more tricky to keep the planks in place and what position to put them in, the higher you get the harder i find to keep the planks flat to the keel (they look very off and not flat but they are more than they look, its just the angle.. i think  ) so i hope once sanded down this shouldn't be a problem.  Processing - Progressing
Previous builds: HMS Victory
Current build: HMS Sovereign of the seas
|
|
|
Rank: Super-Elite  Groups: Registered
Joined: 24/04/2010 Posts: 5,787 Points: 17,662 Location: Stafford, United Kingdom
|
Hi sorry to say this, maybe its because the hull has the wrong shape? kind regards Mike MWG BUILD DIARIES: HMS VICTORY, SOVEREIGN OF THE SEAS, SAN FRANCISCO II, HMS HOOD, HMS ENDEAVOUR LONGBOAT, HMS VICTORY X-SECTION, 007 DB5, NISSAN GTR, CUTTY SARK, RB7, AKAGI, BARK HMS ENDEAVOUR, HUMMER H1, MITSUBISHI ZERO.
|
|
|
Rank: Pro Groups: Registered
Joined: 24/09/2012 Posts: 491 Points: 1,452 Location: London
|
MWG wrote:Hi sorry to say this, maybe its because the hull has the wrong shape? kind regards Mike Ahh yeah ofcourse, its weird that they went with this style too seeing as in the painting with Peter Pett it clearly shows a flat stern. i noticed this earlier while going through Doris's build on MSW, but i was already too far in to make any modifications. Processing - Progressing
Previous builds: HMS Victory
Current build: HMS Sovereign of the seas
|
|
|
Rank: Pro Groups: Registered
Joined: 24/09/2012 Posts: 491 Points: 1,452 Location: London
|
I think most of the hard hull planking has been done in the sharp corners of the build, the rest should be fairly simple and smooth especially when we move up to cover the top ribs. Forgot to add but this is the simple way i undertake planking, boiling Hot water in a glass, and 0.5mm brass nails, very easy to sand down, and i think the nails provided are a bit too big, more likely for the planks to split. 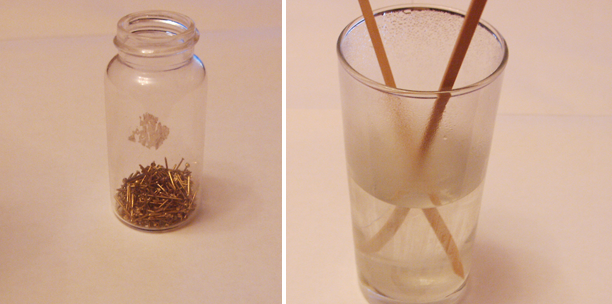 Progress so far, getting messy and isn't perfect. i cant wait to start filling and sanding it down smooth  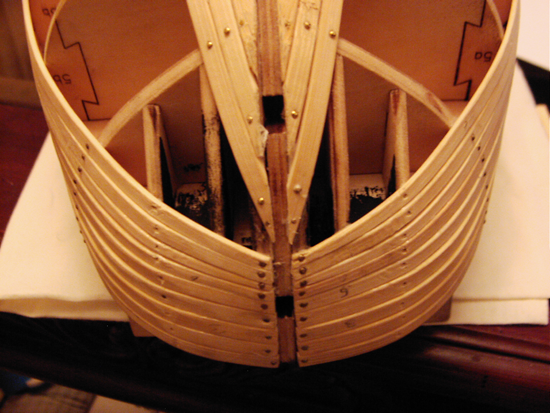 Processing - Progressing
Previous builds: HMS Victory
Current build: HMS Sovereign of the seas
|
|
|
|
|
Hi Admiral! She's coming on really well there! I had a lot of splitting at first with my DelPrado hull planks, mainly due to the quality of the wood I think, I always prefer to drill the planks where the nails will be driven in using a drill bit just a little smaller than the nail, if you're using 0.5mm nails, a bit of about .4 or .3mm would do it and should avoid most of the splitting. Keep up the great work! Robin First wooden ship: The Grimsby 12 Gun 'Frigate' by Constructo Second: Bounty DelPrado Part Works Third: HMS Victory DelPrado Part Works 1/100 scale Diorama of the Battle of the Brandywine from the American Revolutionary War Diorama of the Battle of New Falkland (unfinished sci-fi), Great War Centenary Diorama of the Messines Ridge Assault Index for the Victory diary is on page 1
|
|
|
|
|
Progressing well Admiral, won't be too long now before you have covered the complete hull.... I haven't had too much of a problem with splitting planks, mainly due to pre-drilling .5mm holes..... Well done..... Regards Alan
|
|
|
|
Guest
|
 US
US

