|
|
 Rank: Vice-Master    Groups: Registered
Joined: 09/02/2012 Posts: 569 Points: 1,675 Location: Scotland
|
A bit fiddly, the pins held the block quite well, never mind, next time Alan.
Moalantait wrote:similar to what i did mo.... but didnt think about the pins to hold the deadeyes.... pitty i am finished this now. as for the wire a few curses as it broke... if only you posted this a couple of months ago Mo
|
|
|
Rank: Vice-Master Groups: Registered
Joined: 09/02/2012 Posts: 569 Points: 1,675 Location: Scotland
|
moriarty wrote:Hi Mo, I have been trying to see where and how you are short of guns. I see that you have put 13 ports on each side ,I only put in 12 and the very last ports on the stern cabin I leave closed but there is a gun in there although a smaller weapon than supplied but you can only see it when the lights are on. That accounts for 4 but you would still be short . They must have packed it wrong mate. The pin rails look like they wont give you any trouble and as for glueing them in depends on how tight a fit you have got. Looking tidy though.   False alarm there about being short of cannons, I have a full set of 42. I have not fitted any to the rear, under the captains quarters, I have made the cannon lid's closed there.
Mo. Mo
|
|
|
Rank: Vice-Master Groups: Registered
Joined: 09/02/2012 Posts: 569 Points: 1,675 Location: Scotland
|
|
|
|
|
|
Simply loving your build Mo.... cracking job there....
Regards
Alan
|
|
|
Rank: Vice-Master Groups: Registered
Joined: 09/02/2012 Posts: 569 Points: 1,675 Location: Scotland
|
Gandale wrote:Simply loving your build Mo.... cracking job there....
Regards
Alan Cheers Alan, On Wednesday, it will be the First Anniversary of me starting my build, I never dreamt I would be this far on in 1 year,
MoMo
|
|
|
Rank: Vice-Master   Groups: Registered
Joined: 13/01/2012 Posts: 605 Points: 1,630 Location: Bucks
|
Sent an email Mo HMS Surprise
HMS Snake
HMS Bounty
HMS Royal Caroline
HMS Victory rebuild
HMS Supply
|
|
|
Rank: Vice-Master Groups: Registered
Joined: 09/02/2012 Posts: 569 Points: 1,675 Location: Scotland
|
Thanks for the help on the rigging, I will have to complete the timber walkway detail to the bow before I fit the bowsprit, I will read and pick away at it. I will keep you posted.
MoMo
|
|
|
Rank: Vice-Master Groups: Registered
Joined: 09/02/2012 Posts: 569 Points: 1,675 Location: Scotland
|
|
|
|
|
|
Very nice Mo. think the improvised jig you made is superb, wonderful idea.... well done...
Regards
Alan
|
|
|
Rank: Vice-Master Groups: Registered
Joined: 13/01/2012 Posts: 605 Points: 1,630 Location: Bucks
|
Spot on Mo, all the holes are in the correct way. HMS Surprise
HMS Snake
HMS Bounty
HMS Royal Caroline
HMS Victory rebuild
HMS Supply
|
|
|
Rank: Vice-Master Groups: Registered
Joined: 09/02/2012 Posts: 569 Points: 1,675 Location: Scotland
|
Today is the 1st Anniversary of me starting to build the ship, I never thought I would have got this far in 12 month's Getting on a bit now, I have had to order some more materials to complete the hull, In the meantime I am trying out some of the rigging, to make sure I have the right kit, and I know what I am doing, I have had some help from Ian, and been doing a bit of reading on the subject, so this is how I am going to proceed. I am going to fix the bottom section of the main mast in place, I am going to glue it in place,( bit of pressure here ) then I am going to do the thick black thread that hold the ratlines, I have pre made these, this is how I did it.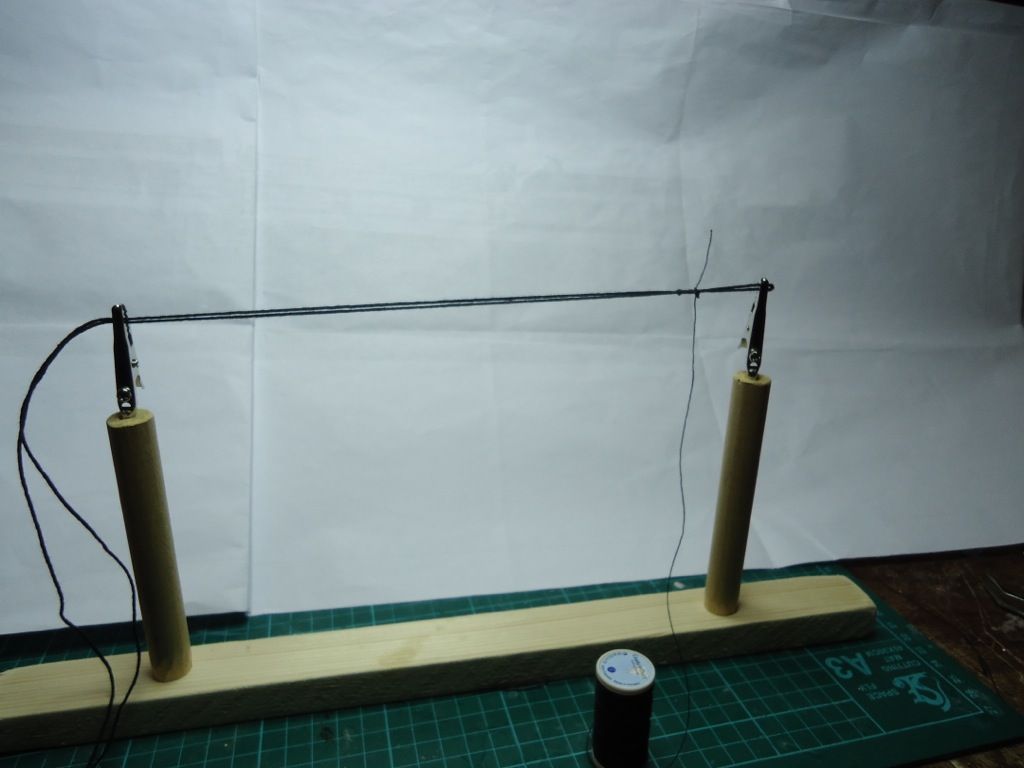 I made the jig above, I marked the amount of space I needed to get the thread over the top of the mast, I marked the thread with a crocodile clip, then did the seizing. I made the jig above, I marked the amount of space I needed to get the thread over the top of the mast, I marked the thread with a crocodile clip, then did the seizing. 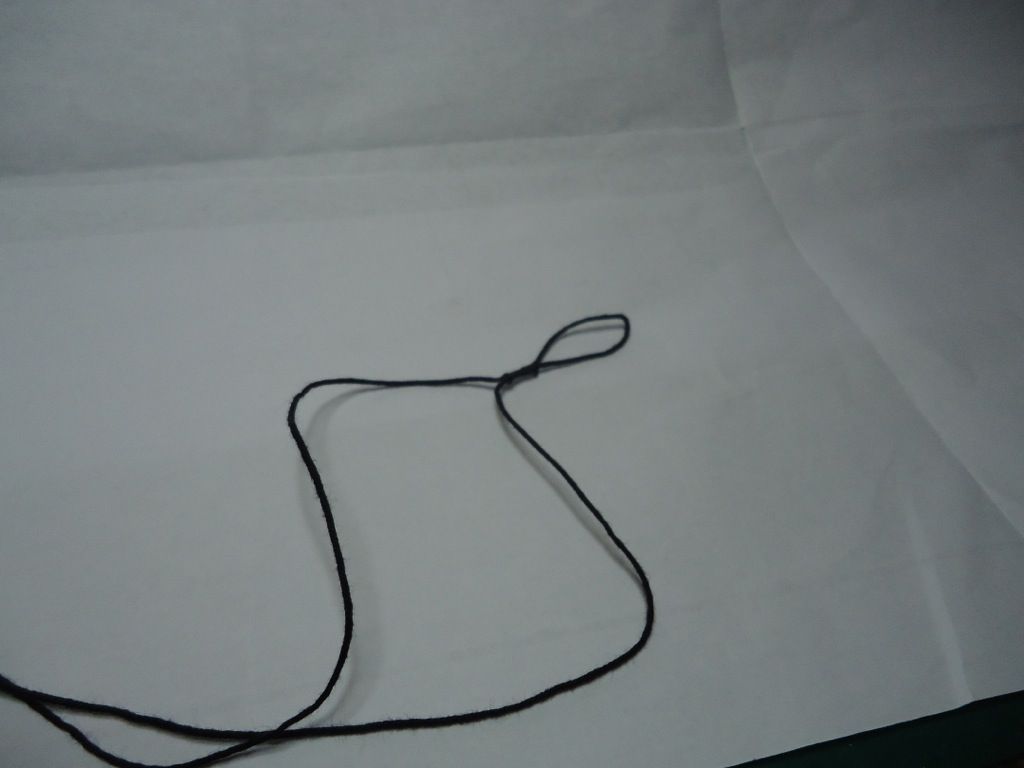  This gives me enough room to get the lines over the mast, apparently they are done in pairs, 2 down one side and then 2 down the other side, Mo This gives me enough room to get the lines over the mast, apparently they are done in pairs, 2 down one side and then 2 down the other side, MoMo
|
|
|
|
|
Hi Mo. She's coming on beautifully there, I like the jig idea for the dead eyes too! One little tip I found some time ago if your rigging thread is especially 'hairy' is to get a small block of natural beeswax (old style cabinet supplies or hardware shops usually have it) and then to run the thread over the block a couple of times before then running it between your thumb and forefinger. This will usually bind the hairs to the body of the thread for a better scale appearance. Keep up the great work! Robin First wooden ship: The Grimsby 12 Gun 'Frigate' by Constructo Second: Bounty DelPrado Part Works Third: HMS Victory DelPrado Part Works 1/100 scale Diorama of the Battle of the Brandywine from the American Revolutionary War Diorama of the Battle of New Falkland (unfinished sci-fi), Great War Centenary Diorama of the Messines Ridge Assault Index for the Victory diary is on page 1
|
|
|
Rank: Vice-Master Groups: Registered
Joined: 09/02/2012 Posts: 569 Points: 1,675 Location: Scotland
|
Plymouth57 wrote:Hi Mo.
She's coming on beautifully there, I like the jig idea for the dead eyes too!
One little tip I found some time ago if your rigging thread is especially 'hairy' is to get a small block of natural beeswax (old style cabinet supplies or hardware shops usually have it) and then to run the thread over the block a couple of times before then running it between your thumb and forefinger. This will usually bind the hairs to the body of the thread for a better scale appearance.
Keep up the great work!
Robin Thanks for the tip Robin, but I have already got some.
Mo. 🐝. Mo
|
|
|
Rank: Vice-Master Groups: Registered
Joined: 13/01/2012 Posts: 605 Points: 1,630 Location: Bucks
|
Love all these little inovations you keep coming up with Mo but they all work pretty good. Dont put too much tension on or you will knock the mast out of plumb. Nice one HMS Surprise
HMS Snake
HMS Bounty
HMS Royal Caroline
HMS Victory rebuild
HMS Supply
|
|
|
Rank: Vice-Master Groups: Registered
Joined: 09/02/2012 Posts: 569 Points: 1,675 Location: Scotland
|
|
|
|
Rank: Vice-Master     Groups: Registered
Joined: 17/11/2012 Posts: 863 Points: 2,608 Location: Gohfeld (Germany)
|
Hi Mo! As usual a very very nice work, you make a perfect job! Regards, Bernd
|
|
|
|
|
Hi Mo, love it, love it, love all of it.... Great work once again....
Regards
Alan
|
|
|
Rank: Vice-Master Groups: Registered
Joined: 09/02/2012 Posts: 569 Points: 1,675 Location: Scotland
|
Thanks Bernd & Alan, I have quite a bit of time on my hands just now. Trying to push on, my free time might be short lived.
Mo. ⏰. 🚴 Mo
|
|
|
 Rank: Pro  Groups: Registered
Joined: 25/01/2010 Posts: 459 Points: 1,367 Location: Bridlington
|
Hi Mo For some reason model space has NOT been keeping me updated on all the posts. Regards
Rob
Bridlington.
Built Flying Scotsman (Train). Collecting HMS VICTORY
|
|
|
Rank: Pro Groups: Registered
Joined: 25/01/2010 Posts: 459 Points: 1,367 Location: Bridlington
|
OOP'S Looks Great MO. Regards
Rob
Bridlington.
Built Flying Scotsman (Train). Collecting HMS VICTORY
|
|
|
|
Guest (11)
|
 US
US

