|
|
 Rank: Pro   Groups: Registered
Joined: 01/04/2013 Posts: 342 Points: 1,029 Location: Essex
|
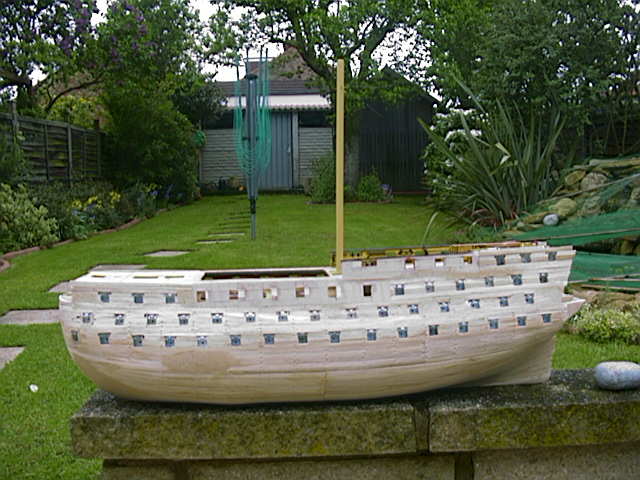
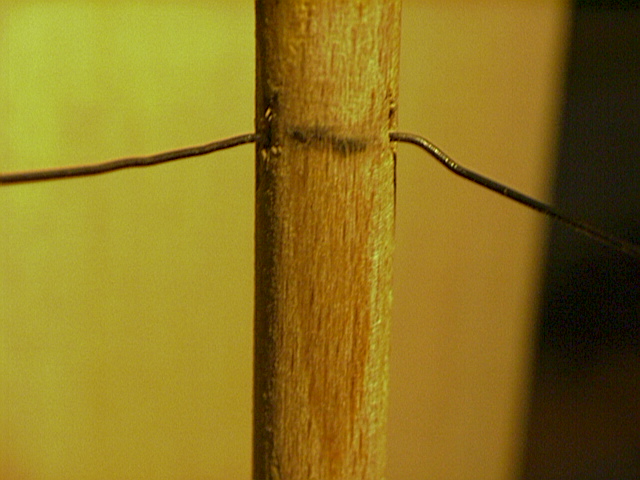
I have recently renewed my interest in continuing this build, and searching the internet looking for info, I found this forum and in particular Robin's (Plymouth57)build log. Reading his first entry was like telling my own story. I also subscribed to Del Prado's Victory build with great expectations after reading the flyers and seeing the adds, but even after a couple of weeks it was clear that the materials supplied were not of good quality, and as the build progressed,and I had bought some reference books and searched for info on the net to assist with the build, it became clear that the finished product would be a far from accurate depiction of HMS Victory. I decided to use the timber supplied to build the basic hull and first planking, then purchase better quality materials to complete the build and also make the many changes and upgrades needed to produce a more accurate model and also add some extras of my own along the way. Although I have been building models of some sort or another for most of my life, unlike Robin, this was my first try at a POB ship, but just like Robin I had to shelve the build several years ago. I will try to find photos of the various changes and upgrades I have done and once I'm up to date will carry on the build log in more detail as I go. I will start with the only picture I seem to have of the completed first planking.  By this stage I had already added additional gun ports to the bow and stern areas that were not included in the Del Prado version. You will notice that the first part of the main mast is in place. This is because of one of my additions, lighting, I wanted to light the stern galleries and lanterns, and as Victory at Trafalgar had the admiral's lantern on the main mast platform, I needed to get wiring up there from within the hull, so I cut a small groove on each side of the mast up to (I hope) the correct height and fixed two small wires into the grooves, then made good with filler.  The wire is quite stiff as I will use it to form the lanterns brackets. More to follow when I dig out some photos. Regards to all. Alan England expects that every man will do his duty.
|
|
|
 Rank: Vice-Master     Groups: Registered
Joined: 20/10/2010 Posts: 511 Points: 1,459 Location: Loughborough
|
Welcome to the forum Sparks, you will find a plethora of information on the site. Will be interesting to see how you approach your build. Peter    Builds in progress: HMS Victory.HMS Surprise.
Completed builds: Revell London Bus 1/24.
Builds to do:Sovereign of the seas, Hms Albion.
|
|
|
|
|
Welcome to the diary gang Sparks! It's great to see another DelPrado (brings back memories seeing the basic hull again) and from your later photos you're just like me, trying to cram as much detail into as small a space as possible!  (Them DeAg boys have got it easy!  ) My biggest regret was that I did'nt go down the light up route, I thought about it, not as comprehensive as yours with the mast lantern but I really wish I'd gone for the stern galleries and hatches when I had the chance - still no good crying over spilt milk! (it's bad enough crying over missing skidbeams!!  ) Best of luck with your postings and keep 'em coming! Robin First wooden ship: The Grimsby 12 Gun 'Frigate' by Constructo Second: Bounty DelPrado Part Works Third: HMS Victory DelPrado Part Works 1/100 scale Diorama of the Battle of the Brandywine from the American Revolutionary War Diorama of the Battle of New Falkland (unfinished sci-fi), Great War Centenary Diorama of the Messines Ridge Assault Index for the Victory diary is on page 1
|
|
|
 Rank: Master      Groups: Registered
Joined: 30/03/2011 Posts: 1,344 Points: 4,079 Location: Bryanston, Johannesburg. RSA
|
Welcome aboard Sparks. It sounds like your up for the challange as well as being in the right place for all the right type of help that you will require. Good luck wth your build, will be watching with interest. Rgds, Hans
"It's okay to make mistakes. mistakes are our teachers - they help us to to learn, even if it is painfully"
Current Build:
Endeavour Cross section,D51
Completed: HMS Victory
Under the bench: Endeavour x 2,Sovereign of the Seas, Akagi and The Black Pearl!HMS Victory Cross Section
|
|
|
 Rank: Beginner Level 2  Groups: Registered
Joined: 26/01/2012 Posts: 10 Points: 20
|
Welcome to the forum Sparks.
I like your idea of running the lights up the mast, will be interesting to see how it unfolds.
Greetings Lucien.
|
|
|
 Rank: Semi-Pro Level 1  Groups: Registered
Joined: 22/07/2012 Posts: 69 Points: 144 Location: Belgium
|
|
|
|
 Rank: Pro   Groups: Registered
Joined: 01/04/2013 Posts: 342 Points: 1,029 Location: Essex
|
Thanks for the welcome guys. I will apologise in advance for the vagary of these initial posts, all this work was done by about 2007 so its hard to remember exactly how I did some of the work, at my age its hard to remember what I did last week, let alone 6-8 years ago,  In the following photo, you will see that I have actually cut out the entry port openings as I didn't like the moulded door and canopy supplied. Also, the plywood parts supplied to form the upper gun deck waist area and quarter deck walls had the gun ports in the wrong positions, and as you can see, I have filled them in and cut new gun ports in the correct locations.  I also thickened up the quarter deck walls with another layer of ply.  I wasn't happy with the painted detail lines I had done on the inside of the quarter deck walls and later replaced them with small gauge wire formed to shape and painted black. England expects that every man will do his duty.
|
|
|
 Rank: Pro   Groups: Registered
Joined: 01/04/2013 Posts: 342 Points: 1,029 Location: Essex
|
I think the next major thing I did was the copper plating of the hull. In the photo below I have scribed the water line and prepared the hull below it to give me a smoother finish to fix the plates to.  I purchased individual plates that were about 15X5mm in size( a bit larger scale wise than the actual plates used on Victory) with ready marked rivets around the edges.  I can't remember exactly how many I used but it was several hundred  One of the books I have used to good effect is Alan McGowan's "HMS Victory Her Construction, Career and Restoration" In this book is a plan of the copper plating,   and I followed this plan as closely as I could. Where I had to cut the plates to shape, I re-did the rivet marks along the new edge by turning the plate over and using a hammer and small punch. The next photo shows the plating getting underway.  As you can imagine, this was quite a long process.  Below are some photos of the finished copper plating.     In the last photo of the stern, I have arrowed to a small hole, this is the jack socket that takes the electrical supply for the lighting. As mentioned before, this work was done several years back and as you can see, the copper is quite bright and shiny. I did not lacquer it and over the years it has mellowed down and tarnished a bit as this more recent photo shows.  By the time I finish my Victory I should have natural patina on it  regards Alan England expects that every man will do his duty.
|
|
|
|
|
Alan, superb tiling.... very well done....   Regards Alan
|
|
|
 Rank: Pro   Groups: Registered
Joined: 01/04/2013 Posts: 342 Points: 1,029 Location: Essex
|
While my attention is on the copper plating, I will mention the rudder. Again,because of the time involved, I can't remember exactly, but the rudder supplied by Del Prado was incorrect. I think I used their rudder and re-shaped and sized it by adding additional timber. I made the gudgeons and pintles from small brass tube,strap and rods, shaping as required and soldering the parts together, then painting black. Below is a close up of one of the gudgeon plates.  The rudder was then copper plated and the pintles fixed to it. Here is the finished rudder with all the gudgeon plates next to it.  Also notice the spectacle plate above the copper on the right, I made this in the same way as the gudgeons and pintles. Below is a photo of the rudder in place, I have lifted it slightly to show the pintles fitting into the gudgeon plates.  Regards Alan England expects that every man will do his duty.
|
|
|
 Rank: Master      Groups: Registered
Joined: 30/03/2011 Posts: 1,344 Points: 4,079 Location: Bryanston, Johannesburg. RSA
|
Well done Alan, well thought and worked out. Rgds, Hans
"It's okay to make mistakes. mistakes are our teachers - they help us to to learn, even if it is painfully"
Current Build:
Endeavour Cross section,D51
Completed: HMS Victory
Under the bench: Endeavour x 2,Sovereign of the Seas, Akagi and The Black Pearl!HMS Victory Cross Section
|
|
|
 Rank: Pro   Groups: Registered
Joined: 01/04/2013 Posts: 342 Points: 1,029 Location: Essex
|
Another alteration I did early on in the build, although I didn't realise just how early on until I saw my photos, was the skid beams. Another major error by Del Prado. As you have probably seen on Robin's (Plymouth57) build log, Del Prado just put the skid beams on the ribs that were within the waist area, just 4, without any regard for accuracy. HMS Victory actually has 6 skid beams, so I cut the original 4 out and made locating cut outs along the edges of the waist area at the correct locations for 6 new skid beams to sit into.  The above photo shows that I had corrected the skid beam issue before I had finished the first planking. The following photo, showing a close up of the skid beam pillars, brings to light another of Del Prado's slap dash methods, the gratings. Early on in the build, before I knew better, I followed their instructions for the gratings which consisted of making up a frame from 4 pieces of timber and sticking it onto the deck with a piece of mesh beneath it to represent the grating.  Once I realised that small timber grating could be purchased from on line stores like Model Dock Yard, I took the plunge and changed them. As there were no cut outs in the deck for the Del Prado style gratings, they had to be made. I remember it was quite a task to get into the waist area and cut the holes in the upper gun deck, scary too  But it was well worth the effort as this next photo shows.  You will also see that I have formed the smaller openings each side of the main mast, another Del Prado omission.  England expects that every man will do his duty.
|
|
|
|
|
Some beautiful work there Sparks!  You've gone even further than I did in those areas, I decided to fix the rudder at an early stage (as soon as the copper tape was finished). The rudder was attached with two quite thick brass rods into the stern keel and rudder and the pintels etc. formed from lead strip after it was fixed, not so intricate or movable as your separate components. I also changed the DelPrado 'netting' into proper gratings (and also on the bow and beakhead areas too. Unlike you I didn't go and cut out the deck beneath them though, I took the easier option and marked out the grating then painted the deck matt black!  So well done indeed for your hard work and brilliant results! Keep them coming! Robin First wooden ship: The Grimsby 12 Gun 'Frigate' by Constructo Second: Bounty DelPrado Part Works Third: HMS Victory DelPrado Part Works 1/100 scale Diorama of the Battle of the Brandywine from the American Revolutionary War Diorama of the Battle of New Falkland (unfinished sci-fi), Great War Centenary Diorama of the Messines Ridge Assault Index for the Victory diary is on page 1
|
|
|
 Rank: Super-Elite      Groups: Registered
Joined: 24/04/2010 Posts: 5,787 Points: 17,662 Location: Stafford, United Kingdom
|
Hi Sparks, very nice work  Kind regards Mike MWG BUILD DIARIES: HMS VICTORY, SOVEREIGN OF THE SEAS, SAN FRANCISCO II, HMS HOOD, HMS ENDEAVOUR LONGBOAT, HMS VICTORY X-SECTION, 007 DB5, NISSAN GTR, CUTTY SARK, RB7, AKAGI, BARK HMS ENDEAVOUR, HUMMER H1, MITSUBISHI ZERO.
|
|
|
 Rank: Pro Groups: Registered
Joined: 31/12/2011 Posts: 123 Points: 369 Location: Graz, Austria
|
Well done, Sparks!  Attaching the gratings with the skid beams in place is quite an achievement. Best regards, Bernd
|
|
|
|
|
Hi Sparks, impressive progess there.....   Regards Alan
|
|
|
 Rank: Pro   Groups: Registered
Joined: 01/04/2013 Posts: 342 Points: 1,029 Location: Essex
|
Thanks guys, Bernd, I made my skid beams removable, so not as difficult as you imagined, but still pretty scary. Robin, the main reason I wanted actual open grating was down to the lighting again. I decided on lighting at a very early stage and had installed 5mm yellow LED's on the upper gun deck to give a glow through the gun ports, and up through the gratings. I don't want to get too into the lighting at the moment but it gives a lovely effect through the grating, this photo is not very good (a bit grainy) as the camera was pretty basic ( I have a better one now), but you get the idea.  Regards Alan England expects that every man will do his duty.
|
|
|
 Rank: Pro   Groups: Registered
Joined: 01/04/2013 Posts: 342 Points: 1,029 Location: Essex
|
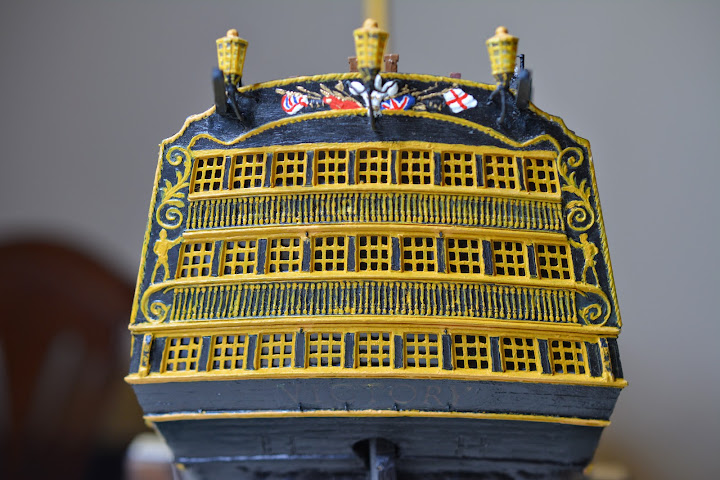
Next up was the stern galleries. Del Prado's one wasn't too bad for shape etc as I recall, but no decoration and a piece of card with windows printed on it to stick inside, not very realistic looking to say the least. I think it caused so much negative feedback that they provided a cast metal replacement later on in the build, but by that time I had already made other arrangements. Searching the internet looking for 1/100 scale HMS Victory parts didn't help much but did bring to my attention that there was a 1/100 scale HMS Victory kit made by Helller. I was talking to a fellow modeller I was working with at the time and he mentioned that he owned that kit, had purchased it a few years earlier with good intent, but never really getting started with it, and he was willing to sell it to me at quite a reduced price, so I arranged to go and see the kit. Imagine my delight at seeing a nicely moulded rear gallery at the right scale. Delving into the kit further I was even more delighted to see that the ships lanterns were moulded in two halves from clear plastic, perfect for my lighting plans. Purchase completed, I headed home eager to make a start. Once I had temporarily assembled the rear gallery parts and offered them up, it was clear that some modifications would be needed to make it fit, but the overall look was really good. I added some internal floors made from scrap timber.  This was done mainly as a fixing platform for the yellow LED lamps that would illuminate the galleries. The next couple of pics were taken more recently with my new DSLR camera.    Notice in the first photo looking at the stern how the ships name has faded. I made my own decal for the name when I did the galleries several years ago, this is how it did look.  I don't know why its happened, but I will have to redo it at some point, perhaps I should have coated it with clear varnish, any tips would be welcome. The next shot is of the lanterns.  As stated earlier, they were formed in two halves and during assembly, a small yellow LED lamp was installed inside each one. Luckily, Victory's lanterns have a three arm bracket,  this close up of the underside of the centre, larger lantern shows the bracket, the two outer arms are actually the wires feeding the LED lamps. More to follow shortly. Regards Alan England expects that every man will do his duty.
|
|
|
 Rank: Pro   Groups: Registered
Joined: 01/04/2013 Posts: 342 Points: 1,029 Location: Essex
|
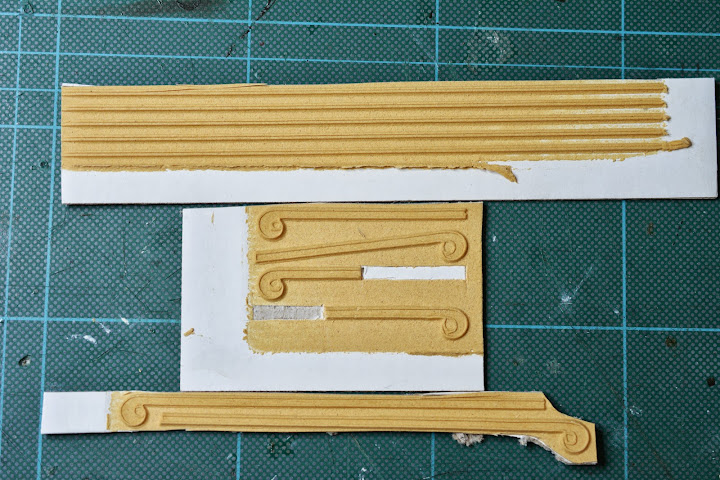
Next I tackled the hull decoration and wales. The Del Prado build did not provide for any fancy hull decoration and the depiction of the wales was pretty basic, the wales on Victory do not actually follow the lines of the gun ports or the painted bee lines and they rise up at the stern, the lower wale also has a sort of rebated top edge. Here is a photo of the actual ship showing the hull decoration at the point where the quarter deck steps lead up to the poop deck.  Through Model Dockyard I purchased a "Victory Mouldings" set from an Italian company called Corel. The mouldings were made from composite wood fibre onto card backing sheets.  The hardest part was getting them off the backing card cleanly. I used these mouldings and some additional small brass wire bent to shape to create my representation of the hull decorations.   The wales were created by adding additional thicknesses of hull planking to form the approximate size and shape of the three main wales that run the length of the hull. I can't find any pics of the wales before the hull was painted so here are some more recent shots of the starboard side.            The gaps visible in the line of smaller moulding above the upper gun deck gun ports is where the channels will fit. More later. Regards Alan England expects that every man will do his duty.
|
|
|
 Rank: Pro   Groups: Registered
Joined: 01/04/2013 Posts: 342 Points: 1,029 Location: Essex
|
The Corel mouldings set was used again, along with a bit of scratch building, to enhance the beak head area.    As you can see from the above photo, I had to thin out the timber on the beak to take the figure head, that was made from 2 cast metal figureheads I had bought (using the best bits from each), and the cherubs were from the Heller Victory kit, I liked these because they looked more cherubic (and a bit more like the ones on the actual ship) than the ones on the cast metal figureheads I had.    Painting the figurehead seamed to take forever as I kept re-touching parts that went wrong or I wasn't happy with  , but luckily the Latin text around the top of the shield came as a decal on one of the figureheads I had bought. Regards Alan England expects that every man will do his duty.
|
|
|
|
Guest
|