|
|
 Rank: Vice-Master        Groups: Registered
Joined: 17/11/2012 Posts: 863 Points: 2,608 Location: Gohfeld (Germany)
|
Hi Admiral! The planking is looking very nice and shows me what to do !    Regards, Bernd
|
|
|
 Rank: Pro    Groups: Registered
Joined: 24/09/2012 Posts: 491 Points: 1,452 Location: London
|
finally finished drilling holes in one side, must say my hand is pretty sore from that, took most of the day including yesterday, would of been easier if i marked out where the drill wholes instead of measuring each hole, i did that because i wasn't too keen on having pencil marks on the wood, i didn't want to go through to make effort to sand it all off making the strips thinner but i am pleased with the outcome ordered around 700 rivets, research does great work, got them even cheaper than last time but the 200 from america should take a while to come. but before i apply them i'll add the upper wales so that i wont overlap any tree nailing along with some varnish. The holes arn't visible in these images i'll take more pictures eventually but its not easy  so in the mean time i'll finish off the other side and will probably cut the planks alot closer to the gun ports instead of sanding and cutting them down after they're applied, just because i found some of them started to come off when filing down. 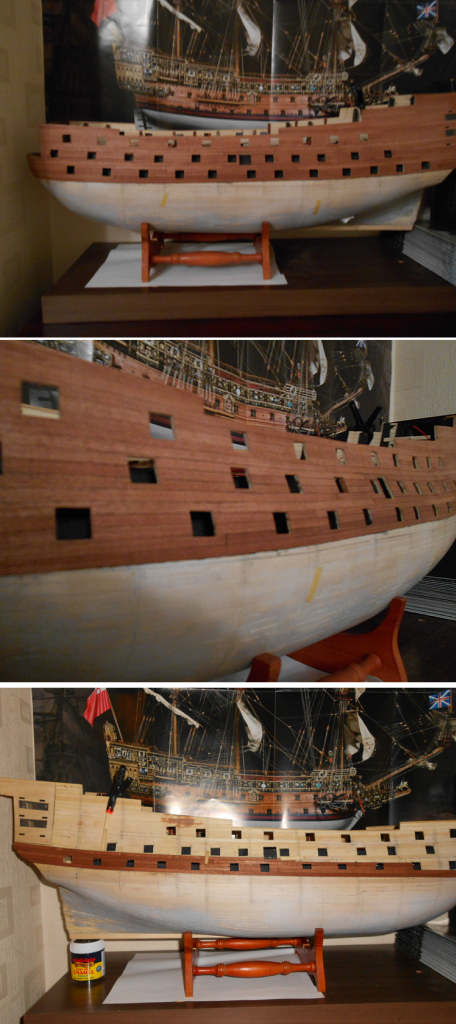 I think i would of liked a lighter finish on the wood just to make the tree nailing stand out a bit more but im sure i'll be happy anyway, also will probably add 2 more rows of planking because i probably wont paint the wales red. Processing - Progressing
Previous builds: HMS Victory
Current build: HMS Sovereign of the seas
|
|
|
 Rank: Super-Elite        Groups: Registered, Forum Support Team, Administrators, Global Forum Support Team, Moderator, Official Builds Joined: 09/11/2012 Posts: 8,520 Points: 24,651 Location: East midlands
|
Hi Admiral,  That`s looking  WTG , can`t wait to see the results of the rivets, keep us posted. Regards delboy271155 (Derek) COME BACK GUY FAWKES "YOUR COUNTRY NEEDS YOU"
|
|
|
 Rank: Super-Elite      Groups: Registered
Joined: 24/04/2010 Posts: 5,787 Points: 17,662 Location: Stafford, United Kingdom
|
Very nice work Admiral  look after those fingures. kind regards, Mike MWG BUILD DIARIES: HMS VICTORY, SOVEREIGN OF THE SEAS, SAN FRANCISCO II, HMS HOOD, HMS ENDEAVOUR LONGBOAT, HMS VICTORY X-SECTION, 007 DB5, NISSAN GTR, CUTTY SARK, RB7, AKAGI, BARK HMS ENDEAVOUR, HUMMER H1, MITSUBISHI ZERO.
|
|
|
 Rank: Pro    Groups: Registered
Joined: 24/09/2012 Posts: 491 Points: 1,452 Location: London
|
delboy271155 wrote:Hi Admiral,  That`s looking  WTG , can`t wait to see the results of the rivets, keep us posted. Regards delboy271155 (Derek) me too derek  many thanks Processing - Progressing
Previous builds: HMS Victory
Current build: HMS Sovereign of the seas
|
|
|
 Rank: Pro    Groups: Registered
Joined: 24/09/2012 Posts: 491 Points: 1,452 Location: London
|
MWG wrote:Very nice work Admiral  look after those fingures. kind regards, Mike ahaha will try mike, thanks for the comment   Processing - Progressing
Previous builds: HMS Victory
Current build: HMS Sovereign of the seas
|
|
|
 Rank: Pro    Groups: Registered
Joined: 24/09/2012 Posts: 491 Points: 1,452 Location: London
|
Small update, thinking of doing a modification to the stern but im not sure how to under take it, its something that should of been done long ago before planking but i think its still possible, im looking to cut a section off and put the stern post there instead of the one that will be supplied, seen this on several models and on nigels model and it looks something worth doing, though im not sure how to cut it off, will probably do it with a razor hack saw and sand down the planking with a router.  Im looking to cut the red section and replace it with the stern post which will sit on the keel. Processing - Progressing
Previous builds: HMS Victory
Current build: HMS Sovereign of the seas
|
|
|
|
|
Excellent work Admiral, really looking good...   .. Like the idea of the stern post modification and to cut it as you describe may be easier and cleaner with small jig saw or even a dremel with cutting disc....   .. Time for some more experimentation I think....   Regards Alan
|
|
|
 Rank: Pro    Groups: Registered
Joined: 24/09/2012 Posts: 491 Points: 1,452 Location: London
|
Gandale wrote:Excellent work Admiral, really looking good...   .. Like the idea of the stern post modification and to cut it as you describe may be easier and cleaner with small jig saw or even a dremel with cutting disc....   .. Time for some more experimentation I think....   Regards Alan thanks alan  wasn't as hard as i thought, i used a small razor blade from tamiya and a razor saw, next is to just sand it all down Processing - Progressing
Previous builds: HMS Victory
Current build: HMS Sovereign of the seas
|
|
|
 Rank: Pro    Groups: Registered
Joined: 24/09/2012 Posts: 491 Points: 1,452 Location: London
|
finally finished the second side, needs a little bit more work and another 2 rows on each side but happy with the outcome, though the planks aren't perfectly placed to mirror the other side of the hull, about 1-2mms off but thankfully the laws of physics only allow you to see one side of the ship  Hopefully i have some maple coming tomorrow (along with my long awaited rivets)so i can start on the lower hull, using maple so that i wont have to paint it white and it'll show the texture of the wood hopefully, and maybe even some tree nailing   but i know it'll be an even longer process than the upper hull to complete  Now to drill some holes... 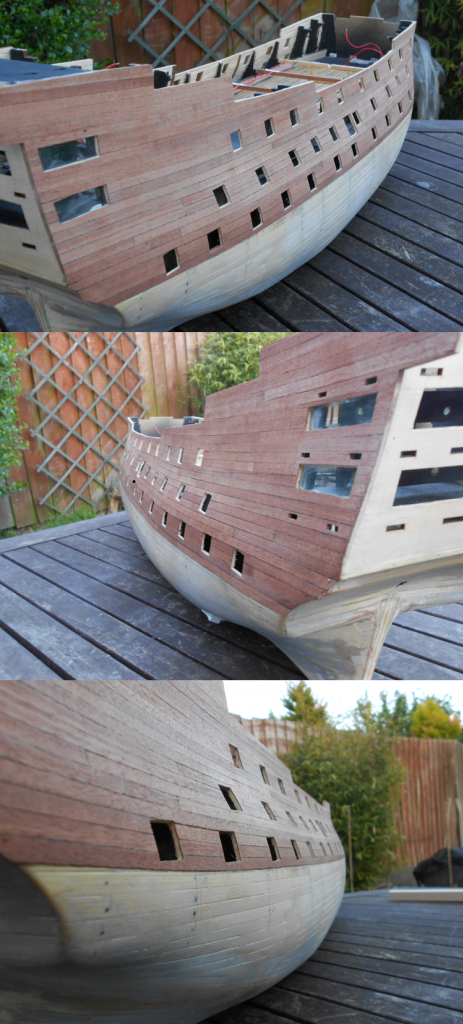 Processing - Progressing
Previous builds: HMS Victory
Current build: HMS Sovereign of the seas
|
|
|
 Rank: Pro    Groups: Registered
Joined: 24/09/2012 Posts: 491 Points: 1,452 Location: London
|
Secondly is the stern modification Cut using a razor saw, not clean at the moment, not easy getting both sides aligned but i'll work on it a bit tomorrow, going to be using some lime for the new stern, that'll also be a test to get all the measurements right but it'll be fun. 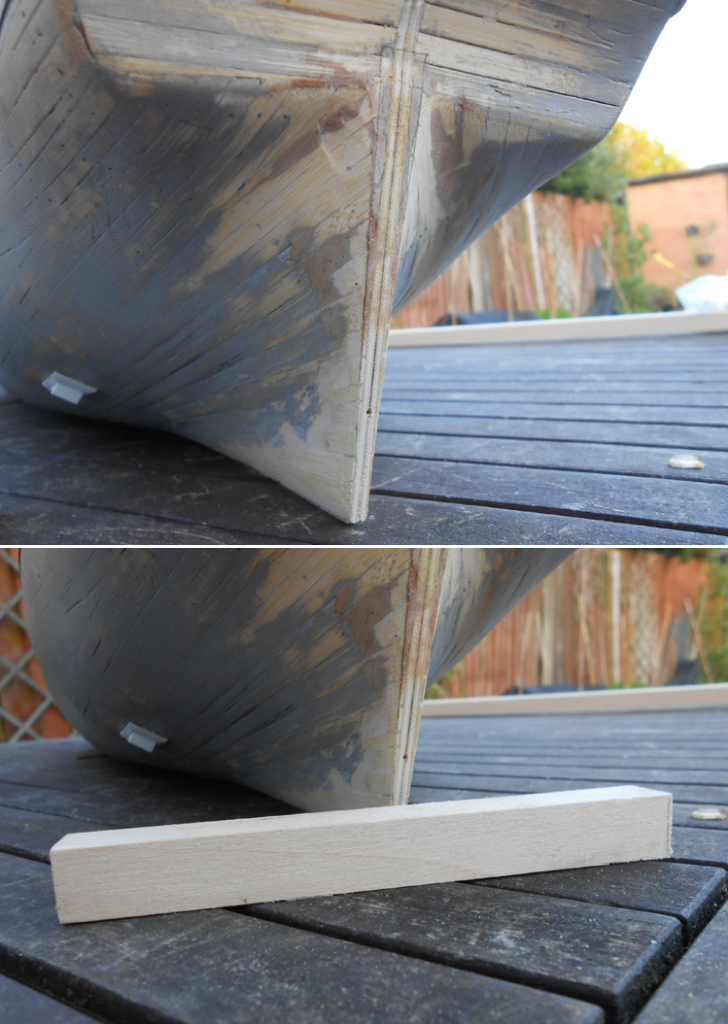 Another thing i want to try is some varnishing, i have some matt varnish, satin and antique pine(just for comparison) none of them seem to please me, As you might be able to tell, matt varnish and satin are barely comparable, up close you can barely see the difference but otherwise useless. (top normal plank, left matt, middle satin, right pine) 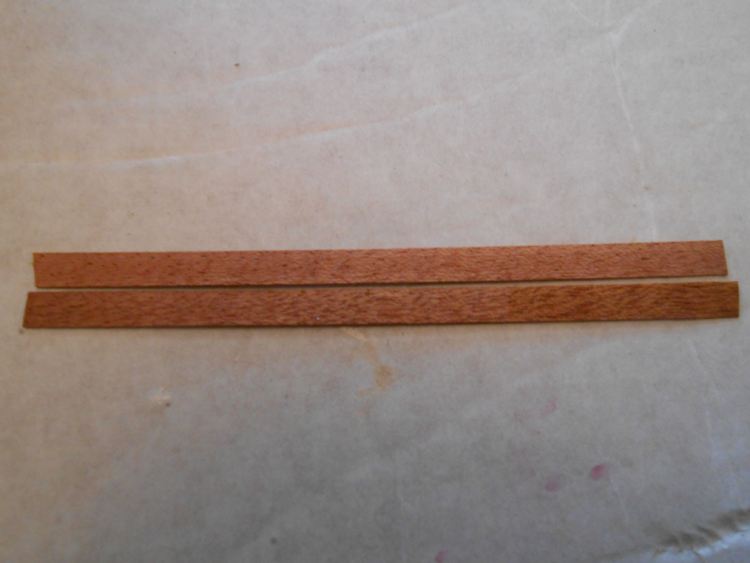 Processing - Progressing
Previous builds: HMS Victory
Current build: HMS Sovereign of the seas
|
|
|
|
|
|
|
|
 Rank: Pro Groups: Joined: 24/08/2009 Posts: 48,827 Points: -13,348
|
Beautiful work on the first planking Admiral  .I see you went for the sternpost modification.Just a suggestion,but if you fit your sternpost after the lower planking you can cut it a very basic oversize shape and then sand to the hull profile when fitted.I wasn't able to do this because I covered it in maple veneer.It is a good idea to put two or three brass dowels in the joint and use epoxy glue. Kind Regards Nigel
|
|
|
 Rank: Pro    Groups: Registered
Joined: 24/09/2012 Posts: 491 Points: 1,452 Location: London
|
ahaha   ''treenailititis'' something i fear with all my heart   Processing - Progressing
Previous builds: HMS Victory
Current build: HMS Sovereign of the seas
|
|
|
 Rank: Pro    Groups: Registered
Joined: 24/09/2012 Posts: 491 Points: 1,452 Location: London
|
NMBROOK wrote:Beautiful work on the first planking Admiral  .I see you went for the sternpost modification.Just a suggestion,but if you fit your sternpost after the lower planking you can cut it a very basic oversize shape and then sand to the hull profile when fitted.I wasn't able to do this because I covered it in maple veneer.It is a good idea to put two or three brass dowels in the joint and use epoxy glue. Kind Regards Nigel thanks nigel, great ideas, i was going to stick it on and just leave 1 or 2mm left but what you've given is probably a better idea, would hate to have ruined it and have to make another, i'll probably have to sand it when its not stuck on as the planks will only be 0.5mm thick, now i wish i had started the planking with something thicker Processing - Progressing
Previous builds: HMS Victory
Current build: HMS Sovereign of the seas
|
|
|
 Rank: Pro    Groups: Registered
Joined: 24/09/2012 Posts: 491 Points: 1,452 Location: London
|
Experimenting with the new maple i got, never used this wood before but i do like the look of it, this way i wont have to paint the lower hull and it gives a better look, only problem is tree nailing, not sure how to go about it. I'd like to use some filler, but i feel it may get into the grain and sanding it down may be a problem as its too thin. Toothpicks was another idea but they're too big and fairly the same shade as the maple.. and I could just order some more tree rivets but i think it would be much too many, right now im closely considering using filler, but i've come up with another simple idea which would cost nothing, Simply using the sapele already supplied, cutting it into small splinters with a pointed edge, this way its like a very fragile nail and even though they're not rounded its something very hard to notice if at all noticeable. Gives a nice effect and roughly the right colour im looking for. (only the middle two have been tree nailed this way, the rest and just holes) 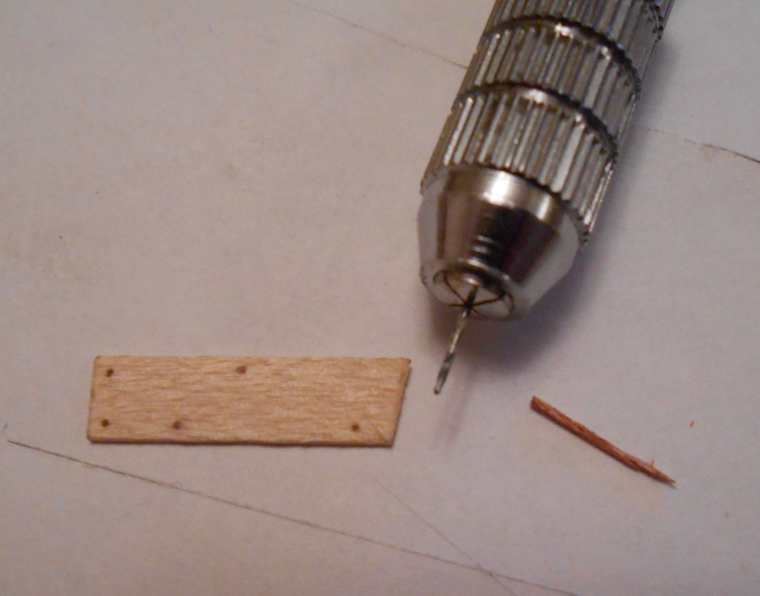 Processing - Progressing
Previous builds: HMS Victory
Current build: HMS Sovereign of the seas
|
|
|
 Rank: Master       Groups: Registered
Joined: 05/09/2012 Posts: 1,400 Points: 4,690 Location: Beaminster, Dorset
|
That's a neat idea, Admiral. The Sapele will split well into little splinters. 
|
|
|
|
|
Now that's a novell idea but a heck of a lot of work Admiral, especially when you think the cocktail sticks was a time consuming process....   .. Admire you if you go down that route...   .. I have been having a think but not to sure if it would work, am willing to try little experiment to see how it goes... Thinking of .5mm rigging line but with a good coating of bees wax to make it fairly rigid... predrill .5mm holes and see if the line would go into the predrilled holes easy with a little touch of PVA....   .. May be a crazy idea but it is just a thought at this stage.... Good luck with whichever process you decide, build is looking great.....   Regards Alan
|
|
|
 Rank: Pro Groups: Joined: 24/08/2009 Posts: 48,827 Points: -13,348
|
Hi Admiral
That is going to be a massive job.I have been treenailing my wales with 0.5mm copper wire and that was bad enough.The filler would work provided you seal the planking before sanding,then treenail and then sand.You would only have to sand once,and most of it would just be removing filler.I sealed mine with thinned Zap finishing resin but this is not for the faint hearted.If you want to maintain the colour of the Maple you are going to have to be careful what you use on the lower hull as most varnishes have a yellow brown tint that will darken the Maple.All I could suggest is the flat matt clear acrylic from the Admiralty range as they claim it won't change the colour of the wood.I have not used it myself so I can't comment any further.
Kind Regards Nigel
|
|
|
 Rank: Pro    Groups: Registered
Joined: 24/09/2012 Posts: 491 Points: 1,452 Location: London
|
NMBROOK wrote:Hi Admiral
That is going to be a massive job.I have been treenailing my wales with 0.5mm copper wire and that was bad enough.The filler would work provided you seal the planking before sanding,then treenail and then sand.You would only have to sand once,and most of it would just be removing filler.I sealed mine with thinned Zap finishing resin but this is not for the faint hearted.If you want to maintain the colour of the Maple you are going to have to be careful what you use on the lower hull as most varnishes have a yellow brown tint that will darken the Maple.All I could suggest is the flat matt clear acrylic from the Admiralty range as they claim it won't change the colour of the wood.I have not used it myself so I can't comment any further.
Kind Regards Nigel Yup it sure is nigel, but if filling the holes turns out too be too big a problem then i'll be happy to just tree nail them with some of the left over sapele, its just the right colour and i wont have to buy anything  I do plan on giving a couple of coats of varnishing afterwards, and while the colour of the maple is great im not too bothered if the colour changes slightly, aslong as its considerably lighter than the sapele planking, though there is some fairly good matt varnishes that dont change colour, i recently got some humbrol matt cote which works well but is a bit thin, i still have loads of planing to do so theres loads of time to find the right varnish, as long as it protects the planking i'll be happy   Processing - Progressing
Previous builds: HMS Victory
Current build: HMS Sovereign of the seas
|
|
|
|
Guest
|