|
|
 Rank: Pro   Groups: Registered
Joined: 01/04/2013 Posts: 342 Points: 1,029 Location: Essex
|
Thanks Alan and Hans, regards Alan England expects that every man will do his duty.
|
|
|
 Rank: Pro   Groups: Registered
Joined: 01/04/2013 Posts: 342 Points: 1,029 Location: Essex
|
OK, moving on the quarter deck.  I suppose the major enhancement on this deck is the 6 visible guns. I have used the supplied carriages and added the eye bolts for the tackle which was made using rigging cord and 2mm wooden blocks. Again, on the new gun barrel I added the breeching ring.  I purchased these barrels for the motif on them, thinking it my pass (at my 1/100 scale) for the GR cypher.  But in my haste to buy them, didn't realize that the "dolphins" near the trunions dates them to a much earlier period, so I have just turned them over. I did send some artwork of the cypher to a brass etching company and got back a sample sheet, but they could not make them as small as required. I still have to add the "running in" tackle. I had it in my mind for a long time that during battle it would not be needed as the recoil brings the gun back in, but obviously there could be misfires so it will be added, I have the ring bolts in the deck, and did do it on a mock up I made to practise on the tackle.  Notice in the photo above that the barrel is still the right (wrong  )way up. Going off topic a moment, its strange how myself and Robin (plymouth57) have gone through many similar processes during our builds. Some more shots, excuse the pun, of the guns.    England expects that every man will do his duty.
|
|
|
|
|
Some lovely detail there Sparks and have to say I love the colour and effect of your decking, it's stunning....   Regards Alan
|
|
|
 Rank: Pro   Groups: Registered
Joined: 01/04/2013 Posts: 342 Points: 1,029 Location: Essex
|
Thanks for you kind comments Alan, I did buy better quality (it wasn't difficult) lime planking than the supplied material, and have stained it light oak, I think, then satin varnish. England expects that every man will do his duty.
|
|
|
 Rank: Pro   Groups: Registered
Joined: 01/04/2013 Posts: 342 Points: 1,029 Location: Essex
|
To continue, to the fore of this deck, where the main mast comes up, I have made divisions in the openings either side of the mast and installed the three rigging cords that come through it, as attaching them below on the upper deck later will be difficult. Also added the eyebolts at the base of the mast needed at the rigging stage.  The larger of the ropes, the "main topsail sheet" belays to the "bits" below, that are visible from the waist, so I had to make the bits from scrap timber.  The other 2 lines, the "main jeers" and the "main clue garnets" belay to bits further back behind the main mast. as this was an afterthought, I was unable to put these in but managed to belay those lines to some eyebolts that I fixed to the upper deck through the openings either side of the mast, as this area won't be visible, I think I'll get away with it  There should be grating over these openings but I will add this at a later stage. England expects that every man will do his duty.
|
|
|
 Rank: Pro   Groups: Registered
Joined: 01/04/2013 Posts: 342 Points: 1,029 Location: Essex
|
To the aft of this deck we have the ships wheel and binnacle as you pass through to the cabins below the poop deck. Again, for want of finding anything better, I used parts from the Heller kit, the only ships wheels I could buy were only 8 spokes maximum (Victory's wheel has 10 ) the binnacle from the kit was made from 2 parts clear plastic, lighting again, and could not be passed up.  I added eyebolts to the binnacle for lashing down and rope to the double wheel.  The steps leading to the poop deck were the pre-made type used in the waist, cut to size, the platform was scratch built and the railings a mixture of kit parts and scratch building.  Centre of deck is the stairway leading down to the upper deck. The steps themselves were made according to Del Prado instruction from timber strips and the hand rails again a mixture of kit parts and scratch building.  England expects that every man will do his duty.
|
|
|
 Rank: Pro   Groups: Registered
Joined: 01/04/2013 Posts: 342 Points: 1,029 Location: Essex
|
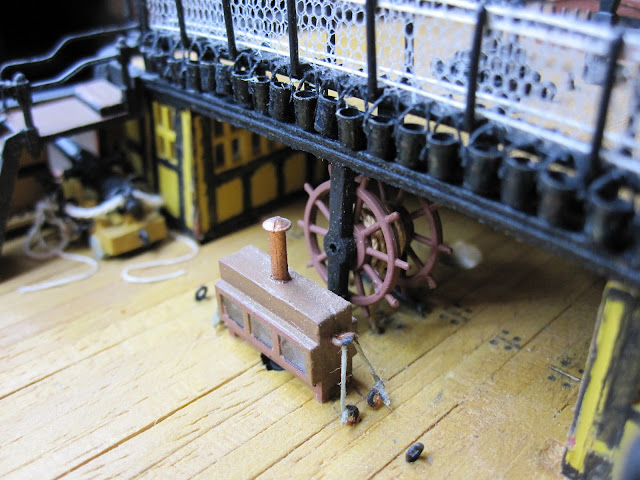
Above the wheel and binnacle can be seen the hammock cranes and netting, below this are the 21 fire buckets that are quite prominent on the real ship. As these were not included in the Del Prado version, and I could not buy buckets small enough to fit 21 into the space, I had to raid the Heller kit again. I made my own decals from a photo I took of the GR cypher on the real buckets and after a lot of trial and error managed to get pretty good results. Due to the size involved the buckets were fitted to the rail, and hooks and rope handles added individually, before the whole assembly was fixed in place.    More soon Regards Alan England expects that every man will do his duty.
|
|
|
 Rank: Pro   Groups: Registered
Joined: 01/04/2013 Posts: 342 Points: 1,029 Location: Essex
|
Just noticed my build log had 1805 views ! Has to be a good sign  Regards to all Alan England expects that every man will do his duty.
|
|
|
 Rank: Pro   Groups: Registered
Joined: 01/04/2013 Posts: 342 Points: 1,029 Location: Essex
|
Sorry for the delay in the next post "The poop deck" I am making some last minuet alterations. I was taking some photos to upload and noticed some things I wasn't happy with. Being able to take good close up shots with my new camera has its drawbacks too, as I hadn't noticed these things before,  but I suppose that's a good thing really. Hope to be posting again soon. Regards Alan England expects that every man will do his duty.
|
|
|
|
|
Beautiful work Alan, credit to your skills....   .. Look forward to seeing more of your build as time goes on.....   Regards Alan
|
|
|
 Rank: Pro   Groups: Registered
Joined: 01/04/2013 Posts: 342 Points: 1,029 Location: Essex
|
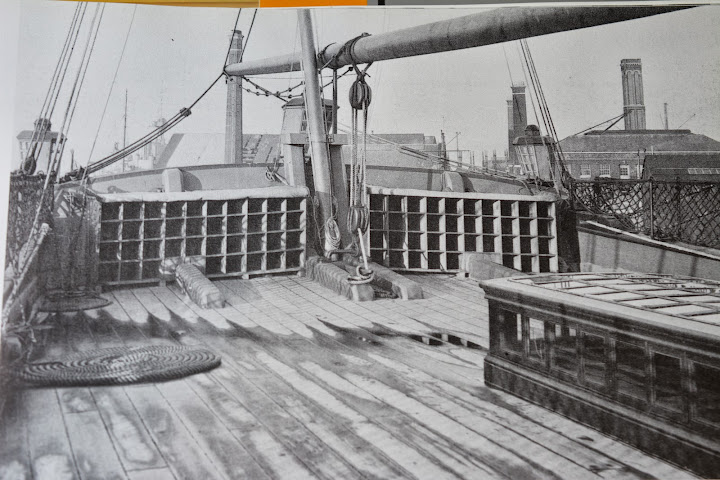
OK, after a bit of re-working, here we go with the poop deck.  The Del Prado kit didn't give much detail to the poop deck apart from the solid cast skylight and some cleats, that I thought were a bit oversize. because of my lighting intentions I did not want to use the solid skylight. I did consider the Heller one that was made from clear plastic (I'm sure that kit was designed to be illuminated  ) But from the few pictures I had seen of the poop deck, the Heller, and Del Prado versions were the wrong shape. The skylight on Victory (at least the one that's been there for the past 90 years or so) has a curved top to it. So I decided to make my own from Evergreen plastic strips of varying sizes and Evergreen clear sheet. The leaded light frame pieces are 0.5mm square and were put together on a piece of sticky paper to keep them in place then glued together with Plastic Weld liquid.  Before fitting into place I fixed 3 false beams across the opening that would be seen on the real ship. Unfortunately the skylight has gathered a lot of dust and dirt over the years (although it was covered up) and I have broken a couple of frame sections trying to clean it, that will have to be repaired.  The transom knees were from the Heller kit and as you can see from the top photo, I had made a couple of flag lockers. It was while taking a close up of these that I noticed some errors in the pigeon holes and a gouge out of the frame work. Around the same time I came across this old black and white plate that shows the flag lockers to be a lot longer and right up against the two centre transom knees.  Notice the curved top on the skylight. I also found this more recent colour photo that shows the black/yellow colour scheme that I had not done on the poop deck walls etc.  Looking at the black and white photo, it seems the knees were once painted yellow, but I like the yellow black scheme and decided to go with that. England expects that every man will do his duty.
|
|
|
|
|
Lovely work ther sparks, enjoying your build....   Regards Alan
|
|
|
 Rank: Pro   Groups: Registered
Joined: 01/04/2013 Posts: 342 Points: 1,029 Location: Essex
|
I made new flag lockers from my trusty old hard wood sheet and grating material.   I re-did the paintwork with yellow and black (these close up shots are pretty unforgiving, but it doesn't look too bad from a normal viewpoint) Notice also some of the wiring to the lanterns.  While I had it stripped down, I decided to make the knees more accurate and add the ensign staff bracket. I used a piece of square Evergreen stock and filed a half round groove into it. I have no idea where the white metal bracket came from, but I knew it was somewhere in my "box of bits" and what I could use it for.  I fixed the parts between the tops of the centre knees and made the horse bracket from some small wire bent to shape and fixed it by drilling holes in the knees and gluing into place.  I fixed the flag lockers in place and made some small cleats to go on the face and top of the transom. It was about then that I realised the yellow ochre I had used was a lot yellower than the rest of the ship  and had to go over it with a more mellow version.(again, it doesn't look that bad from a normal distance, that's my excuse anyway  )  I then made a couple of "canvas" covers from material and painted off white. fixed one in the closed position and the other rolled up.  Finally, referring back to an older picture to show the extra cleats and eye bolts fitted around the deck that will be needed at rigging stage.  At the moment, I have made a start on the poop deck hammock cranes and netting, but still a way to go with that yet.  More soon. Regards Alan England expects that every man will do his duty.
|
|
|
|
|
Looking great Sparks! That's the same method for the flag lockers that I'm heading for (some time!) and I'm also going for the glazed skylight but probably out of perspex. Some great ideas there! Robin First wooden ship: The Grimsby 12 Gun 'Frigate' by Constructo Second: Bounty DelPrado Part Works Third: HMS Victory DelPrado Part Works 1/100 scale Diorama of the Battle of the Brandywine from the American Revolutionary War Diorama of the Battle of New Falkland (unfinished sci-fi), Great War Centenary Diorama of the Messines Ridge Assault Index for the Victory diary is on page 1
|
|
|
 Rank: Pro   Groups: Registered
Joined: 01/04/2013 Posts: 342 Points: 1,029 Location: Essex
|
Thanks Alan and Robin, I think that just about brings to a close this part of the build log that shows work already completed some years ago. Another thing I did make, but will not be fitting to the ship until all the hammock cranes and netting are in place, are the chain wales or channels. I didn't like the Del Prado supplied ones or their plastic dead eyes, so made my own from my hard wood sheet and wooden dead eyes of varying sizes purchased through Model Dockyard. Below are some pics of the portside set (starboard side is the same but reversed) starting at the front with the fore channel.   After the dead eyes were fixed in place I edged the channels with small brass rod bent to shape, then the whole assembly was painted black.  ] Regards Alan England expects that every man will do his duty.
|
|
|
 Rank: Pro   Groups: Registered
Joined: 01/04/2013 Posts: 342 Points: 1,029 Location: Essex
|
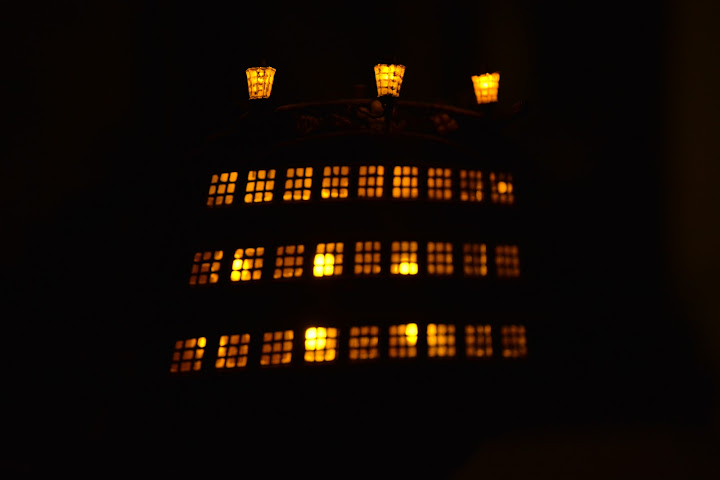
You have probably noticed I have mentioned lighting a few times during the course of this build log, so may as well show that as it comes under works already completed. I suppose the main reason for illuminating a period ship like Victory is to show off the stern galleries, so I'll start there. These first couple of photos are in normal light.   Then total darkness.  A side view of the galleries.  Here's one looking down at the quarter and poop decks.  Down into the waist below the skid beams.   Entry port.  Finally up onto the fore castle, where you can see light coming up through the mast hole too.  I hope it won't be too long before I'm posting newly completed works. Regards to all. Alan England expects that every man will do his duty.
|
|
|
 Rank: Super-Elite        Groups: Registered
Joined: 30/01/2013 Posts: 4,604 Points: 13,607 Location: Monmouthshire UK
|
Absolutely amazing, I love the lighting, Im so annoyed I didnt put lights in mine now and i have gone too far into the build to do anything about it. Oh well, good excuse to get the Santasima Trinidad I suppose  Steve
|
|
|
 Rank: Master      Groups: Registered
Joined: 30/03/2011 Posts: 1,344 Points: 4,079 Location: Bryanston, Johannesburg. RSA
|
Beautiful job there Alan.  Love that lighting.  Rgds, Hans
"It's okay to make mistakes. mistakes are our teachers - they help us to to learn, even if it is painfully"
Current Build:
Endeavour Cross section,D51
Completed: HMS Victory
Under the bench: Endeavour x 2,Sovereign of the Seas, Akagi and The Black Pearl!HMS Victory Cross Section
|
|
|
|
|
Hi Alan, a lovely looking build and the lighting is superb... not too much and not too bright.... congratulations on a beautiful result.....   ..Look forward to seeing your progress....   Regards Alan
|
|
|
 Rank: Pro   Groups: Registered
Joined: 01/04/2013 Posts: 342 Points: 1,029 Location: Essex
|
Thank you Steve, Hans and Alan for your comments. Alan, I'm especially chuffed with your comment on the lighting  as I was very conscious when designing it, that I didn't want the ship lit up like Blackpool tower, and wanted to replicate the dimmer light given from oil lanterns. Thanks again to you all and I hope to be continuing with the build log soon. Regards Alan England expects that every man will do his duty.
|
|
|
|
Guest
|