|
|
 Rank: Pro Groups: Registered
Joined: 25/03/2010 Posts: 100 Points: 289 Location: derby
|
Hi everyone How can I build or buy a jig to hold the boat in place.  Any help is most welcome especially with photos. Thanks Pam 
|
|
|
Rank: Pro  Groups: Registered
Joined: 17/03/2010 Posts: 128 Points: 336 Location: Windsor, Berks
|
I agree This would be very useful Follow my build to learn how to make firewood
|
|
|
Rank: Pro Groups: Registered
Joined: 25/03/2010 Posts: 100 Points: 289 Location: derby
|
Come on lads help a struggling lady. How do I build a jig?  Pam x
|
|
|
Rank: Pro  Groups: Registered
Joined: 18/03/2010 Posts: 121 Points: 359 Location: Waterlooville, Portsmouth. The home of HMS Victory.
|
OK Pam lets have a go then. What I did with the last Victory was buy a cheap shelf from the DIY shop. Using 1 piece of batton, screw it to the shelf laid flat. Measure the false keel and screw the second batton in place to that measurement. Believe it or not I have had that Jig for over 3 years.
Paul
|
|
|
Rank: Pro Groups: Registered
Joined: 25/03/2010 Posts: 100 Points: 289 Location: derby
|
Hi Paul thanks for answering So i get a small plank and attach a baton What size baton do I need and how do I know what the hull measurements are. This is so confusing to a non technical mind In a nut shell is it a box which the hull sits in Any pics or diagrams would really help me Pam xx
|
|
|
 Rank: Semi-Pro Level 1  Groups: Registered
Joined: 22/03/2010 Posts: 66 Points: 180 Location: Horwich, Bolton, UK
|
Here's what I use Pam. It cost me about £35 though...  Or here's a cheaper solution    Tom Quentin Tarantino - Hallowed Be Thy Name!
|
|
|
Rank: Pro Groups: Registered
Joined: 25/03/2010 Posts: 100 Points: 289 Location: derby
|
Hi Tom So its basically something to hold the hull in place? A blonde moment coming up -why do you need one? Pam 
|
|
|
Rank: Pro Groups: New Members, Unapproved Joined: 24/08/2009 Posts: 48,827 Points: -13,348
|
Here is a picture of a jig holding the keel and frames, let the picture do the talking:) One large piece of wood, some battoning as mentioned above, place the keel down and move the battons towards the keel untill it stands on its own, nails down the battoning, keel stays up and square.  colin
|
|
|
Rank: Pro Groups: New Members, Unapproved Joined: 24/08/2009 Posts: 48,827 Points: -13,348
|
Here is a few other options, this from Cornwall Model Boats  A building slip for models up to 90 cm long.The notched keel support is screwed to the baseplate. Two guide blocks, one permanent and one adjustable to match all sizes, secure the positioning of the keel. A wooden rod ensures that the foundation is stable. The middle piece (square) slides back and forth and is useful in positioning the frames at right angles. A building slip for models up to 90 cm long.The notched keel support is screwed to the baseplate. Two guide blocks, one permanent and one adjustable to match all sizes, secure the positioning of the keel. A wooden rod ensures that the foundation is stable. The middle piece (square) slides back and forth and is useful in positioning the frames at right angles. Bit pricey at £40 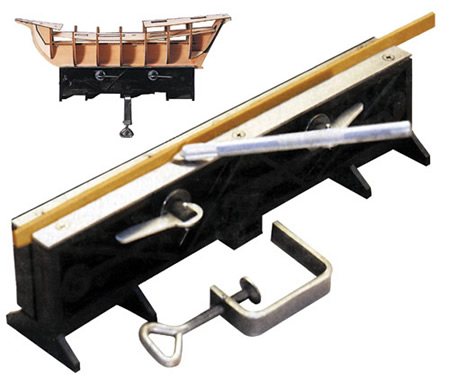 This special tool from Mantua performs like a vice except that the jaws can be adjusted to clamp on an angle (to accommodate tapered items such as spars). A quick release lever speeds the re-clamping process once the jaws are initially adjusted. Designed to be clamped on the edge of a workbench, the Strip Clamp can also be mounted on a "lap board" for more portability. This one is £25 Just a though Pam:)at least this all gives you some ideas, maybe you could knock one up cheaper if you feel like it. Colin
|
|
|
Rank: Pro Groups: Registered
Joined: 25/03/2010 Posts: 100 Points: 289 Location: derby
|
Thanks Colin Its down to B+Q smile nicer at the wood dept and get some lenght's cut from off cuts. It is so nice to have people who will help me A huge thank you to everyone and happy building Pam xx
|
|
|
Rank: Pro Groups: New Members, Unapproved Joined: 24/08/2009 Posts: 48,827 Points: -13,348
|
Just make sure the wood you get for the battoning (that will sandwich the Keel) is super straight. At least check the edges are nice and clean and have no warping.
Good luck and be sure to show us your results, take your time and measure before nailing and glueing.
Also be sure to get the lenght right, as we dont have the full keel at the moment, so maybe just get your wood over sized and cut to lenght as soon as the part become available.
|
|
|
Rank: Pro Groups: Registered
Joined: 25/03/2010 Posts: 100 Points: 289 Location: derby
|
Thanks again Colin Roughly how wide should the wood be as I will get B+Q to machine cut some pieces. Is plane wood better than rough cut and does it matter what thickness it is. Cheers Pam x
|
|
|
Rank: Semi-Pro Level 1 Groups: Registered
Joined: 22/03/2010 Posts: 66 Points: 180 Location: Horwich, Bolton, UK
|
Hi Pam, I bought the "Amati Keel Clamp" to clamp the keel together and hold everything in situ as I proceeded to do the build. Much the same as any other keel-clamping method. Mind you, on a 48" ship, it might be as well to use a tailor made jig like the recommendations already given.
AMATI KEEL CLAMPQuentin Tarantino - Hallowed Be Thy Name!
|
|
|
Rank: Pro Groups: New Members, Unapproved Joined: 24/08/2009 Posts: 48,827 Points: -13,348
|
Pam, the model spec shows the model to be 17inches, bear in mind that included the mast's, so in fact the width of the hull would be a little less, I would get 17" width to be sure, as for the battons width, well 2", maybe, your choise, you only have to sandwich the keel with it. As for lenght, once again the model spec would include all mast's and booms ect so geting the full lenght of the hull is a little hard...hang on a sec, I know. below is a picture of the Artesania Latina Victory, for which our build is based, so hull measurement would be pretty much the same, I guess! Looking at it its not that long, maybe 3ft? you could always cut it down if its too long. This picture shows a different way of doing the jig, you must use a ruler to get it straight though. Stick with the sandwich approach:) As for wood, use plain wood, as for thickness, see the pictures, not too thick for the battons, see my picture.  Hope that helps a little, everyone does it different, so take all the advice and come up with what works for you Pam. This is what you would be expecting to have after the keel and frames are made. 
|
|
|
Rank: Pro Groups: Registered
Joined: 18/03/2010 Posts: 121 Points: 359 Location: Waterlooville, Portsmouth. The home of HMS Victory.
|
Hi Pam, go with Colin on this one. His photo is the same as the jig I made. It's cheap and it will last for years.
Regards, Paul
|
|
|
Rank: Pro Groups: Registered
Joined: 25/03/2010 Posts: 100 Points: 289 Location: derby
|
wow it looks great thanks everyone 
|
|
|
Rank: Semi-Pro Level 1 Groups: Registered
Joined: 22/03/2010 Posts: 66 Points: 180 Location: Horwich, Bolton, UK
|
Just been in the garage and found some L-Brackets which would allow me to duplicate that rig Colin. Looks like it'd act as a very stout support for the big girl.  But then I like the idea of something with a lower profile so I went for the setup below, based on your advice. Luckily, I already had these pieces of 10mm hardwood, so it saved me some money. I cut them to length and made sure they were straight and true by putting them against a long steel level. After fitting the first one to the baseboard, I then offered the other one up to it and using pieces of the kit to guage the exact gap needed, I clamped the two pieces in place while I screwed down the second piece of hardwood. When I removed the clamps, the kit pieces stayed firmly in place, with virtually no lateral movement. Thanks for the ideas!  Tom Quentin Tarantino - Hallowed Be Thy Name!
|
|
|
Rank: Pro Groups: New Members, Unapproved Joined: 24/08/2009 Posts: 48,827 Points: -13,348
|
Just bear in mind guys that you may not be supplied with the keel sections within consecutive mags, i.e. they could well be supplied a number of mags apart which seems to be the case, for starters there is no keel section supplied in mag 2 if you look at the parts listed for mag 2 on the back page of mag 1, maybe this is why mags 1&2 concentrate on the forward bulkhead/forward keel build, which in turn means you won't be able to lay the full keel into a jig or add the full set of frames until all the keel sections arrive, (looks like the keel wil be in 3 sections based on the normal kit), so you might have to wait a while to get going 
|
|
|
Rank: Pro Groups: New Members, Unapproved Joined: 24/08/2009 Posts: 48,827 Points: -13,348
|
MadDogMcQ wrote:Just been in the garage and found some L-Brackets which would allow me to duplicate that rig Colin. Looks like it'd act as a very stout support for the big girl. But then I like the idea of something with a lower profile so I went for the setup below, based on your advice. Luckily, I already had these pieces of 10mm hardwood, so it saved me some money. I cut them to length and made sure they were straight and true by putting them against a long steel level. After fitting the first one to the baseboard, I then offered the other one up to it and using pieces of the kit to guage the exact gap needed, I clamped the two pieces in place while I screwed down the second piece of hardwood. When I removed the clamps, the kit pieces stayed firmly in place, with virtually no lateral movement. Thanks for the ideas! Tom Hi Tom, hate to tell you but the keel of this model will not drop into a base board jig slot, if you look at the photo in mag 1 on page 10, all of the frames sit flush with the very bottom of the keel, i.e. there is no remaining keel for it to drop into a jig slot. So the best jig to built is one with a flat base board and has 90 degree angle brackets set upon it, that are set so they do not conflict with the lie of the frames upon the keel.
|
|
|
Rank: Semi-Pro Level 1 Groups: Registered
Joined: 22/03/2010 Posts: 66 Points: 180 Location: Horwich, Bolton, UK
|
DANG!!!  Lol, no prob. I'll revert back to the L-Brackets then. Thanks. Quentin Tarantino - Hallowed Be Thy Name!
|
|
|
|
Guest (3)
|
 US
US

