|
|
|
|
A beautiful job Alan! I've still got those to do myself too!  As for the downward 'droop' I wouldn't bother to be honest, as you point out the boomkins are there to control or hold down the sail so in 'real life' they would be subjected to an upward force which would give them an upward curve if anything. I think the droop is there because they haven't been doing their actual job since the old girl went into dry dock and its simply their own weight bending them down (although they have probably been replaced more than once since then!!)((after all, they have got to have some wood to sell on to us fanatics haven't they!!  ) Very well done! Robin First wooden ship: The Grimsby 12 Gun 'Frigate' by Constructo Second: Bounty DelPrado Part Works Third: HMS Victory DelPrado Part Works 1/100 scale Diorama of the Battle of the Brandywine from the American Revolutionary War Diorama of the Battle of New Falkland (unfinished sci-fi), Great War Centenary Diorama of the Messines Ridge Assault Index for the Victory diary is on page 1
|
|
|
 Rank: Pro   Groups: Registered
Joined: 01/04/2013 Posts: 342 Points: 1,029 Location: Essex
|
karl1113 wrote:ingenuity is a marvelous thing,and I doff my hat to you,these little things make all the difference to a model. well done m8. Thanks for the nice comments Karl, and the doffed hat  Regards Alan England expects that every man will do his duty.
|
|
|
 Rank: Pro   Groups: Registered
Joined: 01/04/2013 Posts: 342 Points: 1,029 Location: Essex
|
stevie_o wrote:Very nice addition with those "little mast things" I've not even noticed these on the de ag kit, will have to have to have a look through the official build to see  Steve Thanks Steve, I'm sure they will be on the De Ag kit as they will be needed as part of the rigging process. Regards Alan England expects that every man will do his duty.
|
|
|
 Rank: Pro   Groups: Registered
Joined: 01/04/2013 Posts: 342 Points: 1,029 Location: Essex
|
Plymouth57 wrote:A beautiful job Alan! I've still got those to do myself too!  As for the downward 'droop' I wouldn't bother to be honest, as you point out the boomkins are there to control or hold down the sail so in 'real life' they would be subjected to an upward force which would give them an upward curve if anything. I think the droop is there because they haven't been doing their actual job since the old girl went into dry dock and its simply their own weight bending them down (although they have probably been replaced more than once since then!!)((after all, they have got to have some wood to sell on to us fanatics haven't they!!  ) Very well done! Robin Thanks for you comments Robin, Looking closer at the photos I think they get their downward curve from the stays attached to the hull, but don't think my little replica's will take the strain of that  So I'm in agreement with you to leave them be, in fact I've just given them a first coat of paint. I am turning my attention to the gun port lids now  Regards Alan England expects that every man will do his duty.
|
|
|
|
|
Very nicely done Sparks....  Regards Alan
|
|
|
 Rank: Pro   Groups: Registered
Joined: 01/04/2013 Posts: 342 Points: 1,029 Location: Essex
|
Gandale wrote:Very nicely done Sparks....  Regards Alan Thanks Alan Regards Alan England expects that every man will do his duty.
|
|
|
|
|
Hi there Sparks. Saw your reply on Willz diary regarding the fireing cannon effect, not bad at all!  You could try a variation of my rocket trail effect in reverse with either a small length of brass rod or even a cocktail stick sanded down to fit the muzzle, leave about a 1/4" sticking out of the barrel and glue a small clump of best quality cotton wool to the protruding section. Leave that to dry and then 'tease' it out into the smoke effect. I just had a thought, by varying the length of the sticks and the amount of cotton wool, you can have the guns going off a split second apart!  Off you go....I want to see if it works!    See you soon Robin First wooden ship: The Grimsby 12 Gun 'Frigate' by Constructo Second: Bounty DelPrado Part Works Third: HMS Victory DelPrado Part Works 1/100 scale Diorama of the Battle of the Brandywine from the American Revolutionary War Diorama of the Battle of New Falkland (unfinished sci-fi), Great War Centenary Diorama of the Messines Ridge Assault Index for the Victory diary is on page 1
|
|
|
 Rank: Pro   Groups: Registered
Joined: 01/04/2013 Posts: 342 Points: 1,029 Location: Essex
|
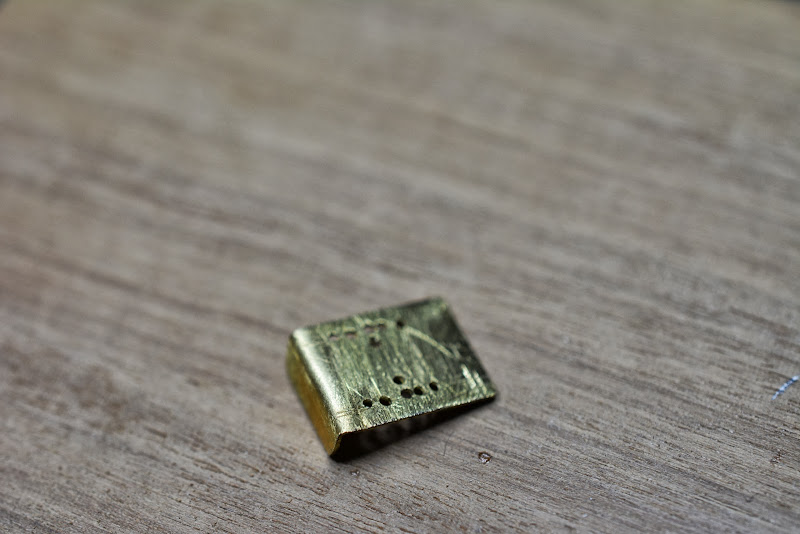
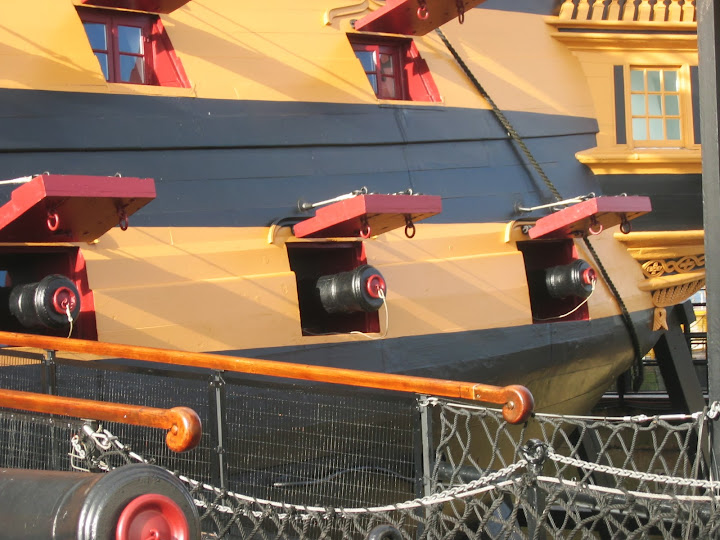
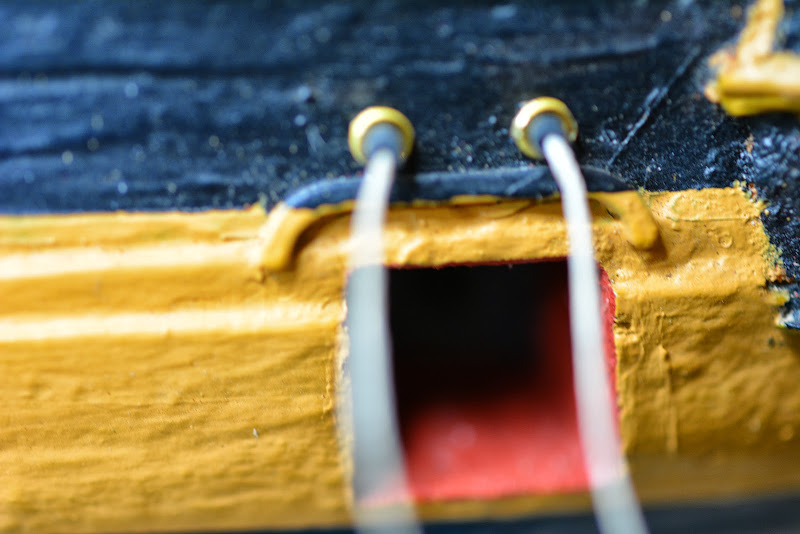
Hi all, A small interim post concerning the gun port lids. Again, after studying photos and plans I made a little template from brass sheet that can be placed into the gun port opening and the holes for the lid ropes drilled into the hull.  I noticed that not all the ropes exited the hull at the same height above the openings and a couple were closer to the centre than the others, hence the various holes in the template (also the need to clear some mouldings). The ropes themselves were guided through the hull inside lead pipes, and on the outside of the hull was a leather gaiter to help keep the hole water tight.  To try to replicate this I am using small lengths of black heat shrink sleeving. My first idea was to fix the heat shrink into the hull, unshrunk, as it were, with the rope attached and then apply the heat so that it shrunk around the rope creating the cone effect in the photo above, but the smallest size I could find (1mm), looked too large, so the plan is to thread the rope through, shrink it around the rope, then glue the rope into it, all before fitting into the hull.    As for the port lids themselves, I am using the ones supplied with the Del Prado kit. I have searched for others but the sizes are not quite right. I have painted them black on the outside and red ochre on the inside, and used the small PE eyebolts to enhance them. I decided long ago not to use the supplied hinge pieces as they did not look accurate, and fitted brass rain drips of the correct shape over the gun port openings. The lids will just be glued into the gun port in an open or closed position. Below is a photo of a "test run" to see how it looked. I will probably reduce the amount that the sleeving sticks out.  To prevent going crazy, I will do these in stages and only fit the port lids in place where it may be awkward later, like under the channels etc. to prevent snapping them off when handling the ship. After doing the test run, I thought of another enhancement to drive me bonkers  I made some small brass washers to tidy up the hole and hopefully give the look (when painted black) of the gaiters on the real ship seen in the photo above. Below is a dry fit in the hull.  These little blighters started life as the rings on some PE hooks, I had to drill out the hole to enlarge it then file up the edges once it was cut from the hook. Now that I have found enough to do the lot, I will paint them first and glue them to the sleeving before fitting into the hull, I can then use it as a sort of depth gauge to keep them all the same. Well, that turned out to be a longer post than I thought  Next update when I get some fitted to the ship. Regards Alan England expects that every man will do his duty.
|
|
|
 Rank: Pro   Groups: Registered
Joined: 01/04/2013 Posts: 342 Points: 1,029 Location: Essex
|
Plymouth57 wrote:Hi there Sparks. Saw your reply on Willz diary regarding the fireing cannon effect, not bad at all!  You could try a variation of my rocket trail effect in reverse with either a small length of brass rod or even a cocktail stick sanded down to fit the muzzle, leave about a 1/4" sticking out of the barrel and glue a small clump of best quality cotton wool to the protruding section. Leave that to dry and then 'tease' it out into the smoke effect. I just had a thought, by varying the length of the sticks and the amount of cotton wool, you can have the guns going off a split second apart!  Off you go....I want to see if it works!    See you soon Robin Yeah, thanks Robin, I'll get right on it  But seriously, as we are trying to create a "ship at battle effect", I suppose we should do something, but I may leave the "rolling broadside" to you  Regards Alan England expects that every man will do his duty.
|
|
|
|
|
Lovely work on the gun port lids Sparks, think it looks fab....   Regards Alan
|
|
|
 Rank: Super-Elite        Groups: Registered
Joined: 30/01/2013 Posts: 4,604 Points: 13,607 Location: Monmouthshire UK
|
Hi, Nice work on the gunport lids, especially considering the scale, well done. Steve
|
|
|
 Rank: Pro   Groups: Registered
Joined: 01/04/2013 Posts: 342 Points: 1,029 Location: Essex
|
Gandale wrote:Lovely work on the gun port lids Sparks, think it looks fab....   Regards Alan Thanks for you nice comments Alan. Regards Alan England expects that every man will do his duty.
|
|
|
 Rank: Pro   Groups: Registered
Joined: 01/04/2013 Posts: 342 Points: 1,029 Location: Essex
|
stevie_o wrote:Hi,
Nice work on the gunport lids, especially considering the scale, well done.
Steve Thanks Steve. Regards Alan England expects that every man will do his duty.
|
|
|
|
|
 Wow stunning work Alan  Rgd Martyn Building ?
Completed. Soliei Royal . Sovereign of the Seas . Virginia . Scotland . San Felipe . Corel vasa , Santisima Trinadad X section , Vasa
Next Build ?
When sailors have good wine, They think themselves in heaven for the time. John Baltharpe
|
|
|
 Rank: Vice-Master     Groups: Registered
Joined: 26/09/2010 Posts: 851 Points: 2,565 Location: Walsall
|
Really like the port lids you have a real eye for the detail.
Regards
Foz
|
|
|
 Rank: Pro   Groups: Registered
Joined: 01/04/2013 Posts: 342 Points: 1,029 Location: Essex
|
Thanks Martyn and Foz for you comments. Well, here we go with another little update, not strictly the gun port lids as promised, but related. While I was checking drawings etc relating to the gun ports, I was reminded (again) that I had not done anything about the sick bay windows on the middle gun deck at the bows.  These windows are a bit smaller than the gun ports, with side opening doors, there seems to be a removable board blocking the bottom half of the opening, I can only think this was to prevent too much wind and spray getting to the sick seamen. Most kits I have seen depict these windows as closed, either moulded into the hull or a separate moulded part to fix to the hull, unless of course you are Del Prado, in which case, you don't bother to depict it at all  Mind you, they didn't even get the amount of actual gun ports right, so I suppose that was a bit too much to expect  They did supply a set of moulded closed doors for the quarter deck gun port, and I considered cutting off the rain drip part and using them, but they were still too large. So me being me, decided to go for it. I knew the hull construction was very thick in that area, that's why I had avoided doing anything before, but throwing caution to the wind, I marked out the openings and with Dremel in one hand and file in the other, got stuck in   Using the aforementioned tools and a small chisel, I rebated a 7mm square X 7mm deep (or there about) opening in the hull on each side. After cleaning up the edges and touching up the paintwork I made the "removable" boards by cutting aftermarket gun port lids, (more about those later) in half and filing off all the detail, then fixing a couple of pieces of 0.5mm X 0.25mm Evergreen strip down the sides.  These were then painted red ochre, and after painting the rear of the openings matt black, they were fixed it place, along with the brass rain drips used on the other gun ports. There seems to be a lot more room in this area on the real ship than on my model, from looking at the photo's it seems the blue and yellow striped carving goes up at a steeper angle than I have done mine, leaving it all a bit cramped. For all my fellow "rivet counters", notice I had a go at Dremeling the little hand grips in the board   England expects that every man will do his duty.
|
|
|
|
|
Nicely done Sparks.....   Regards Alan
|
|
|
 Rank: Pro   Groups: Registered
Joined: 01/04/2013 Posts: 342 Points: 1,029 Location: Essex
|
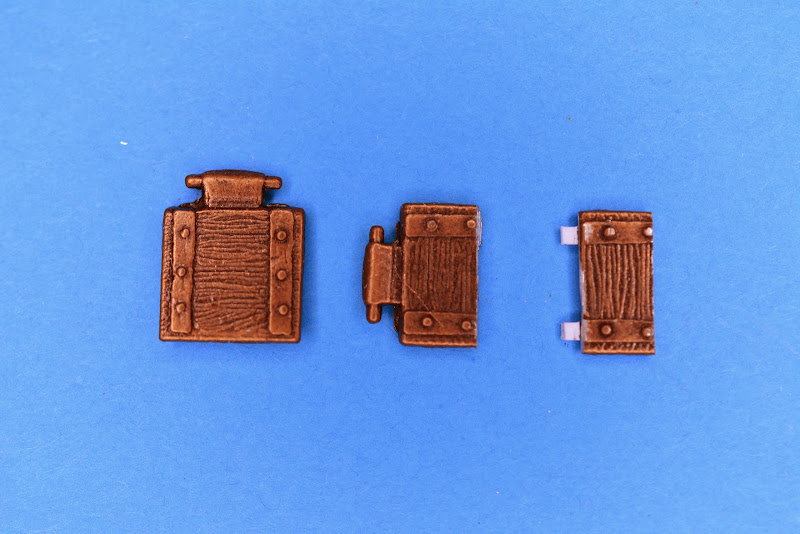
Now onto the doors themselves. I mentioned in the previous post about aftermarket gun ports. While looking for something different to use instead of the Del Prado supplied lids, I purchased a few sample packs of these and thought I might as well make use of some of them. The smallest ones I have are, by coincidence about 7mm square  I cut these roughly in half with a Dremel fine cut disc and as the hinge part on these was not right, that had to come off too, and I glued small pieces of 1mm X 0.75mm Evergreen strip to represent the hinges. Below is a photo of the three stages prior to painting.  After painting, the obligatory small eyelets were fixed in place, and the assembly fixed to the hull.   While I was in "side opening door mode" I made the doors for the quarter deck gun ports in the same way, but using slightly larger lids, these ones had about the right sort of hinge so I just had to file off the little pegs.  Again, after painting and fitting of eyelets they were fixed in place.   I know that in both cases, the doors are a bit bigger then the openings, but by reducing the height, the hinge detail would have been very close, or right on the edge which would not have looked right, so, as the doors won't be closing, and at a normal viewing distance its less noticeable, I think I can live with it  I will try to start an assembly line for the main gun port lids parts over the week end, but as it is my birthday tomorrow, I may be forced into an evening off  Bye for now. Regards Alan England expects that every man will do his duty.
|
|
|
|
|
Hi Sparks! Very nicely done there! All the photos I had of the sick bay windows had the removeable (possibly modern) wooden and glass window frames in so that's what I put in too! Ooops! still, too late now!  Of course, even if they were Trafalgar period, they would have been one of the first things whipped out and sent down to the hold too! Just shows, when I started I hadn't realised I was doing a 'battle scene' Victory!  Incidently, the exact moment in time on my model is right in between two broadsides, that was lucky!  And a very happy birthday for tomorrow!  Robin First wooden ship: The Grimsby 12 Gun 'Frigate' by Constructo Second: Bounty DelPrado Part Works Third: HMS Victory DelPrado Part Works 1/100 scale Diorama of the Battle of the Brandywine from the American Revolutionary War Diorama of the Battle of New Falkland (unfinished sci-fi), Great War Centenary Diorama of the Messines Ridge Assault Index for the Victory diary is on page 1
|
|
|
 Rank: Super-Elite        Groups: Registered
Joined: 30/01/2013 Posts: 4,604 Points: 13,607 Location: Monmouthshire UK
|
Nice work on the windows, looking good  Steve
|
|
|
|
Guest
|