|
|
 Rank: Pro   Groups: Registered
Joined: 25/03/2010 Posts: 472 Points: 1,357 Location: Hyde
|
Hello again
I was browsing Model Ship World forum yesterday and I found gold piece in terms of rigging. There was a link to the spreadsheet that calculates the rigging sizes based on the ship size, year of release and beam size (HMS Victory is 15m).
I couldn't post the original file here but I did the screenshots for the mast sizes and standing rigging details. WOW so much ropes to do :)
 Masts dimensions Masts dimensions
 yards dimensions yards dimensions
 Standing rigging 1 Standing rigging 1
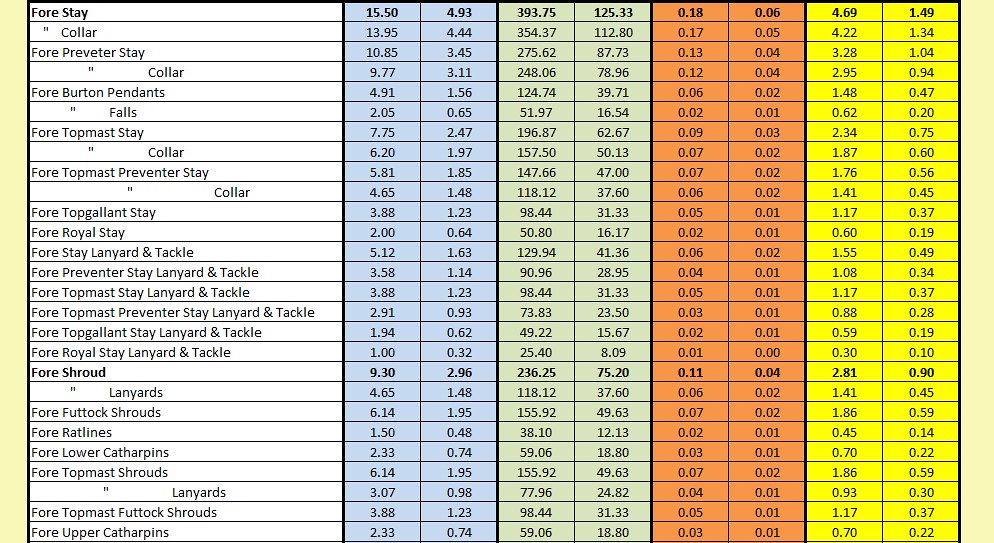 Standing rigging 2 Standing rigging 2
 Standing rigging 3 Standing rigging 3
 Standing rigging 4 Standing rigging 4
 Standing rigging 5 Standing rigging 5
 Standing rigging 6 Standing rigging 6
 Standing rigging 7 Standing rigging 7
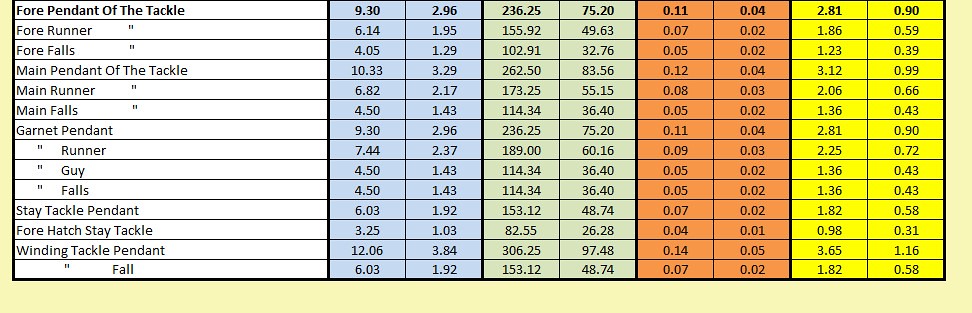 Standing rigging 8 Standing rigging 8
I hope this is helpful. I can get these converted to 1/100 scale for heller too :)
Regards
Tom
|
|
|
 Rank: Vice-Master   Groups: Registered
Joined: 26/05/2014 Posts: 912 Points: 2,773 Location: East Sussex UK
|
Yes please Tom, having them in 1/100 would be great, i'm sure Plymouth 57 would find it very useful as well. Thank you Tom Regards Paul Building: DelPrado HMS Victory. Building: DeAgostini Sovereign Of The Seas.
|
|
|
Rank: Pro Groups: Registered
Joined: 25/03/2010 Posts: 472 Points: 1,357 Location: Hyde
|
|
|
|
Rank: Pro Groups: Registered
Joined: 25/03/2010 Posts: 472 Points: 1,357 Location: Hyde
|
Hello everyone?
I finally managed to rig the deadeyes to the shrouds but it's not about that. I need to finish hammocks before installing masts so here it is.
Before the pics I was thinking about the best way of doing is as I wasn't convinced about the way magazine had told us. It seems unpractical packing the hammocks on top of another so I did little research and I found this way of doing it. It looks quite neat - it is more work but as usual it pays off at the end.
Also I used different fabric as the supplied on was way too thick... I used old bet sheet instead :)
 Untitled Untitled
 Untitled Untitled
 Untitled Untitled
 Untitled Untitled
I hope you like it ;)
See you next time after I've done 100 of them 
|
|
|
Rank: Vice-Master Groups: Registered
Joined: 26/05/2014 Posts: 912 Points: 2,773 Location: East Sussex UK
|
That's amazing, thank you very much Tom it's much appreciated. Regards Paul Building: DelPrado HMS Victory. Building: DeAgostini Sovereign Of The Seas.
|
|
|
Rank: Pro Groups: Registered
Joined: 25/03/2010 Posts: 472 Points: 1,357 Location: Hyde
|
Hello again
Another update, this time I managed to fit boarding spikes. These are photo etched parts that were purchased years ago through this forum. I can't remember who had sold them but they were made to 1/84 scale and I must say they look amazing. Really crisp detail, I painted the rings yellow and blackened the spikes. They are secured with super glue.
 Untitled Untitled
Also I managed to play with the rigging a little, new thread arrived Gutermann Skala 240 in neutral colour for running rigging and some other bits. I made 3x2 strands rope which is probably 0.2mm max and I tested it on the fore mast. Have a look...
 Untitled Untitled
Additionally another book arrived - HMS Victory Her Construction, Career and Restoration by Alan McGowan. Absolute must have for somebody wanted to get most details about the rigging and other parts.
My next spate is continuing on hammocks - the way I'm doing them will push me to the limits I think. I've done only first section you can see on the pic and it took 70 hammocks. It will be around 250-300 by time I finish everything. I'm still thinking of way I'm going to put them in the lower netting. Any ideas?
 Untitled Untitled
Have a great week
Tom
|
|
|
Rank: Vice-Master Groups: Registered
Joined: 26/05/2014 Posts: 912 Points: 2,773 Location: East Sussex UK
|
The spikes and the hammocks are looking good Tom. Building: DelPrado HMS Victory. Building: DeAgostini Sovereign Of The Seas.
|
|
|
|
|
Outstanding work there Tom, your rope work is especially impressive. Think you're going to end up with a top class build when done.... Very well done indeed....  Regards Alan
|
|
|
 Rank: Master     Groups: Registered
Joined: 21/04/2011 Posts: 1,089 Points: 3,296 Location: Buckinghamshire
|
Most impressive work, Tom.
I love the way you have rigged the cranes and fitted your hammocks.
Chris
|
|
|
Rank: Pro Groups: Registered
Joined: 25/03/2010 Posts: 472 Points: 1,357 Location: Hyde
|
Thanks guys, next update will be probably fore mast fitted and deadeyes rigged. I need to think twice before I glue it in place :) Regards Tom
|
|
|
 Rank: Superelite  Groups: Registered
Joined: 10/05/2010 Posts: 2,608 Points: 7,519 Location: Lincolnshire
|
 Very detailed build Tom 
|
|
|
Rank: Pro Groups: Registered
Joined: 25/03/2010 Posts: 472 Points: 1,357 Location: Hyde
|
Hello everyone
Thanks for the comments, I'm really enjoying the build and she will makes me feel proud every time I look at her :)
I've done some progress with the build, the deadeyes are all rigged on fore mast, I'm half way through futtock shrouds and catharpins. Because I'm doing it the proper way it takes so much time to get everything in properly. I hope to get it done this week so I can share some progress pics.
So far have a look at few pics of deadeyes rigging. Of course I made the rope myself which looks amazing in my humble opinion...
 Untitled Untitled
 Untitled Untitled
 Untitled Untitled
 Untitled Untitled
See you next time
Tom
|
|
|
Rank: Master Groups: Registered
Joined: 21/04/2011 Posts: 1,089 Points: 3,296 Location: Buckinghamshire
|
Hi Tom,
Extremely neat and tidy rope work.
Those shrouds look really good.
Chris
|
|
|
Rank: Vice-Master Groups: Registered
Joined: 26/05/2014 Posts: 912 Points: 2,773 Location: East Sussex UK
|
Looks amazing Tom well done mate, and so you should be proud. Regards Paul Building: DelPrado HMS Victory. Building: DeAgostini Sovereign Of The Seas.
|
|
|
Rank: Pro Groups: Registered
Joined: 25/03/2010 Posts: 472 Points: 1,357 Location: Hyde
|
Thanks gents
It is slow work but it pays off 100%
I already can't wait to get started on main mast :)
There is few jobs I've got to do there; need to attach deadeyes onto the platform, change the rigging for the stay and preventer and add boarding spikes. Once done I shall start there :)
I'm not even talking about all the remaining hammocks I need to do... I have 75 which cover just front end so quite a bit of work to do still...
Have a great day
Tom
|
|
|
Rank: Pro Groups: Registered
Joined: 25/03/2010 Posts: 472 Points: 1,357 Location: Hyde
|
Hello everyone.
I managed to attach catharpins and dry fit futtock shrouds. It looks amazing; bit tight but otherwise great :)
I still have to attach shrouds properly bit gosh it takes shape nicely :)
 Untitled Untitled
 Untitled Untitled
 Untitled Untitled
 Untitled Untitled
Stay tuned ;)
Tom
|
|
|
 Rank: Semipro Level 1 Groups: Registered
Joined: 23/03/2010 Posts: 70 Points: 213 Location: bristol
|
Wow Tom that rigging looks spectacular, i was wondering what do you use for the seizing of the ropes, do you make a rope for the seizing or just use single thread of what size?, i have made some rope myself now with a mini rope walk and have been studying your pics and the fantastic link you posted to Olha Batchvarov ship photographer site, that is truly inspirational work. Keep up the good work Tom and your pics are incredible.
|
|
|
Rank: Semipro Level 1 Groups: Registered
Joined: 23/03/2010 Posts: 70 Points: 213 Location: bristol
|
Wow Tom that rigging looks spectacular, i was wondering what do you use for the seizing of the ropes, do you make a rope for the seizing or just use single thread of what size?, i have made some rope myself now with a mini rope walk and have been studying your pics and the fantastic link you posted to Olha Batchvarov ship photographer site, that is truly inspirational work. Keep up the good work Tom and your pics are incredible.
|
|
|
Rank: Pro Groups: Registered
Joined: 25/03/2010 Posts: 472 Points: 1,357 Location: Hyde
|
richard.l wrote:Wow Tom that rigging looks spectacular, i was wondering what do you use for the seizing of the ropes, do you make a rope for the seizing or just use single thread of what size?, i have made some rope myself now with a mini rope walk and have been studying your pics and the fantastic link you posted to Olha Batchvarov ship photographer site, that is truly inspirational work. Keep up the good work Tom and your pics are incredible. Thanks Richard
I use single thread for seizing the ropes and I think it does the job. When seizing the ropes with access to one of the ends (for example when fitting blocks, hooks, etc) it is really easy as you just loop the thread around your finger 4-5 times and transfer it onto the block. When doing stiff like futtock shrouds where both ends are already attached it is bit trickier. I'm using a needle with thread so I have more control. Of course little dab of CA glue to secure it at the end.
If you have any questions just fire away, I'm happy to help.
I'm glad you like my build ;)
Regards
Tom
|
|
|
Rank: Vice-Master Groups: Registered
Joined: 26/05/2014 Posts: 912 Points: 2,773 Location: East Sussex UK
|
Looks amazing Tom, keep the pics coming. Building: DelPrado HMS Victory. Building: DeAgostini Sovereign Of The Seas.
|
|
|
|
Guest (3)
|
 US
US

