|
|
 Rank: Pro Groups: Joined: 24/08/2009 Posts: 48,827 Points: -13,348
|
andysod wrote:Yes Tomick I could paint it any colour I want but I wasn't just talking about the colour, there has been no thought gone into the seat or the harness, and yes we can all do what we wish but I don't think any of us started this at £28.00 per month to look at the very poor quality of these parts, how many other parts will look as bad and how much else do we have to change ourselves at more expense, also Tomick when I do begin the build which I haven't done yet due to lingering ill health I will do a diary, and lastly Tomick to say that there was no mention of museum quality is a little pedantic I think, even if that actual word was not used all descriptions of this build and finish would lead one to that assumption. Andy Museum quality is generally a reference to how any model is built rather than content. That said, there are few kits on the market that do not require enhancement of one form or another to bring them to a level of museum standard and accuracy, not forgetting the ability to produce such. The model also has RAF approval.
པ
|
|
|
|
|
 Hi Andy Yes I agree it is there on the twitter page and to be honest I have never seen that till now so hats off to you, but the video link and web page has no mention of the same statement. regards Andy  Current builds:-C57,Zero, Lamborghini Countach, Caldercraft HMS Agamemnon,Robi,R2-D2, MFH Cobra .
|
|
|
 Rank: Super-Elite        Groups: Registered
Joined: 30/01/2013 Posts: 4,604 Points: 13,607 Location: Monmouthshire UK
|
For what it's worth I have replicated canvas strapping in various scales before and found the following to be a good sub - Paint a square of cotton sheet in the required colour, making sure you have enough sheet for the job and also make sure the paint soaks through the sheet so the edges wont be white when cut. The small weave on the sheet shows well through the paint and does look very much like canvas. When dry paint the sheet in dilute PVA. Allow to dry then with a scalpel and steel rule, slice the sheet up into strips of the required width depending on the size required. The straps can then be folded and glued around buckles/ clasps made from the correct gauge wire. Hope this helps, Steve
|
|
|
Rank: Super-Elite   Groups: Registered, Forum Support Team, Administrators, Global Forum Support Team, Moderator, Official Builds Joined: 09/11/2012 Posts: 8,520 Points: 24,651 Location: East midlands
|
stevie_o wrote:For what it's worth I have replicated canvas strapping in various scales before and found the following to be a good sub -
Paint a square of cotton sheet in the required colour, making sure you have enough sheet for the job and also make sure the paint soaks through the sheet so the edges wont be white when cut.
The small weave on the sheet shows well through the paint and does look very much like canvas.
When dry paint the sheet in dilute PVA.
Allow to dry then with a scalpel and steel rule, slice the sheet up into strips of the required width depending on the size required.
The straps can then be folded and glued around buckles/ clasps made from the correct gauge wire.
Hope this helps,
Steve Hi Steve, WTG matey, Just new somebody out there would have something to assist. I`m trying to obtain some measurements at this point in time and as soon as I get them I can set to work on enhancing the seat and harness. Many Thanks, Regards delboy271155 (Derek) COME BACK GUY FAWKES "YOUR COUNTRY NEEDS YOU"
|
|
|
 Rank: Semi-Pro Level 1 Groups: Registered
Joined: 03/09/2013 Posts: 68 Points: 154 Location: bath uk
|
The comment on twitter is from model space which from all I can see is De-Agostini, which I think all people reading would easily assume the comment is descriptive of there model. You say to voice my opinions to the supplier, that I am in the process of doing. You know yourself that the Spitfire model in 1/12 scale is virtually a one off and consequently finding anything to use after market is going to be hard, so my main point is that De-Agostini could surely have done a lot better for the subscribers in content than they have, you admit yourself that the colour is wrong on the seat, fair enough we can all paint it what we want but surely for the price it could have been done by supplier. All this will be going to De-Ag C/S in a moment so I am not popping at you I am just trying to voice my opinion and my disappointment on the forum which is what I thought it was for.
|
|
|
Rank: Pro Groups: Joined: 24/08/2009 Posts: 48,827 Points: -13,348
|
But you have voiced your opinion and no one has prevented you from doing so no matter what your point is 
|
|
|
Rank: Semi-Pro Level 1 Groups: Registered
Joined: 03/09/2013 Posts: 68 Points: 154 Location: bath uk
|
Well you will be happy to know no more of my opinions, subscription just cancelled, good luck to all who are building the Spit. I wish you all success.
|
|
|
Rank: Super-Elite Groups: Registered, Forum Support Team, Administrators, Global Forum Support Team, Moderator, Official Builds Joined: 09/11/2012 Posts: 8,520 Points: 24,651 Location: East midlands
|
Hi (to all those still interested) Having acquired some measurements this morning, I have coddled up a balsa wood prototype of the spitfire seat I`m trying to scratch build. Now I say coddled because it`s not 100% square but is to scale as per the measurements received. End materials and coverings etc still to be decided. The black line across the back of the seat shows where the original (incorrect) seat was fitted. Here`s where I`m at: 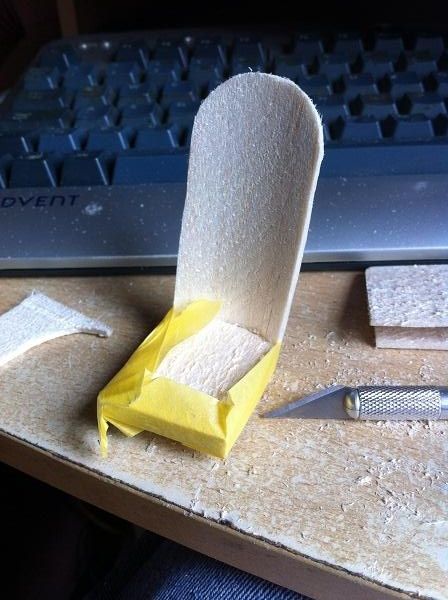 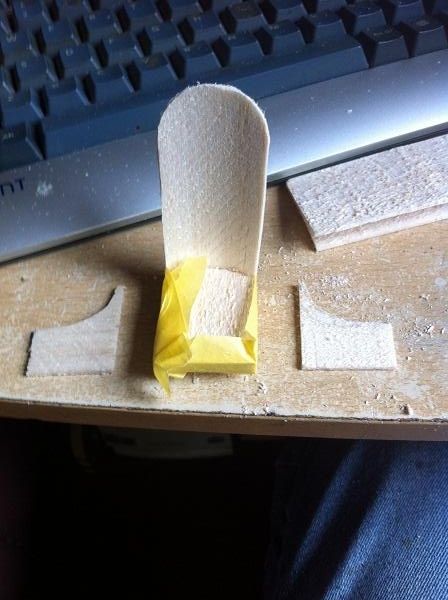 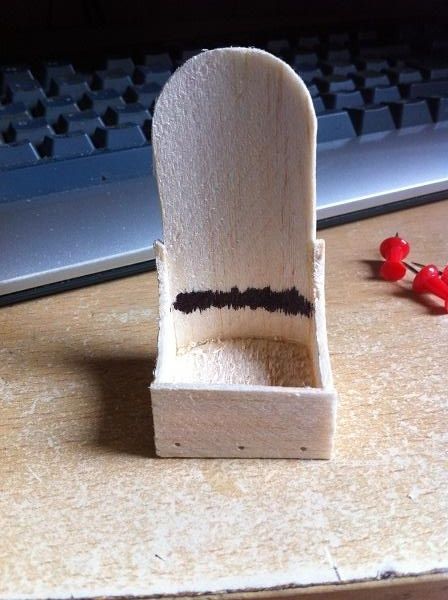 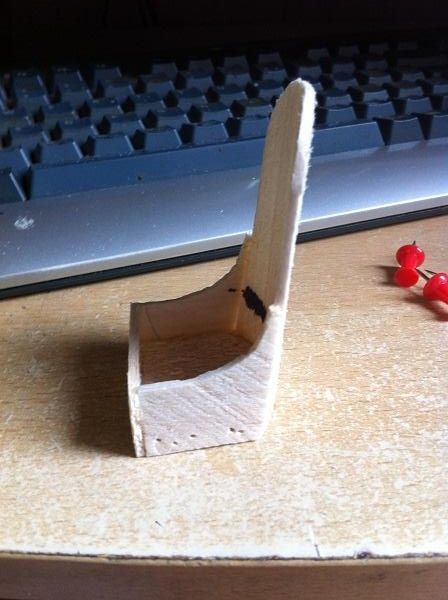 So how am I going to move this forward? Well, my subscription is not up to this point yet, so I`m going to carry on developing the prototype to see what`s possible and then when I get to that point will make the final seat. I will copy this into a model making know-how and post further developments as they come. Regards delboy271155 (Derek) COME BACK GUY FAWKES "YOUR COUNTRY NEEDS YOU"
|
|
|
 Rank: Vice-Master  Groups: Registered
Joined: 23/03/2010 Posts: 507 Points: 1,571
|
i have no idea what the instructions say, but Mr T`s seat is constructed wrongly, the bit you sit on should be glue to the bottom of the sides and not the top, this will then form the bucket shape, no malice intended tomick
|
|
|
Rank: Pro Groups: Joined: 24/08/2009 Posts: 48,827 Points: -13,348
|
The seat reflects exactly the instructions and how its design is intended to be constructed. The instructions are not wrong!
|
|
|
|
|
I am not interested in the argument but certainly Mr T is not to blame he didn't design the kit.
We are all agreed the seat leaves a lot to be desired so as has been said why don't we pool ideas to solve the issues.
It is not an overly complex structure and could be scratch built with a bit of thought, as anything can. first job is to do lots of research then decide based on your ability how much detail you are going to add.
just make sure you keep any modification within the size of the supplied seat so you don't foul any future supplied parts.
some links that may help.
This is a P 51 seat but gives a good idea of how you could fabricate one for your spit.
http://www.spitfireinmyw...itle=the-pilot039s-seat
this seat gives you an idea about how you could fabricate in wood although it is not the standard spit seat
http://www.largescalepla...es/article.php?aid=1883
and hear are some drawings and pics
http://s536.photobucket..../Aviation/seat.jpg.html
Jase“Whenever you find yourself on the side of the majority, it is time to pause and reflect.”
-Mark Twain
|
|
|
Rank: Super-Elite Groups: Registered, Forum Support Team, Administrators, Global Forum Support Team, Moderator, Official Builds Joined: 09/11/2012 Posts: 8,520 Points: 24,651 Location: East midlands
|
jase wrote:I am not interested in the argument but certainly Mr T is not to blame he didn't design the kit.
We are all agreed the seat leaves a lot to be desired so as has been said why don't we pool ideas to solve the issues.
It is not an overly complex structure and could be scratch built with a bit of thought, as anything can. first job is to do lots of research then decide based on your ability how much detail you are going to add.
just make sure you keep any modification within the size of the supplied seat so you don't foul any future supplied parts.
some links that may help.
http://www.spitfireinmyw...itle=the-pilot039s-seat
this seat gives you an idea about how you could fabricate in wood although it is not the standard spit seat
http://www.largescalepla...es/article.php?aid=1883
and hear are some drawings and pics
http://s536.photobucket..../Aviation/seat.jpg.html
Jase Hi Jase, Some great info, many thanks. Love the 2nd and 3rd links, but I`m wondering what the guy in the first link was doing making the seat out of a tea tray. That said, good on yer for helping out. Gives me food for thought on my scratch build. Regards delboy271155 (Derek) COME BACK GUY FAWKES "YOUR COUNTRY NEEDS YOU"
|
|
|
Rank: Vice-Master Groups: Registered
Joined: 23/03/2010 Posts: 507 Points: 1,571
|
no argument here, just an opinion, here`s another pic willz attached the following image(s):
|
|
|
Rank: Pro Groups: Joined: 24/08/2009 Posts: 48,827 Points: -13,348
|
Like I said, the instructions and build are correct for what is provided.
|
|
|
Rank: Vice-Master Groups: Registered
Joined: 23/03/2010 Posts: 507 Points: 1,571
|
ok seems to be a few pondering on making a seat harness, Tomicks hands are tied with any alterations and must build the kit as is, so i had a go at this, see pics, will be doing a full tutorial willz attached the following image(s):
|
|
|
|
|
Nice improvement Wilz “Whenever you find yourself on the side of the majority, it is time to pause and reflect.”
-Mark Twain
|
|
|
Rank: Super-Elite Groups: Registered, Forum Support Team, Administrators, Global Forum Support Team, Moderator, Official Builds Joined: 09/11/2012 Posts: 8,520 Points: 24,651 Location: East midlands
|
willz wrote:ok seems to be a few pondering on making a seat harness, Tomicks hands are tied with any alterations and must build the kit as is, so i had a go at this, see pics, will be doing a full tutorial Hi Willz, WTG seat looks good, that was fast work. Only issue I can see is that the upper harness straps were not fitted to the seat, they were fitted over the protective plate behind the seat and through the main air frame. I assume it`s the same as car seat belts today are fitted to the main car frame. Hope this helps, Regards delboy271155 (Derek) COME BACK GUY FAWKES "YOUR COUNTRY NEEDS YOU"
|
|
|
Rank: Pro Groups: Joined: 24/08/2009 Posts: 48,827 Points: -13,348
|
willz wrote:ok seems to be a few pondering on making a seat harness, Tomicks hands are tied with any alterations and must build the kit as is, so i had a go at this, see pics, will be doing a full tutorial Nice work Wilz and a vast improvement
Just so you know. There are a few further panels to add to the supplied seat, a cockpit floor panel, back and front bottom edge panels which will be fitted later on in the build.
|
|
|
Rank: Vice-Master Groups: Registered
Joined: 23/03/2010 Posts: 507 Points: 1,571
|
delboy271155 wrote:willz wrote:ok seems to be a few pondering on making a seat harness, Tomicks hands are tied with any alterations and must build the kit as is, so i had a go at this, see pics, will be doing a full tutorial Hi Willz, WTG seat looks good, that was fast work. Only issue I can see is that the upper harness straps were not fitted to the seat, they were fitted over the protective plate behind the seat and through the main air frame. I assume it`s the same as car seat belts today are fitted to the main car frame. Hope this helps, Regards delboy271155 (Derek) thats correct Derek, there`s also a Y section where the top fixes to the back of the buckles and the bottom goes through the hole in the seat, but sometimes too much makes it look too busy and messy, i`m not personally doing this model but i like to do these small projects, as for the tutorial i think i`ll do it on the tutorial site thingy. cheers Willz
|
|
|
Rank: Super-Elite Groups: Registered, Forum Support Team, Administrators, Global Forum Support Team, Moderator, Official Builds Joined: 09/11/2012 Posts: 8,520 Points: 24,651 Location: East midlands
|
willz wrote:delboy271155 wrote:willz wrote:ok seems to be a few pondering on making a seat harness, Tomicks hands are tied with any alterations and must build the kit as is, so i had a go at this, see pics, will be doing a full tutorial Hi Willz, WTG seat looks good, that was fast work. Only issue I can see is that the upper harness straps were not fitted to the seat, they were fitted over the protective plate behind the seat and through the main air frame. I assume it`s the same as car seat belts today are fitted to the main car frame. Hope this helps, Regards delboy271155 (Derek) thats correct Derek, there`s also a Y section where the top fixes to the back of the buckles and the bottom goes through the hole in the seat, but sometimes too much makes it look too busy and messy, i`m not personally doing this model but i like to do these small projects, as for the tutorial i think i`ll do it on the tutorial site thingy. cheers Willz Hi Willz, Thanks for coming back on this one, most appreciated Regards delboy271155 (Derek) COME BACK GUY FAWKES "YOUR COUNTRY NEEDS YOU"
|
|
|
|
Guest (4)
|
 US
US

