|
|
 Rank: Pro   Groups: Registered
Joined: 08/02/2015 Posts: 274 Points: 812 Location: Malmesbury
|
Thanks for the kind words guys  Andy you are correct that the nose cone is abs plastic . I can see what you mean about using glass fibre cloth to strengthen the nose cone as it is very flimsy. Had been thinking about putting heat resistant matting on the inside to stop the heat from the engine distorting the nose cone, but this wouldn't add any strength to the nose cone. I will take your advice on board and come up with a way to strengthen the cone when I get to this stage[ Regards Shaun Building-RC spitfire
Build- titanic,Skyrider drone, solar system, T72 tank
|
|
|
Rank: Pro Groups: Registered
Joined: 08/02/2015 Posts: 274 Points: 812 Location: Malmesbury
|
Hi guys time for another update. Issues 4 and 5 First off I had to cut off the three springer Fitted in issue 3 and give the edges a sand.  Next the parts from issue 4 are inspected for any defects and wooden parts given a light sand with 240 grit. Parts supplied in this issue are the right hand middle fuselage section, bulkhead 6 and the second front wheel  After the parts where sanded I tested fitted the middle fuselage section and adjusted as required, when happen with the fit the part is glued into place and checked for square.    While the glue was drying I glue the two halves off the second front wheel together using super glue applied to the centre the edge shown in red, the two halves are then clamped together as before.  When the glue on the fuselage has dried it was time to glue bulkhead 6 into place which finishes issue 4.  Straight onto issue 5 , Again parts are inspected and sanded, Parts supplied in this issue are the left hand middle fuselage section, bulkhead 7 and the second front tyre.  First step in this issue to two bulkhead 7 into place on the right hand fuselage, the bulkhead is clamped to the square to keep it in place while the glue sets.  while the glue set I fitted the tyre onto the rim assembled in issue 4. Next the left hand fuselage is tested fitted and when happy is glued into place. This part is not glued to bulkhead 6 and 7 until later in the build as you have to be able to separate the two fuselage section to fit the rest of the bulkheads.  The assembly is then turn over carefully and checked for square.    The two pots of glue are being used to add some weight and keep the fuselage flat as the glue dries. That's it for this issue thank you all for looking in Regards Shaun Building-RC spitfire
Build- titanic,Skyrider drone, solar system, T72 tank
|
|
|
Rank: Pro  Groups: Registered
Joined: 14/04/2015 Posts: 238 Points: 716 Location: Newcastle
|
Looking good, good luck with the build. I think I would be terrified to fly something I spent so long building just in case I accidentally ploughed it into the ground.
|
|
|
 Rank: Super-Elite     Groups: Registered
Joined: 27/01/2014 Posts: 5,060 Points: 14,980
|
This is coming along quite nicely 
|
|
|
Rank: Super-Elite  Groups: Registered, Forum Support Team, Administrators, Global Forum Support Team, Moderator, Official Builds Joined: 09/11/2012 Posts: 8,520 Points: 24,651 Location: East midlands
|
Hi Shaun, Very neat and tidy. You may need more of those big glue pots to use as weights later. The size of this will use a lot by the look of it.  Keep up the good work. Regards delboy271155 (Derek) COME BACK GUY FAWKES "YOUR COUNTRY NEEDS YOU"
|
|
|
|
|
Looking good so far, nice and tidy too Current builds:-C57,Zero, Lamborghini Countach, Caldercraft HMS Agamemnon,Robi,R2-D2, MFH Cobra .
|
|
|
|
|
Very nice progress Shaun and your methods are very well described... Regards Alan
|
|
|
Rank: Super-Elite  Groups: Registered
Joined: 30/01/2013 Posts: 4,604 Points: 13,607 Location: Monmouthshire UK
|
Nice work Shaun I guess you must have seen all the vids of this but it's going to be a real achievement when you actually get to see all your hard work fly past you  - https://www.youtube.com/...0zCdA&nohtml5=False
Steve
|
|
|
Rank: Pro Groups: Registered
Joined: 08/02/2015 Posts: 274 Points: 812 Location: Malmesbury
|
Hi everyone and thank you all for your kind words Michael.rolph, to be honest I'm a bit scared to fly it when its build going to have to get some practice on a cheap model first. Davetwin, it is coming together fast at the moment, sure it will start to slow down as the build progesses. Derek, it is turning out to be a big model and I lot of fun to build. arpurchase, thank you for your comments, I am spending a lot of time getting the fitment of all the parts correct. Alan, thank you for your comments, I am trying my best with the build diary and I'm pleased everyone is enjoying it. And finally steve, I have seen a few videos of the spitfire flying but not the one you posted. hopefully my will fly as well as this one. Now onto another update. Issue 6. First as usually parts are checked and sanded. Parts supplied in this issue are the wing anchorage plate, bulkhead 5A, bulkhead 7A, bulkhead 8,spider nuts and the rear wheel and tyre.  Firstly the two spider nuts and gently hammered into the wing anchor plate. I was not happy with this fit as they could be pulled out very easily, so I decided to glue them in with super glue gel.   After this the anchorage plate was test fitted and sanded as required to get a good fit. It became clear as to why bulkheads 6 and 7 where not glue in issue 5. When I was happy with the fit, the anchorage plate and bulkhead 6 and 7 are glued into place with superglue gel for the anchorage plate and aliphatic glue for the bulkheads.    The part was then clamped and glue left to dry.  While the fuselage was drying I fitted the rear tyre onto the wheel using a pair of tweezers to help lever the tyre other the rim.   After the glue had dried I applied glue to the notches in the fuselage for bulkhead 5A. This part didn't need to be clamped.   Next the bulkhead 7A is glued onto the back of bulkhead 7 insuring the alignment is correct and is then clamped into place.  The final step in this issue is to fit bulkhead 8 to the ends of the left and right fuselage plate. The part is then clamped and left to dry  The next picture shows what I have so far, please note the 30cm steel ruler against the fuselage showing the size so far. 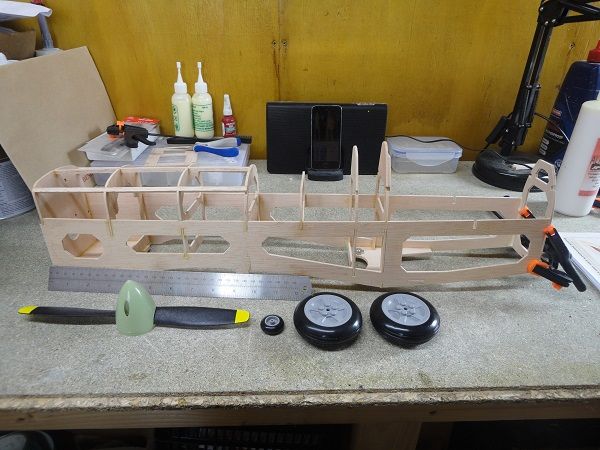 That's it till next time, thank you all for looking in Regards Shaun Building-RC spitfire
Build- titanic,Skyrider drone, solar system, T72 tank
|
|
|
 Rank: Elite Groups: Registered
Joined: 13/02/2011 Posts: 2,243 Points: 6,849 Location: Sussex
|
Hi Shaun, All coming together very well looks a bit like my Spit assembly is this an older model from De-Ago. Regards Trev. Work in progress: Tombstone (Scratch) - San Francisco 2. -The Mayflower ( scratch by plan).
OcCre- Santa-Maria (Kit).
|
|
|
|
|
Another excellent update, thoroughly enjoying following this one..... .. Very well done..... Regards Alan
|
|
|
|
|
Top work!! Coming along very well! 
|
|
|
Rank: Pro Groups: Registered
Joined: 08/02/2015 Posts: 274 Points: 812 Location: Malmesbury
|
Thank you everyone for looking in and your comments Trev your correct this is an older Deagostini kit , think it must be from about 2005/2006  from research I have done but could be wrong Now time for another update issue 7 Part received in issue bulkhead 7B, Rear right side fuselage, sheet of balsa and 3 more stringers  First step is to place the two stringer in the place and the bulkheads and mark the length between bulkhead 4 and 7 (it is important to keep the off cut as these are used later in the build). The stringers are then glues and clamped into place.    Next I jumped a step and glued bulkhead 7B into place. You can see I still have the clamps on bulkhead 8.  After this I returned to the previous step. The balsa sheet in marked and then cut using a 11 blade and steel ruler. The sheet in then glued and clamped into place on top the two stringer and bulkhead 5A. Forgot to get a photo off the sheet clamped.   Next the rear fuselage section is glued in place and checked for square to bulkhead 8.  The final step in to remove the two tabs that where used to keep the fuselage level in the first few issues. I will leave sanding this until the fuselage is complete.   That's it for issue 7 issue 8 coming tomorrow Regards Shaun Building-RC spitfire
Build- titanic,Skyrider drone, solar system, T72 tank
|
|
|
Rank: Elite Groups: Registered
Joined: 13/02/2011 Posts: 2,243 Points: 6,849 Location: Sussex
|
Hi Shaun, Nice update, very clean and tidy, thanks for posting. Regards Trev Work in progress: Tombstone (Scratch) - San Francisco 2. -The Mayflower ( scratch by plan).
OcCre- Santa-Maria (Kit).
|
|
|
Rank: Pro Groups: Registered
Joined: 08/02/2015 Posts: 274 Points: 812 Location: Malmesbury
|
Time for another update Issue 8 First off here is a pic showing the model so far.  Here are the parts in this issue, Rear right fuselage section, Top and bottom fuselage joint brackets (bottom left off pic) and bulkhead 9 and 9A (bottom right off pic)  Firstly the rear right side fuselage section is fitted with the left side in issue 7.  Next the remaining parts are removed from the plywood sheets. They are then sanded.   Next two off cuts off sprinters from issue 3 are glued to reinforce the joint between the rear fuselage sections and bulkhead 8.  After this the two fuselage section are pull together and bulkhead 9 is glued and clamped between them.  It is now time to check the to ends off the fuselage line up  luckily it is all fine  After this the remaining stringer from issue 7 is lined up on top the cockpit base and marked. It is then cut and glued in place on both sides. I is important the corner of the stringer line upwith the bulkheads as shown in the second picture.   Next the top and bottom fuselage brackets are glue and clamped into place at the rear off the fuselage.   The final step is to glue bulkhead 9A to the front off bulkhead 9.  This this what the fuselage looks like at the end off issue 8. Till got a few clamps holding it together.  After returning to the model after a few hours the rear right fuselage had cracked by bulkhead 9  I didn't get a picture of it but I managed to super glue it back together and also glued bulkhead 8A from issue 9 into place to help hold it together. The two cracks start at the ends of the arrow and along to where bulkhead 9 is glued into the fuselage.   That's it for this update. Regards Shaun Building-RC spitfire
Build- titanic,Skyrider drone, solar system, T72 tank
|
|
|
Rank: Super-Elite Groups: Registered, Forum Support Team, Administrators, Global Forum Support Team, Moderator, Official Builds Joined: 09/11/2012 Posts: 8,520 Points: 24,651 Location: East midlands
|
Hi Shaun, Coming on a pace and well done. The cracks in the side panel were a bit unfortunate  , but as the whole fuselage is clad in balsa a bit later in the build it shouldn`t be an issue. Keep up the good work. Regards delboy271155 (Derek) COME BACK GUY FAWKES "YOUR COUNTRY NEEDS YOU"
|
|
|
Rank: Super-Elite Groups: Registered
Joined: 27/01/2014 Posts: 5,060 Points: 14,980
|
Looks like you are doing a pretty fine job there Shaun
|
|
|
|
|
Certainly taking shape now Shaun..... great job you doing with her....  .. Looking forward tot he next update... Regards Alan
|
|
|
Rank: Pro Groups: Registered
Joined: 08/02/2015 Posts: 274 Points: 812 Location: Malmesbury
|
Thanks for all your kind words. It is coming together a quite a pace at the moment. Going to slow down a bit now, just got told at work we have to start working weekends again for the summer  . That means I have to work 12 straight then 2 days off, plus starting at 7am and finishing and 7pm but could be as last as 10pm or sometimes later still Not all bad at least I get paid overtime meaning move money to spend on models Time for update 9 Parts supplied in issue 9 are bulkhead 8A (already fitted), 10mm x 10mm balsa stringer, 3 5mm x 5mm balsa stringer, 13mm x 38mm balsa strip, cutting template, rear wheel steering rod, rear wheel rod support and rear wheel fixing.  The first step was to fit bulkhead 8A which I fitted at the end of issue 8. Next the cutting template is cut out and glued to the 13mm by 38 mm balsa strip using a glue stick. You can see in the picture I have also glued one of the stringers into the underside of the fuselage.  End balsa strip is then cut to length with a razor saw and the sides cut of to the template with a number 10 blade. When the strip is the size of the template the template is removed and the glue clean off.    This part is then test fitted onto bulkheads 7A, 7B, 8A, 8 and 9A. When I had a good fit and was happy with it the part is glued and clamped to bulkheads 7A and 9A only Using aliphatic wood glue.   When the glue is dry the model is turned over and the three remaining bulkheads are glued using super glue.   Next the two remaining stringers are placed into the groves in the bulkheads and marked by bulkhead 9. The stringers are then cut using a knife and glued into place.   The final step in issue 9 is to cut a 31mm strip of balsa wood sheet left over from issue 7 and glue on top the stringers between bulkheads 6 and 7.  That's it for issue 9 here is a pic showing the model so far.  Regards Shaun Building-RC spitfire
Build- titanic,Skyrider drone, solar system, T72 tank
|
|
|
Rank: Elite Groups: Registered
Joined: 13/02/2011 Posts: 2,243 Points: 6,849 Location: Sussex
|
Hi Shaun, Sorry to learn that you have to work weekends again, that mean's a slow down on updates, but what you have shown us all is a great build diary. Keep sending when you can. Regards Trev Work in progress: Tombstone (Scratch) - San Francisco 2. -The Mayflower ( scratch by plan).
OcCre- Santa-Maria (Kit).
|
|
|
|
Guest (6)
|
 US
US

