|
|
 Rank: Pro Groups: Joined: 24/08/2009 Posts: 48,827 Points: -13,348
|
Hi Andy, what you see is what you get and I have,nt ordered any extras. I may get the sails later on or make them myself which I have done in the past. The brass looks a bit garish but I will tone it down with the brass to black and buff it up. Gun carraiges are a bit oooah so I will replace them with the spare from the Surprise build as they are almost the same scale and look better 
|
|
|
|
|
sweeeeeeeeeeeeeeet I did have the feeling that the enhancments available were for those who just bought the plans[apart from the sails]and yes after looking on the link to the build and how he improved the metal bits, after a little weathering they definatly look better.One thing to look out for is the burrs [if there are any] as too often there left on and guilded over  i could never see the point of this. I presume the gun carriages suplied are of the cast metal type and as you say can always be improved upon or discarded for a better type,good luck with the build il look forward to your diary. regards Andy  Current builds:-C57,Zero, Lamborghini Countach, Caldercraft HMS Agamemnon,Robi,R2-D2, MFH Cobra .
|
|
|
Rank: Pro  Groups: Registered
Joined: 22/06/2010 Posts: 179 Points: 428 Location: Poole Dorset
|
Hi Harty, The rear decoration you have is laser cut wood. Mine is photo etch brass. The brass castings are in a different style package. My gun carriages are wood I think yours are as well I don't know how well they will go together, we will have to wait and see. The brass strips I have, have been bent to get them to fit in the box and do look a bit of a mess. I was looking for eyelets in the kit, couldn't find any, then realised that is what the pintles are there for. Apart from the laser cut wood it looks the same. cheers Peter completed..... Endeavour Longboat, San Francisco 2, Virginia 1819
building Royal Caroline
|
|
|
Rank: Pro Groups: Joined: 24/08/2009 Posts: 48,827 Points: -13,348
|
Well here we go again. This is just a dry fit run of all the bulkheads and decking, just to make sure all are ok. They are,nt too bad as it happens. Then take it all apart and do the shaping on the bulkheads to take the planks. 
|
|
|
Rank: Pro Groups: Joined: 24/08/2009 Posts: 48,827 Points: -13,348
|
First layer of planking going on and that will be as far as they go until decking has been done and any extra detail. 
|
|
|
Rank: Pro Groups: Joined: 24/08/2009 Posts: 48,827 Points: -13,348
|
Nearly ready to start laying planks. 
|
|
|
Rank: Pro  Groups: Registered
Joined: 06/08/2011 Posts: 480 Points: 1,421 Location: Galway
|
|
|
|
Rank: Pro Groups: Joined: 24/08/2009 Posts: 48,827 Points: -13,348
|
Zooming along there Harty looking good (as expected) How do you find fairing the frames before fitting them to the keel?
|
|
|
|
|
looking like a good start there Current builds:-C57,Zero, Lamborghini Countach, Caldercraft HMS Agamemnon,Robi,R2-D2, MFH Cobra .
|
|
|
Rank: Pro Groups: Joined: 24/08/2009 Posts: 48,827 Points: -13,348
|
Hi Zeb, I think it is definately easier fairing them down before glueing. You begin to get a feel for the hull after doing a few and it is not too bad if you only have to make little adjustments when planking, the worst of it is gone then
|
|
|
Rank: Pro Groups: Joined: 24/08/2009 Posts: 48,827 Points: -13,348
|
Hi Andy, this is definately a tricky little build and all the picture main plans are in Italian  , so it is not for the faint hearted. I think mistakes will be made on this one , just have to cross that bridge when ever. I dont want to start cutting all the upper planking to the template until I am positive its good. 
|
|
|
Rank: Pro Groups: Joined: 24/08/2009 Posts: 48,827 Points: -13,348
|
Decking going in. 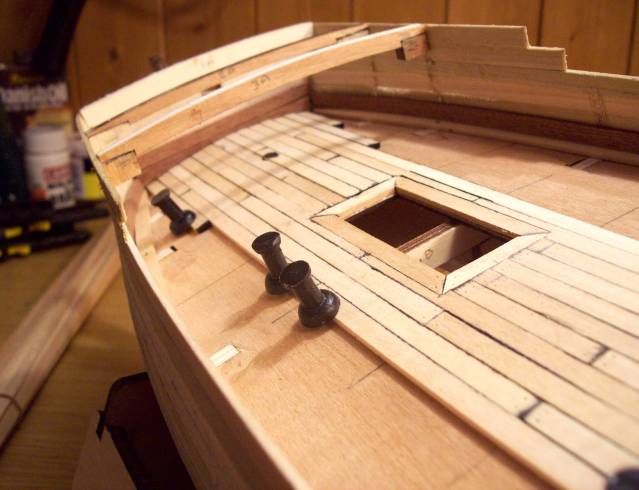
|
|
|
Rank: Pro Groups: Registered
Joined: 22/06/2010 Posts: 179 Points: 428 Location: Poole Dorset
|
Hi Harty, What is the size of your decking strips? Mine have been supplied at 3x0.5mm. Yours look as if they are 1.5 or 2mm. Cheers Peter completed..... Endeavour Longboat, San Francisco 2, Virginia 1819
building Royal Caroline
|
|
|
Rank: Pro Groups: Joined: 24/08/2009 Posts: 48,827 Points: -13,348
|
Hi there Peter, the decking is 2mm. It is the same as on my Surprise build, all left overs. It goes together better and looks better I think specially when treated with the danish oil. You have just got to be a bit wary of the increased height ie gunport clearance for the cannon
|
|
|
 Rank: Elite     Groups: Registered
Joined: 22/03/2010 Posts: 2,065 Points: 6,295 Location: Gorleston-on-sea
|
That's a very nice build there Harty...Like it!!   Current Builds: Deagostini HMS Victory: Deagostini HMS Sovereign of the seas. Completed Builds: Del Prado: HMAS Bounty: Hachette: RMS Titanic: Del Prado: Cutty Sark...
|
|
|
Rank: Pro Groups: Joined: 24/08/2009 Posts: 48,827 Points: -13,348
|
Thanks very much Johnny,been concentrating on decking in the past couple of days, got as far as this 
|
|
|
Rank: Pro Groups: Joined: 24/08/2009 Posts: 48,827 Points: -13,348
|
Only just got this one done, poop deck next then all the hatches I think 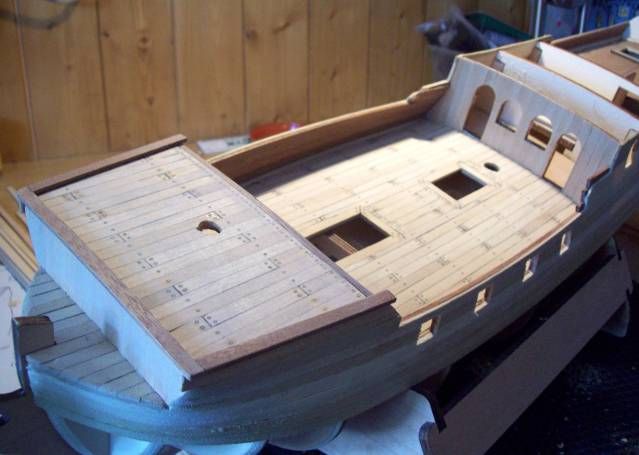
|
|
|
Rank: Pro Groups: Joined: 24/08/2009 Posts: 48,827 Points: -13,348
|
Very nice! a good tidy build you have there.
Steve..
|
|
|
Rank: Pro Groups: Registered
Joined: 22/06/2010 Posts: 179 Points: 428 Location: Poole Dorset
|
She's looking good Harty You will have that finished before I have got my box open. Only kidding. Due to me waiting on some parts for my Virginia 1819 I have made a dry fitting on the RC. I have fitted the frames and decks but noticed that the mast holes don't line up. The foremast leans forward instead of vertical but the others follow the plans. Also the fore upper deck supports are different heights. did you notice anything like that in your build? cheers Peter completed..... Endeavour Longboat, San Francisco 2, Virginia 1819
building Royal Caroline
|
|
|
Rank: Pro Groups: Joined: 24/08/2009 Posts: 48,827 Points: -13,348
|
Hi Pete, yeh I had those but I just put it together and filed it all down to a happy medium. The joys of model making  .
|
|
|
|
Guest
|
 US
US

