|
|
|
|
 Hi Mo the builds starting to come together nicely  Current builds:-C57,Zero, Lamborghini Countach, Caldercraft HMS Agamemnon,Robi,R2-D2, MFH Cobra .
|
|
|
 Rank: Vice-Master    Groups: Registered
Joined: 09/02/2012 Posts: 569 Points: 1,675 Location: Scotland
|
These are by no way instructions how to plank the hull, this inn my interpretation of how to do it, Having read and read about it, mostly coming from Magpie's build, and various other sources.
Firstly I put masking tape on all the ribs of the hull, I then measured the surface lengths of all the ribs, I needed to find out the longest and shortest rib's. I found that the longest rib was the one 6th from the bow, that's counting from No 1, as being the first full frame that comes from the keel, and not the one with the little frames glued to it. I found the shortest frame as being No 1, that was measuring all frames from bow to stern. 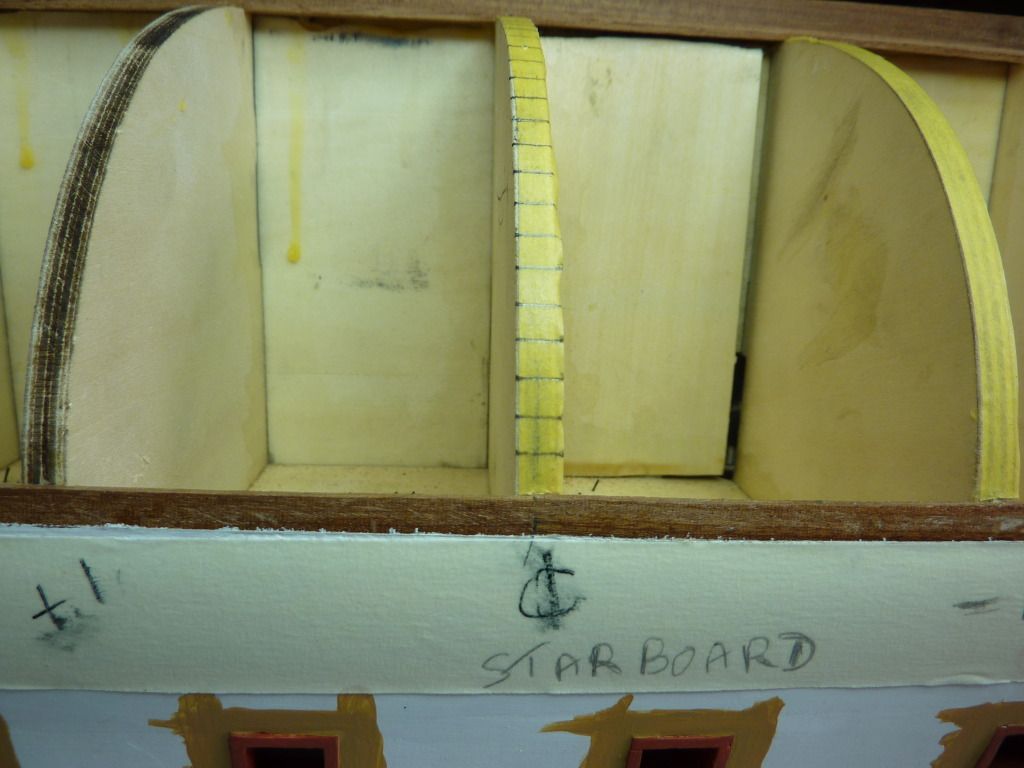 On the longest rib, ( I have called this one center, and marked it as centre on masking tape on the hull to keep myself right,) I held the timber piece's ( that are going to be fixed to the hull ) and marked them, as lines to see how many I would need to fill the frame, as it happens I require 25 and a bit. On the longest rib, ( I have called this one center, and marked it as centre on masking tape on the hull to keep myself right,) I held the timber piece's ( that are going to be fixed to the hull ) and marked them, as lines to see how many I would need to fill the frame, as it happens I require 25 and a bit.
Going to this post in bits Mo
|
|
|
Rank: Vice-Master Groups: Registered
Joined: 09/02/2012 Posts: 569 Points: 1,675 Location: Scotland
|
Next I got a clean board and marked a straight line on it, I then took of the tape on the shortest rib, being No 1, and stuck it on the board at 90 degrees to the base line, I then drew a line parallel to the base line at the height of the shortest rib, I now have a set of tram line at a height of the shortest rib,  I then took the tape of No 2 rib, and stuck it in between the tram lines, ensuring that the bottom right hand corner of the tape and the top right hand corner of the tape were touching the pencil lines, which makes the tapes lie at an angle, ( the angle of the tape will be determined by the length of the tape,) I carried on with this process untill all the tapes were stuck on the board.I numbered all the ribs on the board to remind me where they all came from. As you can see from the picture, all tapes are in place, with the one called center, with the marks on it. 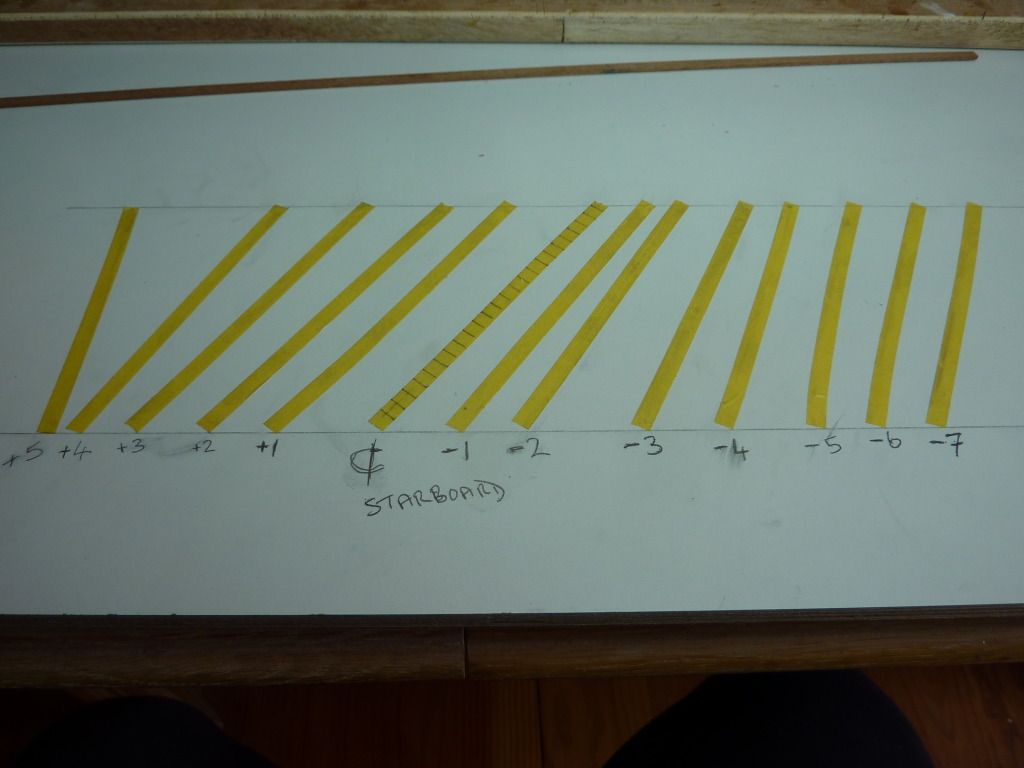 Mo
|
|
|
Rank: Vice-Master Groups: Registered
Joined: 09/02/2012 Posts: 569 Points: 1,675 Location: Scotland
|
|
|
|
Rank: Vice-Master Groups: Registered
Joined: 09/02/2012 Posts: 569 Points: 1,675 Location: Scotland
|
As you can see the tapes are back in place, But the lines are all laying at a angle, again the only points I am interested in, are the points on the right hand side of the tape, I now have to taper my planks so as the upermost edge of my planking always intersects this line, this will ensure that each frame is fully planked.
I am going to leave the tape in place, and fit my planks to the marks on the tape, then cut the tape at the top of the plank for glueing.  Hope this helps, and if any of the real builder's can confirm I have got the theory right, I would appreciate it. Hope this helps, and if any of the real builder's can confirm I have got the theory right, I would appreciate it.
A hopeful MoMo
|
|
|
Rank: Vice-Master Groups: Registered
Joined: 09/02/2012 Posts: 569 Points: 1,675 Location: Scotland
|
Been busy with other things lately, and if I am perfectly honest, I am struggling a bit with the planking to the bottom of the hull. Finding it really difficult to get the planks cut to the taper, been using a knife and a steel rule, but the knife blade sticks in the grain and pulls it away from the rule, even if I score it very lightly. any way trial and error as they say.   Mo Mo
|
|
|
 Rank: Pro Groups: Joined: 24/08/2009 Posts: 48,827 Points: -13,348
|
Interesting to see how your tackling this Mo
|
|
|
|
|
Looking good there Mo Nice to see your planking the way I did it looks spot on mate. Keep it up mate.. ... For those who haven't seen it before.this technique is Taken from a planking eBook I have if anyone would like one;). Chris.. On the bench 1/350 Revell Tirpitz Platinum Edition (Pontos PE and Wooden deck) plus extra Eduard PE set and extra MK1 door sets.
|
|
|
Rank: Pro Groups: Joined: 24/08/2009 Posts: 48,827 Points: -13,348
|
Planking looks good, slow and steady. Glad to see the surprise build is still going.
|
|
|
Rank: Vice-Master Groups: Registered
Joined: 09/02/2012 Posts: 569 Points: 1,675 Location: Scotland
|
Thanks for all your encouragement, its a slow process, At the bow I feel I am still bending the planks where they dont want to go, I am getting the clinker effect at the bow. But I have sanded everything flush as I go and I seem to be getting away with it. Mo Mo
|
|
|
Rank: Vice-Master Groups: Registered
Joined: 09/02/2012 Posts: 569 Points: 1,675 Location: Scotland
|
As you can see from the pictre below, I have had to put in a couple of pieces of planking 10mm wide, to try to get out of my problem with the clinker effect, the piece of planking at the top, held with the white pin, is where the plank strip wants to lye naturally, so I am in filling that area,and hope from there to the keel the problem will dissappear, Not very good I know, but I am learning a lot.  Mo MoMo
|
|
|
Rank: Vice-Master Groups: Registered
Joined: 09/02/2012 Posts: 569 Points: 1,675 Location: Scotland
|
Again the hull planking progressing, this is a warts and all build.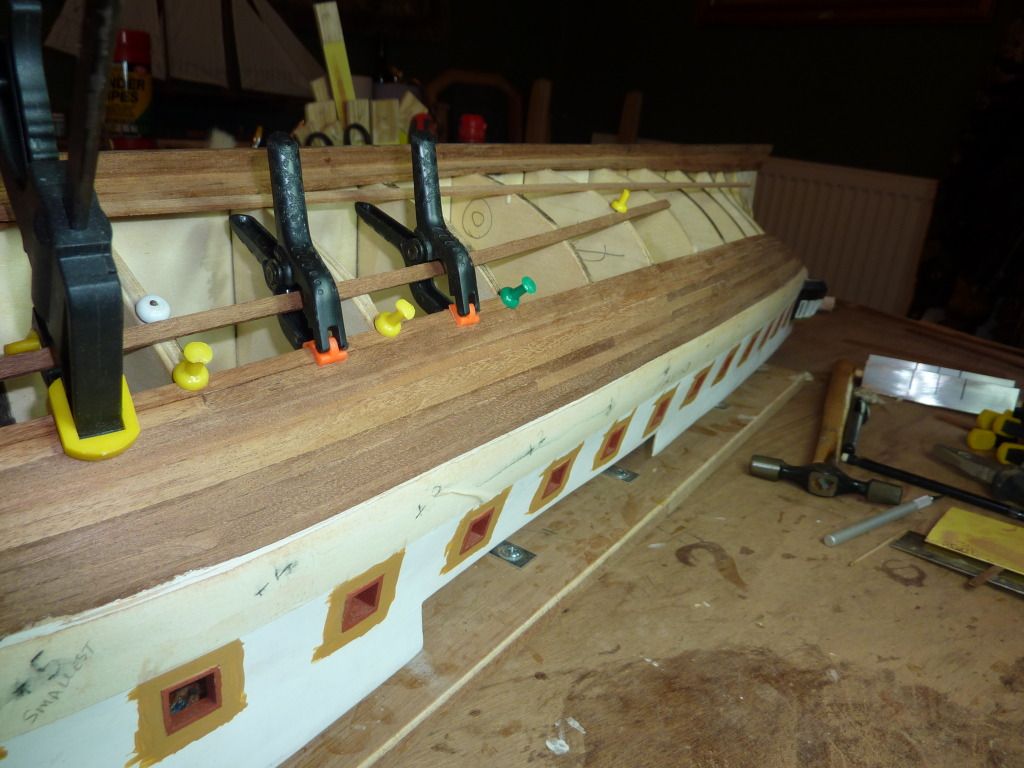  Just bought a plank bender, great, saves soaking and drying time, hopefully progress a bit quicker now.  Not a lot else going on just now, planks planks planks, Been having a look at the build diarys on the Victory site, WOW, GREAT WORKMANSHIP, I take my hat of to them all, awesome. Mo Mo
|
|
|
Rank: Vice-Master   Groups: Registered
Joined: 20/10/2010 Posts: 511 Points: 1,459 Location: Loughborough
|
Nice bit of planking going on there, it is a laborious task but fully worth it in the end when you see the results. Keep up the good work. Builds in progress: HMS Victory.HMS Surprise.
Completed builds: Revell London Bus 1/24.
Builds to do:Sovereign of the seas, Hms Albion.
|
|
|
Rank: Vice-Master Groups: Registered
Joined: 09/02/2012 Posts: 569 Points: 1,675 Location: Scotland
|
Thanks for the encouragement Petpole. I am reasonabally happy with things, But its a big learning curve.
MoMo
|
|
|
Rank: Vice-Master Groups: Registered
Joined: 09/02/2012 Posts: 569 Points: 1,675 Location: Scotland
|
 Still at the planking, progress is slow, a bit to one side , then a bit to the other, Still at the planking, progress is slow, a bit to one side , then a bit to the other,
MoMo
|
|
|
Rank: Vice-Master Groups: Registered
Joined: 09/02/2012 Posts: 569 Points: 1,675 Location: Scotland
|
still planking, planking and more planking, but starting to see light at the end of the tunnel, again fairly happy with the outcome, I was not quite prepared for the amount of stour that around after all the sanding, I have given it a rough sand as I go, but will do the final sand outside, I am petrified I am going to sand through the hull, hope not, I have also bought my Danish Oil, The tricky but still to do is the planking at the top of the stern post, That area has a very tight curves. 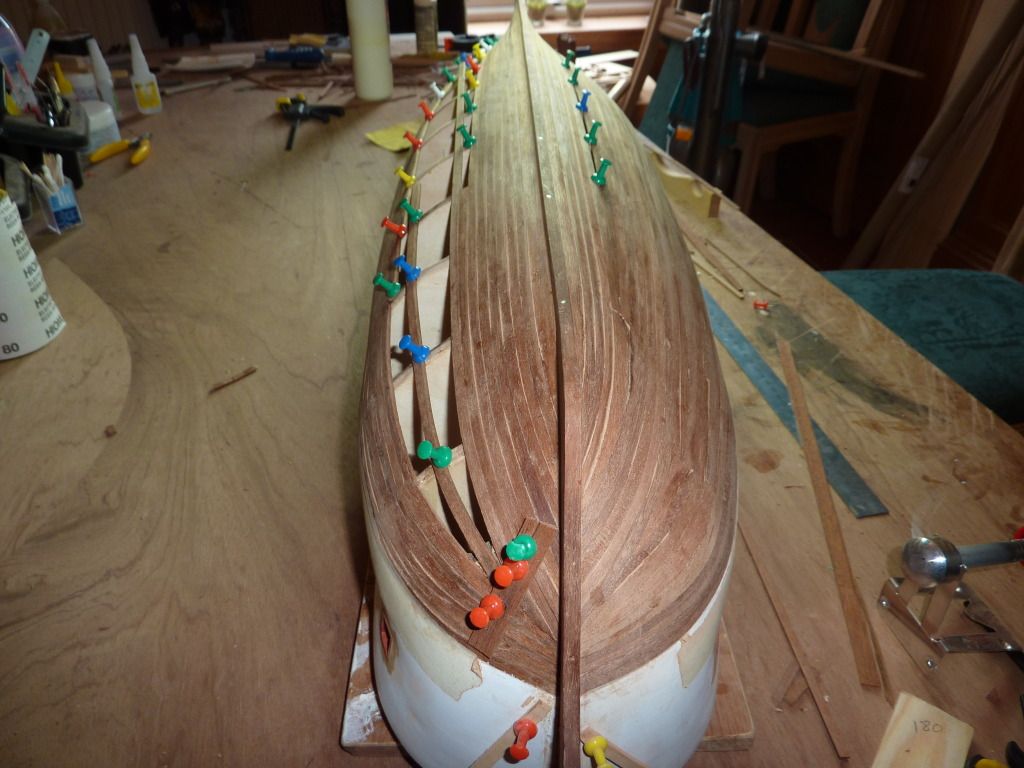  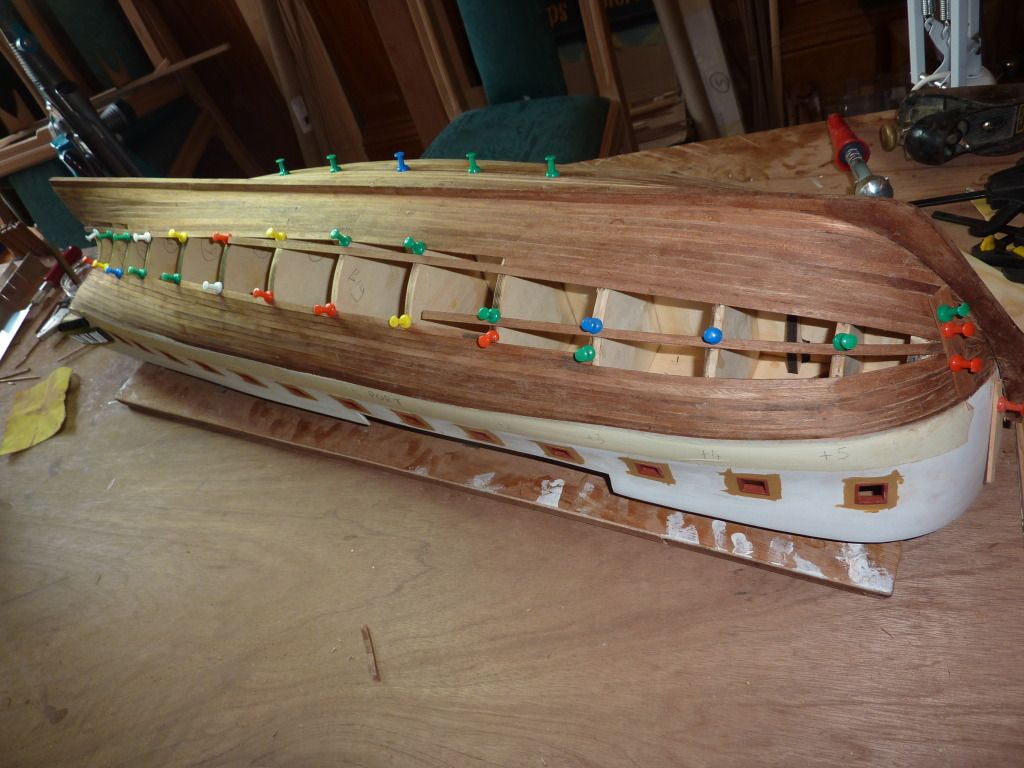 I think the next step after planking is complete and the Danish Oil is complete will be the Whales or the rubbing strips, Will have to look at other builds to get an idea of what to do there, I am not particulary bothered about it being a true replica, I think the next step after planking is complete and the Danish Oil is complete will be the Whales or the rubbing strips, Will have to look at other builds to get an idea of what to do there, I am not particulary bothered about it being a true replica,
Over and out for now.
MoMo
|
|
|
 Rank: Super-Elite   Groups: Registered
Joined: 24/04/2010 Posts: 5,787 Points: 17,662 Location: Stafford, United Kingdom
|
Hi Mo, a very nice job of the planking Kind regards Mike MWG BUILD DIARIES: HMS VICTORY, SOVEREIGN OF THE SEAS, SAN FRANCISCO II, HMS HOOD, HMS ENDEAVOUR LONGBOAT, HMS VICTORY X-SECTION, 007 DB5, NISSAN GTR, CUTTY SARK, RB7, AKAGI, BARK HMS ENDEAVOUR, HUMMER H1, MITSUBISHI ZERO.
|
|
|
Rank: Pro Groups: Joined: 24/08/2009 Posts: 48,827 Points: -13,348
|
Looking good Mo, nice Job.
|
|
|
Rank: Vice-Master Groups: Registered
Joined: 09/02/2012 Posts: 569 Points: 1,675 Location: Scotland
|
|
|
|
Rank: Vice-Master Groups: Registered
Joined: 09/02/2012 Posts: 569 Points: 1,675 Location: Scotland
|
I need some help here. I am thinking about fitting the rudder while the boat is upturned, I have read the instructions, but they are not to clear, How do the two parts of the hinges fit together. 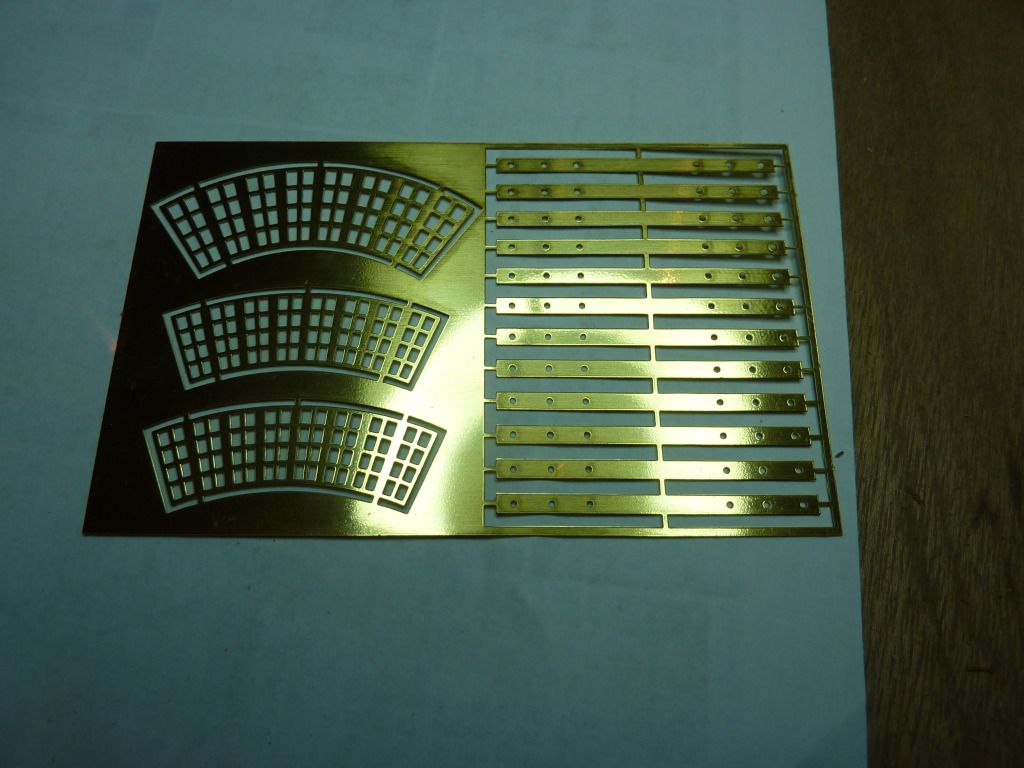 The picture above shows the flat bar hinges, but where do the pins go to form the hinge, Any help would be appreciated. The picture above shows the flat bar hinges, but where do the pins go to form the hinge, Any help would be appreciated.
MoMo
|
|
|
|
Guest (3)
|
 US
US

