|
|
 Rank: Vice-Master   Groups: Registered
Joined: 05/03/2015 Posts: 561 Points: 1,713 Location: South Carolina
|
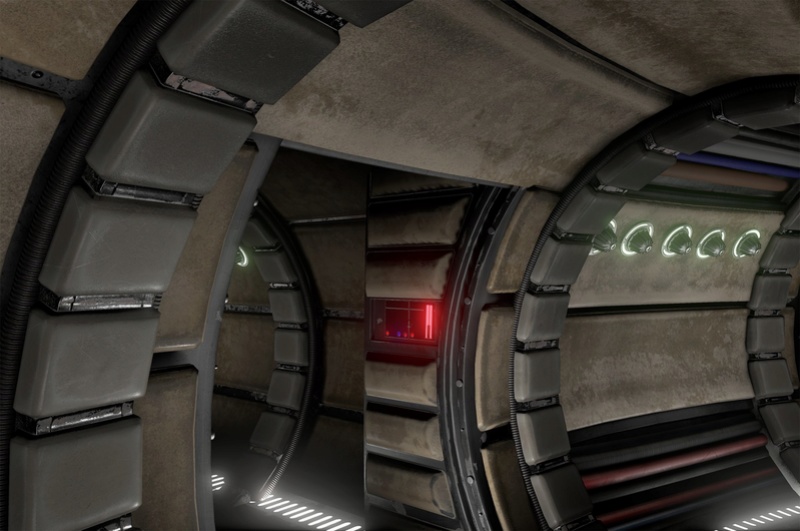
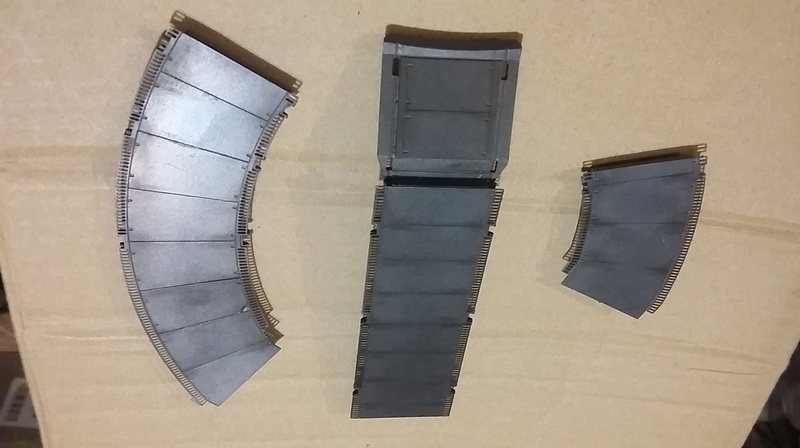
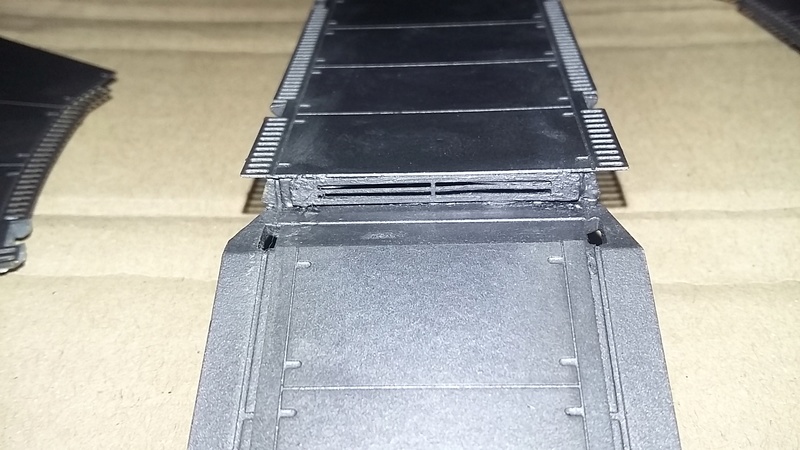
OK all... here's the latest updates to my build. I decided to go with the Paragrafix corridor photoetch kit. I like them over the 3D printed hallways. Why? All the corridors have these little floor slits that emit light. Here's a reference for ya, notice the edges of the floor have these little slits that are lit from underneath. ( PLEASE NOTE: This is a rendering of the interior, not an actual screenshot.)  But you have to trim the sides down but leave the spots where the cushion rings fit. That was a major pain in the tush! However... after trimming my floor plates... the first thing I wanted to do was get these floors looking at least somewhat accurate. That meant gluing, alot of cutting, and repainting. Here's how they came out.   Now, notice the step to the cockpit corridor... this really can't be avoided due to the pit on the bottom of the hull, but this PE kit comes with a nice little plate to put there to light up that section. It also comes with the "hidden floor comparatments" but I'm not gonna use them at all... I just glued them into place. Why? Well... in order to actually do them would mean that I would have to scratch build a little compartment under each floor section, cut out the hole in the floor and then figure out a way to still light up the floor slits an avoid the compartments. Besides, I don't think they will be seen once everything is together, but those floor slits will be, so they are my priority.
|
|
|
 Rank: Vice-Master   Groups: Registered
Joined: 05/03/2015 Posts: 561 Points: 1,713 Location: South Carolina
|
|
|
|
Rank: Administration         Groups: Registered, Administrators, Global Forum Support, Moderator, Forum Support Team, Official Builds Joined: 04/01/2016 Posts: 7,062 Points: 21,493 Location: Northamptonshire, England
|
Looking excellent, I use the steel metalcote paint a lot, particularly on the more detailed parts, then spay them with with the original hull colour with chipping effect. I reacon I should have shares in the company by now the amount of paint I have purchased. I have also used strip led!s under my corridor flooring and put aluminium tape to stop any light leakage. Keep up the good work. Mark Regards
Markwarren
(Mark) Admin
|
|
|
 Rank: Vice-Master   Groups: Registered
Joined: 05/03/2015 Posts: 561 Points: 1,713 Location: South Carolina
|
Markwarren wrote:Looking excellent, I use the steel metalcote paint a lot, particularly on the more detailed parts, then spay them with with the original hull colour with chipping effect. I reacon I should have shares in the company by now the amount of paint I have purchased.
I have also used strip led!s under my corridor flooring and put aluminium tape to stop any light leakage.
Keep up the good work.
Mark I love aluminum tape! That stuff is awesome and 10x stickier then duct tape!
|
|
|
|
|
Looking superb, progressing beautifully....
Regards
Alan
|
|
|
 Rank: Super-Elite        Groups: Registered
Joined: 31/05/2010 Posts: 5,679 Points: 17,011 Location: Wiltshire
|
Those etch parts do look spot on so a very good choice for your build which is looking really good Happy Modelling
BUILDING: Hachette Spitfire Mk 1A, Constructo Mayflower
SUBSCRIPTION COMPLETE (Awaiting building): USS Constitution, Sovereign of the Seas, 1:200 Bismarck (Hachette)
COMPLETED: Porsche 911, E-Type Jaguar, Lam Countach
|
|
|
 Rank: Vice-Master   Groups: Registered
Joined: 05/03/2015 Posts: 561 Points: 1,713 Location: South Carolina
|
Gandale wrote:Looking superb, progressing beautifully.... Thanks bro... really trying to make this look as good as I possibly can! [quote=birdaj2]Those etch parts do look spot on so a very good choice for your build which is looking really good[quote] Yeah... I really like the way they came out. Gives it just that little extra bit of detail that you'd never notice but register subconsciously! Thanks alot!
|
|
|
 Rank: Vice-Master   Groups: Registered
Joined: 05/03/2015 Posts: 561 Points: 1,713 Location: South Carolina
|
|
|
|
 Rank: Pro   Groups: Registered
Joined: 13/05/2016 Posts: 130 Points: 386 Location: Murrieta, CA (USA)
|
Looking really good. This is turning into quite the money pit. Make things as simple as possible but not simpler... - Albert Einstein
|
|
|
 Rank: Vice-Master   Groups: Registered
Joined: 05/03/2015 Posts: 561 Points: 1,713 Location: South Carolina
|
Bill-Devine wrote:Looking really good. This is turning into quite the money pit. Yeah but you got to admit, the look of the printed parts just looks right over the provided ones. The provided bunk above the seats was driving my OCD over the edge. Thanks bro!
|
|
|
 Rank: Super-Elite       Groups: Registered
Joined: 27/01/2014 Posts: 5,060 Points: 14,980
|
LookIng good, you've got to love frame, it's a model in itself.
|
|
|
Rank: Administration         Groups: Registered, Administrators, Global Forum Support, Moderator, Forum Support Team, Official Builds Joined: 04/01/2016 Posts: 7,062 Points: 21,493 Location: Northamptonshire, England
|
Looking good, some excellent work there. Looks like your going to be busy putting the hull prices onto the frame. Regards
Markwarren
(Mark) Admin
|
|
|
 Rank: Vice-Master   Groups: Registered
Joined: 05/03/2015 Posts: 561 Points: 1,713 Location: South Carolina
|
|
|
|
 Rank: Pro   Groups: Registered
Joined: 13/05/2016 Posts: 130 Points: 386 Location: Murrieta, CA (USA)
|
Looking good loving the extra details. Make things as simple as possible but not simpler... - Albert Einstein
|
|
|
 Rank: Pro   Groups: Registered
Joined: 13/05/2016 Posts: 130 Points: 386 Location: Murrieta, CA (USA)
|
LrdSatyr8 wrote:Bill-Devine wrote:Looking really good. This is turning into quite the money pit. Yeah but you got to admit, the look of the printed parts just looks right over the provided ones. The provided bunk above the seats was driving my OCD over the edge. Thanks bro! Yeah I know what you mean about the bunk. It is just totally wrong in the provided part. The one you have looks correct. Make things as simple as possible but not simpler... - Albert Einstein
|
|
|
Rank: Administration         Groups: Registered, Administrators, Global Forum Support, Moderator, Forum Support Team, Official Builds Joined: 04/01/2016 Posts: 7,062 Points: 21,493 Location: Northamptonshire, England
|
Looks really good, I have been thinking about what to do with that room, nice to see it painted up. Just bought your gunner turret hallway. I am also scratch building the inside of the gun turret as we have been advised not to screw down the turret as it's easier to lift off the hull pieces, so I thought if it's not fixed I'll build the inside workings of the turret. Regards
Markwarren
(Mark) Admin
|
|
|
 Rank: Amateur level 2  Groups: Registered
Joined: 24/08/2016 Posts: 45 Points: 138 Location: Maryland
|
Newbie here. Absolutaly unbelievable build. I love the equipment bay. Breathtaking and droolmaking.
|
|
|
 Rank: Vice-Master   Groups: Registered
Joined: 05/03/2015 Posts: 561 Points: 1,713 Location: South Carolina
|
Markwarren wrote:Looks really good, I have been thinking about what to do with that room, nice to see it painted up. Just bought your gunner turret hallway.
I am also scratch building the inside of the gun turret as we have been advised not to screw down the turret as it's easier to lift off the hull pieces, so I thought if it's not fixed I'll build the inside workings of the turret. I saw someone on here do that! That's insane but I love it! :)
|
|
|
 Rank: Vice-Master   Groups: Registered
Joined: 05/03/2015 Posts: 561 Points: 1,713 Location: South Carolina
|
tunko wrote:Newbie here. Absolutaly unbelievable build. I love the equipment bay. Breathtaking and droolmaking. Thanks bro! Have been taking my time to get things right! Hoping it all works out soon! Stay tuned... lots more to come!
|
|
|
 Rank: Vice-Master   Groups: Registered
Joined: 05/03/2015 Posts: 561 Points: 1,713 Location: South Carolina
|
|
|
|
|
Guest (5)
|