|
|
 Rank: Pro    Groups: Registered
Joined: 24/09/2012 Posts: 491 Points: 1,452 Location: London
|
Gandale wrote:So we finally get to see how she looks fully planked.... Super job Admiral, looking forward to seeing her progress and especially on your lighting project..... Well done m8....  Regards Alan Thanks Alan! but it still needs to be cut to shape and sanded down a bit more, i really like the basswood strips though so i cant wait to start laying those aswell as the sapele, the surface doesn't have to be completely smooth i've noticed because even when the other layers are added they still give a smooth finish, oh and ive added the switch, its a big better though Processing - Progressing
Previous builds: HMS Victory
Current build: HMS Sovereign of the seas
|
|
|
Rank: Pro Groups: Joined: 24/08/2009 Posts: 48,827 Points: -13,348
|
Bet you glad the first layer is done with 
|
|
|
 Rank: Master    Groups: Registered
Joined: 30/03/2011 Posts: 1,344 Points: 4,079 Location: Bryanston, Johannesburg. RSA
|
Well done Admiral, great looking first hull. I'm sure we will see great things to come. Judging by what we have seen so far. Rgds, Hans
"It's okay to make mistakes. mistakes are our teachers - they help us to to learn, even if it is painfully"
Current Build:
Endeavour Cross section,D51
Completed: HMS Victory
Under the bench: Endeavour x 2,Sovereign of the Seas, Akagi and The Black Pearl!HMS Victory Cross Section
|
|
|
Rank: Pro Groups: Registered
Joined: 24/09/2012 Posts: 491 Points: 1,452 Location: London
|
Tomick wrote:Bet you glad the first layer is done with ahaha i sure am, but i still have one more side to finish ^^ Processing - Progressing
Previous builds: HMS Victory
Current build: HMS Sovereign of the seas
|
|
|
Rank: Pro Groups: Registered
Joined: 24/09/2012 Posts: 491 Points: 1,452 Location: London
|
Hans wrote:Well done Admiral, great looking first hull. I'm sure we will see great things to come. Judging by what we have seen so far. Thank you hans :) this build will be fun for sure, cant wait to get cracking on with the details :D Processing - Progressing
Previous builds: HMS Victory
Current build: HMS Sovereign of the seas
|
|
|
Rank: Pro Groups: Registered
Joined: 24/09/2012 Posts: 491 Points: 1,452 Location: London
|
As i move on, i realise i've come across another problem i've not thought of. 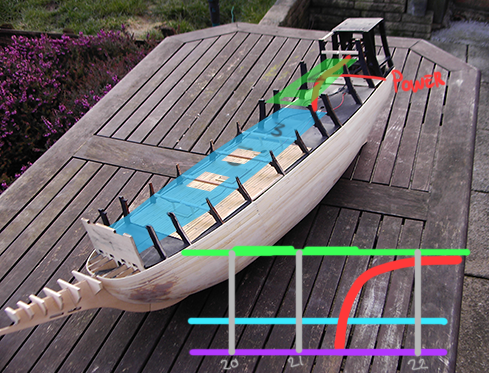 Where i've placed the wires to the galley leds to the power, goes through 3 decks, and more specifically through an area where there will be deck gratings and the wires will be visible below deck 4 where im hoping to place an LED. Now i've thought maybe i can just covered it up or cover the deck grating with some black card, but then it would restrict the light coming through. OR i can re-do the wiring which im not too bothered about doing because it would give me the chance to clean it up a bit, but it would be time consuming and something may go wrong, though in the end its re wiring which i will probably do, thankfully ive not completed the hull planking yet, but im posting this here because im completely open to suggestions before i do something i may regret. Processing - Progressing
Previous builds: HMS Victory
Current build: HMS Sovereign of the seas
|
|
|
|
|
Hi Admiral, build is really coming on nicely and sorry to hear about your wiring problem..... Maybe where the grating is you may be able to fit support pillars around the grating then channel the wires down the back of one of the pillars where it would be out of sight..... Just a thought.....
Regards
Alan
|
|
|
Rank: Pro Groups: Registered
Joined: 24/09/2012 Posts: 491 Points: 1,452 Location: London
|
Gandale wrote:Hi Admiral, build is really coming on nicely and sorry to hear about your wiring problem..... Maybe where the grating is you may be able to fit support pillars around the grating then channel the wires down the back of one of the pillars where it would be out of sight..... Just a thought.....
Regards
Alan Oh its not that which is the problem, i can fit an led for that deck, but its the main wires for all the other LEDS that go to the galley area, it would be visible through the gratings because it goes through the 3rd deck, though i did not think of the idea of putting the led wires through or behind pillars, good idea Processing - Progressing
Previous builds: HMS Victory
Current build: HMS Sovereign of the seas
|
|
|
Rank: Pro Groups: Registered
Joined: 24/09/2012 Posts: 491 Points: 1,452 Location: London
|
Ive mangaged to fix the wiring problem, but now my already rubbish camera has become more rubbish and just freezes when i go to take a picture, so i've resorted to using my phone camera... which isn't the best, but i'll be buying a new one next week, cheaply, any suggestions?  Simply i've just made a bigger whole removing all the ties giving the wires more flexibility and pushed the main wires down into the lower decks and near to where the switch and battery are. To clean up the wires connections i've added some copper strip which im not sure why i haven't thought of it before, saves using alot of wire and seeing as you can get it very thin you can pretty much place it anywhere without having to cut out gaps for wires. The wires will now lie under deck 2, though i need to add one more LED for the lantern at the rear of the ship. So far im finishing up planking the other side of the hull, 2/3 of the way done :) Processing - Progressing
Previous builds: HMS Victory
Current build: HMS Sovereign of the seas
|
|
|
 Rank: Super-Elite  Groups: Registered
Joined: 24/04/2010 Posts: 5,787 Points: 17,662 Location: Stafford, United Kingdom
|
Hi, looking good, Kind regards Mike MWG BUILD DIARIES: HMS VICTORY, SOVEREIGN OF THE SEAS, SAN FRANCISCO II, HMS HOOD, HMS ENDEAVOUR LONGBOAT, HMS VICTORY X-SECTION, 007 DB5, NISSAN GTR, CUTTY SARK, RB7, AKAGI, BARK HMS ENDEAVOUR, HUMMER H1, MITSUBISHI ZERO.
|
|
|
|
|
Hi Admiral, wiring problem nicely worked out, well done... Case of onwards and upwards now.....
Regards
Alan
|
|
|
Rank: Pro Groups: Registered
Joined: 24/09/2012 Posts: 491 Points: 1,452 Location: London
|
MOD 1 New camera should be arriving sometime this week, nothing special just a nikon coolpix, though i rushed a bit and didn't realise it was a display model and not 100% brand new, shouldn't be a problem though...i hope :| As i have no means of photography i've resorted to photoshop to display the modification im going to be doing. Simply the galley panels will be restricting the light that i want to be shown from the windows, so i'll be needing to cut out rectangle slots for the 2 decks and then add some detail to make them look like windows. (including the middle back panel) 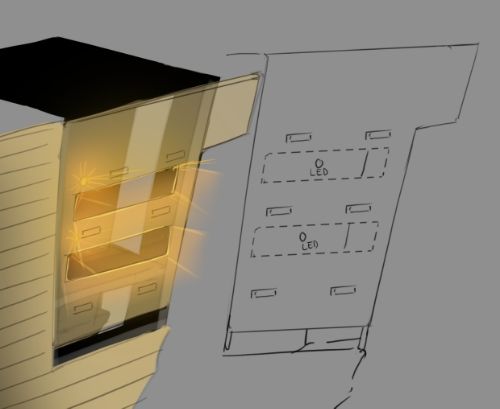 Haven't made any modifications yet because im unsure of how to cut these out cleanly, i dont really like working with plywood and i dont have a great use of tools but knives, also i have a feeling the wood may become too flimsy with the big gaps. Also going to have to wait out a couple weeks of magazine to catch up and start cutting out the cannon slots and finally lay the 2nd layers of wood, so i'll be needing something to past the time  Processing - Progressing
Previous builds: HMS Victory
Current build: HMS Sovereign of the seas
|
|
|
|
|
Hi Admiral, maybe you could frame the gaps on the inside to give added regidity to the ply, perhaps frame before cutting the pieces out... If they are carefully framed with additional ply or bamboo then I think it would work...... Just a thought.... Regards Alan
|
|
|
Rank: Pro Groups: Registered
Joined: 24/09/2012 Posts: 491 Points: 1,452 Location: London
|
Thank alan, though i've already cut the pieces, pretty much just carved them out and its not as flimsy as i thought so it should be fine. i'll be making frames of them, and i've added some support at the back along with some clear plastic. 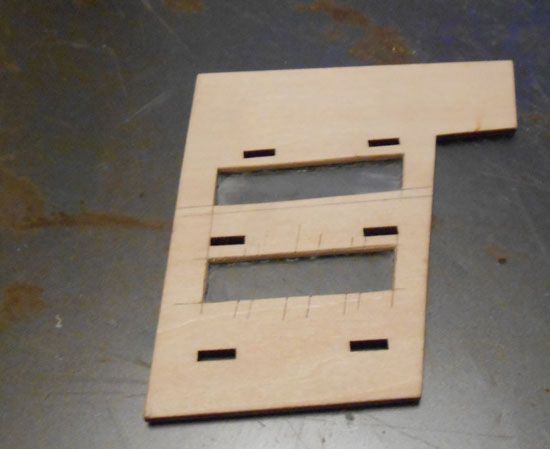 Processing - Progressing
Previous builds: HMS Victory
Current build: HMS Sovereign of the seas
|
|
|
|
|
Somehow I knew you would work it out and all would turn out... Well done...
Regards
Alan
|
|
|
Rank: Pro Groups: Registered
Joined: 24/09/2012 Posts: 491 Points: 1,452 Location: London
|
My camera has finally come, it does work though for some reason theres a problem with the memory card, and isn't easy to focus, none the less it works. First time i've done this, i've bought some 'Backen it' works almost instantly but for some reason it doesn't come out purely black, its almost a dark grey, i've dipped it in twice now and will try a 3rd time, but it doesn't seem to give off a nice look like the pros get, so i've ordered some mattcote. 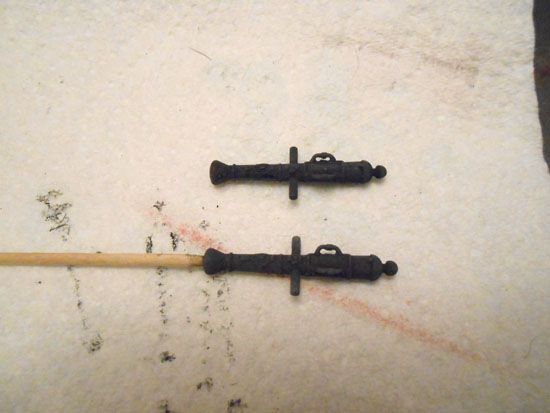 Any tips on how to effectively blacken metal would be great Processing - Progressing
Previous builds: HMS Victory
Current build: HMS Sovereign of the seas
|
|
|
|
|
Wish I could give some tips, I found the same problem with some of the items I used using Blacken-it.... In the end I decided to paint some items and to be honest I was a lot happier with it.....
Regards
Alan
|
|
|
Rank: Pro Groups: Registered
Joined: 24/09/2012 Posts: 491 Points: 1,452 Location: London
|
still getting used to this camera but hopefully you can see a change. Im getting used to using blacken it now, but it still doesn't work aswell on other things, seems to just rub off, but on the cannons its looking good after a watered coat of black paint. Later i added a dry brush of gold but i think i like the full black look better, just have to blacken the other parts. 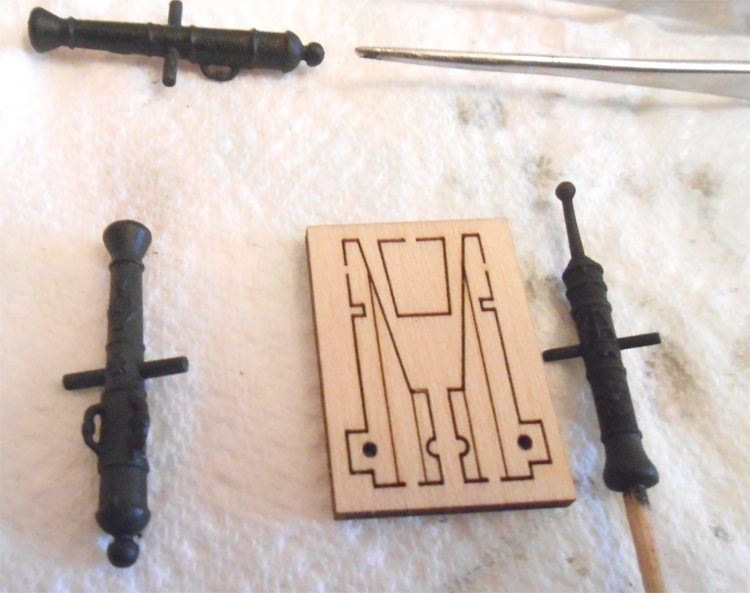 So far this is where i'll be staying with the ship until we get to issue 35. 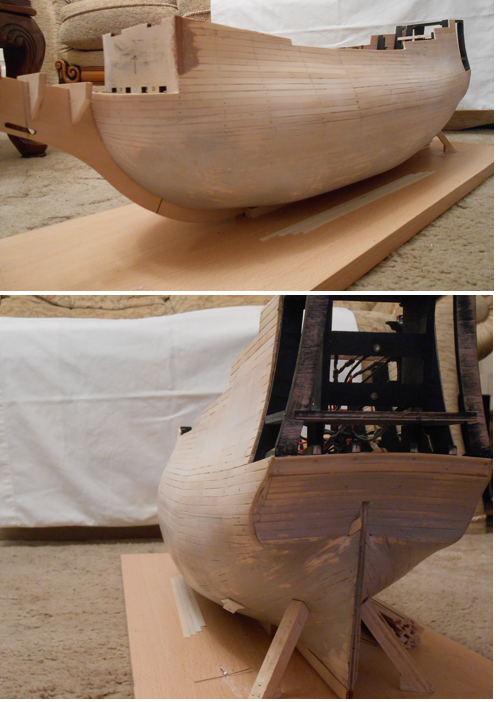 I've added the other two galley panels, and also picked up a rotary tool for £6, works great glad i finally got one . Processing - Progressing
Previous builds: HMS Victory
Current build: HMS Sovereign of the seas
|
|
|
|
|
Hi Admiral, so that is what she looks like fully planked... very nice work there... You have enough room in there to be able to fit the dummy gun supports etc, think it would be a little tight for space.... Cannons looking good too, well done.... Regards Alan
|
|
|
Rank: Pro Groups: Registered
Joined: 24/09/2012 Posts: 491 Points: 1,452 Location: London
|
Gandale wrote:Hi Admiral, so that is what she looks like fully planked... very nice work there... You have enough room in there to be able to fit the dummy gun supports etc, think it would be a little tight for space.... Cannons looking good too, well done.... Regards Alan Many thanks alan, yup i was able to fit the gun supports in, couldn't fit the clamps in but managed to keep them in place to dry from the glue by just using some of the left over bamboo to push them in place against the frames, tempted to plank the bottom of the hull but i think i need to practice the art of patience Processing - Progressing
Previous builds: HMS Victory
Current build: HMS Sovereign of the seas
|
|
|
|
Guest (7)
|
 US
US

