|
|
 Rank: Semi-Pro Level 2   Groups: Registered
Joined: 18/06/2014 Posts: 82 Points: 260
|
Went for the front wing assembly today. Alhough the adhesives for plastic today are probably very good, I decided with the size of this model, I didn't want to take many chances. You will see in the following pictures, I will be using something called JB Weld. They make two kinds, really fast set and slow set. It's an epoxy type where you mix two equal parts to use. The JB Kwik set will set up very fast, so that's why I made sure of the fit with tape and clamps first, then mixed and applied to the inside of the unit. I keep the mix by the part and can use the toothpicks to see how fast the mix set and will know when I can take off the tape and clamps.
|
|
|
 Rank: Elite      Groups: registriert, Registered Joined: 20/03/2011 Posts: 2,356 Points: 7,122 Location: UK
|
Looking good so far Dave  Spencer
|
|
|
Rank: Semi-Pro Level 2 Groups: Registered
Joined: 18/06/2014 Posts: 82 Points: 260
|
Finished the front wing assembly. Pretty straight forward screw together. But a suggestion, you'll see in the following pictures what to do with the screwdriver they give you. It's a good screwdriver but I can't deal with the tape they suggest in the manual. You'll see in one picture the screwdriver with a "RARE EARTH" magnet about 3/8 inch in diameter. Very thin. Stick it on the metal shaft and the screws will stick very well to the magnatized end. Also kind of hard to loose them, be careful. davidyat attached the following image(s):
|
|
|
Rank: Semi-Pro Level 2 Groups: Registered
Joined: 18/06/2014 Posts: 82 Points: 260
|
Pretty much did all I want to do for Stage 1. Waiting for delivery of a Paashe Air Brush and some metalizer paints to come in. Will be gone for about 2 weeks, vacation with relatives. Finished scuffing the 2 tires and attached the die cast front of the engine. Waiting for Stage 2. davidyat attached the following image(s):
|
|
|
Rank: Semi-Pro Level 2 Groups: Registered
Joined: 18/06/2014 Posts: 82 Points: 260
|
Back from vacation. Ready to build. One thing about me is that I will do anything to erase mold marks and marks when putting 2 pieces of plastic together. When you put the rotors together, I can see the mold mark. I have the good luck of acess to a machine shop and mills and lathes. I put the first rotor in the lathe and sanded it down. Then put Tamyia putty with a toothpick on the marks. Then sanded that down and used some Testor's Exhaust Metalizer on the disk, made a hole in a CD and painted the center with Titanium Metalizer. This is the buffing kind and after I buff it out, I like it better than what comes with the kit. davidyat attached the following image(s):
|
|
|
Rank: Semi-Pro Level 2 Groups: Registered
Joined: 18/06/2014 Posts: 82 Points: 260
|
davidyat attached the following image(s):
|
|
|
 Rank: Pro Groups: Joined: 24/08/2009 Posts: 48,051 Points: -13,308
|
Nice work
|
|
|
Rank: Elite Groups: registriert, Registered Joined: 20/03/2011 Posts: 2,356 Points: 7,122 Location: UK
|
Looking good Dave looks like your going to be doing some nice mods Spencer
|
|
|
|
|
 Looking good there and nice work Current builds:-C57,Zero, Lamborghini Countach, Caldercraft HMS Agamemnon,Robi,R2-D2, MFH Cobra .
|
|
|
Rank: Pro  Groups: Registered
Joined: 27/06/2011 Posts: 434 Points: 1,309 Location: milton keynes
|
nice work Dave im waiting till i finish off the zero before starting on the MP4/4 but im the same, needing to get rid of the joint lines around the brake disc regards Dan Built - MP4/23, Zero, Deagostini Falcon, Model Airways 1903 Wright Flyer, Senna Mp4/4.
Working - Mclaren M23 1/8th scale to complement the Deagostini MP4/23 & Mp4/4
on the bench, Model Airways Sopwith Camel.
|
|
|
Rank: Pro  Groups: Registered
Joined: 05/05/2014 Posts: 230 Points: 657 Location: Northeast USA
|
Your rotor color appears slightly too dark; here is a reference photo: 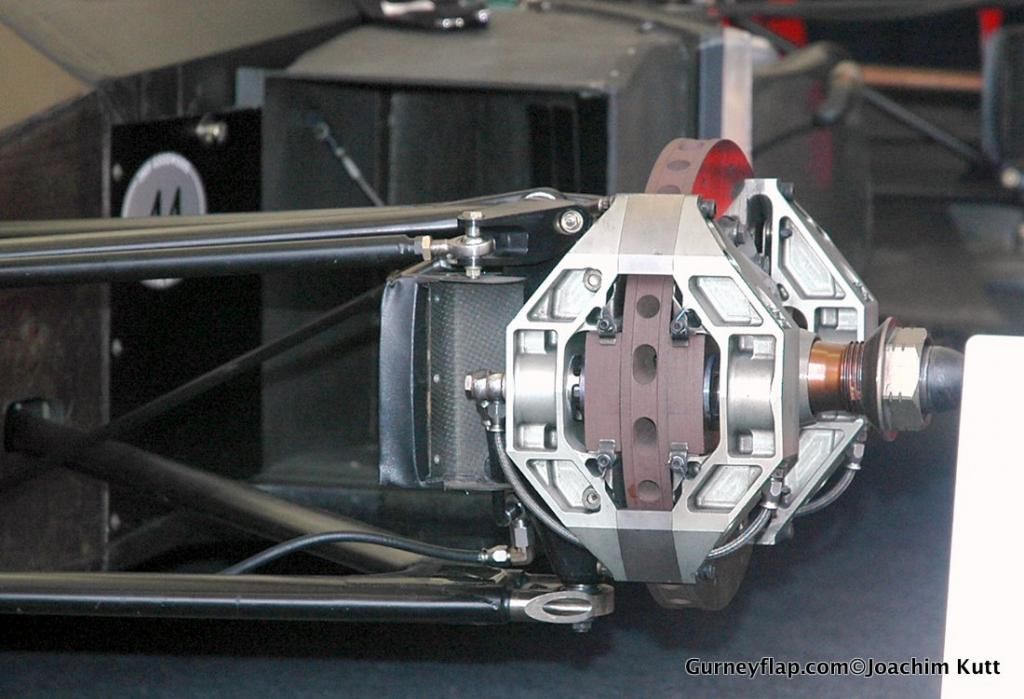
|
|
|
Rank: Semi-Pro Level 2 Groups: Registered
Joined: 18/06/2014 Posts: 82 Points: 260
|
Thanks for the original picture of the rotor disc. What I did was try to match the dark gray that came on the plastic rotor from the kit. Since the rotor isn't installed yet, I can play around with color to match the real rotor color. For now, here is my completed rotor with 2 calipers. I've gotten rid of the joint lines so changing the color of the rotor isn't anything big. davidyat attached the following image(s):
|
|
|
Rank: Semi-Pro Level 2 Groups: Registered
Joined: 18/06/2014 Posts: 82 Points: 260
|
Eagle,
If you go to
Senna McLaren MP4/4 Official Build - Stages 1 - 7 on this site by Tomick and go to post #4, there are a couple of pictures of the original plastic rotor. It looks like your build is already done. If you modifyed the color on your rotor, can you point me in the right direction to get the right color for the "real" rotor? Do you have any pictures of your rotors?
Thanks,
Dave
|
|
|
Rank: Semi-Pro Level 2 Groups: Registered
Joined: 18/06/2014 Posts: 82 Points: 260
|
Taking a break until Pack 3 gets here. I was thinking of starting on the rear wing and I saw some comments in other blogs that it might be better to put on the Marlboro water slide decals BEFORE you assemble the wing. I'm waiting for the decals to come from Autographmodel.com in Europe before I assemble the wing. I've seen that the Marlboro decals are supposed to be in the kit but I don't know when they will get here. They just can't advertise tobacco products.
Dave
|
|
|
Rank: Semi-Pro Level 2 Groups: Registered
Joined: 18/06/2014 Posts: 82 Points: 260
|
First off, take everyone's advice and get the tobacco decals first and apply to the rear wing elements BEFORE you assemble it. Then it took some time for me to fix my mistake I showed in my other blog, "When Good Modelers Make Mistakes". It took some patience and I'm satisfied with my results. davidyat attached the following image(s):
|
|
|
Rank: Semi-Pro Level 2 Groups: Registered
Joined: 18/06/2014 Posts: 82 Points: 260
|
Well month 3 came in. I was surprised to see that the joint line for the intercooler was a little off on both sides. You'll see that I'm pointing to the joint line with the Exacto blade and one of the pictures will show that it's about 30 thousands of an inch off. Looks like I will have to do some bondo and sanding to get it right. It will look good when I'm done and use some metalizer on it. davidyat attached the following image(s):
|
|
|
Rank: Semi-Pro Level 2 Groups: Registered
Joined: 18/06/2014 Posts: 82 Points: 260
|
Pack 3 went very quickly. I like my idea of metalizing parts. The upright looked too much like plastic for me so I metalized it and am pleased with the results. I also like the result of eliminating the joint line in the rotor. It's going to be a long wait for pack 4. By the way, has anyone found the water slide decals for the nose cone that make it look like carbon fiber? Autograph models in Germany still doesn't have them. I have the monocoque carbon fiber decals from them. davidyat attached the following image(s):
|
|
|
Rank: Pro  Groups: Registered
Joined: 15/07/2014 Posts: 204 Points: 578 Location: Alabama, USA
|
Very nice work Dave! I'll be following this build as I just started my build of the MP4-23. Regards, Barry Building - DeAgostini HMS Victory, McLaren MP4-23, Suzuki GSX1300R Hayabusa, Harley Davidson Fat Boy, Lamborghini Countach
|
|
|
Rank: Pro Groups: Registered
Joined: 05/05/2014 Posts: 230 Points: 657 Location: Northeast USA
|
You might try HLJ for the nose section decals; it shows as a backorder, but they restock monthly it seems, depending on orders.
|
|
|
Rank: Semi-Pro Level 2 Groups: Registered
Joined: 18/06/2014 Posts: 82 Points: 260
|
What is HLJ? Never heard of it.
|
|
|
|
Guest
|
 US
US

