|
|
 Rank: Semi-Pro Level 2    Groups: Registered
Joined: 30/11/2014 Posts: 86 Points: 267 Location: Vancouver, BC
|
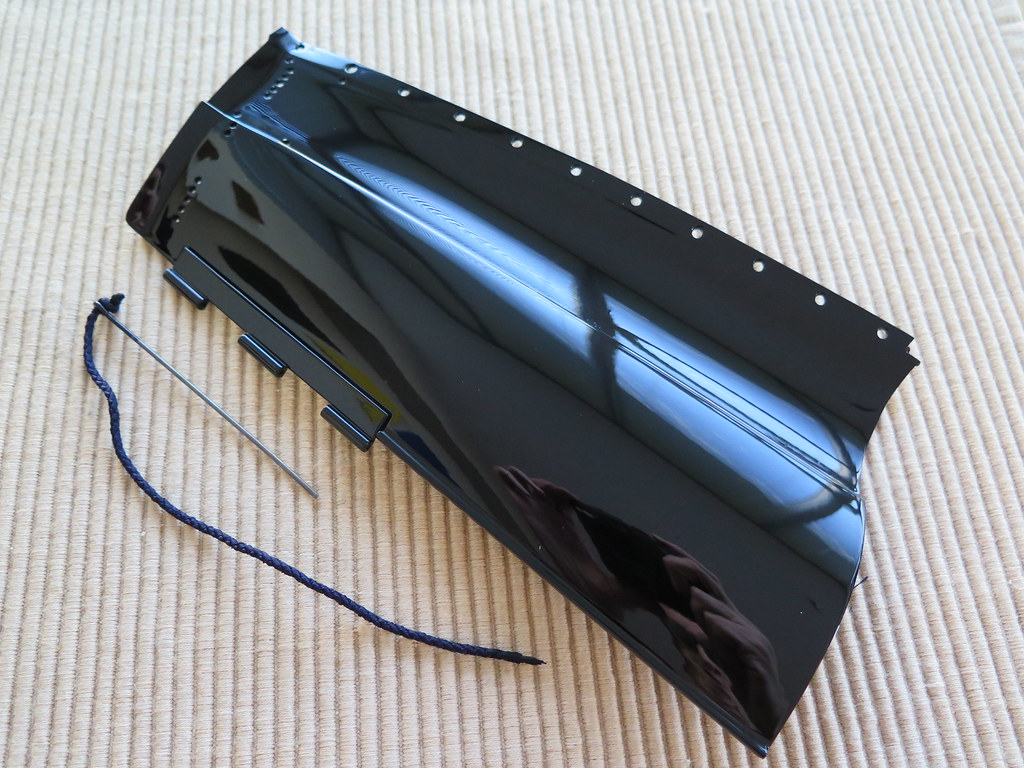
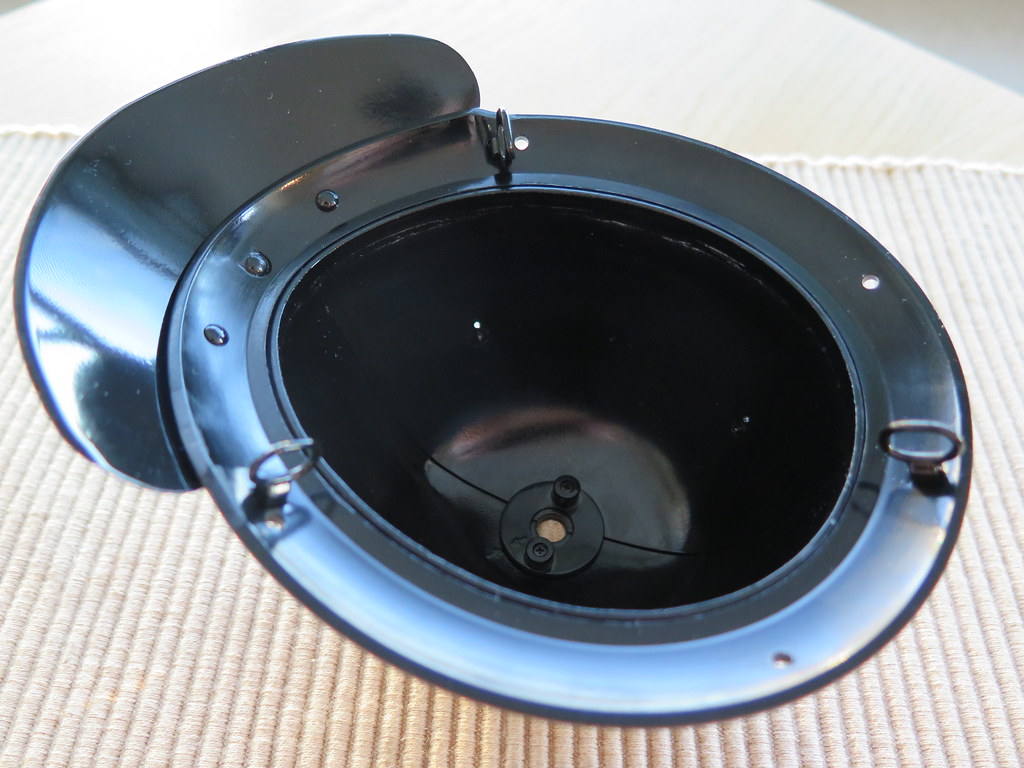
Hi everyone. Here's my build diary of my Samurai kit. Rather than go the usual route I'll try and be a bit different with the presentation. I'd like to present it with my thoughts and experiences with the build in a hope to convert some of the lurkers out there to go for it and purchase the subscription. I was a lurker and reading everyone else's diary helped my to make my decision and purchase a subscription. First off, the first pack consists of four trays of parts. All parts are very carefully packed in their custom made plastic trays so everything arrives in mint condition. All parts are metal so far with a flawless gloss black finish. The instruction book is 8.5" X 11" in size and in full colour. Lots of colour photos to help explain the trickier bits. The instructions take you through all the operations that you can perform in each tray. So, you would do a bit with the tasset plates then some helmet work then face mask stuff. You're kinda jumping around a bit so I found it easier to do all operations concerning each assembly from beginning to end, so I did everything I could with the helmet, then everything on the face mask, cuirass and lastly the taste plates. Everything going to get greasy finger prints despite your best efforts, I found 99% pure isopropyl alcohol and a micro fibre cloth works well. Lets start with the helmet;Joining the two halves is quick and easy, the joining ring is cast metal, not plastic! Also, the holes for the screws are pre tapped, nice! You get one spare screw and two spare rivets. The rivets go in the smaller of the two holes. The instructions said to put some glue in the hole then put the rivet in the hole. I found it easier to put the rivet in the hole and hold it with my finger then apply one drop of CA glue from the inside of the helmet. No chance of CA glue getting on the outside of the helmet.  Next is the face mask; Next is the face mask;The instructions say to glue the ears on with "multi purpose glue". I used CA with no issues. My "securing post plates" matched the contours of the face mask just fine. With the nose pins CA'ed in place I'm pretty sure I could still remove the nose piece if nessesary. It seems like you might have to, the instructions don't explicitly say one way or the other.  Next is the Cuirass; Next is the Cuirass;Not much to say here except I used CA instead of the "multi purpose glue". I left the plastic sheet on to keep greasy fingerprints off the glossy black paint. An impossible task!  Lastly, the tasset plates; Lastly, the tasset plates;The preceding assemblies were a piece of cake compared to the tasset plates. These are fiddly. I attached the leather backing without using sticks which went well, but then again I'm a troublemaker! When you make the pointy ends on the lace, make the ends very fine and pointy. If you don't it will be very tough to pull the end through the little holes. My ends were to bulky and the ends were frayed badly by the end. For the bottom of the sixth tasset I made a very fine point and that went way faster. The whole mountain fold vs valley fold is important to the finished look so do whatever you have to do to manipulate the lace to get the correct fold. The lace will fray easily so be gentle with it. With my experience with the first tasset assembly, I'm convinced I will be able to do the next tasset assembly in half the time or less with 69% less swearing!  That's it for now, pack two is in the mail as I write this. Can you guess what the leather pads for the tasset plates have in common with a BMW i3?Cheers, Gord. Subscribed: Suzuki GSX 1300R Hayabusa In The Last Few Years Builds: DeAgostini Samurai Armour Kobayashi Kougei: 1/100 Horyuji Kondo, 1/100 Horyuji Inner Gate, 1/36 Muro-ji Five-Story Pagoda, Public Bath House of Showa, Model Shipyard: 1/72 Los Morrillos de Cabo Rojo Lighthouse. 1/72 Kermorvan Lighthouse Woody Joe: 1/150 Azuchi Castle. Building: Kobayashi Kougei: 1/100 Himeji Castle, 1/70 ji Kinkaku. Received but not started: Woody Joe 1/50 Ishiyamadera Pagoda
|
|
|
 Rank: Pro Groups: Joined: 24/08/2009 Posts: 48,051 Points: -13,308
|
Great start and congrat's on receiving your first medal 
|
|
|
 Rank: Super-Elite      Groups: Registered
Joined: 30/01/2013 Posts: 4,604 Points: 13,607 Location: Monmouthshire UK
|
Very nice start Gord  Nice to see another Samurai build on here - BTW, if your worried about finger prints a couple of members have used the very thin gloves when handling any parts, either in latex or cotton, they are used by jewelers etc, you can also polish the parts up with your fingers when you wear them  here is an example - http://www.amazon.co.uk/...ILVERWARE/dp/B00II7PW32 Steve
|
|
|
Rank: Pro  Groups: Registered
Joined: 17/06/2013 Posts: 169 Points: 510 Location: Hereford United Kingdom
|
Hi Gord, I think you are going to enjoy your build. It can get very addictive as you progress. Everything is looking good so far.. Bob.
|
|
|
Rank: Semi-Pro Level 2 Groups: Registered
Joined: 30/11/2014 Posts: 86 Points: 267 Location: Vancouver, BC
|
stevie_o wrote:BTW, if your worried about finger prints a couple of members have used the very thin gloves when handling any parts, either in latex or cotton, they are used by jewelers etc, you can also polish the parts up with your fingers when you wear them here is an example - http://www.amazon.co.uk/...ILVERWARE/dp/B00II7PW32 Steve I have now got some cotton gloves from Amazon, but they fit too loosely to do anything requiring precision. Might try powder-free latex gloves. Thanks for looking in! Subscribed: Suzuki GSX 1300R Hayabusa In The Last Few Years Builds: DeAgostini Samurai Armour Kobayashi Kougei: 1/100 Horyuji Kondo, 1/100 Horyuji Inner Gate, 1/36 Muro-ji Five-Story Pagoda, Public Bath House of Showa, Model Shipyard: 1/72 Los Morrillos de Cabo Rojo Lighthouse. 1/72 Kermorvan Lighthouse Woody Joe: 1/150 Azuchi Castle. Building: Kobayashi Kougei: 1/100 Himeji Castle, 1/70 ji Kinkaku. Received but not started: Woody Joe 1/50 Ishiyamadera Pagoda
|
|
|
Rank: Semi-Pro Level 2 Groups: Registered
Joined: 30/11/2014 Posts: 86 Points: 267 Location: Vancouver, BC
|
longblade wrote:Hi Gord, I think you are going to enjoy your build. It can get very addictive as you progress. Everything is looking good so far.. Bob. I'm lovin' the process! I would like to subscribe to another one (or two), but can't decide! Subscribed: Suzuki GSX 1300R Hayabusa In The Last Few Years Builds: DeAgostini Samurai Armour Kobayashi Kougei: 1/100 Horyuji Kondo, 1/100 Horyuji Inner Gate, 1/36 Muro-ji Five-Story Pagoda, Public Bath House of Showa, Model Shipyard: 1/72 Los Morrillos de Cabo Rojo Lighthouse. 1/72 Kermorvan Lighthouse Woody Joe: 1/150 Azuchi Castle. Building: Kobayashi Kougei: 1/100 Himeji Castle, 1/70 ji Kinkaku. Received but not started: Woody Joe 1/50 Ishiyamadera Pagoda
|
|
|
|
|
Hi Gord A very nice start the Tasset's look great and as you do more they do get faster to do. One tip to be aware of the laces will stretch slightly with the weight of the metal plates so something to keep an eye on when making them up so they are all the same length. I started off using the cotton gloves but like yourself found there a hindrance more than a help so swoped to using nitrile gloves which was much better. Regards Andy Current builds:-C57,Zero, Lamborghini Countach, Caldercraft HMS Agamemnon,Robi,R2-D2, MFH Cobra .
|
|
|
|
|
Great start Gord, great to see another of these builds start up.... Will be following your progress... Regards Alan
|
|
|
Rank: Super-Elite   Groups: Registered
Joined: 31/05/2010 Posts: 5,679 Points: 17,011 Location: Wiltshire
|
Ford Very nice start to a lovely model. Unless something else takes my eye this is one I am hoping to get once my SofS subscription finishes Happy Modelling
BUILDING: Hachette Spitfire Mk 1A, Constructo Mayflower
SUBSCRIPTION COMPLETE (Awaiting building): USS Constitution, Sovereign of the Seas, 1:200 Bismarck (Hachette)
COMPLETED: Porsche 911, E-Type Jaguar, Lam Countach
|
|
|
Rank: Semi-Pro Level 2 Groups: Registered
Joined: 30/11/2014 Posts: 86 Points: 267 Location: Vancouver, BC
|
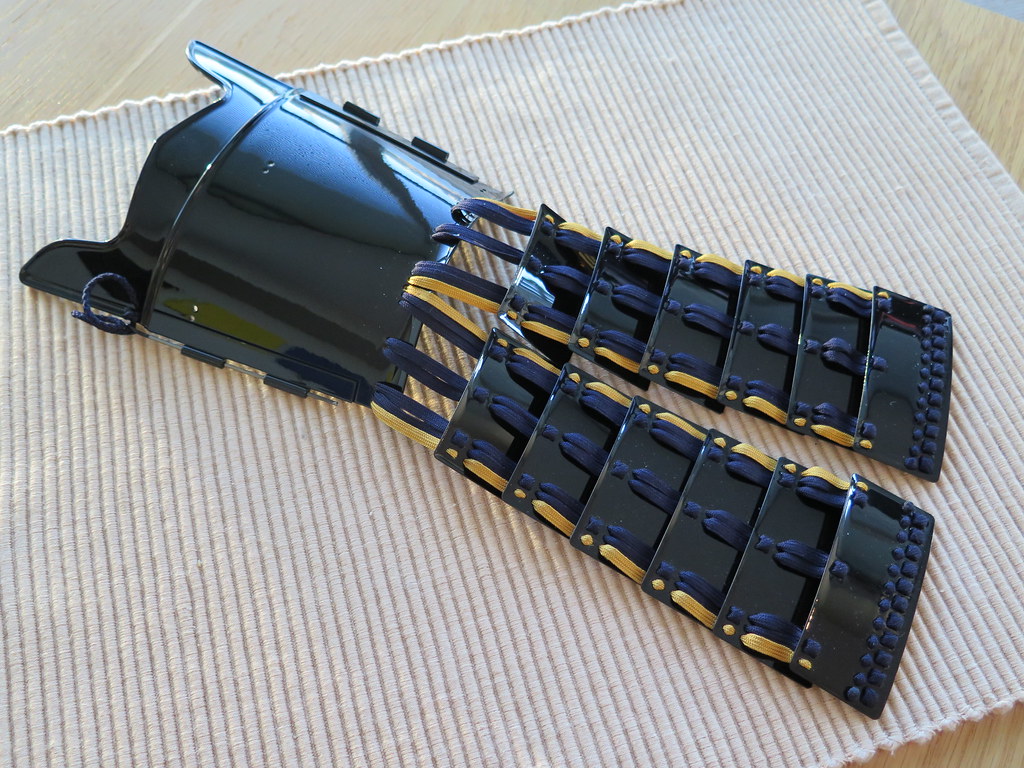
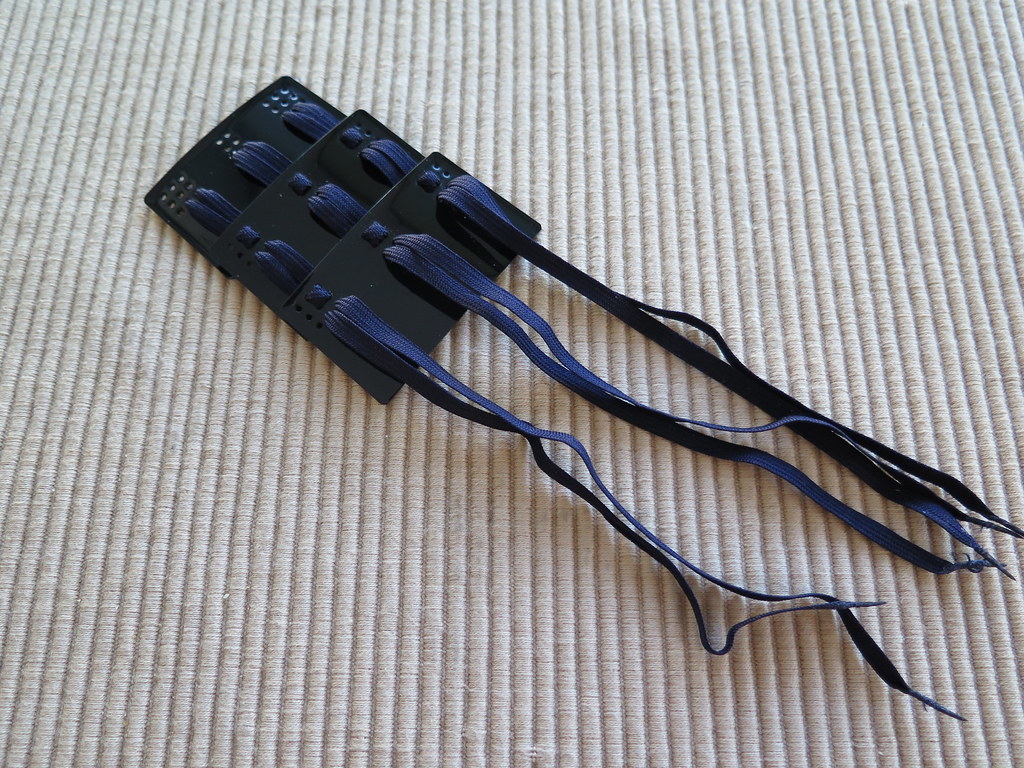
Welcome to Pack 2 of 12. First off, thanks to all who stopped by to check things out and to the people that commented! In the previous post was the following question: Can you guess what the leather pads for the tasset plates have in common with a BMW i3?The answer is the double-sided adhesive. The battery pack in the i3 is made up of many, many small Samsung battery packs, they are stuck together to make a big pack with the exact same 3M adhesive that is used to stick the leather pads to the tasset plates. Totally done by robots. Now, on to Pack 2. The helmet:This month I added the visor to the helmet. It's held on with rivets, but not the kind you bash with a hammer. The kind that fit precisely together. A drop of CA glue per rivet and it's stuck on. Next, the crest mount is added with a rivet and a drop of CA glue. Then i added the crest holder into the crest mount, just a friction fit, no glue. The helmet wing plate has two blossoms added to the ends, in the centre of the flowers. Again, one small drop of CA glue for each. The wing plate is not mounted to the helmet at this stage, but I can see where it's supposed to go.   More Tasset Plates: More Tasset Plates:One more tasset plate was made. I was able to make this one in less than half of the time of the first one owing to the experience from doing the first one. You also get a start on the 3rd tasset panel with two tasset plates laced together. Make sure to make the ends very thin and pointy as this really speeds up the process. Apparently there are 11 tasset panels in total! 11 of them!  The Cuirass Side: The Cuirass Side:Two Cuirass sides are made up, I used CA to attach the parts together. The two finished tasset panels are laced to the front Cuirass from the last stage and the two sides are attached to the front with metal pins through the hinge holes. These pins fit perfectly and are attached with cord.   Thank you to Andy for mentioning that the weight of the tasset plates will make the lace stretch, so make sure to adjust accordingly so the second one hangs like the first one. I made the second plate hang a couple of millimetres higher, so that when the other four plates are added the spacing will be the same. I haven't bought powder free latex gloves yet so I am just cleaning the surface with 99% pure alcohol and a microfibre cloth. Finger prints are inevitable. Really enjoying the "only so much to do each month" concept that comes with a subscription. I tend to get completely obsessed so this is a good way to break free and do something else. Why did the Samurai class shave the top their head?Cheers, Gord. Subscribed: Suzuki GSX 1300R Hayabusa In The Last Few Years Builds: DeAgostini Samurai Armour Kobayashi Kougei: 1/100 Horyuji Kondo, 1/100 Horyuji Inner Gate, 1/36 Muro-ji Five-Story Pagoda, Public Bath House of Showa, Model Shipyard: 1/72 Los Morrillos de Cabo Rojo Lighthouse. 1/72 Kermorvan Lighthouse Woody Joe: 1/150 Azuchi Castle. Building: Kobayashi Kougei: 1/100 Himeji Castle, 1/70 ji Kinkaku. Received but not started: Woody Joe 1/50 Ishiyamadera Pagoda
|
|
|
|
|
|
|
|
Rank: Semi-Pro Level 2 Groups: Registered
Joined: 30/11/2014 Posts: 86 Points: 267 Location: Vancouver, BC
|
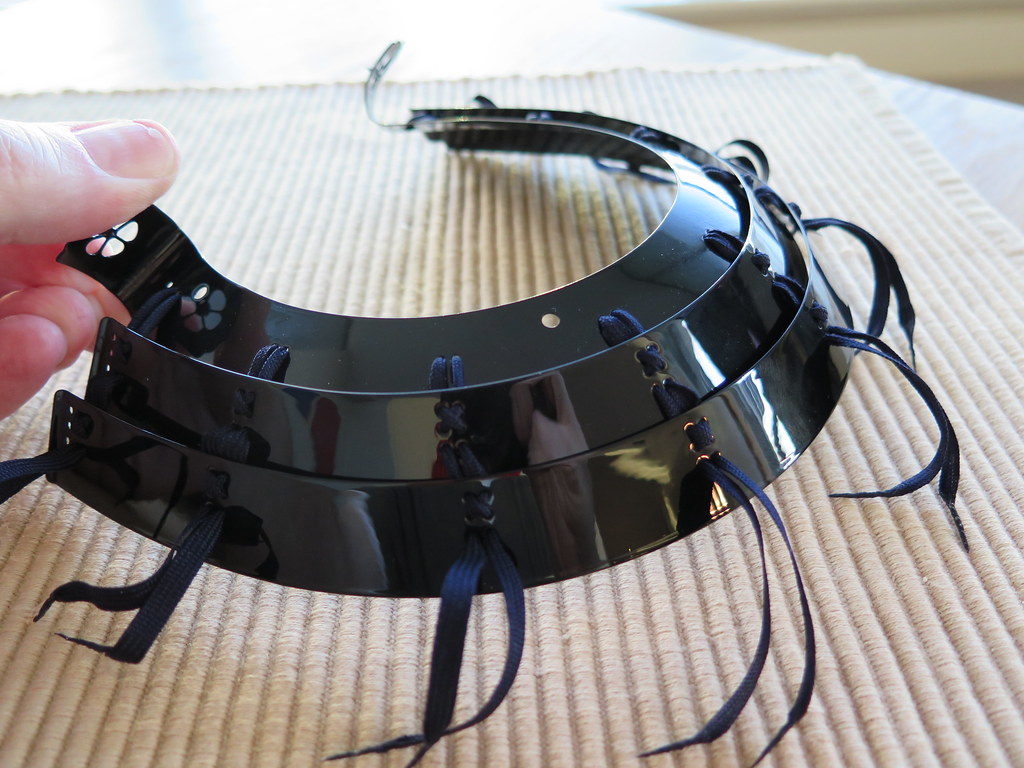
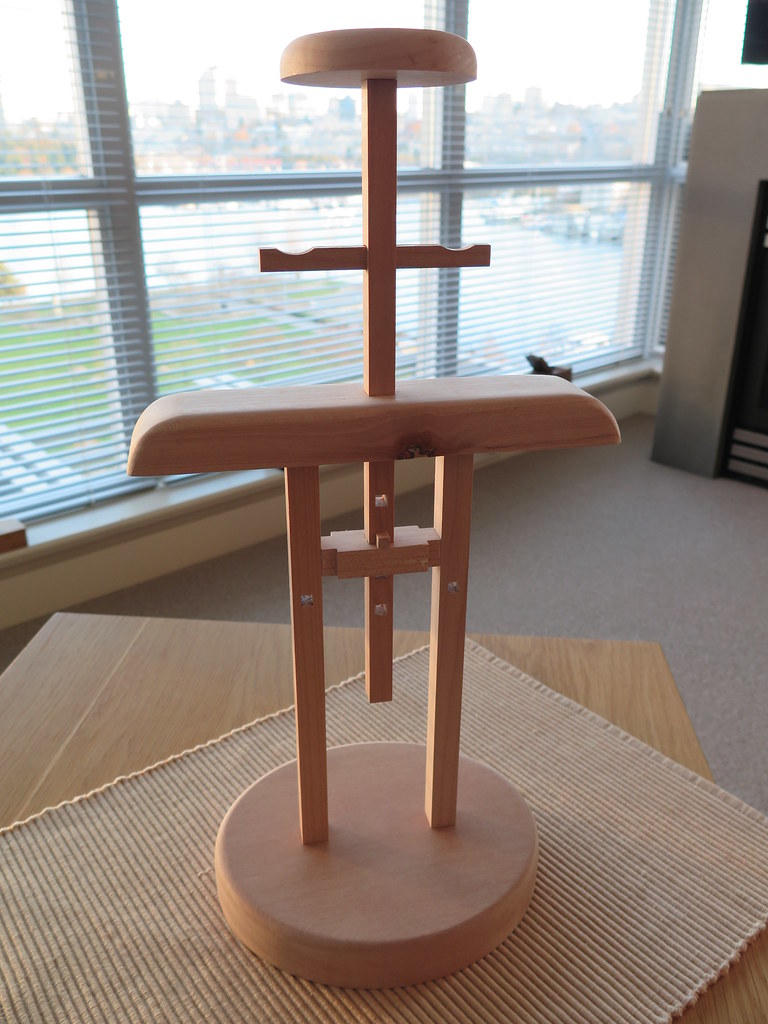
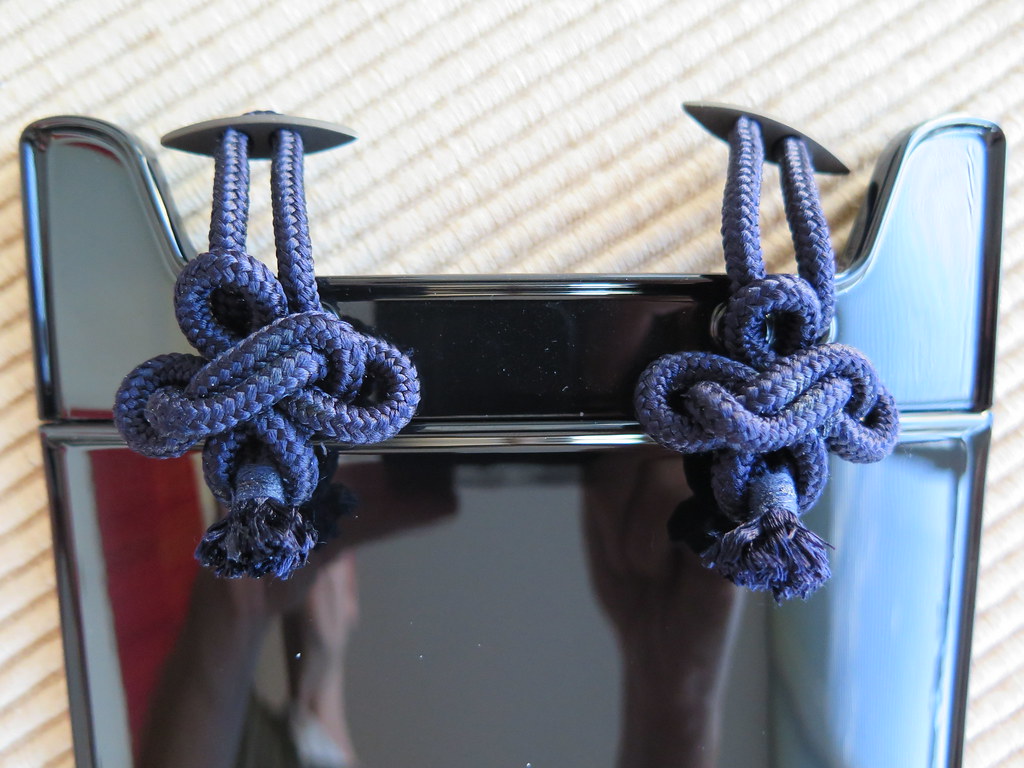
Welcome to Pack 3 of 12. First off, thanks to all who stopped by to check things out and to those that commented! Last months question was: Why did the Samurai class shave the top their head?The reason why the samurai class shaved their the top of their heads is for helmet to fit more easily when they go into battle. From the Meiji period, the samurai were prohibited to wear swords, armours and helmets, and the hair-style lost its significance. It became widely adopted by the lower class who wished to imitate the former warrior class. Now, on to Pack 3. More Tasset Plates and the Cuirass:The third tasset plate which was started last month was finished this month and laced to the cuirass side. A start on the fourth tasset plate was also done this month. 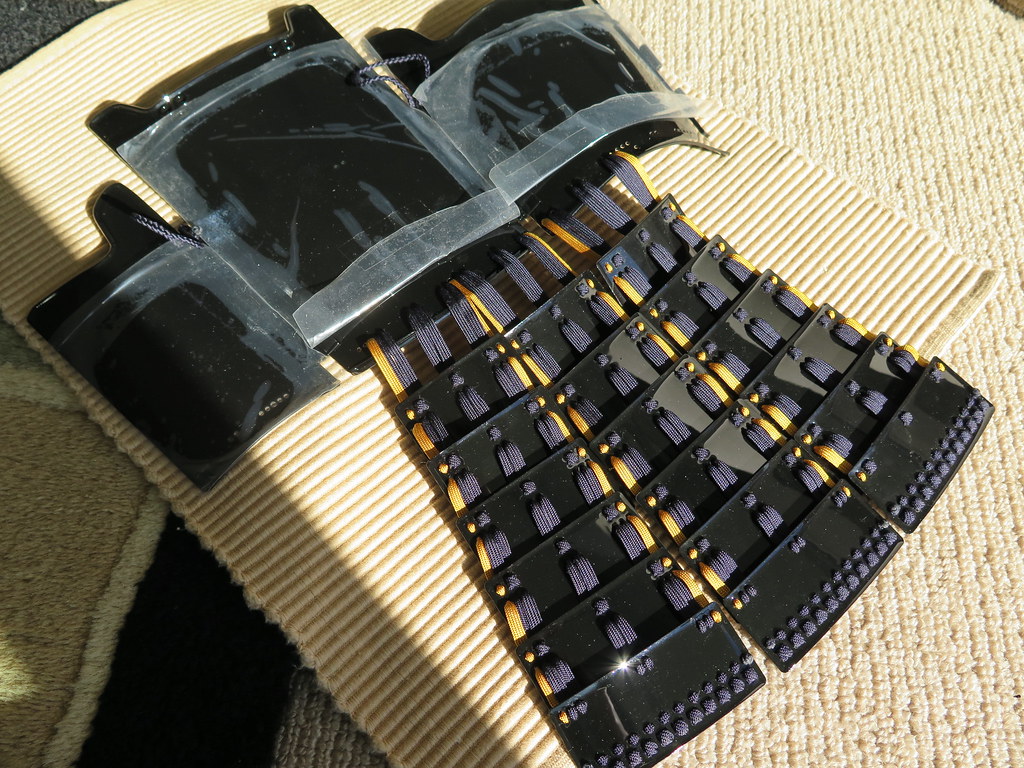 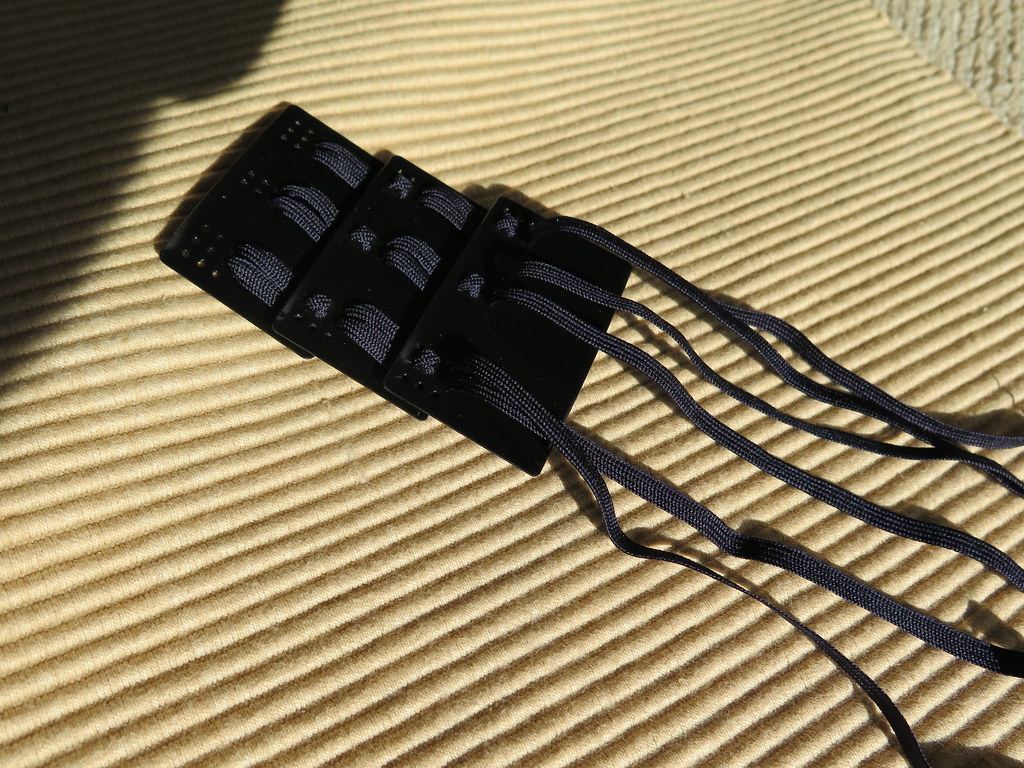 Neck Guard: Neck Guard:Plate two of the neck guard was laced to the first neck guard plate from last month. Boy, was this tricky to get even with the correct spacing. 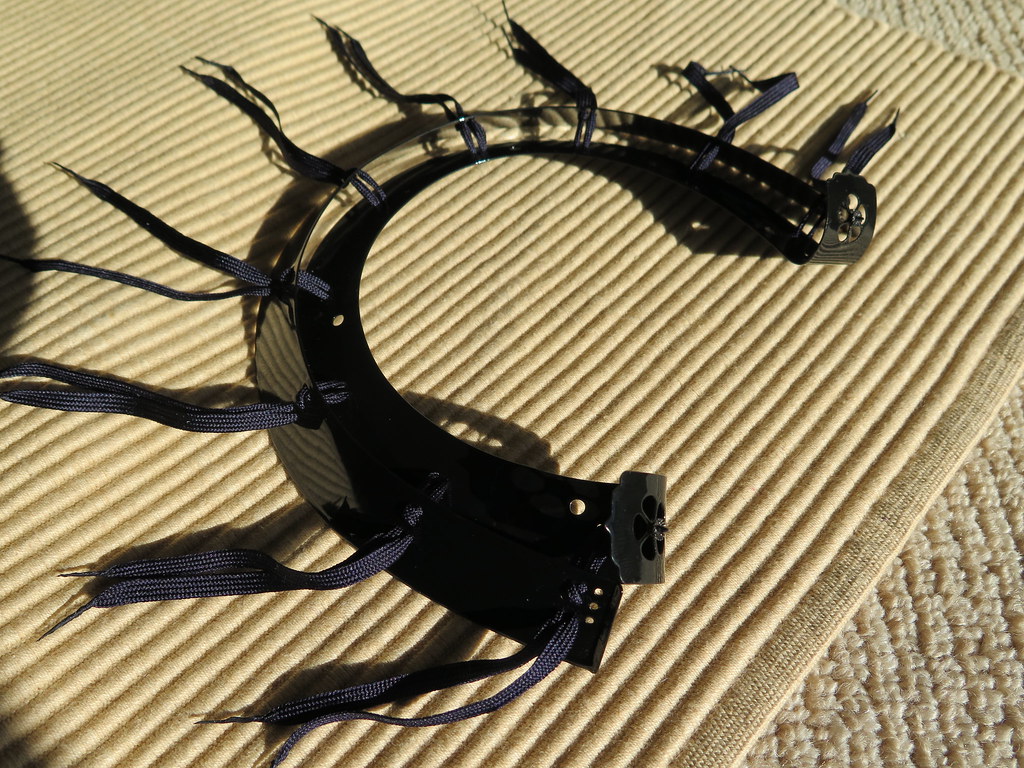 Cuirass Side: Cuirass Side:Another cuirass side was made using CA glue. 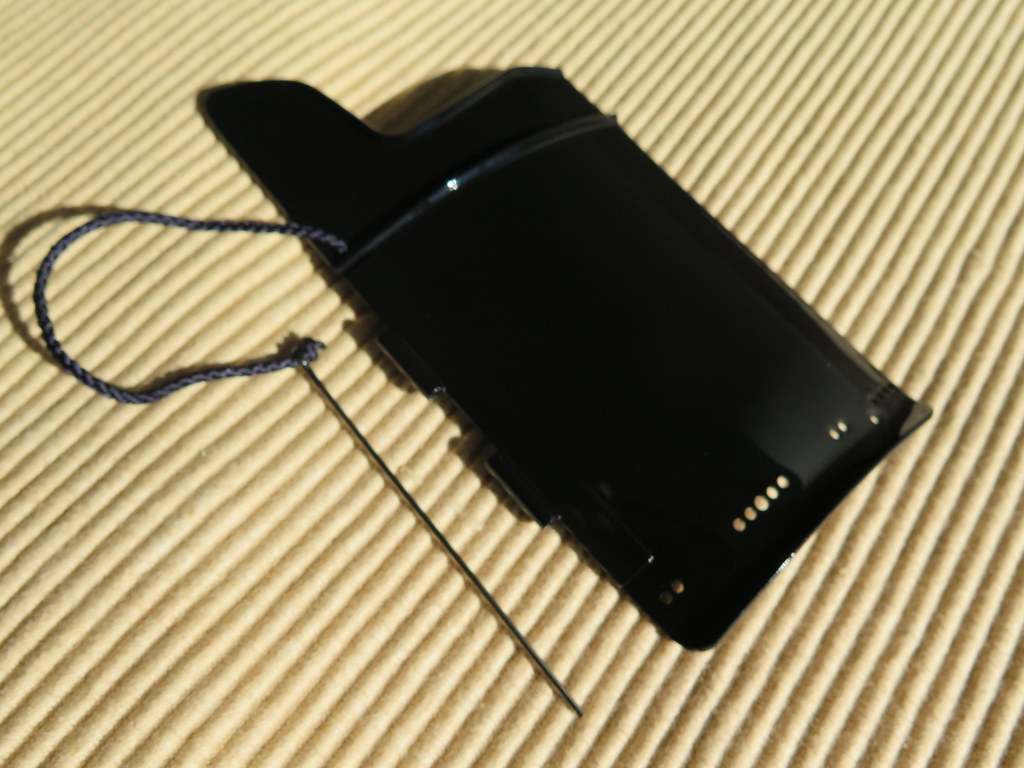 Shoulder Plates: Shoulder Plates:Both left and right shoulder plates were made up. The decorative knots of each one was really challenging to get right. I used a drop of CA glue instead of PVA glue. Doing the knots was the hardest part so far! 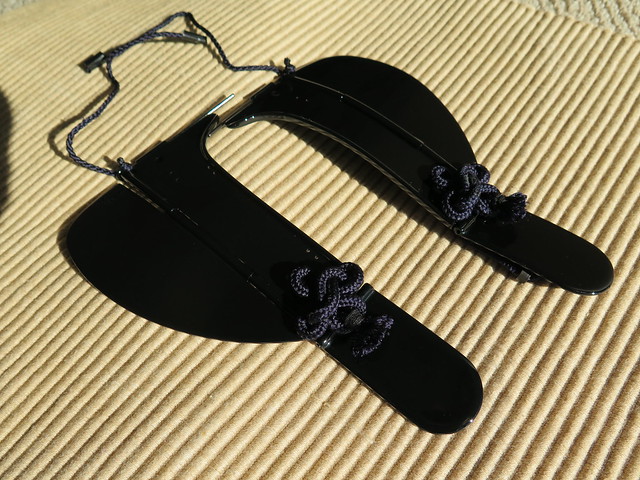 Wooden Stand: Wooden Stand:The wooden parts are very nice quality. I sanded a couple of the dowels for a better fit. I will leave the sanding, finishing and glueing until I’ve got all the wooden parts, then finish all of the parts at once and glue together.  The question for this month is: Could women be Samurai?That’s it for this month. Cheers, Gord. Subscribed: Suzuki GSX 1300R Hayabusa In The Last Few Years Builds: DeAgostini Samurai Armour Kobayashi Kougei: 1/100 Horyuji Kondo, 1/100 Horyuji Inner Gate, 1/36 Muro-ji Five-Story Pagoda, Public Bath House of Showa, Model Shipyard: 1/72 Los Morrillos de Cabo Rojo Lighthouse. 1/72 Kermorvan Lighthouse Woody Joe: 1/150 Azuchi Castle. Building: Kobayashi Kougei: 1/100 Himeji Castle, 1/70 ji Kinkaku. Received but not started: Woody Joe 1/50 Ishiyamadera Pagoda
|
|
|
|
|
Hi Gord Nicely done those knots are a learning curve on there own but you still have a few more to do yet. One piece of advice about the stand if your going to permamently display the armour you may consider glueing it together but the stand was designed in real life to be colapseable so when the armour was packed away in its box the dismantled stand was wrapped in the cloth sheet that goes over the stand. Regards Andy Current builds:-C57,Zero, Lamborghini Countach, Caldercraft HMS Agamemnon,Robi,R2-D2, MFH Cobra .
|
|
|
Rank: Administration  Groups: Registered, Forum Support Team, Administrators, Global Forum Support Team, Moderator, Official Builds Joined: 09/11/2012 Posts: 7,928 Points: 22,964 Location: East midlands
|
Hi Gord, Superb start to a great kit. WTG Regards delboy271155 (Derek) COME BACK GUY FAWKES "YOUR COUNTRY NEEDS YOU"
|
|
|
|
|
Lovely neat and tidy work Gord... keep it going.... Regards Alan
|
|
|
Rank: Super-Elite Groups: Registered
Joined: 30/01/2013 Posts: 4,604 Points: 13,607 Location: Monmouthshire UK
|
Lovely work Gord, I'd quite fancy doing this one myself Steve
|
|
|
Rank: Semi-Pro Level 2 Groups: Registered
Joined: 30/11/2014 Posts: 86 Points: 267 Location: Vancouver, BC
|
Hi Andy. Thanks so much for the advice, I had no idea! I was very close to sanding and glueing too! Cheers, Gord. arpurchase wrote: Hi Gord Nicely done those knots are a learning curve on there own but you still have a few more to do yet. One piece of advice about the stand if your going to permamently display the armour you may consider glueing it together but the stand was designed in real life to be colapseable so when the armour was packed away in its box the dismantled stand was wrapped in the cloth sheet that goes over the stand. Regards Andy Subscribed: Suzuki GSX 1300R Hayabusa In The Last Few Years Builds: DeAgostini Samurai Armour Kobayashi Kougei: 1/100 Horyuji Kondo, 1/100 Horyuji Inner Gate, 1/36 Muro-ji Five-Story Pagoda, Public Bath House of Showa, Model Shipyard: 1/72 Los Morrillos de Cabo Rojo Lighthouse. 1/72 Kermorvan Lighthouse Woody Joe: 1/150 Azuchi Castle. Building: Kobayashi Kougei: 1/100 Himeji Castle, 1/70 ji Kinkaku. Received but not started: Woody Joe 1/50 Ishiyamadera Pagoda
|
|
|
Rank: Semi-Pro Level 2 Groups: Registered
Joined: 30/11/2014 Posts: 86 Points: 267 Location: Vancouver, BC
|
Welcome to Pack 4 of 12.
First off, thanks to all who stopped by to check things out and to those that commented!
In the previous post was the following question:
Could women be Samurai?
Samurai could be female. Samurai status was inherited by all descendants (male and female) of samurai, and women samurai were expected to fight fiercely to protect their village/town while the men had left.
Now, on to Pack 4.
More Tasset Plates and the Cuirass:
The fourth tasset plate which was started last month was finished this month and laced to the cuirass side. A start on the fifth tasset plate was also done this month.
Neck Guard:
Plate three of the neck guard was laced to the second neck guard plate from last month. Again, this was tricky to get even with the correct spacing.
Cuirass Back Side:
Two cuirass plates for the back of the outfit were glued using CA glue.
The Helmet:
Three cast metal loops have been added to the underside of the helmet with screws.
Wooden Stand:
The wooden parts are very nice quality. More wooden parts have been added to the stand. I think this is it for parts for the stand. Should any pieces be glued together?
Cuirass Decorative Knots:
Two more decorative knots were made up for the top of the front Cuirass. These are very challenging to do! I hope thats it for these decorative knots?!?
The question for this month is:
Which of the four subjects was not part of Samurai cultural and artistic endeavors?
1. Calligraphy
2. Literature
3. Mosquito Hunting
4. Flower Arranging
That’s it for this month, cheers, Gord.Subscribed: Suzuki GSX 1300R Hayabusa In The Last Few Years Builds: DeAgostini Samurai Armour Kobayashi Kougei: 1/100 Horyuji Kondo, 1/100 Horyuji Inner Gate, 1/36 Muro-ji Five-Story Pagoda, Public Bath House of Showa, Model Shipyard: 1/72 Los Morrillos de Cabo Rojo Lighthouse. 1/72 Kermorvan Lighthouse Woody Joe: 1/150 Azuchi Castle. Building: Kobayashi Kougei: 1/100 Himeji Castle, 1/70 ji Kinkaku. Received but not started: Woody Joe 1/50 Ishiyamadera Pagoda
|
|
|
Rank: Super-Elite Groups: Registered
Joined: 27/01/2014 Posts: 5,060 Points: 14,980
|
Thats looking very nice Gord, your lacing looks great, I expect it can be quite tricky to get it looking that neat.
With regards to the stand I would say some of the parts are glued as the official build diary says to only glue where it tells you. Having not build this myself I cant advice anymore on the gluing, sorry.
|
|
|
|
|
Hi Gord As for the stand there should be two more parts that fit horizontally into the the lower two uprights where the holes are towards the top these are around 10 cm long and again as previously mentioned should not be glued in place. these two rods hold the breast plate in the correct position when the armour is positioned on the stand [ I have used your posted picture to illistrate the two holes mentioned]. As for the knots there not over yet there are several smaller knots of the same type to be made on the guantelets but after doing the larger ones these although challenging can be completed. Well done on your progress so far. As for your question I suspect its mosquito hunting. Regards Andy arpurchase attached the following image(s): Current builds:-C57,Zero, Lamborghini Countach, Caldercraft HMS Agamemnon,Robi,R2-D2, MFH Cobra .
|
|
|
|
Guest
|
 US
US

