|
|
 Rank: Beginner Level 3  Groups: Registered
Joined: 03/07/2014 Posts: 27 Points: 71 Location: Baltimore, MD USA
|
Looks fantastic! Two questions: What did you end up using to secure the radiator coolant lines you added to the monococque? And, what does your coolant overflow hose hook to on the front of the engine? I was planning on adding these too. Thanks!
|
|
|
 Rank: Pro  Groups: Registered
Joined: 01/12/2014 Posts: 102 Points: 312 Location: Chicago, IL
|
SARON81 wrote:Looks fantastic! Two questions: What did you end up using to secure the radiator coolant lines you added to the monococque? And, what does your coolant overflow hose hook to on the front of the engine? I was planning on adding these too. Thanks! Hello,
-For the coolant lines, I used 24 gauge black bead wire. You can find this in any craft store (used to make jewelry etc).
-For the overflow house, I had to supply my own hose because the model only gives enough to go up half way (not sure why they did that?). I connected the two overflow hoses with shrink tubing. I connected it to the water inlet pipe (see Stage 60). I'm not sure if this is correct but if not, I took my liberties here.
Here's the real thing and mine; you can use this as reference: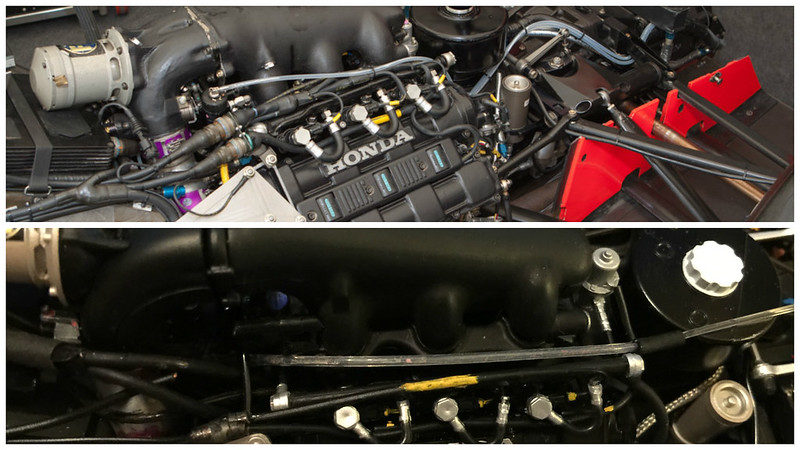
|
|
|
Rank: Beginner Level 3 Groups: Registered
Joined: 03/07/2014 Posts: 27 Points: 71 Location: Baltimore, MD USA
|
Thank you very much!
Again, it came out fantastic!
|
|
|
Rank: Pro Groups: Registered
Joined: 01/12/2014 Posts: 102 Points: 312 Location: Chicago, IL
|
I scratch built the linkage and throttle cable (I think that's what it is?):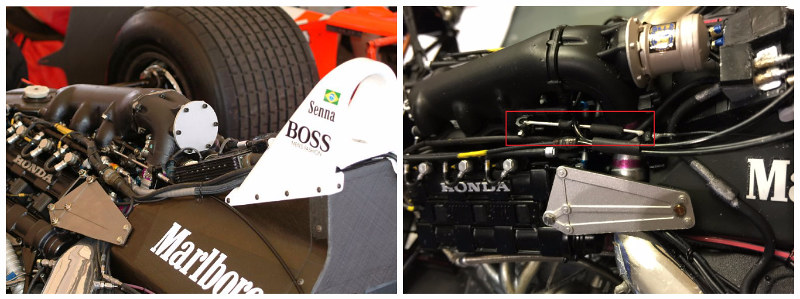
|
|
|
Rank: Beginner Level 2 Groups: Registered
Joined: 24/02/2016 Posts: 13 Points: 39 Location: Kuwait
|
NSXKid wrote:I drilled out the rear light housing to add a real LED.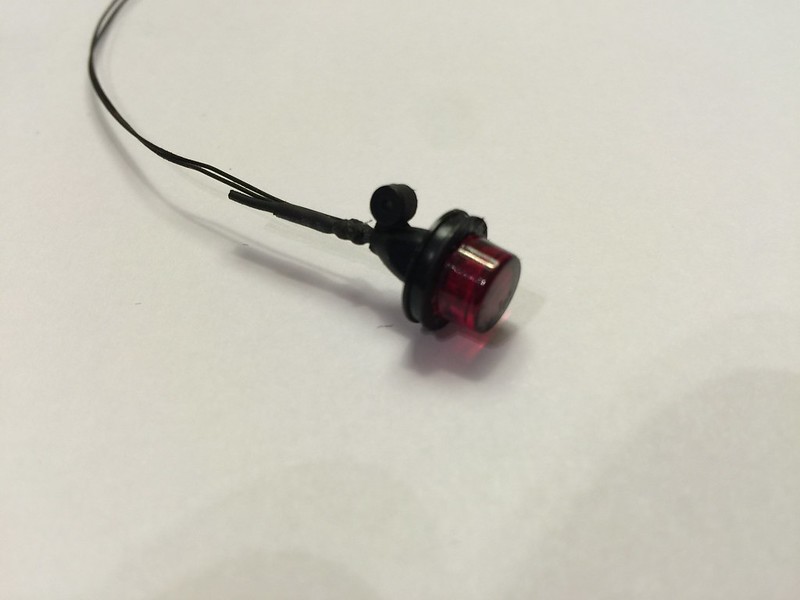 Jim, Do you have any details on the brake light? How did you wire and hide it? Jason
|
|
|
Rank: Pro Groups: Registered
Joined: 01/12/2014 Posts: 102 Points: 312 Location: Chicago, IL
|
Jason,
I put the battery snap & switch inside the monocoque. The model is big so there is so much room. I ran the wire along the right side of the engine through the firewall. I've added so much additional wiring to the model so it runs along with the other wires/hoses. I drilled out a hole on the bottom plate for the switch to go through to turn the light on/off.
The LED light is 1.8mm. Here is a video so you can see the light in action:https://www.youtube.com/watch?v=JNaXns7tnBM
|
|
|
Rank: Beginner Level 2 Groups: Registered
Joined: 24/02/2016 Posts: 13 Points: 39 Location: Kuwait
|
[quote=NSXKid]
Jason,
I put the battery snap & switch inside the monocoque. The model is big so there is so much room. I ran the wire along the right side of the engine through the firewall. I've added so much additional wiring to the model so it runs along with the other wires/hoses. I drilled out a hole on the bottom plate for the switch to go through to turn the light on/off.
The LED light is 1.8mm. Here is a video so you can see the light in action:https://www.youtube.com/watch?v=JNaXns7tnBM[/quote] That's awesome work! I have never fiddled with LED's. Do you have a link to where you sourced all the components? Also, After applying the decals to the tires. Did you do any prep to the surface first? And did you use a clear coat to protect them after? Thanks for the help. Sorry for all the questions. I'm just really nervous about start my build next week. Jason
|
|
|
Rank: Pro Groups: Registered
Joined: 01/12/2014 Posts: 102 Points: 312 Location: Chicago, IL
|
You can source a little flashing light just from just about anywhere. I bought it from a model train supply merchant.
I ordered one flashing LED, 1.8mm in white with a 'normal' flash rate. Get a wire length of at least 14". You will also need a battery snap-switch.
http://www.modeltrainsoftware.com/dcflasher.html
http://www.modeltrainsoftware.com/snco.html
As far as applying decals to the tires, I did no prep nor I used clear coat. Some of the number decals came off that are on the surface (not on the sidewall) from handling during final assembly so I bought some replacement decals to fix (still yet to apply).
The tires were a lot of work since I sanded the tires to get rid of the glossy finish. I also had to use nail polish remover (non-acetone type) to remove the stock GoodYear lettering. Then I had to mask each tire and use the stencil to spray on the GoodYear lettering. It takes several coats...
|
|
|
 Rank: Super-Elite       Groups: Registered
Joined: 31/05/2010 Posts: 5,679 Points: 17,011 Location: Wiltshire
|
Little additions like the light make such a BIG difference to a build. It looks brilliant - well done Happy Modelling
BUILDING: Hachette Spitfire Mk 1A, Constructo Mayflower
SUBSCRIPTION COMPLETE (Awaiting building): USS Constitution, Sovereign of the Seas, 1:200 Bismarck (Hachette)
COMPLETED: Porsche 911, E-Type Jaguar, Lam Countach
|
|
|
 Rank: Vice-Master  Groups: Registered
Joined: 05/04/2016 Posts: 705 Points: 2,118 Location: Ferrara
|
NSXKid wrote:Added foil to simulate when they used to wrap (to insulate?) the brake lines: Hi Jim, i have a question. Many people remade the brakes hose with braided wire, but on mfh book i saw the the brakes hose are black wrapped with allumium sheath. I see this mod on your build. Did you used allumium tape to make this? frah2o attached the following image(s): Collection active: Lotus 97T, Audi Quattro A2, Vw Maggiolino '60
Work in progress: Porsche 911 RS Turbo
Completed model: Delta WRC Martini, Mclaren MP4/4, Golf GTI 1/8 Tuned
|
|
|
Rank: Pro Groups: Registered
Joined: 01/12/2014 Posts: 102 Points: 312 Location: Chicago, IL
|
Hi Frah2o,
For the brake hoses, I bought a sheet of Bare-Metal foil.
https://www.amazon.com/C...-Adhesive/dp/B00DR26YYO
Jim
|
|
|
Rank: Vice-Master Groups: Registered
Joined: 05/04/2016 Posts: 705 Points: 2,118 Location: Ferrara
|
Thanks very much  Collection active: Lotus 97T, Audi Quattro A2, Vw Maggiolino '60
Work in progress: Porsche 911 RS Turbo
Completed model: Delta WRC Martini, Mclaren MP4/4, Golf GTI 1/8 Tuned
|
|
|
Rank: Vice-Master Groups: Registered
Joined: 05/04/2016 Posts: 705 Points: 2,118 Location: Ferrara
|
NSXKid wrote:I think these are all the sizes you need for the front and rear suspension area:
1.4mm x 4mm
1.4mm x 6mm
1.4mm x 8mm
1.4mm x 10mm
1.6mm x 6mm
2mm x 6mm
I sourced them from Scale Hardware. I bought the 1.4mm x 10mm from Autograph as Scale Hardware does not carry that size. The two sizes I could not find were the 1.4x4 and 2x6. The worse case scenario is cutting down the bolt a few mm (I bought the 2x8 from Scale, etc). I actually did find a site that has the 2mmx6mm but the site is not in English so I'll see if the 2x8 will work.
I think I forgot about some smaller sizes I may need for the front wing and possibly doing the side pod bolts by the radiators so I'll have to evaluate further. I Jim, sorry for another question. I decided to bought the bolts that you mentioned in this post. My question is about the tool to screw these bolts. Does exist any right tool for these or must use a nipper? Thanks in advice Collection active: Lotus 97T, Audi Quattro A2, Vw Maggiolino '60
Work in progress: Porsche 911 RS Turbo
Completed model: Delta WRC Martini, Mclaren MP4/4, Golf GTI 1/8 Tuned
|
|
|
Rank: Pro Groups: Registered
Joined: 01/12/2014 Posts: 102 Points: 312 Location: Chicago, IL
|
frah2o wrote:
I Jim, sorry for another question.
I decided to bought the bolts that you mentioned in this post.
My question is about the tool to screw these bolts. Does exist any right tool for these or must use a nipper?
Thanks in advice
I had to buy a nut driver set. This is why it's an expensive hobby, lol. I bought these German made ones:https://www.amazon.com/g...5_s00?ie=UTF8&psc=1
|
|
|
Rank: Vice-Master Groups: Registered
Joined: 05/04/2016 Posts: 705 Points: 2,118 Location: Ferrara
|
NSXKid wrote:frah2o wrote:
I Jim, sorry for another question.
I decided to bought the bolts that you mentioned in this post.
My question is about the tool to screw these bolts. Does exist any right tool for these or must use a nipper?
Thanks in advice
I had to buy a nut driver set. This is why it's an expensive hobby, lol. I bought these German made ones:https://www.amazon.com/g...5_s00?ie=UTF8&psc=1
Thanks to much for the tip and link.  Collection active: Lotus 97T, Audi Quattro A2, Vw Maggiolino '60
Work in progress: Porsche 911 RS Turbo
Completed model: Delta WRC Martini, Mclaren MP4/4, Golf GTI 1/8 Tuned
|
|
|
Rank: Beginner Level 1 Groups: Registered
Joined: 25/02/2018 Posts: 8 Points: 24 Location: San Ramon
|
May I ask what the best technique is for scuffing the tires?
|
|
|
Rank: Pro Groups: Registered
Joined: 01/12/2014 Posts: 102 Points: 312 Location: Chicago, IL
|
Fhan wrote:May I ask what the best technique is for scuffing the tires? You can use medium grit sandpaper.
|
|
|
Rank: Beginner Level 1 Groups: Registered
Joined: 25/02/2018 Posts: 8 Points: 24 Location: San Ramon
|
Hi Jim,
A question about the mini champs 1/8 helmet. Are the decals on them water slide decals that can easily be removed? I ask because it’s dam near impossible to find this one anymore. All the other seasons are available but not the right be you have. I was thinking about getting one of the other seasons and concert it using the museum collection decals. This would only work though if I can remove he other decals. Thanks for your time
|
|
|
Rank: Pro Groups: Registered
Joined: 01/12/2014 Posts: 102 Points: 312 Location: Chicago, IL
|
Fhan wrote:Hi Jim,
A question about the mini champs 1/8 helmet. Are the decals on them water slide decals that can easily be removed? I ask because it’s dam near impossible to find this one anymore. All the other seasons are available but not the right be you have. I was thinking about getting one of the other seasons and concert it using the museum collection decals. This would only work though if I can remove he other decals. Thanks for your time I have to double check (I just moved and my helmet is packed in a box still) but I think the decal on the visor is the only one you can probably remove. Everything else is pad printed onto the helmet.
|
|
|
Rank: Beginner Level 1 Groups: Registered
Joined: 25/02/2018 Posts: 8 Points: 24 Location: San Ramon
|
NSXKid wrote:Fhan wrote:Hi Jim,
A question about the mini champs 1/8 helmet. Are the decals on them water slide decals that can easily be removed? I ask because it’s dam near impossible to find this one anymore. All the other seasons are available but not the right be you have. I was thinking about getting one of the other seasons and concert it using the museum collection decals. This would only work though if I can remove he other decals. Thanks for your time I have to double check (I just moved and my helmet is packed in a box still) but I think the decal on the visor is the only one you can probably remove. Everything else is pad printed onto the helmet. Damn, thanks for the info. Saved me from wasting $40. I might have to spring for the overpriced cersion
|
|
|
|
Guest
|
 US
US

