|
|
 Rank: Amateur level 2  Groups: Registered
Joined: 04/01/2015 Posts: 44 Points: 108
|
Hi, Sorry to be a nudge but I have a question about the placement of the starboard Stern Side Wall. Some adjustment is needed and as I don't have any reference yet of future steps, I want to be sure I make the adjustments correctly so as to not adversely effect future steps. The arrow in the following picture is pointing to the rear most notch on the side wall. I assume the top of the notch sits on the frame and as the right side overlaps the frame, it needs to be trimmed to fit. Even though it is a good amount.  As you can see in the next pic, the side wall needs to be seriously bent to fit the frames. I assume this is correct. 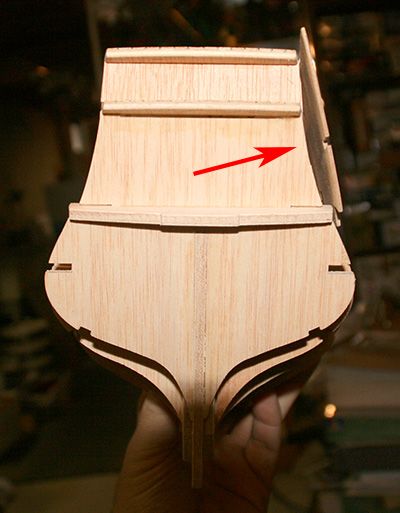 Here is a top view of this rear deck area. 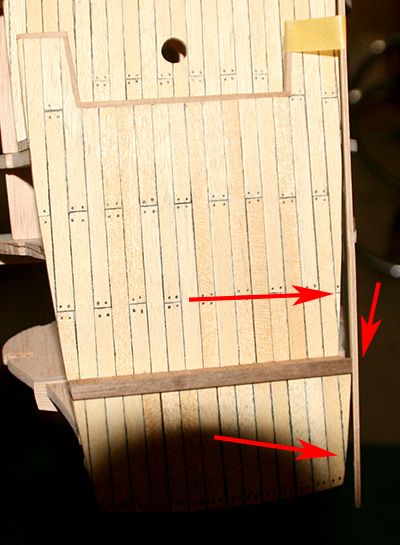 The arrows pointing to the right are highlighting gaps caused by the frame. It seems the top most deck, the poop deck(?) is causing the majority of this gap. Should it be sanded more inline to make the curvature of the side wall more gentle? Also the right most arrow that is pointing down is highlighting the edge of the poop deck. Where the side wall meets this area, the side wall is just a bit higher. Is this correct? This is the placement when everything on the side wall lines up with the frames. Your help is greatly appreciated, Steve
|
|
|
|
|
Hi Steve, I can't give definitive answers on this as I haven't started building this kit yet. What I would say is take a good look at Mr T's Official build, issue 24, this does show how the side panels should sit as looking from the side. I would also recommend you take a close look at the first page of Karl's diary, again this gives some excellent views of the stern area....  .. . It's not much but hopefully will give you a clearer picture.....  Regards Alan
|
|
|
Rank: Amateur level 2 Groups: Registered
Joined: 04/01/2015 Posts: 44 Points: 108
|
Hi Alan,
Thanks, I've looked over the build and while it does give me some idea where to go, it also causes me to ask another question.
When I line up the side wall on all of the notches like in the build, I have the problem illustrated in my first pic. Although, all of the notches on the side wall don't sit all of the way down on the frames as shown in the build. If they did, the side wall would be lower then the first pic. Thing is, if I line everything up with the back notch, the top of the frame sits even or a bit lower then the top deck. The build shows it is a bit higher then the deck. However, if I line the side wall up like in is in the build there is a lot of space on the top of that back notch. The arrow is pointing to this notch in the first pic. There is no space there now but there will be one if I were to move the side wall up a bit so it is higher then the top most deck.
Can't win. lol
Steve
|
|
|
Rank: Amateur level 2 Groups: Registered
Joined: 04/01/2015 Posts: 44 Points: 108
|
I think I found the problem. I took the side wall from step 19 that shows it on the starboard side and switched it with the side wall from step 20 that goes on the port side. They both fit pretty well when switched. Seems I may have had a packaging issue. Other then some minor fitting, it looks like they will both fit now.
I'll move on and see how it goes.
Thanks,
Steve
|
|
|
 Rank: Pro Groups: Joined: 24/08/2009 Posts: 48,827 Points: -13,348
|
Re your photo #2 - correct, you need to bend the panel to match the curve of the ribs.
Best to need to pin it, then either remove the pins or sand the heads flat. They won't be visble when the second skin veneer planking is fitted.
|
|
|
|
Guest
|
 US
US

