|
|
 Rank: Vice-Master   Groups: Registered
Joined: 05/03/2015 Posts: 561 Points: 1,713 Location: South Carolina
|
Ok folks... time to add a new update to my build. I've been getting alot of questions about my new corridor sconce light sets on Shapeways. I made them because all the offerings so far (PE/SW) have all been too large! You should be able to fit 5 lights per large cushion. All the offerings so far you can only fit 3-4. That don't cut it for my OCD! 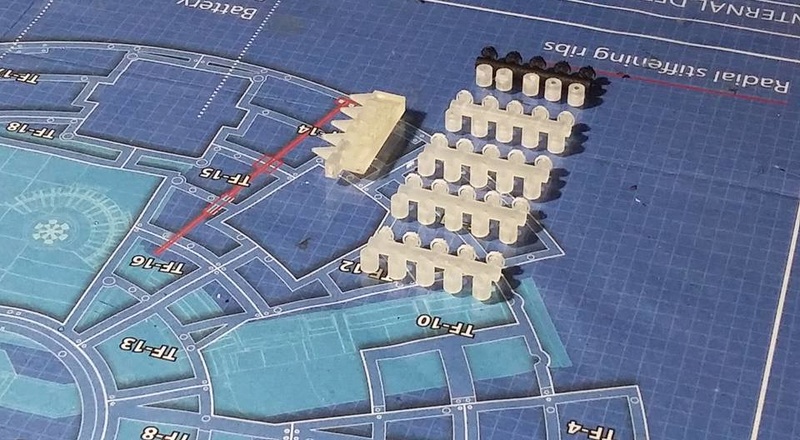 They both (the ESB and ANH versions) come with this little tool I designed called the Drill Guide. 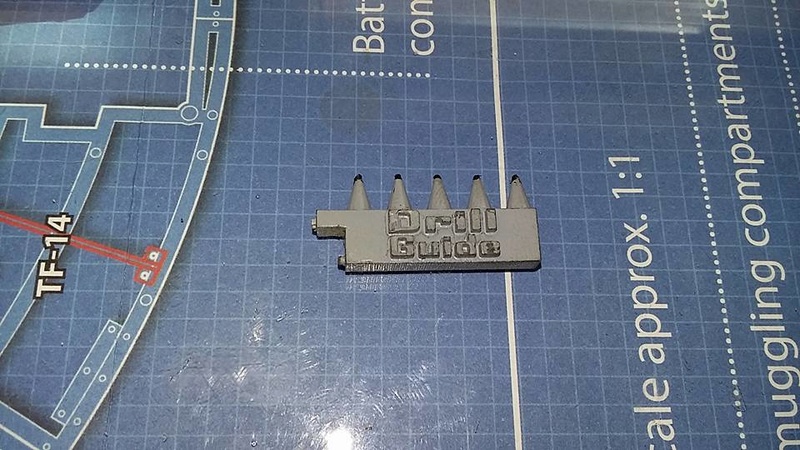 But yet, no one can figure out how to use it. I painted it with primer so it's easy to see... It's really simple to use... here's how: First things first, identify the top of each cushion that needs a light on it. On the back mark the top position so you don't forget. Then, take the edge of my tool and place it on the top edge as shown and push it against the surface of the cushion. Rub it back and forth creating a very light mark on the plastic (not so hard it does damage, and not so light you can't see it). You can prepaint the cushion whatever color you want and it'll make the marking a bit easier as well...  Next, dip the pointed marker ends in a little bit of paint (doesn't really matter what kind, I like to use watercolor or arcylic paint here because it can be removed easily if I make a mistake. 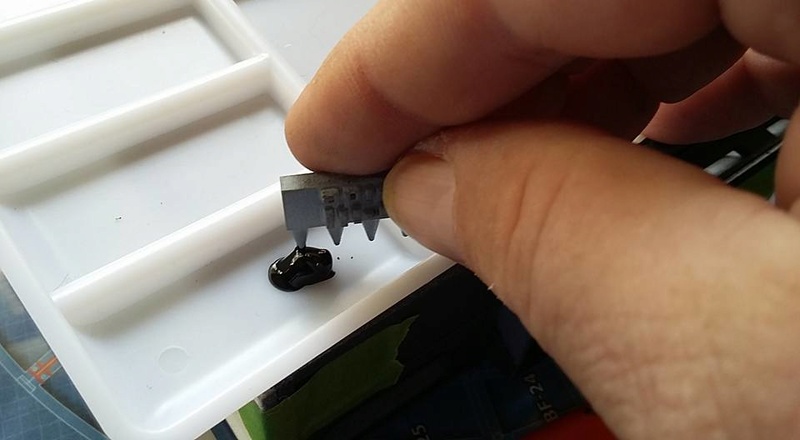 Next, touch the painted tips to the surface along the line you "rubbed" into the cushion previously. Just a dot of paint is all you need. These will be the drill points where you will drill a hole. 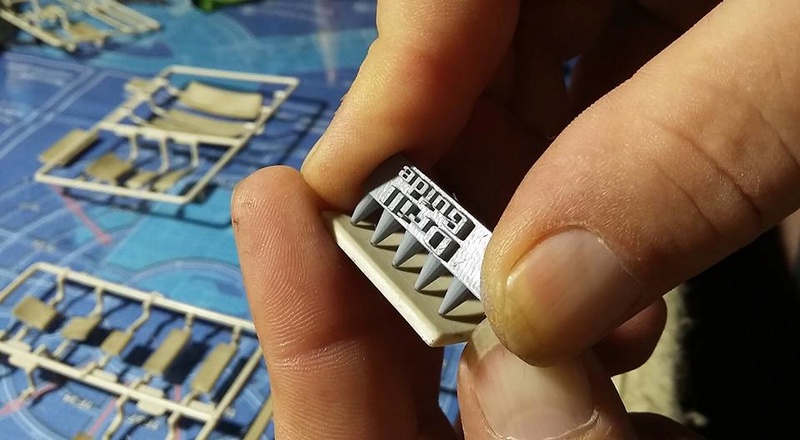 Some have worried about how it will work with the convex or concave cushions, well never fear, just by tilting it sideways you can still get a good point mark on those cushions easily as you can see below! Convex Cushion: 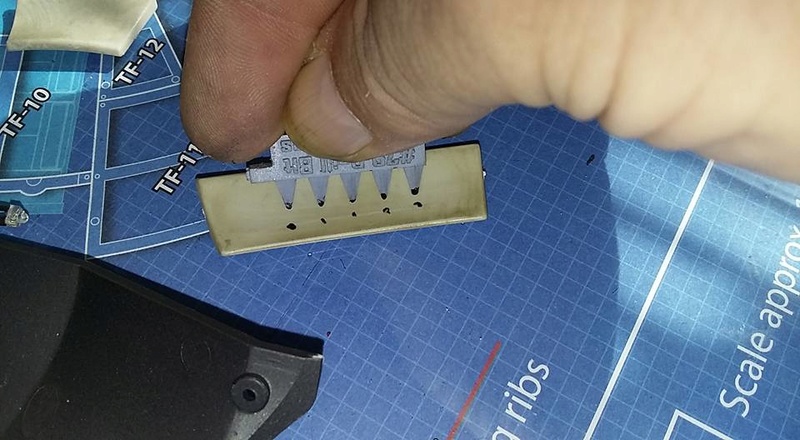 Concave Cushion:  You should now have perfectly spaced dots on each cushion. 5 for the large cushions (try to center them as best you can), 3-4 for the medium cushions and only 1 for the small ones. Now, you want to prepare your holes for drilling, so, take a sharp hobby knife and prep your drill holes. You don't want to make these too big, just large enough to give the drill bit something to grab onto as you start drilling your holes. Make the starter holes for each pin point marking you made earlier. Try to be as precise as possible in this step. If you move off the first line you made it'll show later. 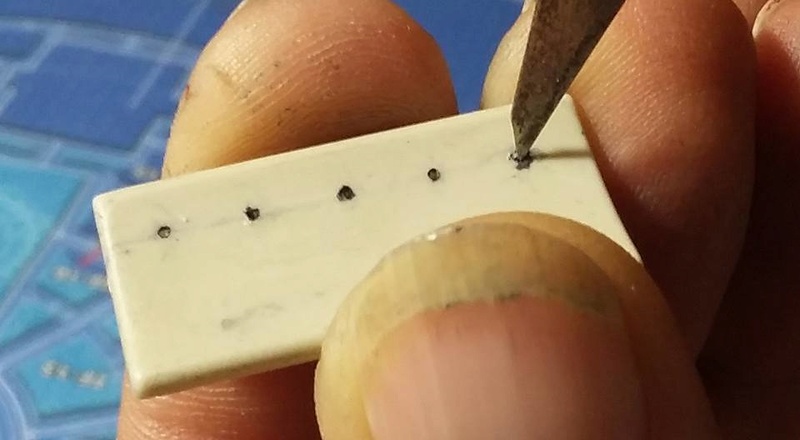 Next you want to take a small drill bit (here I got a 1/16th) and begin drilling the holes in each cushion where you made your marking starter holes.  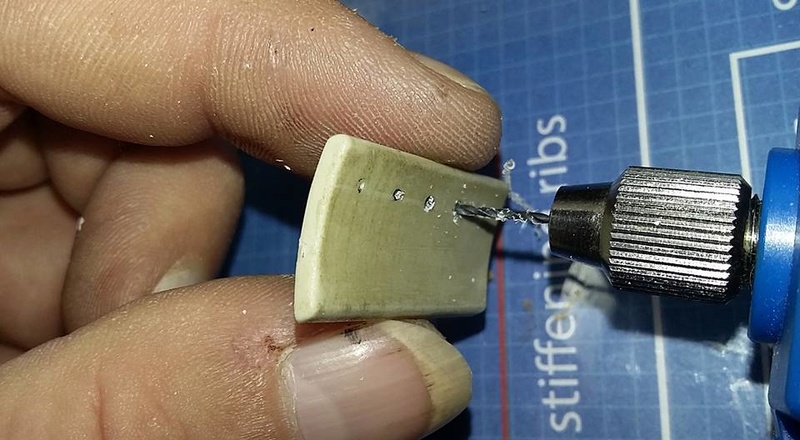 Now that you got all your small holes drilled, you have 2 options here. #1 you can begin gluing and drilling the large holes all the way thru both the cushion and the corridor parts or #2 you can set the part on the corridor and using the small holes drill thru the corridor. I chose the second option here because my larger drill isn't very delicate, so I have to be careful when I drill with it. 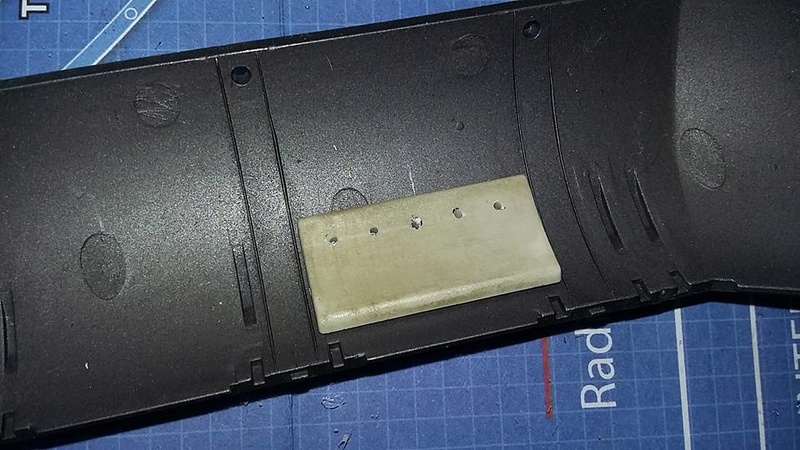 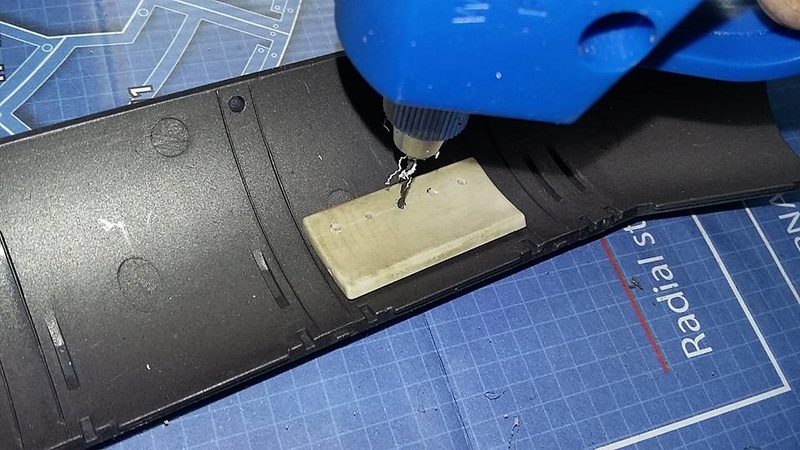 The drill bit to use for my corridor lights will be a 5/16th inch or 3.8mm bit. 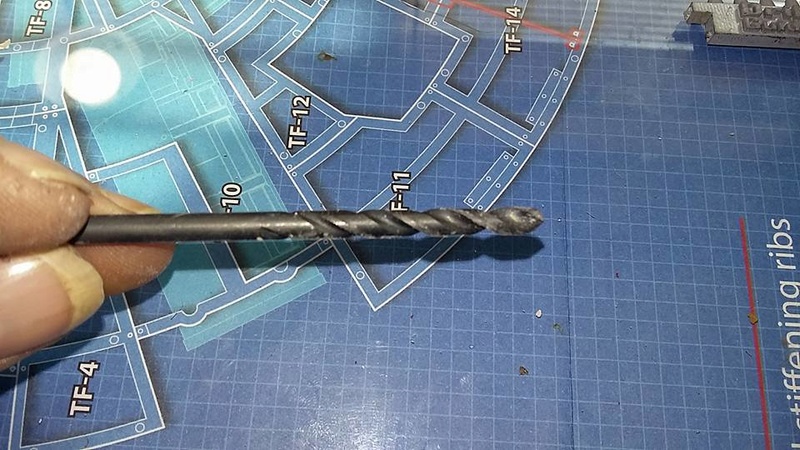 Yes I know, an extra step! LOL 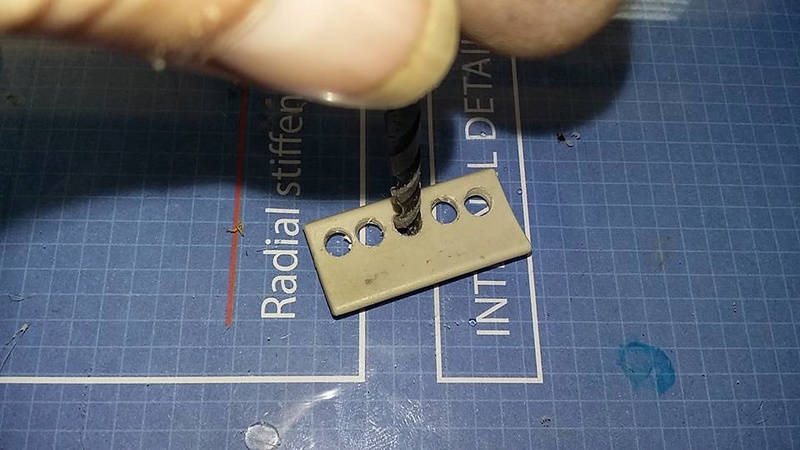 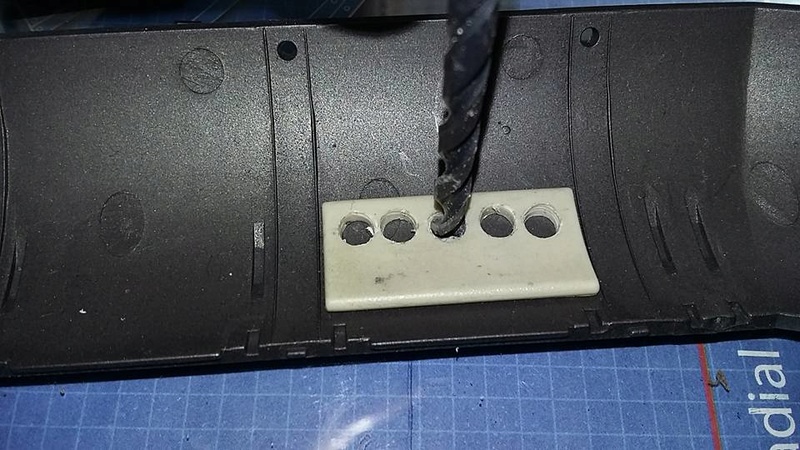 Now that all the holes are drilled you're ready to install the lights. Hope this helps and enjoy! :) 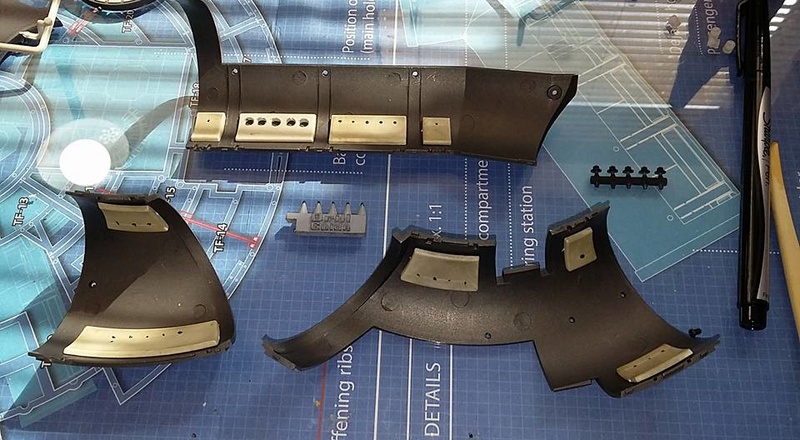
|
|
|
 Rank: Master    Groups: Registered
Joined: 07/07/2015 Posts: 1,292 Points: 3,928 Location: Allentown PA
|
That is freaking awesome. I haven't looked at upgrade parts in while since my build is on hold. I wanted to do light but was gonna skip because of the drilling multiple holes. This tool you made takes away that worry so I think I will now do this mode. Thanks for doing such awesome work, it lets us less skilled individuals build nicer kits.
DeAgostini kit builds:
Millennium Falcon: 18% Complete
Shelby GT-500: 28% Complete
Thunderbird 2: 13.75% Complete
|
|
|
|
|
Saw those on the shapeways site, whilst looking at your models, great idea. I've just finished the gunners tunnel you did, this evening. Looks great with the light in, just hope you will be able to see it well once put together.
|
|
|
Rank: Vice-Master Groups: Registered
Joined: 05/03/2015 Posts: 561 Points: 1,713 Location: South Carolina
|
Metal Mech wrote:That is freaking awesome. I haven't looked at upgrade parts in while since my build is on hold. I wanted to do light but was gonna skip because of the drilling multiple holes. This tool you made takes away that worry so I think I will now do this mode. Thanks for doing such awesome work, it lets us less skilled individuals build nicer kits. Thank you so much for that bro! I try to think what would make things easier for myself and go from there. Takes alot of the measuring and guess work out of the equation when you got a little tool like this!
|
|
|
Rank: Vice-Master Groups: Registered
Joined: 05/03/2015 Posts: 561 Points: 1,713 Location: South Carolina
|
Markwarren wrote:Saw those on the shapeways site, whilst looking at your models, great idea. I've just finished the gunners tunnel you did, this evening. Looks great with the light in, just hope you will be able to see it well once put together. I've got my tunnel all painted myself just not glued together yet. I got the ABS one with the resin ladder. That thing is seriously thin but looks so good when it's attached! Thanks for that bro! I've got a few other little ideas in the works as well.
|
|
|
 Rank: Amateur level 2 Groups: Registered
Joined: 29/09/2015 Posts: 41 Points: 123 Location: USA
|
I saw your hall wall sconces on shapeways and was like heck ya! They look awesome and thanks for making them the correct size. I have added them to my future upgrades parts list, lol.
|
|
|
Rank: Vice-Master Groups: Registered
Joined: 05/03/2015 Posts: 561 Points: 1,713 Location: South Carolina
|
bwize wrote:I saw your hall wall sconces on shapeways and was like heck ya! They look awesome and thanks for making them the correct size. I have added them to my future upgrades parts list, lol. Thanks bro! I may end up adding 5 more to the set to make sure that if you wanna do all 28 lights or just the ones that are seen. Only 24 are actually seen from the open areas. There are 6 that aren't seen very well but will still throw light around. I dunno... whatcha think?
|
|
|
 Rank: Semi-Pro Level 2 Groups: Registered
Joined: 04/09/2015 Posts: 92 Points: 256 Location: Atlantis
|
Always enjoy your posts and terrific innovations LS! In the process of playing catch up with my build but good to see you moving forward so well. What will he think of next?
|
|
|
Rank: Vice-Master Groups: Registered
Joined: 05/03/2015 Posts: 561 Points: 1,713 Location: South Carolina
|
Moonman wrote:Always enjoy your posts and terrific innovations LS! In the process of playing catch up with my build but good to see you moving forward so well. What will he think of next? In the words of the immortal Eric Idle "No one expects the Spanish Inquisition! Bwuhahahahahaha!" Stay tuned to my shop to see what I come up with next. Got some things that are waiting for more issues before I release them due to wanting to get accurate measurements. But I'm sure they'll be epic! Thanks for the cudos my friend! :)
|
|
|
Rank: Amateur level 2 Groups: Registered
Joined: 29/09/2015 Posts: 41 Points: 123 Location: USA
|
LrdSatyr8 wrote:bwize wrote:I saw your hall wall sconces on shapeways and was like heck ya! They look awesome and thanks for making them the correct size. I have added them to my future upgrades parts list, lol. Thanks bro! I may end up adding 5 more to the set to make sure that if you wanna do all 28 lights or just the ones that are seen. Only 24 are actually seen from the open areas. There are 6 that aren't seen very well but will still throw light around. I dunno... whatcha think? Hmmm... interesting. Honestly I have never counted them all. Can you elaborate on the 4-6 that aren't seen very well. Where would they be installed?
|
|
|
Rank: Vice-Master Groups: Registered
Joined: 05/03/2015 Posts: 561 Points: 1,713 Location: South Carolina
|
bwize wrote:LrdSatyr8 wrote:bwize wrote:I saw your hall wall sconces on shapeways and was like heck ya! They look awesome and thanks for making them the correct size. I have added them to my future upgrades parts list, lol. Thanks bro! I may end up adding 5 more to the set to make sure that if you wanna do all 28 lights or just the ones that are seen. Only 24 are actually seen from the open areas. There are 6 that aren't seen very well but will still throw light around. I dunno... whatcha think? Hmmm... interesting. Honestly I have never counted them all. Can you elaborate on the 4-6 that aren't seen very well. Where would they be installed? There are 3 on the inner curve of the short hallway and 1-3 on the outer curve of the long hallway past the cockpit corridor. You really can't see them in the build once they are in place, but when they are lit, they still do throw light around.
|
|
|
Rank: Amateur level 2 Groups: Registered
Joined: 29/09/2015 Posts: 41 Points: 123 Location: USA
|
OH, OK I see. I say include them. I'm still not sure if I am going to add lights to the interior as I have no electrical/wiring experience and an additional control board would be required.
|
|
|
Rank: Vice-Master Groups: Registered
Joined: 05/03/2015 Posts: 561 Points: 1,713 Location: South Carolina
|
I've been sitting on these for awhile now... ever since the photos were released of the Japanese Prototype that came out a few months ago, and I was so hoping that DeAgo would be including them, but alas they aren't so I had to make some for my build. They are totally accurized to the movie and to the DeAgo. I painstaking made sure each of the actual bay doors looked exactly like the ones that come with the kit. But here they are, the opened Landing Bay Doors. What do you all think? 
|
|
|
|
|
Very nice piece of work there.... they look great....  Regards Alan
|
|
|
Rank: Semi-Pro Level 1 Groups: Registered
Joined: 09/07/2016 Posts: 59 Points: 181 Location: Biloxi, MS
|
I'm trying to envision how these go on. I see hooked tabs that I assume go into the falcon. Am I correct in assuming these don't simply swing open but have a false hinge on the larger section of each door. Some more detailed images would really help out here.
|
|
|
Rank: Vice-Master Groups: Registered
Joined: 05/03/2015 Posts: 561 Points: 1,713 Location: South Carolina
|
TheKraken wrote:I'm trying to envision how these go on. I see hooked tabs that I assume go into the falcon. Am I correct in assuming these don't simply swing open but have a false hinge on the larger section of each door. Some more detailed images would really help out here. That's really easy... here's a screen cap from the movie to show you where they go. They are above Chewie's head. Please note this is a image freely on the web. 
|
|
|
 Rank: Pro  Groups: Registered
Joined: 06/08/2015 Posts: 276 Points: 817 Location: Monrovia, Ca
|
I really like those Landing Bay Doors. Might be giving Shapeways another chunk of change. I think my model will be displayed with the landing gear down, so I will need to do something. Are you working on an engine grill or have you found one that you would recommend? Stephen Current Builds: HMS Sovereign of the Seas /// Lamborghini Countach /// Eaglemoss BTTF DeLorean
Finished Builds: Millennium Falcon
|
|
|
Rank: Vice-Master Groups: Registered
Joined: 05/03/2015 Posts: 561 Points: 1,713 Location: South Carolina
|
scraperjawa wrote:I really like those Landing Bay Doors. Might be giving Shapeways another chunk of change. I think my model will be displayed with the landing gear down, so I will need to do something. Are you working on an engine grill or have you found one that you would recommend?
I've been working on an entire engine area kit... a bunch of small parts to cover up those exposed lettering areas on the edges and the grill itself to make it appear more like an engine and not just a covered piece of plastic that has a grid on it. Give it a more beefy feel to it if you know what I mean.
|
|
|
Rank: Pro  Groups: Registered
Joined: 13/05/2016 Posts: 130 Points: 386 Location: Murrieta, CA (USA)
|
You know it is funny how differently you look at the Millennium Falcon in the movies when you are building the model. I find myself intently looking at details of the model in the movies. Make things as simple as possible but not simpler... - Albert Einstein
|
|
|
Rank: Vice-Master Groups: Registered
Joined: 05/03/2015 Posts: 561 Points: 1,713 Location: South Carolina
|
Bill-Devine wrote:You know it is funny how differently you look at the Millennium Falcon in the movies when you are building the model. I find myself intently looking at details of the model in the movies. I know... I keep finding new things all the time. For example, I didn't realize the wall behind the computer console in the lounge was actually bent slightly. There's alot of little details like that you spot when you're building that make this such a cool project! What's something that you've recently discovered you never realized before?
|
|
|
|
Guest
|
 US
US

