|
|
 Rank: Amateur level 2  Groups: Registered
Joined: 04/01/2015 Posts: 44 Points: 108
|
Hi, I have an issue with the first set of planking at the bow. What you see in the picture is my planking at the bow as of Step 29h. While I have the same number of rows planked as in the instructions, They may currently be a bit further up the keel then they should be but this is how things wound up, keeping the planks all butted up to each other. 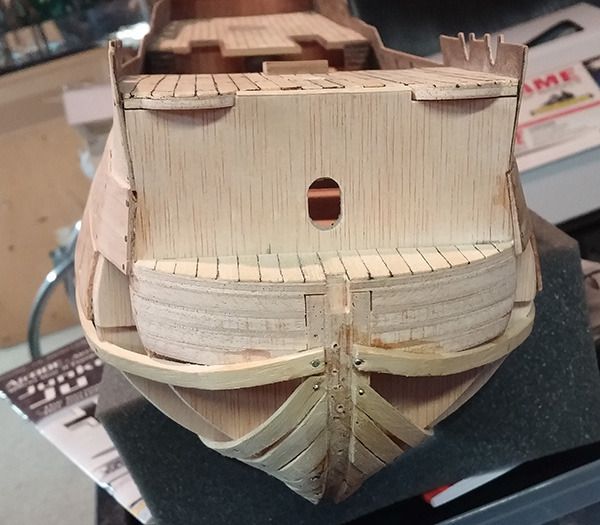 The plank in Step 29i is actually placed but you just can't see that in the picture. Step 29j is where my problem is about to occur. The plank in the step is supposed to go from Frame 6 to the Bow. My problem is where do I anchor the plank at the bow? As you can see there is no more room on the keel. This also leaves the question, where will further planks anchor too but I realize that may come up in the next pack. Any help would be greatly appreciated. Thanks, Steve
|
|
|
 Rank: Super-Elite       Groups: Registered
Joined: 30/01/2013 Posts: 4,604 Points: 13,607 Location: Monmouthshire UK
|
Hi Steve You have a couple of separate problems going on here. Firstly, the frames at the bow have not been fared enough to give the planks a greater surface area to lay on in order to give a smoother curve. The main problem though is that the bow planks are not tapered, if the 4 planks below the top one were tapered even by just a mm or two then there would be enough space left to terminate all the planks going forward. Could do with a few more pics of the sides and stern but for the bow corrections I think all the bow planks need to be removed to get those frames fared correctly. It's well worth getting this sorted now as it's the most important part of the build. Steve
|
|
|
|
|
I totaly agree with steve on his observadions and we could do wiyh a side view too May just be the photo but it also looks like the planks ate not butted up to each other at the point they reach the keel The main issue is now tapering if the planks Jase “Whenever you find yourself on the side of the majority, it is time to pause and reflect.”
-Mark Twain
|
|
|
Rank: Amateur level 2 Groups: Registered
Joined: 04/01/2015 Posts: 44 Points: 108
|
Thanks guys for the advice. Thing is, I really don't remember anywhere in the instructions being told to taper the plank at the bow. Wonder how I missed something so crucial, but honestly, I don't remember it ever being mentioned.
In regards to the fairing of the frames. There wasn't really a good reference as to how much they needed to be sanded. From the pictures, I anyway, really wasn't able to tell. I did the best I could and assumed the directions would go into more detail in a future issue but it didn't and I totally forgot to consider it again.
I'll get a photo of the side up pronto.
Steve
|
|
|
Rank: Amateur level 2 Groups: Registered
Joined: 04/01/2015 Posts: 44 Points: 108
|
I forgot to mention in the post, the space in the planks you see with the top row is due to the wedge shape space mentioned in the directions for the installation of that upper plank.
Steve
|
|
|
|
|
Hi Steve, I have to agree with Stevie and Jase here and think we need to take you back a few steps to get you back on track. Need also to see a few pics from various angles so we can fully appreciate the problems you have and to give you the best possible advice to put things right. Fairing of the hull correctly is one of the most critical parts of any build and you say you couldn't see clearly what was to be achieved in the build instructions. I think it would help you a great deal if you took time to read the beginners guide to planking, especially part 7 which covers fairing of the hull. Link is attached here. http://forum.model-space...aspx?g=posts&t=5669
Study the pics on Mr T's Official build on his faired hull and look closely again at the printed instructions. I think the first thing to do is to give us some pics from various angles and especially along the sides of the hull. Turn the hull upside down so we can see along the bottom of the hull. These pics are invaluable to make sure we take you along the correct path. Please also consider publishing a diary with pics along the way, this will also help us to help you keep on the correct path. Hope this helps. Regards Alan
|
|
|
Rank: Amateur level 2 Groups: Registered
Joined: 04/01/2015 Posts: 44 Points: 108
|
Hi Alan, I took some shots of the hull. Please let me know if you need any other shots or close ups of any area. With 30+ years of plastic building experience, I've been interested in trying my hand at wood ships for a while now. From what I saw, I thought Model Space would be a good way to build and learn at the same time. However, it seems I may be trying to climb Mt. Everest after just learning to walk. I was aware about tapering and what you are trying to accomplish. On the other hand, I have no idea how far to take it. After already taking things too far in another instance, I proceeded with no prior experience and only going by what I was able to glean from the instructions. Being mindful of the cost of this project and the extreme reluctance to have to basically start over if I screwed up the frames, I proceeded with extreme caution. Apparently too cautious and under did the process. I do have to say that with the likelihood of having to re-do the planking is pretty daunting. This isn't the first time I need to re-do something and had to wait about a month for replacement parts. I would need at least one package of replacement planking adding another month of waiting. In addition, my lack of knowledge in this endeavor will undoubtedly cause issues in future areas. A build diary sounds like a good idea and would certainly help greatly. The help you and your colleagues have been providing me is GREATLY appreciated and informative. I just worry about becoming an albatross to all of you. Thank You, Steve PS: Thank you for that link by the way. Very informative. Now I wish I had access to H. G. Wells. :-) 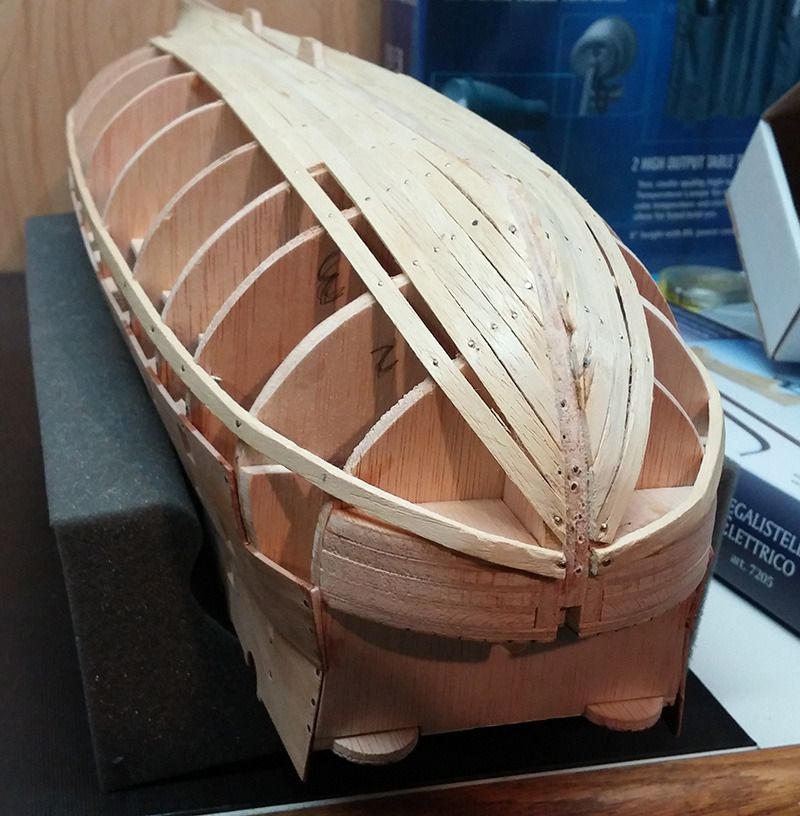 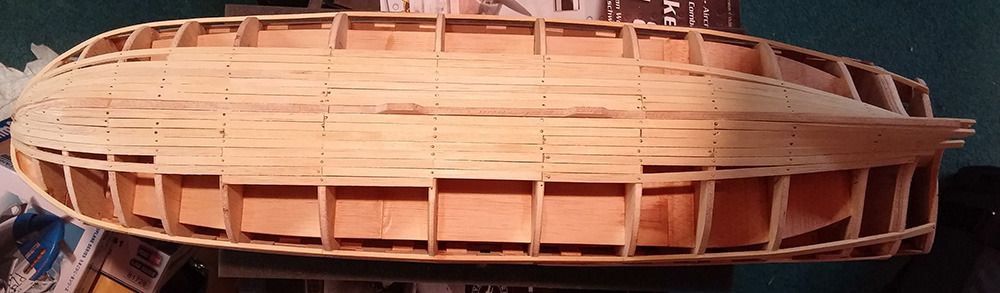 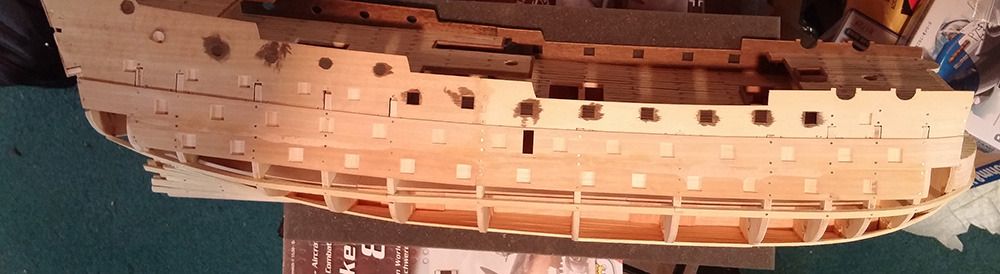 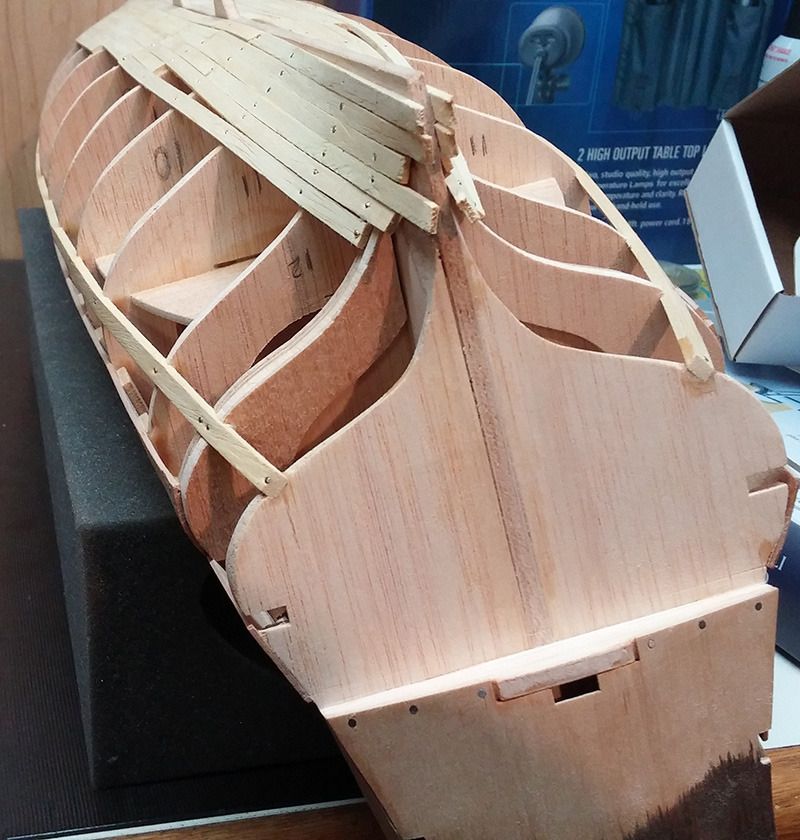
|
|
|
|
|
Hello. ok the pics help a lot. the good news, your forming the plank curve well. but you do need to correct some things. First you need to strip back the hull planking and fair the hull more at least from rib 10 back and the first three. you know when you had done enough because a strip of card will make the curve in contact with the full surface of the rib edge. once that is done you can relay the planking. you will need to chamfer the bow ones and possibly some of the stern ones to. this should be described in the instructions. if not there are plenty of examples in various build diaries on this forum. good luck Jase “Whenever you find yourself on the side of the majority, it is time to pause and reflect.”
-Mark Twain
|
|
|
Rank: Amateur level 2 Groups: Registered
Joined: 04/01/2015 Posts: 44 Points: 108
|
Hi Jase,
Guess I'll pull off those forward planks, do some reading and work on the frames. Got my fingers crossed I can salvage most of those planks. :-) I'll post pictures again before I re-plank. Like suggested, where should I post a build diary? Under this thread?
Thanks for the Help,
Steve
|
|
|
Rank: Amateur level 2 Groups: Registered
Joined: 04/01/2015 Posts: 44 Points: 108
|
Knowing what I know now and studying some shots of the bow from the official build, I see at least one of my problems. When I got to the keel at the bow, I bent the plank too far to match the previous plank. I did not need to put such a steep bend into the plank and should have let it lay more naturally. I think that whole problem may have started with the first planks that abut the keel. You are supposed to bend the plank over the keel and cut the overlap. I tried to follow the pictures but apparently I made the bend too steeply. As the first one was probably bad, I just increased my error as I worked my way up the bow. Are there any images of the completed bow I can see? The build diary hasn't got that far yet.
Since I am new to this, I am probably not seeing things that experience would tell me to notice. It can be frustrating. I can take some solace in that some Bourbon may help. Although, I suppose Rum would be more appropriate. :-)
Thanks,
Steve
|
|
|
|
|
Thanks Steve, the pics you have given are indeed a great help. Building ships from wood is a lot different to working with plastic and to be honest you are not doing a bad job. Here on the forum there are a lot of members who will readily help you to get to something you can be proud of, hence the reason for doing a diary, it helps us no end to keep you track. Don't worry about becoming an albatross to us all, you are part of the most helpful forum there is on the net.... Now onto your build.
As Jase has said, the next stage is to remove the planks you have fitted and with care you should be able to at least use some of the planks again remembering of course you have a second layer to add which is of veneer. The aim of the first layer is simply to have a nice smooth hull without any gaps, bumps or hollows and the use of filler will also help achieve this. All of this though is no good unless we get the fairing of the hull correct. Once you have the planks removed, give us pics of the hull both upside down and the right way up looking squarely down the hull from both the bow to the stern and the stern to the bow.... These pics will also help us to see you end up with a symmetrical shape to the hull...
Hope this helps and if you have any other queries then do get back to me... Good luck with it...
Regards
Alan
|
|
|
|
|
stevelow wrote:Hi Jase,
Guess I'll pull off those forward planks, do some reading and work on the frames. Got my fingers crossed I can salvage most of those planks. :-) I'll post pictures again before I re-plank. Like suggested, where should I post a build diary? Under this thread?
Thanks for the Help,
Steve Hi Steve, If you wish to start a build diary then start a new topic (Diary Title) in this area http://forum.model-space...aspx?g=topics&f=243
Regards Alan
|
|
|
|
Guest
|
 US
US

