|
|
 Rank: Semi-Pro Level 1  Groups: Registered
Joined: 25/05/2015 Posts: 66 Points: 204 Location: Minneapolis
|
Thanks, Aegis. I had to cut the Shapeways console from the section that fits between the seats (all one unit), then shave the front off it so it could fit behind the front-facing section. It was lots of nerve-wracking work with a saw, and a lot of test-fitting and re-cutting. If you rotate my cockpit, you'll see a ragged mess underneath - completely invisible when installed! The original Shapeways console also has a lot of pretty levers that I accidentally destroyed in the process.
|
|
|
Rank: Semi-Pro Level 1 Groups: Registered
Joined: 25/05/2015 Posts: 66 Points: 204 Location: Minneapolis
|
The Hold - a work in progress, despite weeks of effort. Not sure what it's all for, as I have no intention of peeling off my hull to reveal it. Anyway, it represents my first scratch built anything, which is rewarding; I'm quite chuffed with the bunk wall, which looks black when painted in the photos, but isn't. I used styrene sheets, pipes and beams, but don't look too closely at the cuts. Actually, it seems as though I've done something to all the walls, and there's still another to go. Cheers.     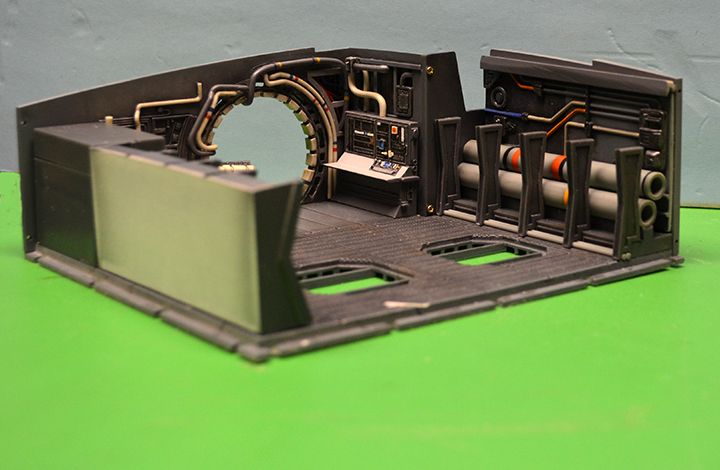
|
|
|
Rank: Semi-Pro Level 1 Groups: Registered
Joined: 13/06/2015 Posts: 66 Points: 198 Location: South Dakota, USA
|
Your scratch built wall section looks fantastic! If you didn't say anything, I'd be inclined to think it was part of the original kit.
|
|
|
 Rank: Super-Elite      Groups: Registered
Joined: 27/01/2014 Posts: 5,060 Points: 14,980
|
Lovely work on y9u scratchbuilt wall part, your hold is looking pretty cool. I also found that my first scratch build took a very long time but it was quite satisfying when it was finished. Look forward to seeing more 
|
|
|
Rank: Semi-Pro Level 2  Groups: Registered
Joined: 29/05/2015 Posts: 79 Points: 236 Location: Ontario
|
That is some really nice detail work there. Well done.
|
|
|
 Rank: Master  Groups: Registered
Joined: 07/07/2015 Posts: 1,292 Points: 3,928 Location: Allentown PA
|
I have actually been putting some thought into this myself as I originally planned to mount the falcon on the wall. One possible solution is to not install it in the kit, but instead build a case for it and display it as a diorama. This would work really well if your wanting to wire it up for lighting and/or want to build the maintenance pits.
DeAgostini kit builds:
Millennium Falcon: 18% Complete
Shelby GT-500: 28% Complete
Thunderbird 2: 13.75% Complete
|
|
|
Rank: Semi-Pro Level 1 Groups: Registered
Joined: 25/05/2015 Posts: 66 Points: 204 Location: Minneapolis
|
First stab at painting the underside. I've changed direction since starting the kit; now, it'll be a combination of airbrush and oil. There's no oil weathering on it yet, but the airbrush adds a lot I think. I'm mixing all my own colours, using a range of Tamiya paints as a palette.  
|
|
|
 Rank: Pro Groups: Registered
Joined: 04/07/2015 Posts: 99 Points: 309 Location: north wales
|
Thats looking great... Love your technique... First class !!!!
|
|
|
Rank: Semi-Pro Level 2 Groups: Registered
Joined: 02/06/2015 Posts: 82 Points: 237
|
Excellent job! What color are you using for the exterior red panels?
|
|
|
Rank: Semi-Pro Level 1 Groups: Registered
Joined: 25/05/2015 Posts: 66 Points: 204 Location: Minneapolis
|
Thanks, Adriuus.
Brad - I'm using a mix of flat red and hull red, which is quite dark.
I was also a bit broad with my claim of mixing all the colours; I'm working over Insignia White, although as Steve D. says in his videos, this is generally not visible as it comes out of the can, but is buried beneath layers of transparent colour over the top.
|
|
|
Rank: Super-Elite Groups: Registered
Joined: 27/01/2014 Posts: 5,060 Points: 14,980
|
BradM73 wrote:Excellent job! What color are you using for the exterior red panels? If you take a look at the Fine Molds, colour all out card there it suggests Mr Colour Aqueous (similar paints to Tamiya) Russet as the colour to use. However in issue 48 we should start receiving colour references using Tamiya codes.
|
|
|
Rank: Pro  Groups: Registered
Joined: 06/08/2015 Posts: 276 Points: 817 Location: Monrovia, Ca
|
Nice job on the hull painting. I will probably be doing something similar with build. Really like the look of the cargo hold as well. Might have to steal some ideas there. Stephen Current Builds: HMS Sovereign of the Seas /// Lamborghini Countach /// Eaglemoss BTTF DeLorean
Finished Builds: Millennium Falcon
|
|
|
Rank: Semi-Pro Level 1 Groups: Registered
Joined: 25/05/2015 Posts: 66 Points: 204 Location: Minneapolis
|
Thanks again for looking and commenting. Another couple of pics; no massive changes, but I thought I'd try pushing a couple of areas towards near completion, using oils to add streaks and shadows, rust and splats. Nothing screwed on yet, so it all looks a bit rickety. I'll add some unifying stuff once it's all together, but I think this is a fairly good impression of what I'm trying to achieve.  
|
|
|
Rank: Super-Elite Groups: Registered
Joined: 27/01/2014 Posts: 5,060 Points: 14,980
|
Looking great Al!  Look forward to seeing more
|
|
|
 Rank: Vice-Master Groups: Registered
Joined: 05/03/2015 Posts: 561 Points: 1,713 Location: South Carolina
|
Looking great my friend... can't wait to see more!
|
|
|
 Rank: Amateur level 2 Groups: Registered
Joined: 29/09/2015 Posts: 41 Points: 123 Location: USA
|
Dude, that hold is looking great. Love the details above the nav computer and that forward wall looks freak'n great! I am also really liking the weathering and panel work, particularly the cockpit tube.
|
|
|
Rank: Semi-Pro Level 1 Groups: Registered
Joined: 25/05/2015 Posts: 66 Points: 204 Location: Minneapolis
|
Staring at the underneath for months, and it's far from done. I've learned many things as I've painted it, and my technique has changed from one side of the hull to the other - hopefully not too visibly. Gone back and forth on pre-shading, and have decided to do it selectively to emphasize certain areas.  The most important thing I've discovered is to keep as inconsistent as the original; there's no one-size-fits-all solution to painting or weathering. I can't even define where painting ends and weathering begins. It's an absolutely seductive process, and I've lost days just figuring out how to layer it. 
|
|
|
Rank: Super-Elite   Groups: Registered
Joined: 31/05/2010 Posts: 5,679 Points: 17,011 Location: Wiltshire
|
Looking very cool indeed. Nice touch mixing your own paints, but wow what a large surface to paint. I think Dagostini pulled off a good one when they launched this kit as its generated so many in depth and interesting build diaries. Hope it continues to build well for you. Happy Modelling
BUILDING: Hachette Spitfire Mk 1A, Constructo Mayflower
SUBSCRIPTION COMPLETE (Awaiting building): USS Constitution, Sovereign of the Seas, 1:200 Bismarck (Hachette)
COMPLETED: Porsche 911, E-Type Jaguar, Lam Countach
|
|
|
|
|
You've got that spot on, great colouring, superb paintwork. One of the best I've seem. Keep up the good work Mark
|
|
|
Rank: Vice-Master Groups: Registered
Joined: 05/03/2015 Posts: 561 Points: 1,713 Location: South Carolina
|
Looking great bro! Keep it coming!
|
|
|
|
Guest
|
 US
US

