|
|
 Rank: Super-Elite       Groups: Registered
Joined: 27/01/2014 Posts: 5,060 Points: 14,980
|
Please dont get too excited just yet, I though I would just kick of my build diary with some pictures of what I have received so far. Today I received pack 13 of 33 and decided I would spend the day sorting through all the parts and organising them. Hopefully the pictures will give others who haven't built these plank on frame ships how much wood is actually involved, LOTS  The quality of the wood supplied looks and feels really good and so do all the cast parts too  Planks and strips all sorted into sizes, I realised that some of the same size are a different colour so will need to be careful I check the instructions carefully when I start 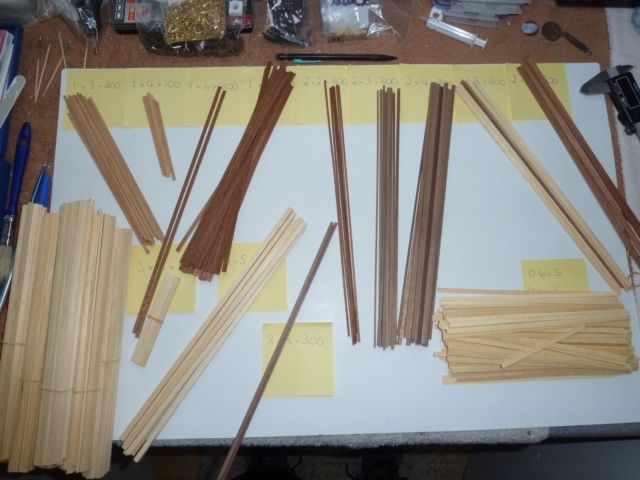 Massive pile of planking strips, these are 2 x 5 x 250mm 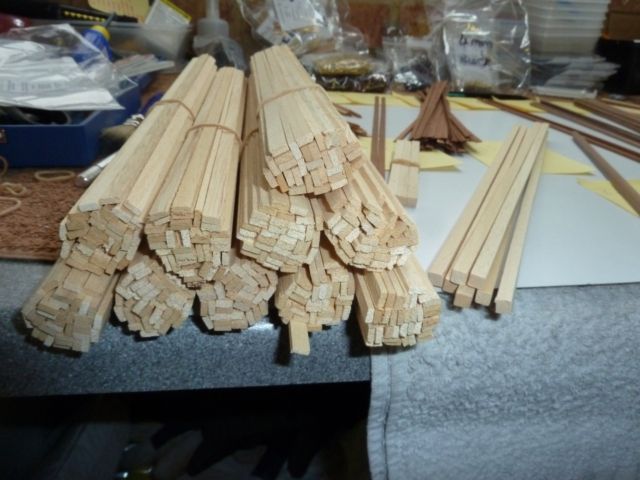 These ones confused me as the in the instructions (61, 62, 63 & 64) it says they are 2 x 5 x 250mm however they are actually 1 x 5 x 250mm. Perhaps someone who has built to this stage can advise  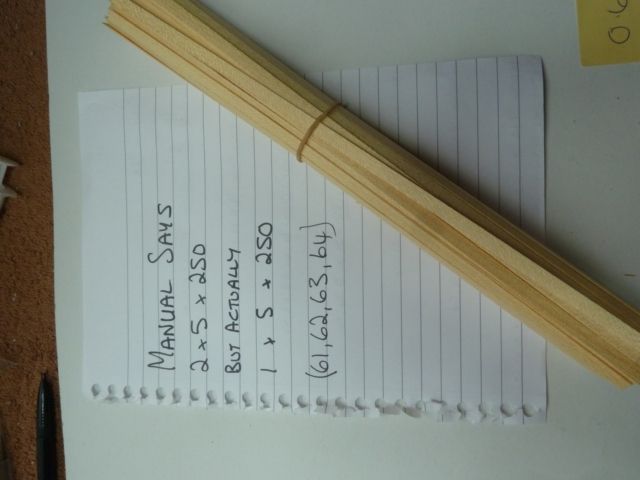 Lots and lots of little bits all sorted, there are a massive pile of pins supplied I wouldnt want to drop them on the floor  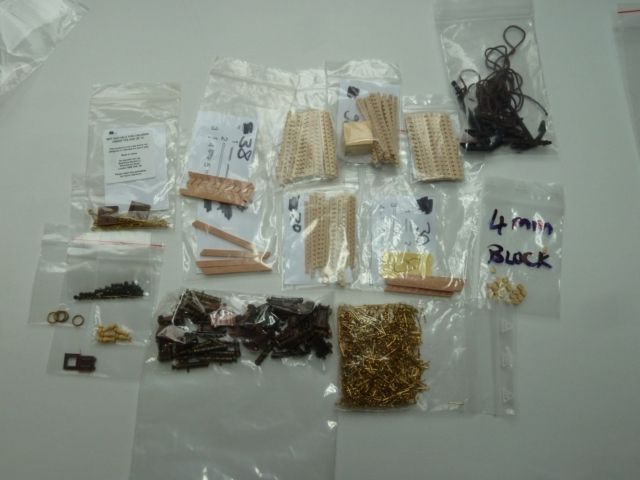 More wood  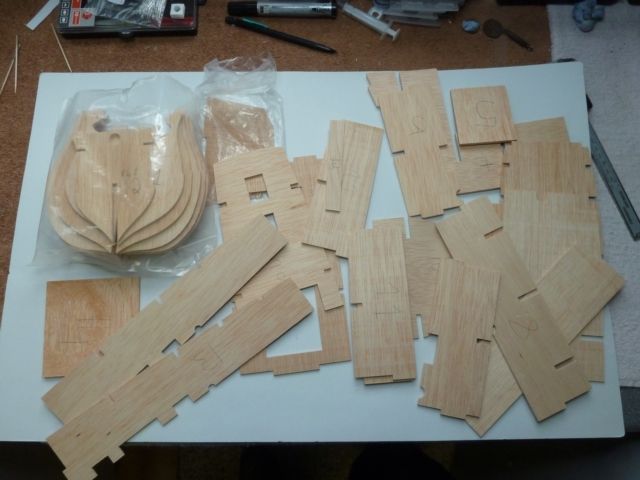 This shows some pictures of the cross section parts, I havent sorted these 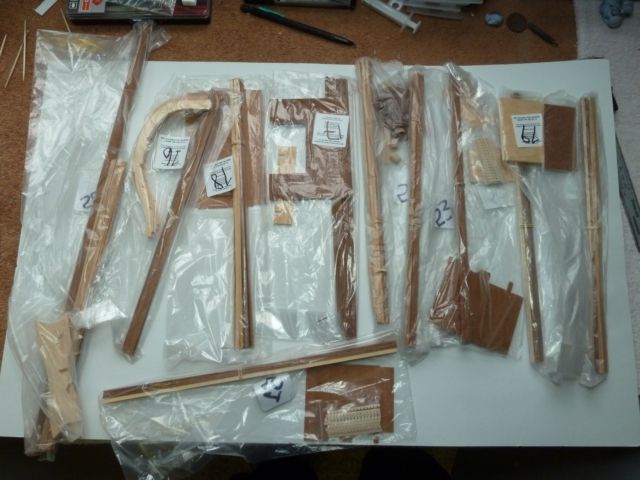
|
|
|
Rank: Super-Elite   Groups: Registered
Joined: 30/01/2013 Posts: 4,604 Points: 13,607 Location: Monmouthshire UK
|
Well I did get excited Dave  , thought you were about to start  be good to see another Trinny on here, looking forward to it anyway! Steve
|
|
|
Rank: Super-Elite Groups: Registered
Joined: 27/01/2014 Posts: 5,060 Points: 14,980
|
stevie_o wrote:Well I did get excited Dave , thought you were about to start be good to see another Trinny on here, looking forward to it anyway! Steve Sorry to dissappoint Steve, I think I am getting close to starting to be honest as of late I have been reading a lot of plank on frame builds and even the Trinny manual a lot I think I have solved my dilema I mentioned above. In stages 61, 62, 63 & 64 'Your parts' section lists 2 x 5 x 250 strips but the actual strips in the pack are 1 x 5 x 250. After studying the instructions it would appear that in stage 62 Step D it says to glue a 2 x 5 strip below the first gun port, the same strips are then used going up the hull in the rest of the stages. Looking closely it seems the strip that are being used are in fact the 1 x 5 that were supplied in those stages.
|
|
|
Rank: Super-Elite Groups: Registered
Joined: 27/01/2014 Posts: 5,060 Points: 14,980
|
|
|
|
|
|
Hi Dave Nice to see another build on the go. The hull is double planked using the planks you have now as the first layer then the bow and stern infills are added and the second half mm planking added this will make a very strong hull so I would not worry too much about the initial planking. The rule of thumb here is to get the lay of the planks flat and butted up to each other with a minimum of gaps this is done by tapering the top edge to fit the upper plank and dont forget also that some longitudinal tapering will also be needed in places. good luck with her Andy  Current builds:-C57,Zero, Lamborghini Countach, Caldercraft HMS Agamemnon,Robi,R2-D2, MFH Cobra .
|
|
|
Rank: Super-Elite Groups: Registered
Joined: 27/01/2014 Posts: 5,060 Points: 14,980
|
arpurchase wrote: Hi Dave Nice to see another build on the go. The hull is double planked using the planks you have now as the first layer then the bow and stern infills are added and the second half mm planking added this will make a very strong hull so I would not worry too much about the initial planking. The rule of thumb here is to get the lay of the planks flat and butted up to each other with a minimum of gaps this is done by tapering the top edge to fit the upper plank and dont forget also that some longitudinal tapering will also be needed in places. good luck with her Andy Thanks Andy I think I am now starting to understand the planking stage, guess I will see when I actually start putting it into practive It was just the mis quoted parts in the stages 61, 62, 63, & 64 that were confusing me when I was sorting the parts out.
|
|
|
Rank: Super-Elite Groups: Registered
Joined: 27/01/2014 Posts: 5,060 Points: 14,980
|
|
|
|
|
|
Hi Dave nice start the deck your using I think fits on the next deck down but it should lay flat on the formers Current builds:-C57,Zero, Lamborghini Countach, Caldercraft HMS Agamemnon,Robi,R2-D2, MFH Cobra .
|
|
|
Rank: Super-Elite Groups: Registered
Joined: 27/01/2014 Posts: 5,060 Points: 14,980
|
arpurchase wrote: Hi Dave nice start the deck your using I think fits on the next deck down but it should lay flat on the formers Thanks Andy, Ive double checked and it is the right deck for the position however after stufying my pictures I think the 1st rib might not be pushed hime all the way which has raised the front if the deck slightly, I will double check tomorrow What size board would you recommend to use to build on?
|
|
|
|
|
Hi Dave, great to see you take on the challenge of a plank on frame build. Don't think you will regret this one as she is a beautiful ship and you'll learn lots to techniques in the process... Good luck with the build, will be following your progress all the way.... Regards Alan
|
|
|
Rank: Super-Elite Groups: Registered
Joined: 30/01/2013 Posts: 4,604 Points: 13,607 Location: Monmouthshire UK
|
Nice start Dave, I think your right and the deck could be pushed down a little further on rib 1, maybe a cleanup needed to get a better fit? Steve
|
|
|
|
|
Hi Dave lovely start will be following  Rgd Martyn Building ?
Completed. Soliei Royal . Sovereign of the Seas . Virginia . Scotland . San Felipe . Corel vasa , Santisima Trinadad X section , Vasa
Next Build ?
When sailors have good wine, They think themselves in heaven for the time. John Baltharpe
|
|
|
Rank: Super-Elite Groups: Registered
Joined: 27/01/2014 Posts: 5,060 Points: 14,980
|
Thanks Alan, Steve and Martyn I will get the rest of the ribs fitted first so I can make sure everything is straight and the lower decks sit flat then I will redo rib 1 Just wondering what size board is needed that will fit this
|
|
|
|
|
Hi Dave I use a solid pine plank 42 mm thick and around 1 metre long I have a longer one of the same thickness for models like the Akagi or Yamato. I got my boards from a saw mill as off cuts at around a £5 each. Hope this helps. Regards Andy Current builds:-C57,Zero, Lamborghini Countach, Caldercraft HMS Agamemnon,Robi,R2-D2, MFH Cobra .
|
|
|
Rank: Super-Elite Groups: Registered
Joined: 27/01/2014 Posts: 5,060 Points: 14,980
|
Thanks Andy, I have had to bodge a jig for now as I was on a training course today that over ran. I made some more progress by adding to more ribs, I quite enjoying it so far 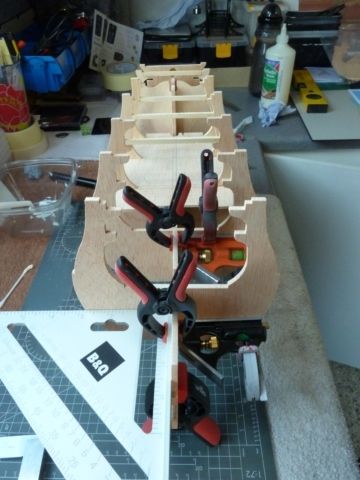 While I waited for the glue to grab and start drying I set about trying to work out a way of making it easier to cut the planks I needed for the first deck, I ended up making this jog 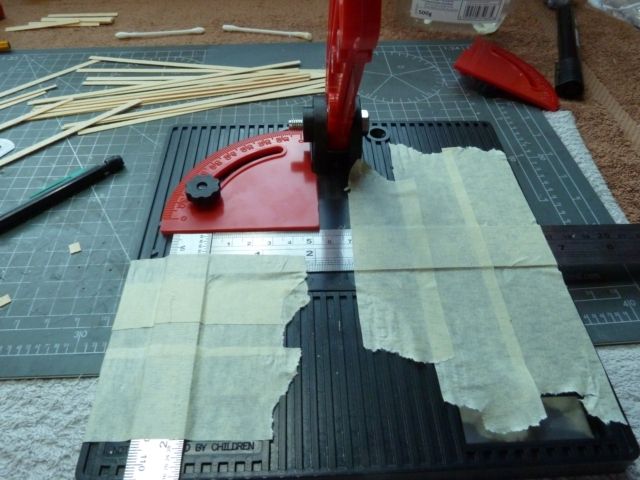 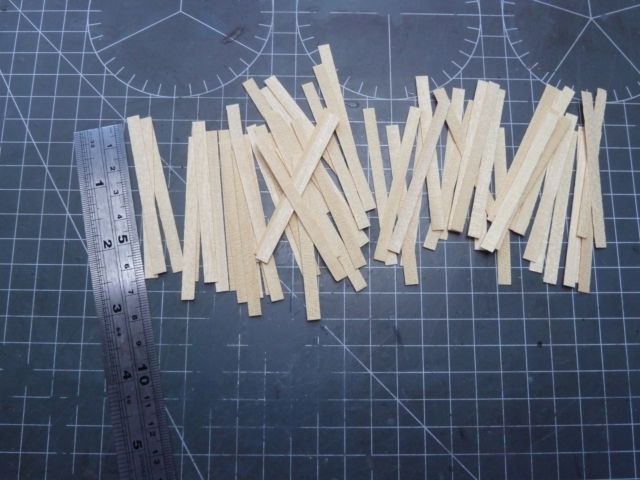 Next I bodged a dry dock until I get the chance to get something more substantial 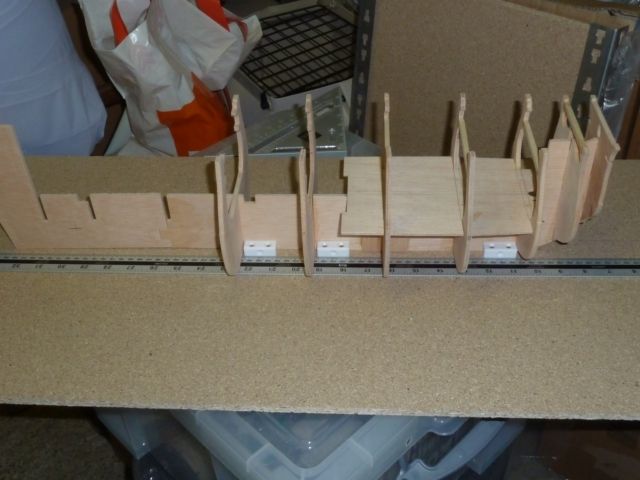 Decks dry fitted to test fit 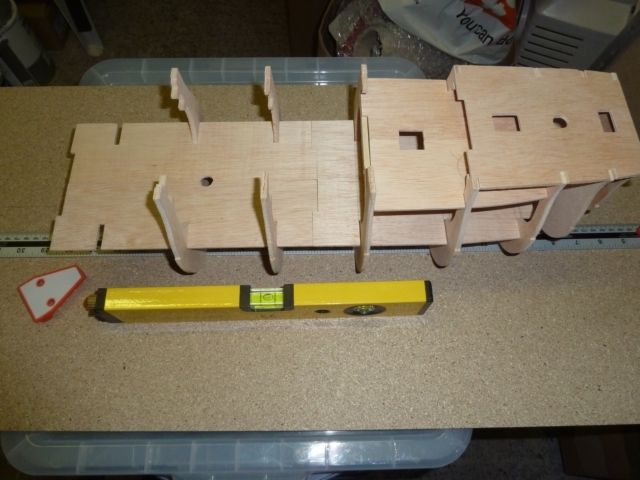 Here is where I need help, As per my previous post I not sure if rib one is seated correctly or if it is . If you could have a look at the following photos and see if it looks correct or not. Base reading of my dry dock 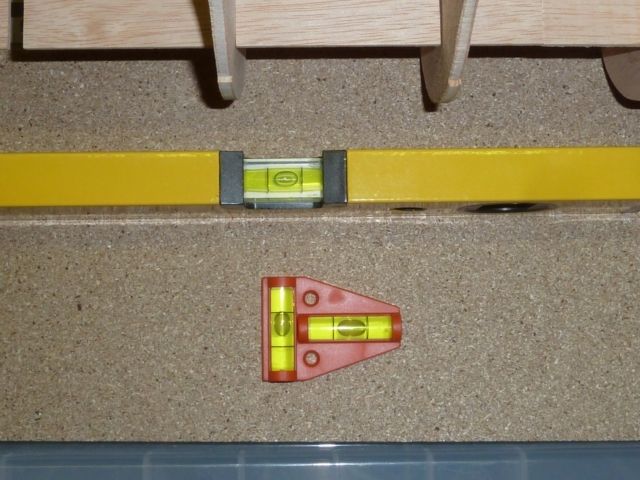 This hidden deck looks straight and level (dry fitted)  This deck also looks straight and level, so far so good (dry fitted) 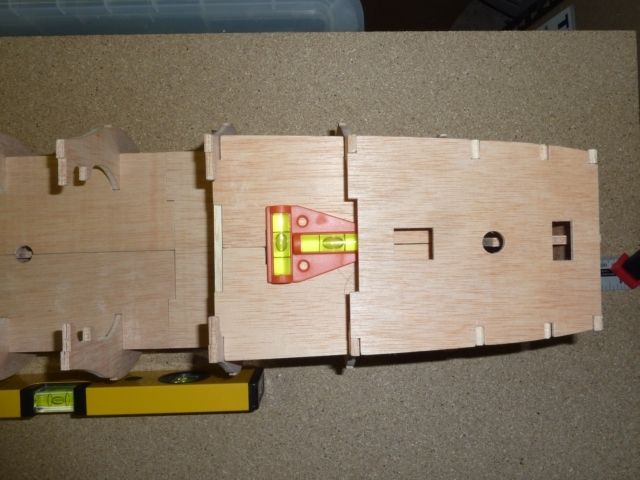 This is where it goes slightly wrong, the deck is level on one plane but is also higher at the front. So my question is Is this the correct angle for this deck, forcastle deck I believe, main middle deck is level so effectively mine is gently sloping down from the front to a level mid deck. I have studied other builds and it also looks like there is a slope, official build included but it could just be the photo angle. I am acutally starting to think it is correct. It would really help if someone else could put a spirit level on their forcastle deck in the same place to check the angle as its really doing my nut in If not and it should be straight and level then the only thing it can be is rib 1 that is causing the problem in which case I believe hot water is the answer? I just want to make sure before I start taking it apart again 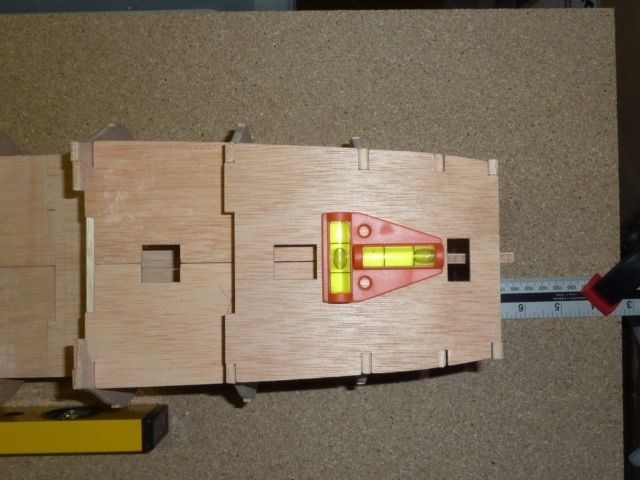 Thanks for looking
|
|
|
|
|
Hi Dave I agree it looks like rib one is too high as the deck is flat on my build in this area another way to test this is if ribs 2,3 and 4 are the same height by laying a rule or straight edge along them then rib one is too high. Hope this helps. Regards Andy Current builds:-C57,Zero, Lamborghini Countach, Caldercraft HMS Agamemnon,Robi,R2-D2, MFH Cobra .
|
|
|
|
|
Looks like you are off to a great start Dave, nicely done.... Regards Alan
|
|
|
Rank: Super-Elite Groups: Registered
Joined: 27/01/2014 Posts: 5,060 Points: 14,980
|
arpurchase wrote: Hi Dave I agree it looks like rib one is too high as the deck is flat on my build in this area another way to test this is if ribs 2,3 and 4 are the same height by laying a rule or straight edge along them then rib one is too high. Hope this helps. Regards Andy Hi Andy I have just put a metal ruler across ribs 2,3 and 4 as you suggested and they are indeed level, in fact they are level all the way back to rib 7, rib 1 is then about 1.5 to 2mm higher Its odd I messed up the first one but have got the rest all so level after that  Guess its the hot water tomorrow to sort it out! Thanks for checking, really appreciate it, it means that I wont be thinking about it when trying to get to sleep now
|
|
|
Rank: Super-Elite Groups: Registered
Joined: 27/01/2014 Posts: 5,060 Points: 14,980
|
Sorry, damn phone double posted. MOD please delete
|
|
|
Rank: Super-Elite Groups: Registered
Joined: 27/01/2014 Posts: 5,060 Points: 14,980
|
Gandale wrote:Looks like you are off to a great start Dave, nicely done.... Regards Alan Thanks Alan I was originally going to wait until I had more packs stashed but then I realised that as I haven't built one of these before I better crack on and see if its for me before I too far into the subscription. Barring the issue with rib 1 I am really enjoying it so far
|
|
|
|
Guest
|
 US
US

