|
|
 Rank: Semi-Pro Level 1  Groups: Registered
Joined: 13/06/2015 Posts: 66 Points: 198 Location: South Dakota, USA
|
I've been working on this model since July, and I figured it was high time to get around to writing the first entries to my build log. While I know that the 32" filming model had only the most modest of details for things like the cockpit, I decided that I wanted to use the filming sets as my sources. The kit cockpit works okay at a distance, but when examined closely, there are a lot of details really off. I'm not a fan of using stickers for these things, either. My options included the lovely Paragrafix photoetch set, but I wanted to do a lot more detail, so I began to scratch build the cockpit from styrene. The cockpit is the natural place to start, since that comes complete within the first two months of parts. I really like how De Agostini is spreading out the parts of the construction. The start with the cockpit and main hold/lounge area, with external parts sprinkled in. I'm currently at five months in, and I have plenty to keep me busy for a long while, as I intend to extensively customize the hold and cockpit areas to match the filming sets from the movies. Here is where I decided to use the original cockpit parts, and where I made my first cut:  This was taken after I had already cut the floor where I was originally intending to put in the levels that should be in the cockpit. Here is what it looked like with the dividing wall.  The floor levels-  After looking at things, I decided to build the entire floor.  Here is the original cockpit resting on the new floor-  Building up the side walls. You can see where I'm lengthening the cockpit to be more accurate to the ESB set. 
|
|
|
 Rank: Super-Elite      Groups: Registered
Joined: 27/01/2014 Posts: 5,060 Points: 14,980
|
That's some rather nice scratch building Dan, I'm really going to enjoy following this 
|
|
|
Rank: Semi-Pro Level 1 Groups: Registered
Joined: 13/06/2015 Posts: 66 Points: 198 Location: South Dakota, USA
|
Here is the underside of the new floor. The washers are glued in place to allow me to place the rear seats with magnets.  Speaking of the seats... I wanted to replace the stock seats as the front pair are way too big, and the rear seats are too small and poorly detailed. For the front seats, I purchased a 1:43 scale Porsche toy of the proper model year and cut the seats out of it.  As you can see, the model kit seats are way larger than a more true 1/43 scale.   The new seats with the stock cockpit. I think this looks a lot better.  For the back seats, I decided to try scratch building them. Here are my first iterations of these.    Next up is the main control console.
|
|
|
Rank: Semi-Pro Level 1 Groups: Registered
Joined: 13/06/2015 Posts: 66 Points: 198 Location: South Dakota, USA
|
Thanks Dave!
I never tried anything like this before, so this is all new skill learning for me. I'm really enjoying it.
|
|
|
Rank: Semi-Pro Level 1 Groups: Registered
Joined: 13/06/2015 Posts: 66 Points: 198 Location: South Dakota, USA
|
Now we're onto the main console. The shape of the console in the kit is way off. Using set photos, I crafted my own version of the console. I also scratch built new control yokes to look more like the real props. The scale is too large, I know, but these are a first version. I'll likely build new ones later that are more accurately sized.  The posts that hold them are some metal pieces that I got from an old job. There were going to be tossed out, so I grabbed a big bunch of them to use as greeblies. I have them in a couple of different sizes, and really make great looking posts for the yokes.  Above the yokes is my scratch built console. Here it is with the rest of the console that goes between the seats. I also made by own throttles as the ones with the kit were huge.    I'll be routing fiber optics through the consoles, and install a blue surface mount LED behind the little screen with the rectangular cowling.  Here are the parts together to give an idea of the size of the new extended cockpit.  Here is my first try at the side panels. 
|
|
|
Rank: Semi-Pro Level 1 Groups: Registered
Joined: 13/06/2015 Posts: 66 Points: 198 Location: South Dakota, USA
|
Here is what my hold is doing. I'm using the Paragrafix cargo hold kit, which is fantastic. I'm also scratch building a new computer console, and replacing the wildly inaccurate bunk over the lounge seat. With the scale, the bunk would only sleep someone around Jawa size. 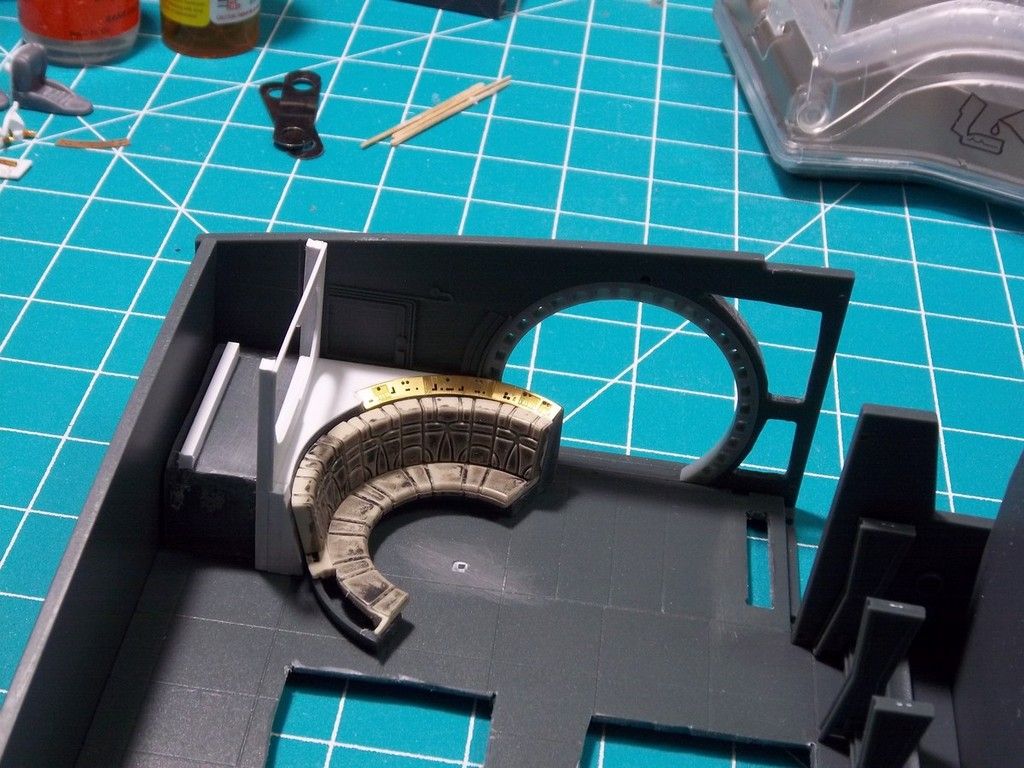 I'm going to be lighting the controls that are at the base of the bench seat, as well as the longer ones by the wall above the seat backs. I'm going to be threading an electro luminescent wire through the lounge area to light it all up. I'm not going to worry about blinkies on this part. Here's the channel I cut to house the EL wire. 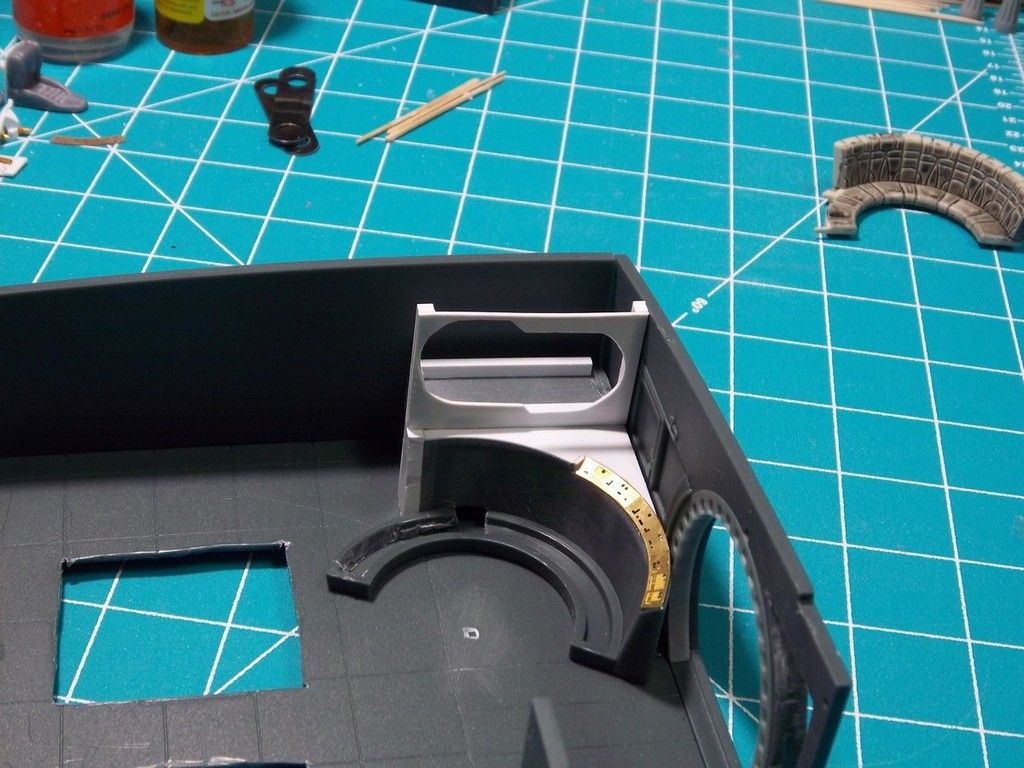 As visible in the first pic, I cut the holes in the wall for the insets. 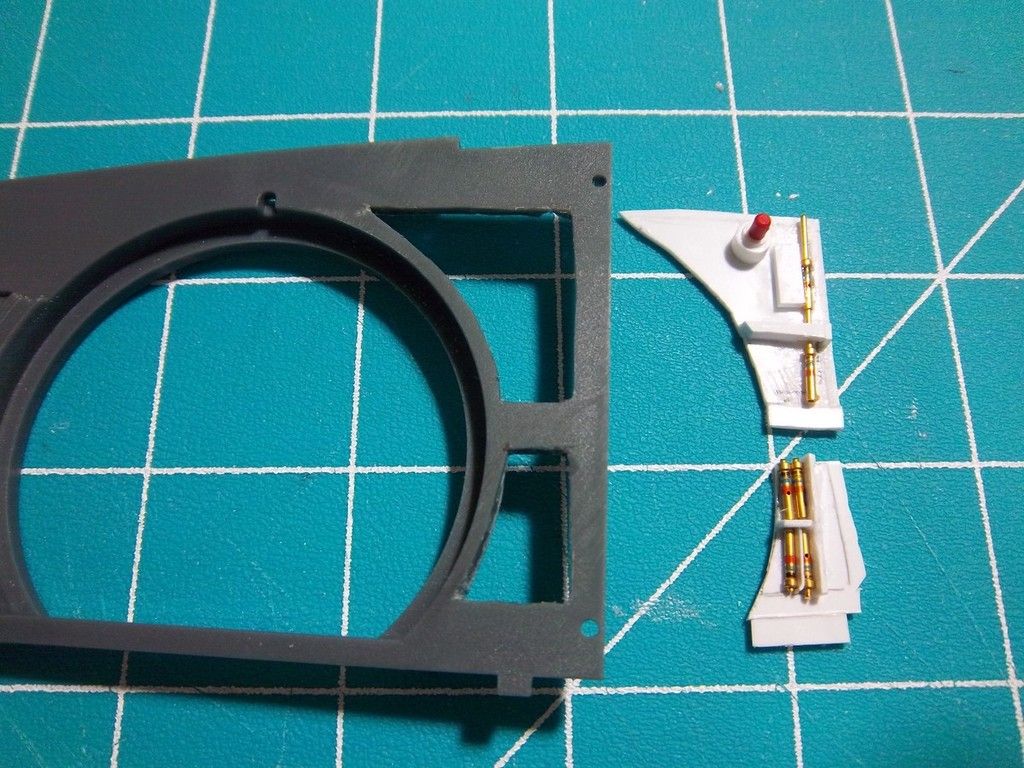 Here are what the greeblies look like that I'm using all over the place. They're really great looking. 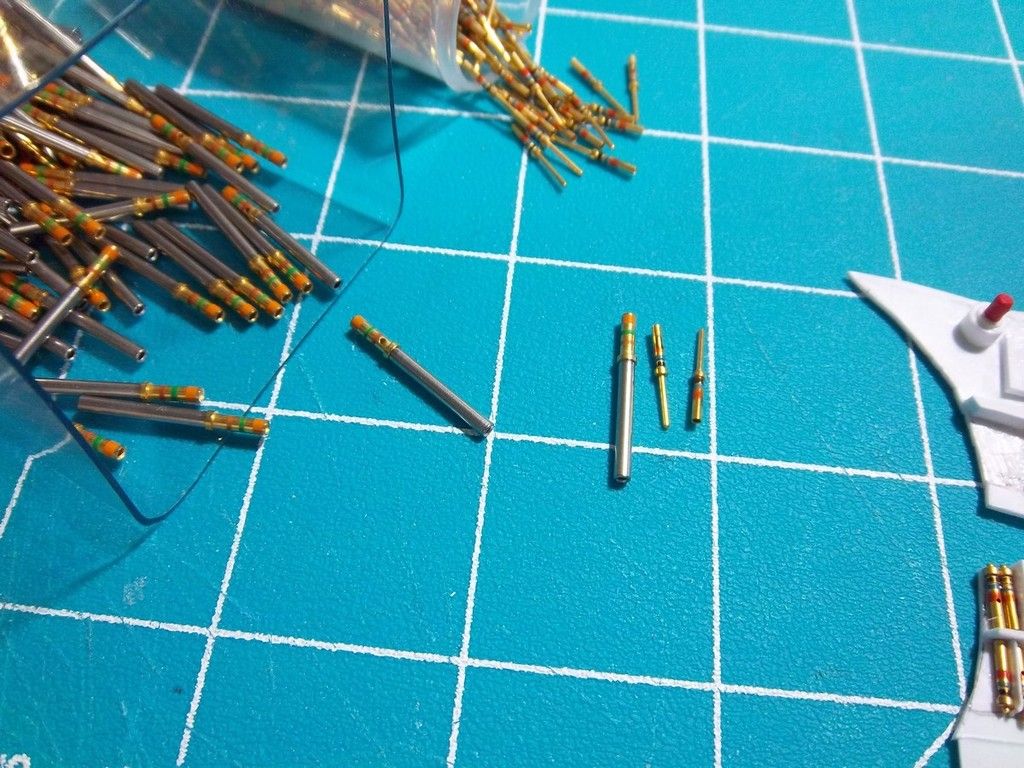
|
|
|
Rank: Semi-Pro Level 1 Groups: Registered
Joined: 13/06/2015 Posts: 66 Points: 198 Location: South Dakota, USA
|
I decided to scrap where I was on the bunk and start over. I wanted the wall behind the seat backs on the left side, and this method made it easier to get the bunk shape built. 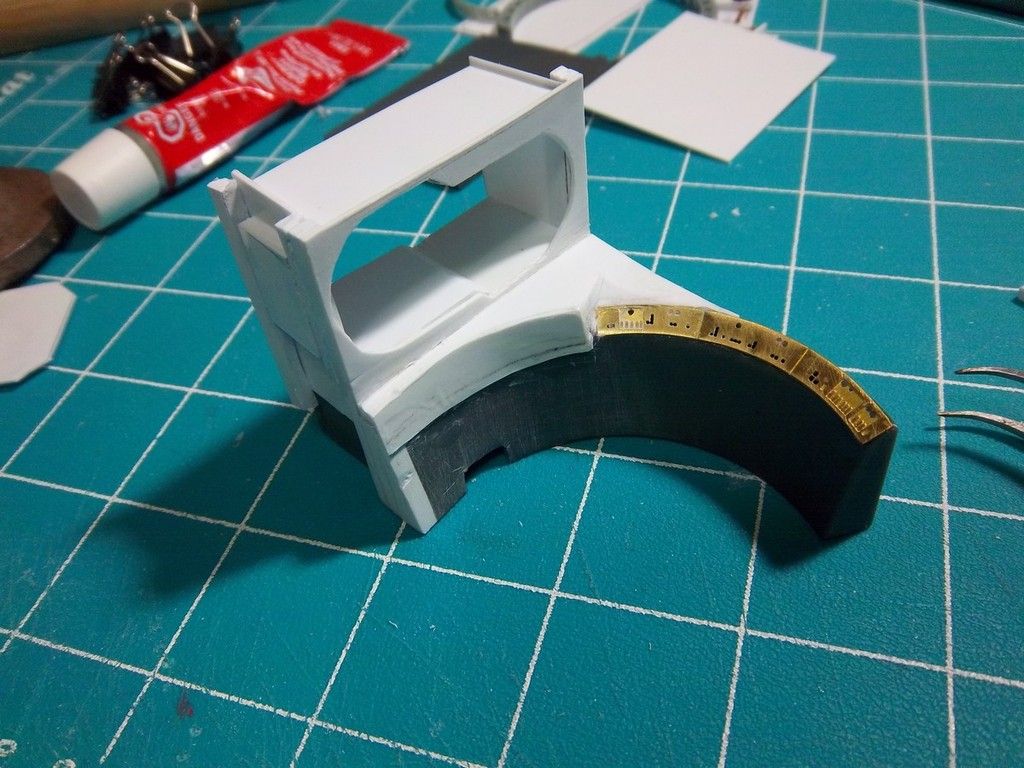 I'm also moving the seat/bunk area back further as the doorway is blocked off to much by the seat and the computer. Also, what I intended was to use a piece of thin styrene between the photo etch and the stock floor. This let me fill in the holes in the PE, as well as control the hole size where the maintenance pits are. I first sized out a white piece as the base. 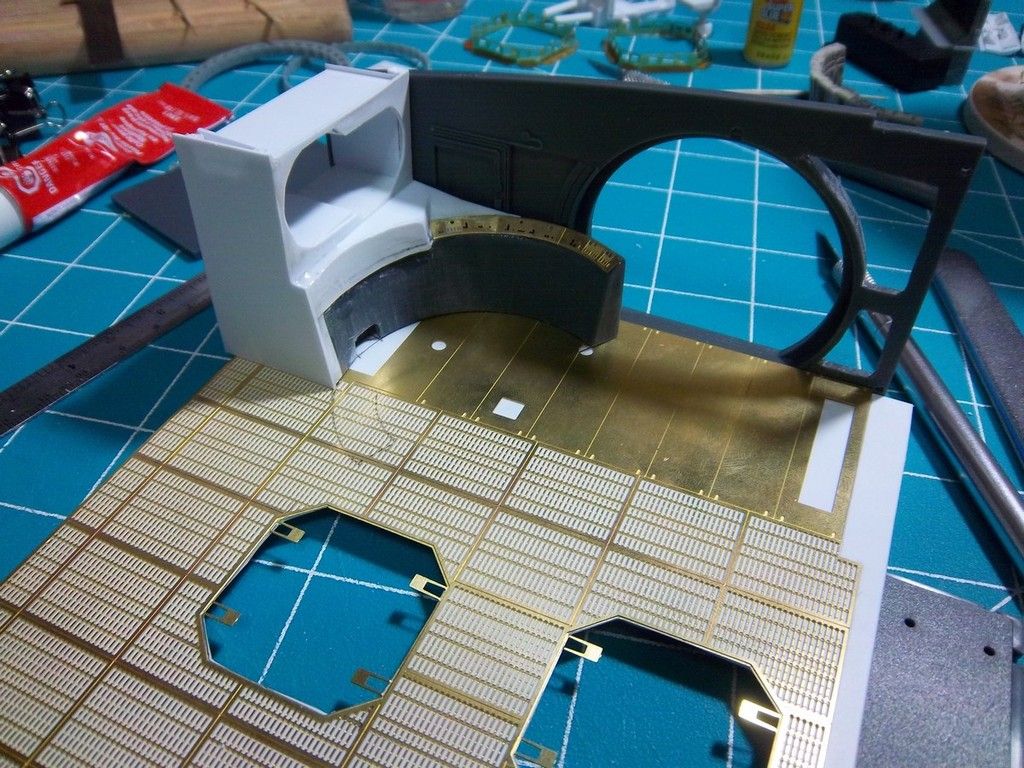 Later, I decided to use black styrene as the base so it won't be a problem if my priming and painting miss any spots under the floor grid. 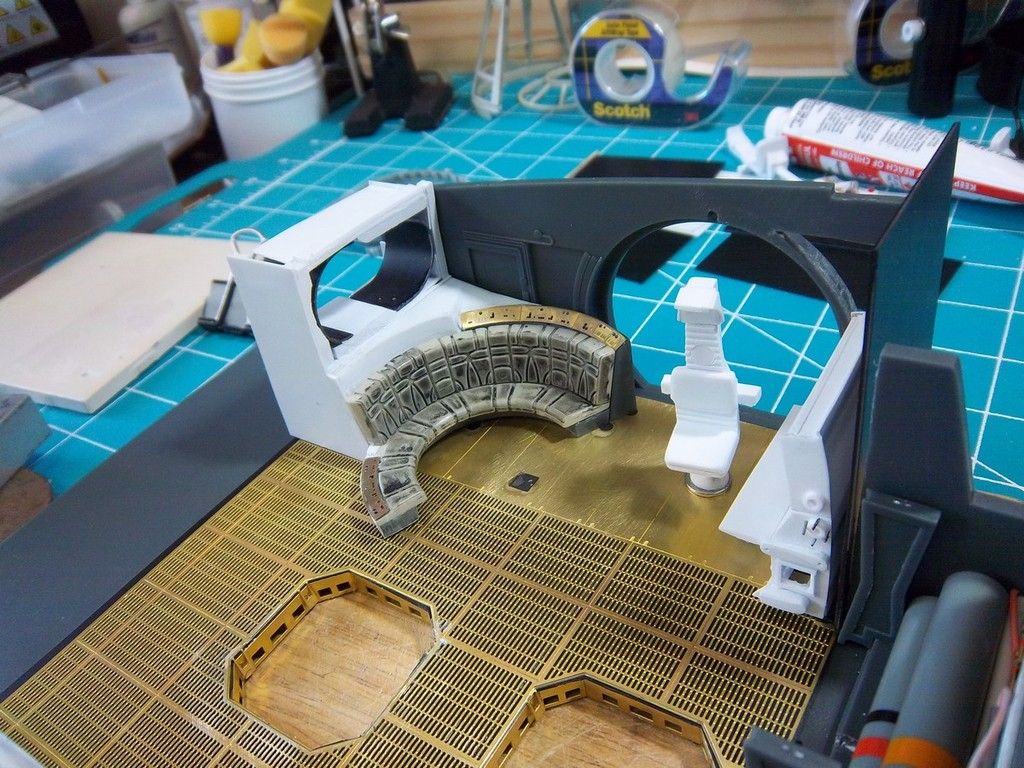 I also added some metal under the floor to allow me to use the magnetic chair idea here too. I'll likely either remake this chair or get a shapeways one. The scale is just too big in here. The floor levels are all glued down and sanded now. Here's the hold as it is today. Yesterday I worked on the alcove where the pipes are as well as moving the wall behind the computer back some for more room. 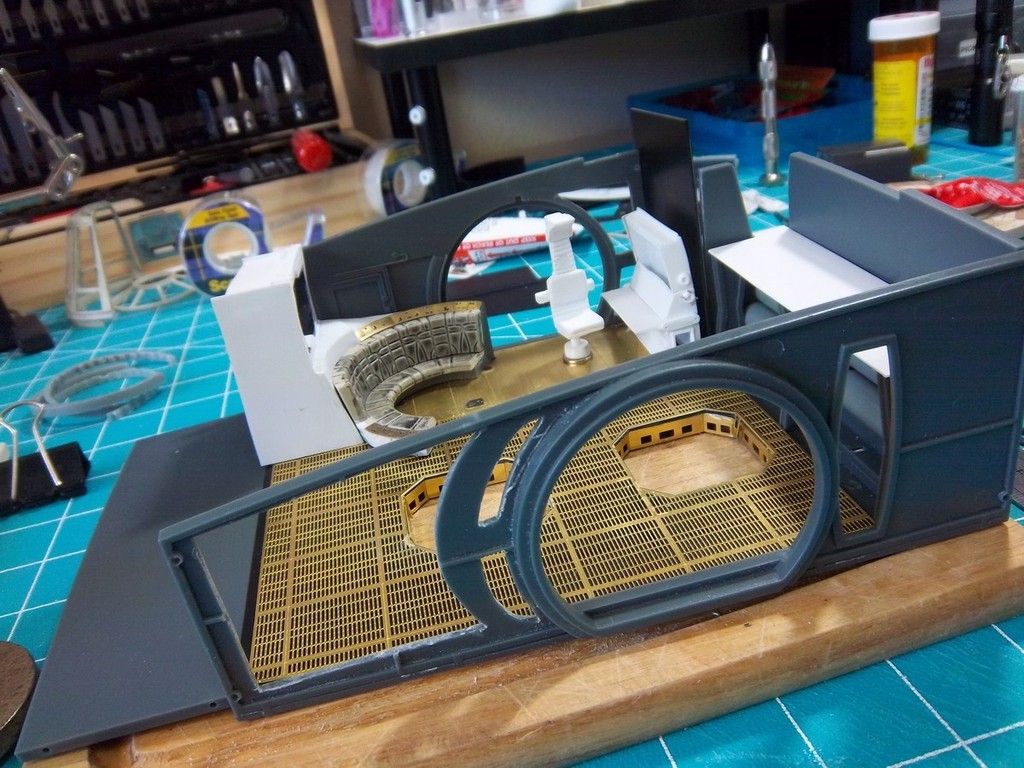 You can see that I cut a huge hole in the port side wall. My plan is to add the room that was shown in the original set mockup model in issue 16, page 13. This shot shows the top I'm putting over the pipes. This is an early cut that I'll be refining to make it look like the film set. See issue 14 page 13 bottom left for what my goal is. 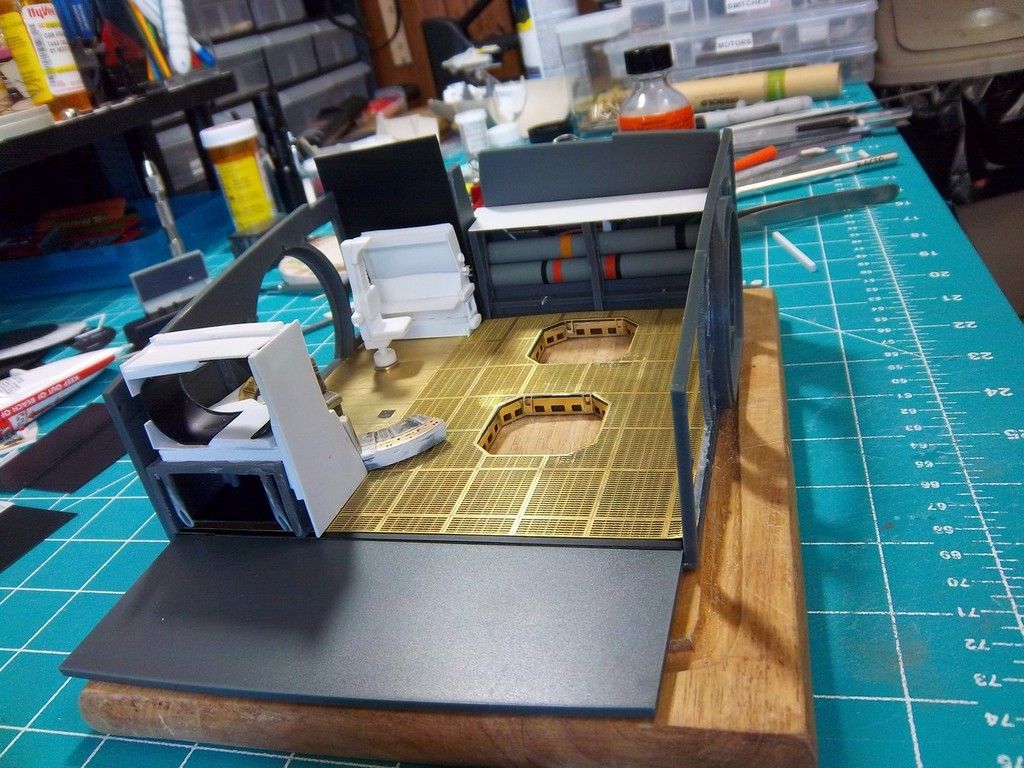 This shot shows the greeblies I added to the back wall behind the pipes. 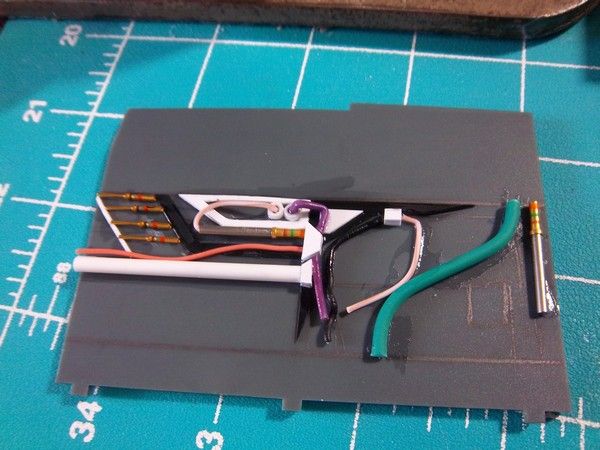 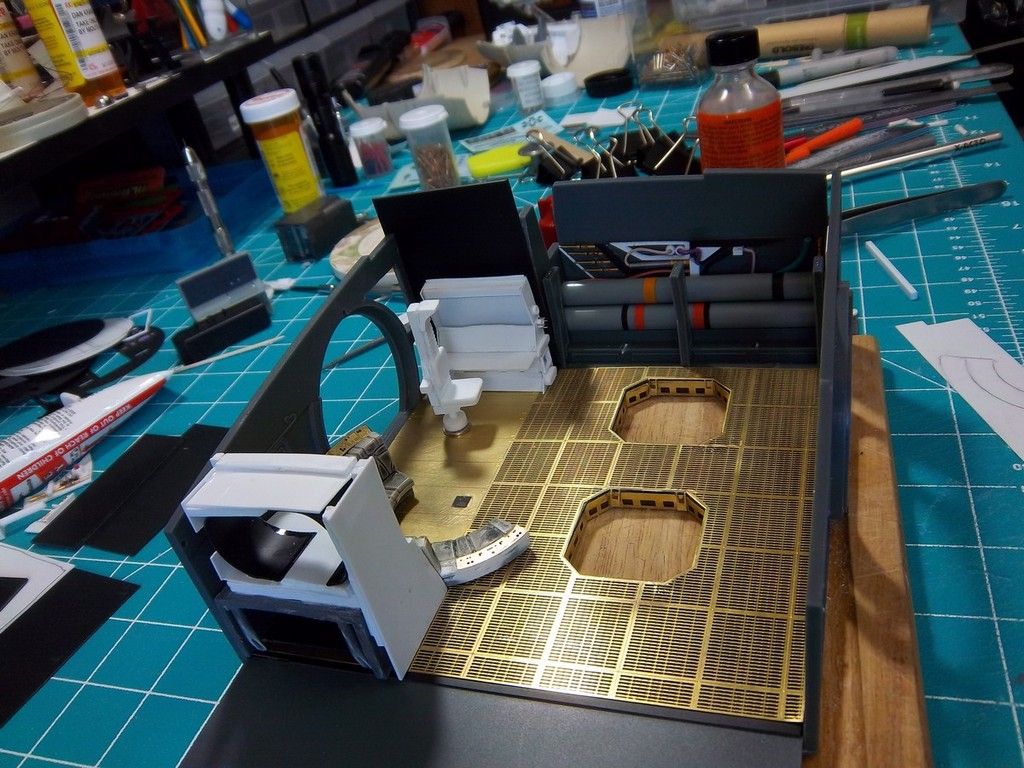
|
|
|
 Rank: Vice-Master Groups: Registered
Joined: 05/03/2015 Posts: 561 Points: 1,713 Location: South Carolina
|
Great looking scratch building there bud... love the idea of dropping the back of the cockpit, may have to steal that from ya! :)
|
|
|
 Rank: Pro  Groups: Registered
Joined: 06/08/2015 Posts: 276 Points: 817 Location: Monrovia, Ca
|
Dan, Really nice work on your scratch building. Love those rear seats for the cockpit. Can't wait to see what you will come up with next. Stephen Current Builds: HMS Sovereign of the Seas /// Lamborghini Countach /// Eaglemoss BTTF DeLorean
Finished Builds: Millennium Falcon
|
|
|
Rank: Vice-Master Groups: Registered
Joined: 05/03/2015 Posts: 561 Points: 1,713 Location: South Carolina
|
Very nice job so far and awesome attention to detail as far as I've seen. Love the work you've done on the nav seats. Almost finished with mine.
|
|
|
Rank: Super-Elite Groups: Registered
Joined: 27/01/2014 Posts: 5,060 Points: 14,980
|
Lovely bit of scratch building there Dan
|
|
|
 Rank: Beginner Level 1 Groups: Registered
Joined: 04/09/2015 Posts: 7 Points: 27
|
Hi Dan,
Can I ask you what all those little greebles are?
|
|
|
Rank: Semi-Pro Level 1 Groups: Registered
Joined: 13/06/2015 Posts: 66 Points: 198 Location: South Dakota, USA
|
I used to do electronic assembly, and they were little plugs that came installed in the sockets of connectors. You remove these, then you can plug in whatever other kind of wire attachment system you wanted. These were kinda blanks that normally got tossed out. I kept a bunch of them, even though at the time I had no modelling plans. I like to make stuff though, and these were just too awesome not to hold on to.
|
|
|
Rank: Pro Groups: Registered
Joined: 08/05/2015 Posts: 239 Points: 693 Location: Wisconsin
|
I really like that flooring in hold area. Good job and keep the pics coming!
|
|
|
 Rank: Amateur level 2 Groups: Registered
Joined: 29/09/2015 Posts: 41 Points: 123 Location: USA
|
Man, that's some nice scratchbuilding skills there. Your hold is looking excellent. I too plan on purchasing the brass floor and it's nice to see it in use.
|
|
|
Rank: Semi-Pro Level 1 Groups: Registered
Joined: 13/06/2015 Posts: 66 Points: 198 Location: South Dakota, USA
|
It's been a while. I've been working on a number of projects as Falcon parts have come in. Tonight I finally got the majority of my lounge area and the nav computer complete. I just need to add a matt coat and weather them some. First up is the bench area. I rebuilt the bunk area, added the computer consoles and have areas cut out in the bunk for the little screens that go in there. I'll have to see of the lighting would work for those to be lit up. I haven't built the lamps that go between the bunk and the seats yet. Here are some shots at various angles- 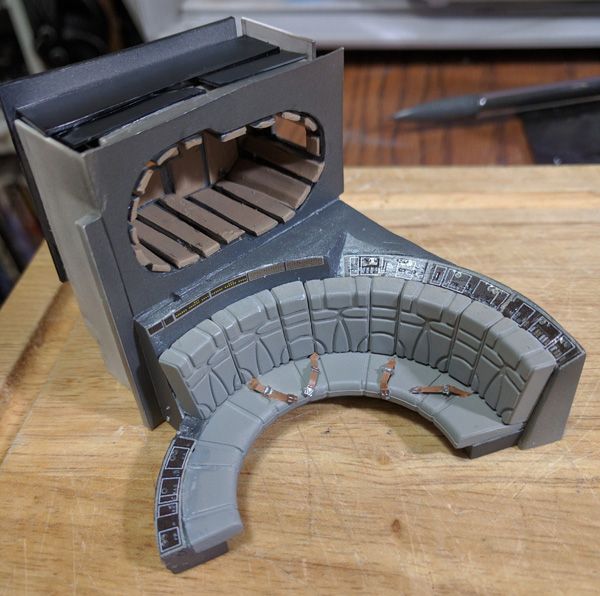 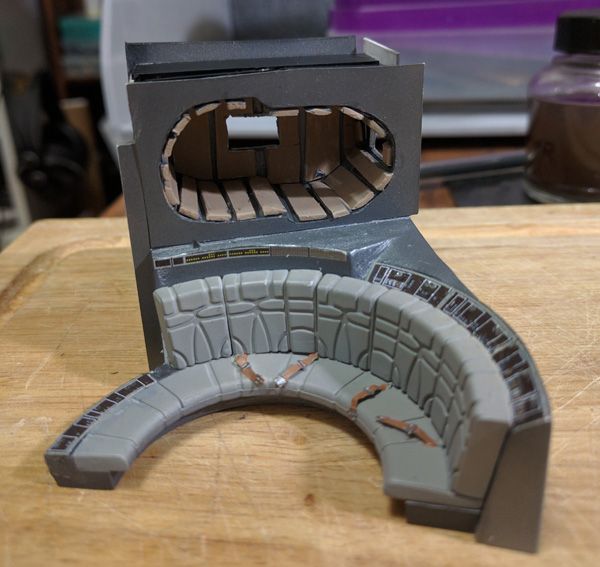 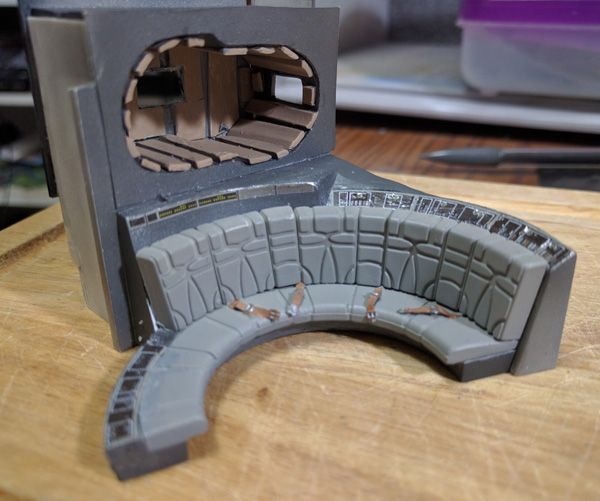 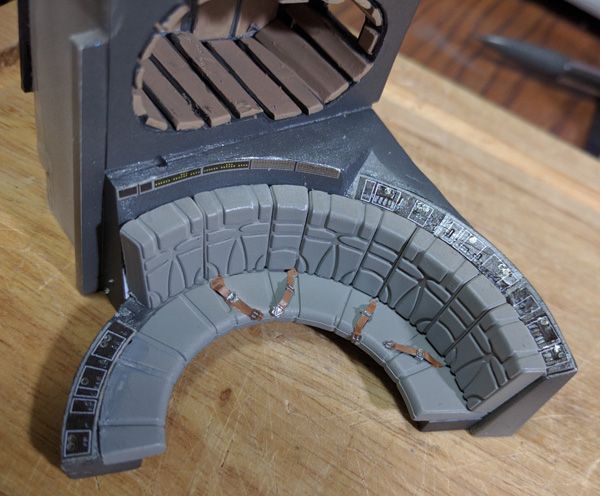 The little seat belts are photo etch for a 1/48 WWII bomber.
|
|
|
Rank: Semi-Pro Level 1 Groups: Registered
Joined: 13/06/2015 Posts: 66 Points: 198 Location: South Dakota, USA
|
And now the nav computer. This too needs a dull coat to take away the shine. It's hollow, so I intend to put a sheet of EL panel in there cut to size to make the lights come on. The Paragraphix kit is fantastic. The decals lined up beautifully with the photo etch. I did cut the decals into pieces to apply them though. I had glued in the switches already, so I just applied my decal pieces around them. 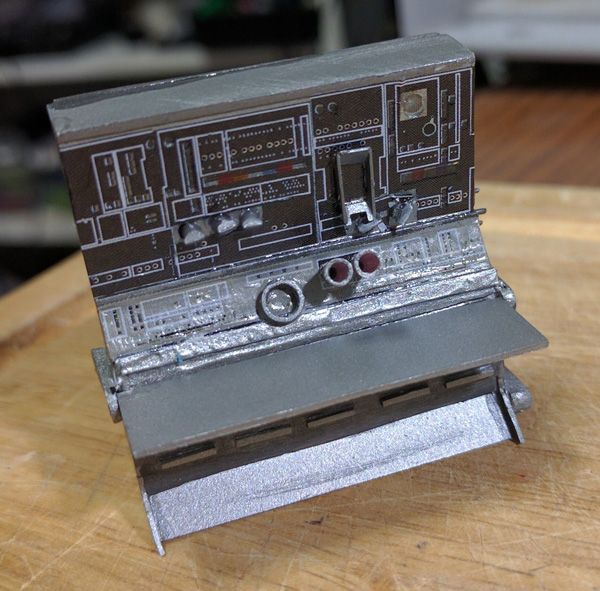 This side shows the little opening that R2 used to turn the hyperdrive back on in ESB. 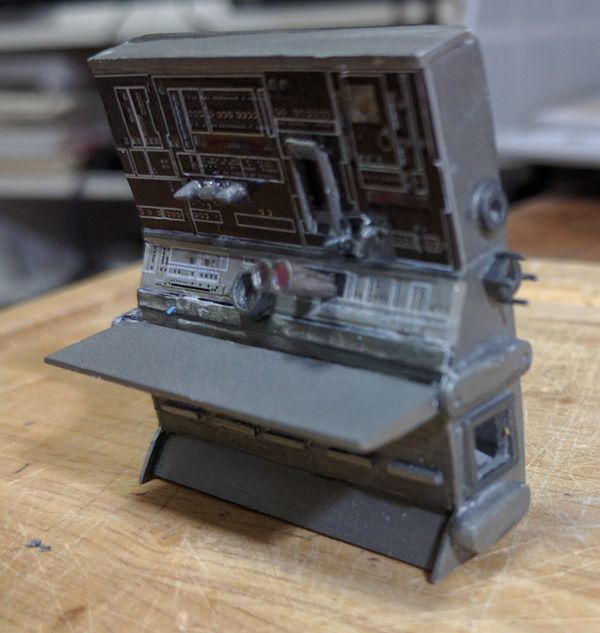 And here is my console next to the one that comes with the kit. 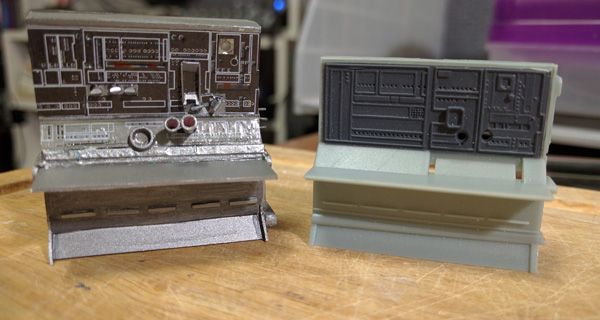
|
|
|
Rank: Semi-Pro Level 1 Groups: Registered
Joined: 13/06/2015 Posts: 66 Points: 198 Location: South Dakota, USA
|
I'll work on getting the other photos fixed later. I just now saw that the links broke for some reason. The images didn't move at all, so I don't know why they're broken.
|
|
|
Rank: Administration   Groups: Registered, Administrators, Global Forum Support, Moderator, Forum Support Team, Official Builds Joined: 04/01/2016 Posts: 7,178 Points: 21,841 Location: Northamptonshire, England
|
Great work Dan, you attention to detail is second to none. Keep up the good work and the pictures coming. Regards
Markwarren
(Mark) Admin
|
|
|
|
Guest
|
 US
US

