|
|
 Rank: Super-Elite        Groups: Registered
Joined: 31/05/2010 Posts: 5,679 Points: 17,011 Location: Wiltshire
|
Hope your build goes well and gives you a lot of fun putting it together. Happy Modelling
BUILDING: Hachette Spitfire Mk 1A, Constructo Mayflower
SUBSCRIPTION COMPLETE (Awaiting building): USS Constitution, Sovereign of the Seas, 1:200 Bismarck (Hachette)
COMPLETED: Porsche 911, E-Type Jaguar, Lam Countach
|
|
|
Rank: Super-Elite Groups: Registered, Moderator, Tech Support, Technical Support, Forum Support Team, Forum Support USA, Global Forum Support, Global Forum Support Team Joined: 17/12/2013 Posts: 3,983 Points: 11,974 Location: NY, USA
|
Great to see you up and running with this build.I will be watching this with interest.I would love a 3d printer
|
|
|
 Rank: Semi-Pro Level 1  Groups: Registered
Joined: 17/11/2015 Posts: 60 Points: 183 Location: USA
|
It actually is kind of fun seeing it come together as I go through the build. Quick note about the nuts, if they don't go in from one side of the piece I found it often will slide in better from the other side. I didn't get any progress pics of Stage 3, but it is fairly easy to do. For Stage 4 I started with these:  First I peeled the backing off, then inserted the nuts. Specific to these two (Small bracket plates), I did NOT need glue, as the fit was tight. This is where my note comes into play, these were still a tight fit from either side. Anyway that's what happened to me, yours may differ.    In the above image I have set the bracket subassembly on the bottom panel, to get it level so that I can tighten the screws. Don't forget to put washers on!  The Bottom panel, before 'the peel'. You can probably figure out where the bracket subassembly will go. Make sure to align everything properly, to ensure a successful build. In the following image note the location of the four holes, in relation to the bracket subassembly. this is what I'm talking about, aligning everything properly. The build guides instruct about this at every step.  One more…Stage 4 completed  DSC03851 DSC03851 by JJ Cano, on Flickr
|
|
|
Rank: Administration  Groups: Registered, Forum Support Team, Administrators, Global Forum Support Team, Moderator, Official Builds Joined: 09/11/2012 Posts: 7,942 Points: 23,012 Location: East midlands
|
Hi,  Coming on nicely. May be a useful tip for you, but I left as much covering paper on the large parts as possible. I only removed it from the area I was working on at the time. Keep up the good work, it`s a nice kit to assemble. Regards delboy271155 (Derek) COME BACK GUY FAWKES "YOUR COUNTRY NEEDS YOU"
|
|
|
Rank: Semi-Pro Level 1 Groups: Registered
Joined: 17/11/2015 Posts: 60 Points: 183 Location: USA
|
yeah I saw that in your diary. I should have done that, it's a good tip. totally forgot
I don't hink I have anymore peeling to do though. I'm almost ready to do pack 4
|
|
|
Rank: Administration Groups: Registered, Forum Support Team, Administrators, Global Forum Support Team, Moderator, Official Builds Joined: 09/11/2012 Posts: 7,942 Points: 23,012 Location: East midlands
|
AgentReverie wrote:yeah I saw that in your diary. I should have done that, it's a good tip. totally forgot
I don't hink I have anymore peeling to do though. I'm almost ready to do pack 4 It starts getting interesting from here on, especially when you start fitting the drive gears and belts. Will try and get an update on for you of my build in the next couple of days. It may assist you as you progress. Regards delboy271155 (Derek) COME BACK GUY FAWKES "YOUR COUNTRY NEEDS YOU"
|
|
|
Rank: Semi-Pro Level 1 Groups: Registered
Joined: 17/11/2015 Posts: 60 Points: 183 Location: USA
|
you've got great pictures on your build! I'll be happy for any assist you could provide, thanks I hope fitting that stuff in won't test my patience too much lol 
|
|
|
Rank: Administration Groups: Registered, Forum Support Team, Administrators, Global Forum Support Team, Moderator, Official Builds Joined: 09/11/2012 Posts: 7,942 Points: 23,012 Location: East midlands
|
AgentReverie wrote:you've got great pictures on your build! I'll be happy for any assist you could provide, thanks I hope fitting that stuff in won't test my patience too much lol Think your patience will be fine. The instructions are first class, but sometimes one picture from a different angle can be priceless.  Regards delboy271155 (Derek) COME BACK GUY FAWKES "YOUR COUNTRY NEEDS YOU"
|
|
|
Rank: Semi-Pro Level 1 Groups: Registered
Joined: 17/11/2015 Posts: 60 Points: 183 Location: USA
|
yes, I agree about the pictures, there was one in the guide that confused me, but the other pictures helped. And here is Stage 5. I should probably have paced myself a bit, because as I catch up with the packs I have received, I will have to wait for the next one arrive :-/ Here are the components for Stage 5, installing a cooling fan.  getting the fan guard in place…  hold it in place and get the cooling fan in place. The cable should go to the bottom right  I think my old MRC-Tamiya spanner will come in handy during the build. I recall another build diary is using one as well. It's from an old RC kit  Stage 6, install the noise filter. It will be installed on the same panel as the cooling fan, above. Components-  in it goes, don't forget to washer your screws! Also check to see if any washers have stuck together. This only happened to me once so far. I thought I was short one washer, but nope. There are spares included in a later step, but luckily I was not missing any.  This spanner is included in pack 03 with a 2mm Allen key  I don't seem to have pictures of the limit switch install. Maybe I didn't upload them. Anyway this is the completed panel of Pack 02, Stage 7. If you're at this point and have Pack 03 ready, don't put this panel away just yet, if you decide to keep building. 
|
|
|
Rank: Semi-Pro Level 1 Groups: Registered
Joined: 17/11/2015 Posts: 60 Points: 183 Location: USA
|
Before proceeding further, there was an amendment to the alignment of the fan assembly. Luckily Delboy was able to post about his before I got too far into the build. So fellow future builders take note(and go check out Delboy's build diary!) : before the amendment-  after-  DSC03929 DSC03929 by JJ, on Flickr I'll try to get a new update posted soon. Thanks for looking!
|
|
|
|
|
Looking good Current builds:-C57,Zero, Lamborghini Countach, Caldercraft HMS Agamemnon,Robi,R2-D2, MFH Cobra .
|
|
|
|
|
Great to see this one coming along, nice tidy work being shown.... Nicely done.... Regards Alan
|
|
|
Rank: Semi-Pro Level 1 Groups: Registered
Joined: 17/11/2015 Posts: 60 Points: 183 Location: USA
|
Pack 03, Stage 8: Adding the z-axis limit switch and a reinforcing plate Components:  Build- Insert the screws in the switch  Don't forget the washers!  fasten to the back panel, noise filter to bottom left   Next, attach the reinforcing plate--Turn the rear panel over so that the cooling fan is at lower left, noise filter to the right    Keep panel safe!
|
|
|
Rank: Semi-Pro Level 1 Groups: Registered
Joined: 17/11/2015 Posts: 60 Points: 183 Location: USA
|
Pack 03, Stage 9 preview  I didn't get a lot of Stage 9 photographed, but I will post what I did get. Mostly this Stage is screwing all the panels together to create the 'box of the 'idbox' 
|
|
|
Rank: Administration Groups: Registered, Forum Support Team, Administrators, Global Forum Support Team, Moderator, Official Builds Joined: 09/11/2012 Posts: 7,942 Points: 23,012 Location: East midlands
|
Good to see you progressing with this one. It starts to get interesting when the box is constructed, so hope to see another update soon. Regards delboy271155 (Derek) COME BACK GUY FAWKES "YOUR COUNTRY NEEDS YOU"
|
|
|
Rank: Semi-Pro Level 1 Groups: Registered
Joined: 17/11/2015 Posts: 60 Points: 183 Location: USA
|
|
|
|
Rank: Semi-Pro Level 1 Groups: Registered
Joined: 17/11/2015 Posts: 60 Points: 183 Location: USA
|
Stage 10: Tightening the nuts and fitting the assembly jig. Sorry not a lot of pictures for this step.  
|
|
|
Rank: Semi-Pro Level 1 Groups: Registered
Joined: 17/11/2015 Posts: 60 Points: 183 Location: USA
|
Stage 11: Attach the lead screw nut to the table base. Last worked on in Stage 2. attach a lead screw nut.  Slather your nuts umm I mean the nut with some PVA glue...  The instructions point out to keep the straight edges of the nut parallel with the edges of the table base..  underside:  Stage 11 completed 
|
|
|
Rank: Semi-Pro Level 1 Groups: Registered
Joined: 17/11/2015 Posts: 60 Points: 183 Location: USA
|
|
|
|
Rank: Semi-Pro Level 1 Groups: Registered
Joined: 17/11/2015 Posts: 60 Points: 183 Location: USA
|
Stage 14 Attach the left-hand Y-axis slider rodeo the housing (and belts too!) 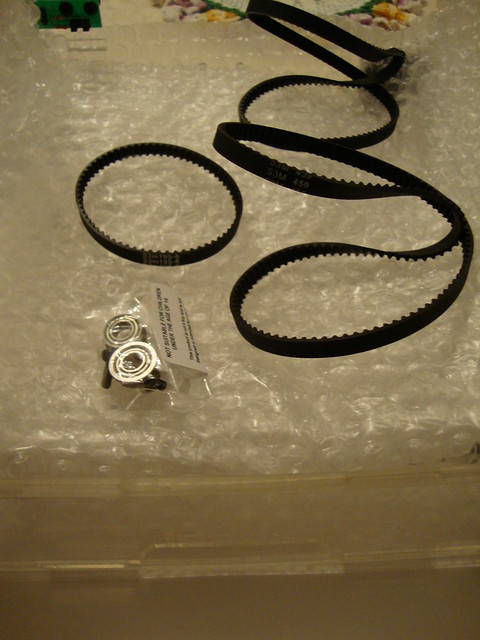 getting the bearing in... 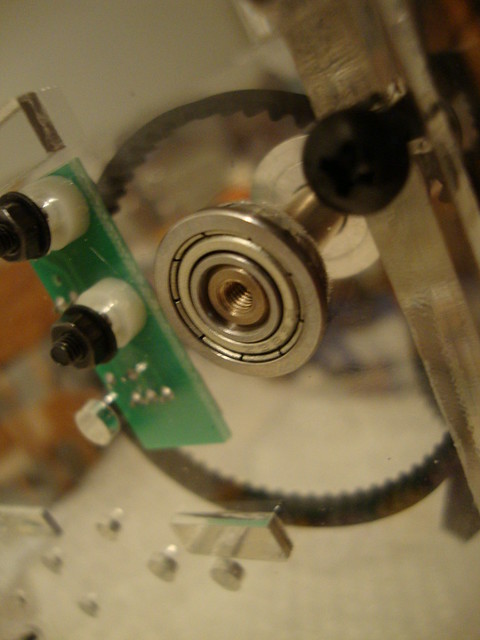 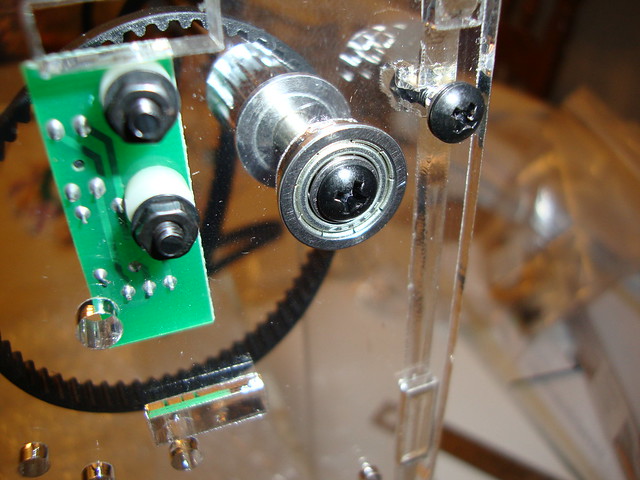 Again I haven't been getting very many pictures of my build. It looks like I don't have any for Stage 15 which is the beginning of another slider rod assembly. Stage 16 to 20. My apologies not a lot of pictures.  
|
|
|
|
Guest
|
 US
US

