|
|
 Rank: Super-Elite        Groups: Official Builds, Administrators, Moderator, Global Forum Support, Registered Joined: 04/06/2011 Posts: 5,559 Points: 16,829 Location: ipswich
|
|
|
|
 Rank: Master  Groups: Registered
Joined: 19/05/2015 Posts: 1,419 Points: 4,272 Location: Darmstadt, Germany
|
Holy moly, this is amazing.
|
|
|
 Rank: Pro Groups: Joined: 24/08/2009 Posts: 48,827 Points: -13,348
|
Nice work Roy, some excellent scratchbuilding skills on show there - well done.
Kev
|
|
|
Rank: Super-Elite   Groups: Registered
Joined: 31/05/2010 Posts: 5,679 Points: 17,011 Location: Wiltshire
|
Roy I certainly like it. Your build skills using the things you do such as fibreglass and resin are amazing. Have you ever tackled anything full size or it just the scale versions you concentrate on? Looking forward to your next updates on this one. Happy Modelling
BUILDING: Hachette Spitfire Mk 1A, Constructo Mayflower
SUBSCRIPTION COMPLETE (Awaiting building): USS Constitution, Sovereign of the Seas, 1:200 Bismarck (Hachette)
COMPLETED: Porsche 911, E-Type Jaguar, Lam Countach
|
|
|
Rank: Super-Elite  Groups: Registered
Joined: 19/06/2013 Posts: 4,588 Points: 13,553 Location: West Yorkshire
|
Fabulous work Roy, another great scratchbuild on the way.
Al
|
|
|
Rank: Super-Elite Groups: Official Builds, Administrators, Moderator, Global Forum Support, Registered Joined: 04/06/2011 Posts: 5,559 Points: 16,829 Location: ipswich
|
Many thanks you guys.
I've never done anything 1:1 size - 1/8 is big enough...
I've always enjoyed building model cars and somehow I ended up scratching my first one - another C Type - about 3 years ago.
I have admit that it does kill the interest in kit-building rather a bit.
I've got a pretty huge stash of model cars, including 3 unbuilt Pochers, 3 more 1/8 kits and about a dozen 1/12 Tamiyas, but scratching it all is more fun.
Mind you, I'm subscribing to the Shelby Mustang and have thoughts on some others, but even the Shelby will get a major overhaul when I start on it.
All good fun.
Roy.
|
|
|
Rank: Super-Elite Groups: Official Builds, Administrators, Moderator, Global Forum Support, Registered Joined: 04/06/2011 Posts: 5,559 Points: 16,829 Location: ipswich
|
Just a little more... Some bulkhead details added. The regulator box face was done by printing a photo of a real box (Google images) on clear transfer film. When added over the painted box, it looked pretty good - I hope. The engine lamp was cast in resin and the bracket made from flattened Coke-tin metal. Roy. 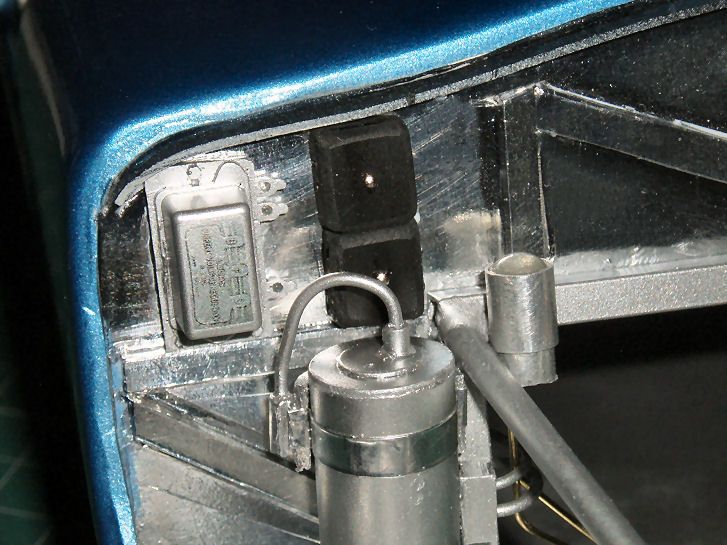  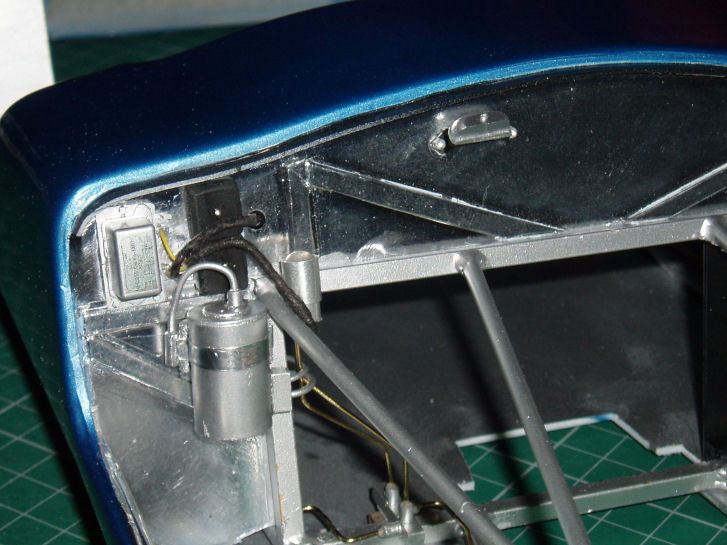
|
|
|
|
|
Unbelievable stuff ! Please keep posting pictures.
How are the chassis frame members joined? by epoxy?
Keep up the great work.
Malc.
|
|
|
Rank: Super-Elite Groups: Registered
Joined: 27/01/2014 Posts: 5,060 Points: 14,980
|
Pretty impressive stuff Roy!
I'm always fascinated watching people scratch build, I'm sure this will be yet another stunning turn out from you
|
|
|
Rank: Super-Elite Groups: Official Builds, Administrators, Moderator, Global Forum Support, Registered Joined: 04/06/2011 Posts: 5,559 Points: 16,829 Location: ipswich
|
Thanks guys.
Yes, the chassis tubes are all epoxied - I haven't learned the dark art of soldering stuff and epoxy allows me to move bits about as it's setting, if it isn't quite right.
Roy.
|
|
|
Rank: Super-Elite Groups: Registered
Joined: 17/12/2013 Posts: 3,982 Points: 11,974 Location: NY, USA
|
Another jaw dropping scratchbuild Roy.
Carl
|
|
|
Rank: Super-Elite Groups: Official Builds, Administrators, Moderator, Global Forum Support, Registered Joined: 04/06/2011 Posts: 5,559 Points: 16,829 Location: ipswich
|
Kind words much appreciated. Please - any questions - just ask. I've now added the drivers door - hinges made from brass rod bent into a 'dog-leg' and inserted into brass tube epoxied inside the body. The door was taped in place for a good fit, then the hinges attached inside the door skin. It will all have inner panels covering the gubbins eventually. I also added a rubber seal around the body door opening so there's no light gap when the door is closed. A small amount now also added on the firewall. More on the interior next, then fit the engine... Roy. roymattblack attached the following image(s):
|
|
|
|
|
Wow I wouldn't no where to start on building something like that. Stunning work Roy Rgd Martyn Building ?
Completed. Soliei Royal . Sovereign of the Seas . Virginia . Scotland . San Felipe . Corel vasa , Santisima Trinadad X section , Vasa
Next Build ?
When sailors have good wine, They think themselves in heaven for the time. John Baltharpe
|
|
|
|
|
Very nice work indeed. Love the body colour.
|
|
|
Rank: Super-Elite Groups: Official Builds, Administrators, Moderator, Global Forum Support, Registered Joined: 04/06/2011 Posts: 5,559 Points: 16,829 Location: ipswich
|
Just a bit more today...
I've added the inner door panel and started building up the rear of the cockpit but I'm not happy with it.
Not quite the right shape so it just might all get heaved out again...
Roy.
|
|
|
Rank: Super-Elite Groups: Official Builds, Administrators, Moderator, Global Forum Support, Registered Joined: 04/06/2011 Posts: 5,559 Points: 16,829 Location: ipswich
|
Forgot to add the pics... roymattblack attached the following image(s):
|
|
|
Rank: Super-Elite Groups: Registered
Joined: 19/06/2013 Posts: 4,588 Points: 13,553 Location: West Yorkshire
|
Great work Roy, really enjoy watching this come together.
Al
|
|
|
Rank: Pro Groups: Joined: 24/08/2009 Posts: 48,827 Points: -13,348
|
First time I have seen this. It is a thing of beauty. Keep up the good work.
|
|
|
Rank: Super-Elite Groups: Official Builds, Administrators, Moderator, Global Forum Support, Registered Joined: 04/06/2011 Posts: 5,559 Points: 16,829 Location: ipswich
|
Hello chaps. The interior parts are moving along slowly. The rear wall and tunnel are made from a very poor moulding taken when I built my first C Type model a few years back - a few pics of that one attached. The covering on the tunnel was made by the tedious job of binding the whole thing with thin nylon cord and using wire to make the edge binding. It's reasonably close to the actual car. Lots of tubing and other stuff to add before fitting the innards into the body permanently. Roy. First - My original C Type - my first ever scratch build: roymattblack attached the following image(s):
|
|
|
Rank: Super-Elite Groups: Registered
Joined: 27/01/2014 Posts: 5,060 Points: 14,980
|
I can see how all that binding on the tunnel was tedious, it does look pretty awesome though and well worth the effort.
I was just admiring the colour and fins mom the bodywork and wondering what the colour is?
|
|
|
|
Guest (4)
|
 US
US

