|
|
 Rank: Amateur level 2   Groups: Registered
Joined: 15/03/2017 Posts: 46 Points: 138 Location: Outer reaches of the galaxy .... West Midlands
|
Cheers Mark  Finally got proof of concept, with everything working on the breadboard: https://youtu.be/vaVF2pfwQ7MWill be working on the circuit diagrams and PCB layout soon. Then at long last I'll be able to crack on with some modelling 
|
|
|
 Rank: Pro Groups: Registered
Joined: 26/01/2014 Posts: 119 Points: 343 Location: Newcastle
|
very nice. I didn't know you could get an apt control an Arduino Current builds: HMS Victory, hachette black pearl, DC-3, R2-D2, Millennium Falcon
|
|
|
Rank: Amateur level 2 Groups: Registered
Joined: 15/03/2017 Posts: 46 Points: 138 Location: Outer reaches of the galaxy .... West Midlands
|
Bazholding wrote:very nice. I didn't know you could get an apt control an Arduino There's plenty of them on the app store/play store just type in arduino as a search in your appropriate store. I like the Blynk App ( www.blynk.cc) for the terminal widget which gives some feedback. Takes a while to get to grips with but is pretty easy in the end. The Landing Lights, Ant-Cols and headlights need no coding basically the app turns those digital outputs on or off from the app. All the rest have other conditions/actions so requires coding.
|
|
|
|
|
Very impressive Chip, love what you have done. Can’t wait until it’s all put together. Keep up the great work. Mark
|
|
|
Rank: Amateur level 2 Groups: Registered
Joined: 15/03/2017 Posts: 46 Points: 138 Location: Outer reaches of the galaxy .... West Midlands
|
Finalised my circuit design and drew it out in Eagle. It should sit on top of the Arduino Mega as a shield, powered from the Mega's supply 12V, the blue shading are the Mega pins: 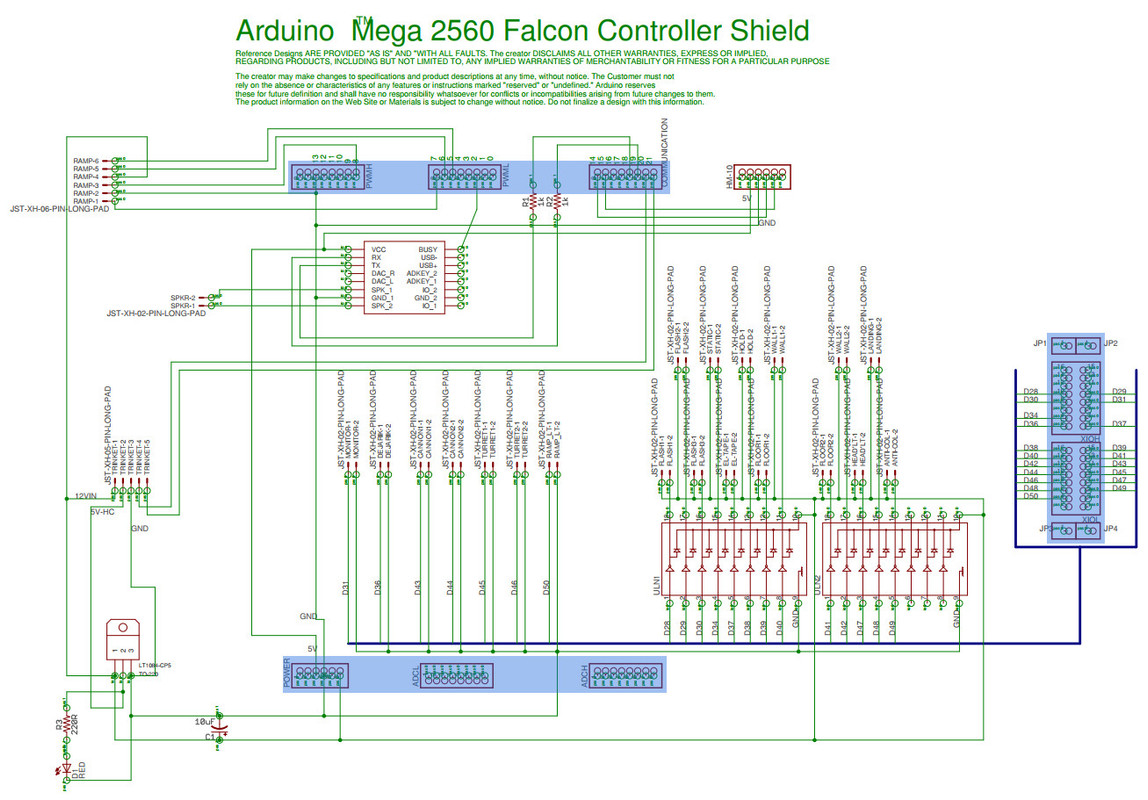 Went through Ealge's PCB service and the cost is €50.03 for a single prototype board through Eurocircuits. Does anyone know any other reputable PCB makers that may be lower cost? Might be expensive if Iv'e made any mistakes.  I have checked, checked and triple checked but you know how it is with your own work you sometimes read what you think you've written not what you have. PCB Top view: 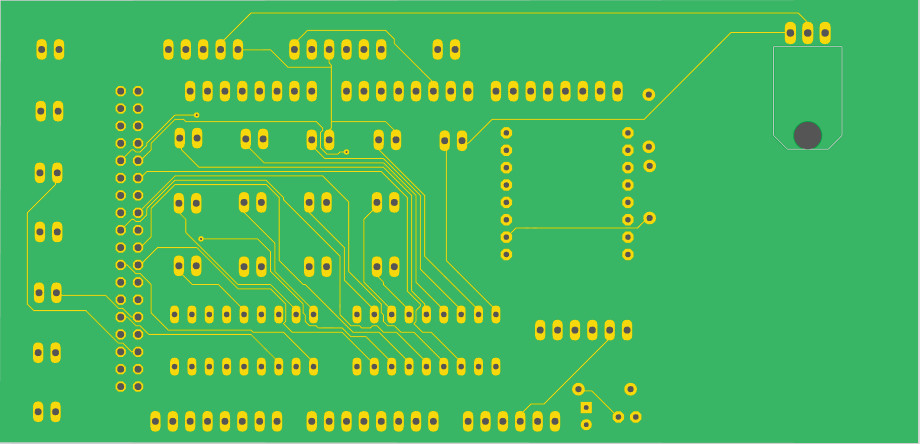 PCB Bottom view: 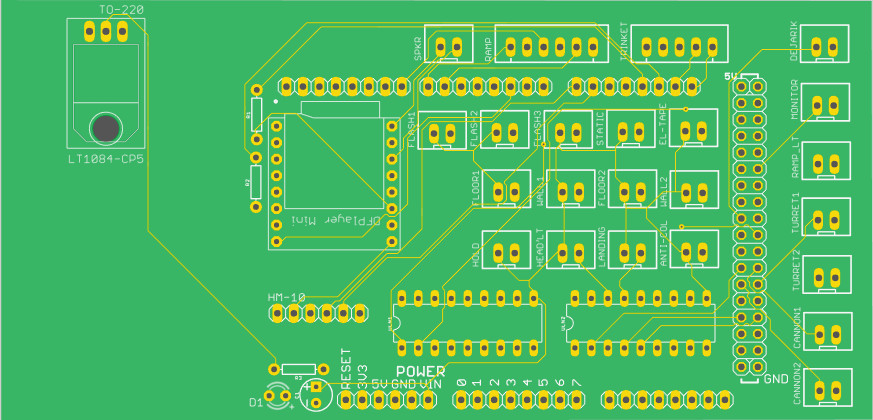
|
|
|
Rank: Amateur level 2 Groups: Registered
Joined: 15/03/2017 Posts: 46 Points: 138 Location: Outer reaches of the galaxy .... West Midlands
|
Submitted my PCBs for manufacture through PCBGoGo, even with DHL 2/3 day postage came in cheaper at a minimum order for 5 than it was for 1prototype through Eurocircuits. Gives me a couple of spares incase I screw anything up lol Should have these within the next week so will be able to test it out fully, and should be fairly compact.
|
|
|
|
|
Nice one, I look forward to seeing how you get on, fingers crossed.  Mark
|
|
|
Rank: Amateur level 2 Groups: Registered
Joined: 15/03/2017 Posts: 46 Points: 138 Location: Outer reaches of the galaxy .... West Midlands
|
Boards came today, quality looks good and initial resistance checking of lines seems good. Have test fitted it with the Arduino Mega with standard header pins, fits great but may have to use extended header pins to allow for the nut/bolt securing the heatsink to the voltage regulator as it sits flush with the Mega’s serial/usb port: 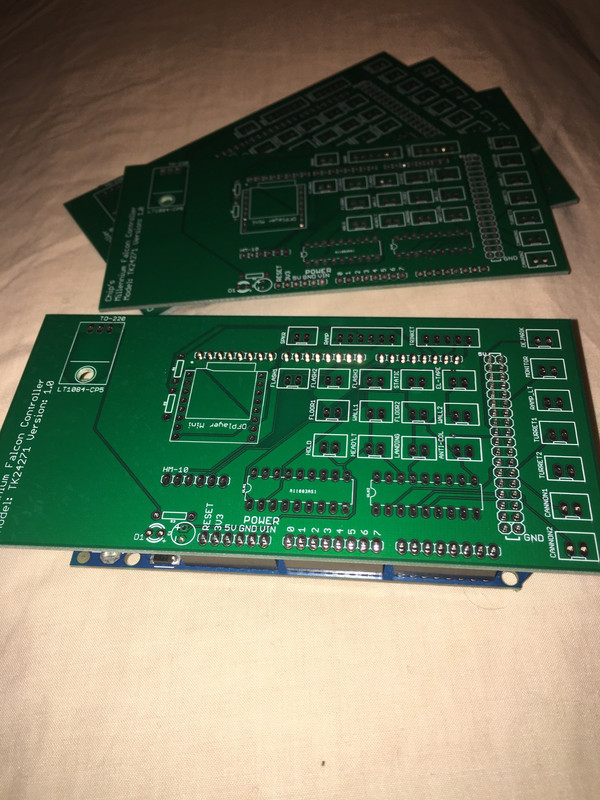 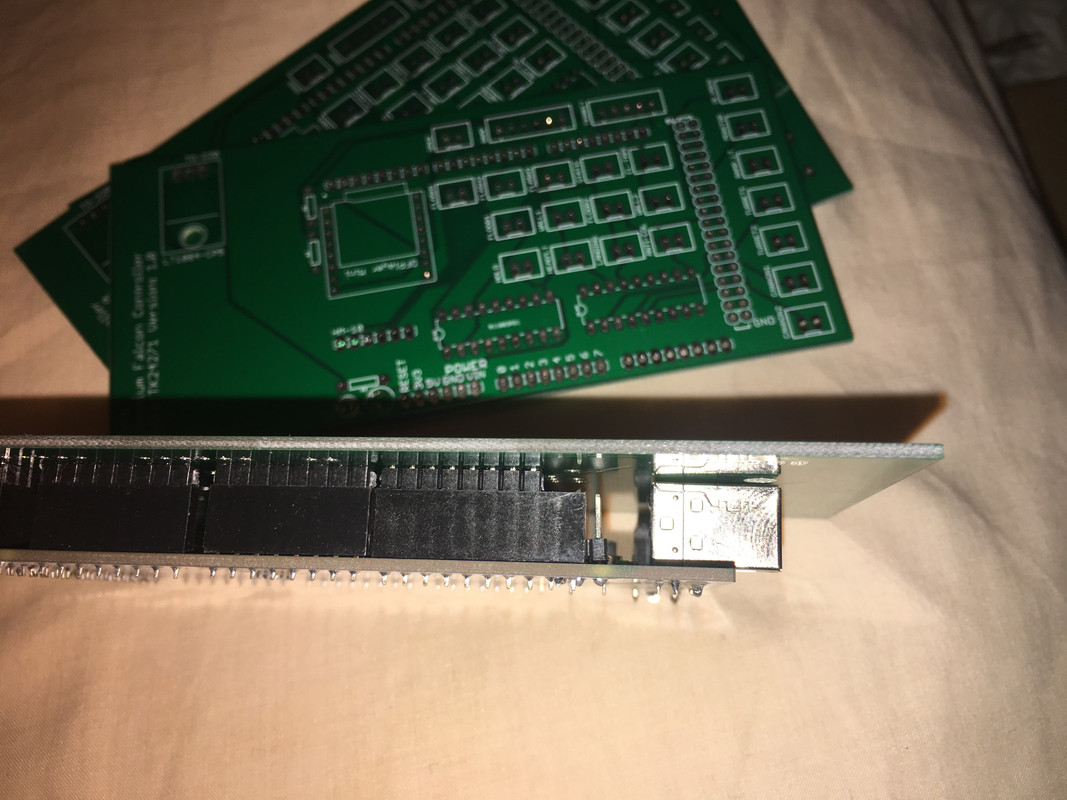 Will see how it works once I get through all the soldering, puppy time allowing of course.... she’s looking more angelic every day, but don’t be fooled she’s getting more devilish day by day lol 
|
|
|
 Rank: Super-Elite       Groups: Official Builds, Administrators, Moderator, Global Forum Support, Registered Joined: 04/06/2011 Posts: 4,209 Points: 12,772 Location: ipswich
|
Blimey... Is it going to fly when you're finished???
Amazing work.
Roy.
|
|
|
Rank: Amateur level 2 Groups: Registered
Joined: 15/03/2017 Posts: 46 Points: 138 Location: Outer reaches of the galaxy .... West Midlands
|
roymattblack wrote:Blimey... Is it going to fly when you're finished???
Amazing work.
Roy. Lol if only and thanks Roy learning all this as I go.
|
|
|
|
|
Boards look great Chip, nice work. When’s the hyperdrive coming.  Mark
|
|
|
Rank: Amateur level 2 Groups: Registered
Joined: 15/03/2017 Posts: 46 Points: 138 Location: Outer reaches of the galaxy .... West Midlands
|
Quick update. Hope to have pics and a vid in the next couple of days, but it hasn’t been plain sailing it seems in drawing up my circuits I made a couple of mistakes: 1. Cross connected the Bluetooth Tx and Rx lines - I originally had the Bluetooth module mounted directly to the board but due to the cross connection I have now connected it via a y pin JST connector and wiring so I can uncross the lines within the wiring. 2. Cross connected the DF Player mini Tx and Rx lines - managed to get around this through crossing over the 1k resistors that are in these lines. Sound and 12V and 5V circuits are all now working. Just finished wiring up the Trinket and Neopixels and am getting no response, have probably cross connected the Mega/Trinket I2C lines too lol more fault finding tomorrow..... unfortunately still not getting much time to myself to really crack on with this, but slowly getting there. In these problems I have ended up ruining 2 of my boards trying to desolder components, good job I went with PCBGoGo and got the 5 boards made for the price of a single UK prototype lol The voltage regulator is 5A rated, and the Darlington pair lines of the ICs are rated at 500mA per channel so plenty of power available to play with for the lighting/sound etc.
|
|
|
Rank: Amateur level 2 Groups: Registered
Joined: 15/03/2017 Posts: 46 Points: 138 Location: Outer reaches of the galaxy .... West Midlands
|
Neopixel issue solved, dry joint on the earth line to the Neopixel strip
|
|
|
Rank: Super-Elite   Groups: Registered
Joined: 31/05/2010 Posts: 5,679 Points: 17,011 Location: Wiltshire
|
That is really smart. Its going to take your falcon build to a whole new level. You are so clever to be able to design things like this. Just watched you video and found it very impressive. Hope it all continues well. Happy Modelling
BUILDING: Hachette Spitfire Mk 1A, Constructo Mayflower
SUBSCRIPTION COMPLETE (Awaiting building): USS Constitution, Sovereign of the Seas, 1:200 Bismarck (Hachette)
COMPLETED: Porsche 911, E-Type Jaguar, Lam Countach
|
|
|
Rank: Amateur level 2 Groups: Registered
Joined: 15/03/2017 Posts: 46 Points: 138 Location: Outer reaches of the galaxy .... West Midlands
|
birdaj2 wrote:That is really smart. Its going to take your falcon build to a whole new level.
You are so clever to be able to design things like this.
Just watched you video and found it very impressive.
Hope it all continues well. Thanks for the kind words Tony, been a long time (30 years) since I did anything with PCBs. The Arduino has been a new experience with a lot of googling to get it working roughly how I want it.
|
|
|
Rank: Amateur level 2 Groups: Registered
Joined: 15/03/2017 Posts: 46 Points: 138 Location: Outer reaches of the galaxy .... West Midlands
|
All lines tested and working  just need to make up all the various lighting cables now. The Trinket Pro and neopixel capacitor are inside the engine unit to keep things tidy. Speaker, BLE and Engines connected: 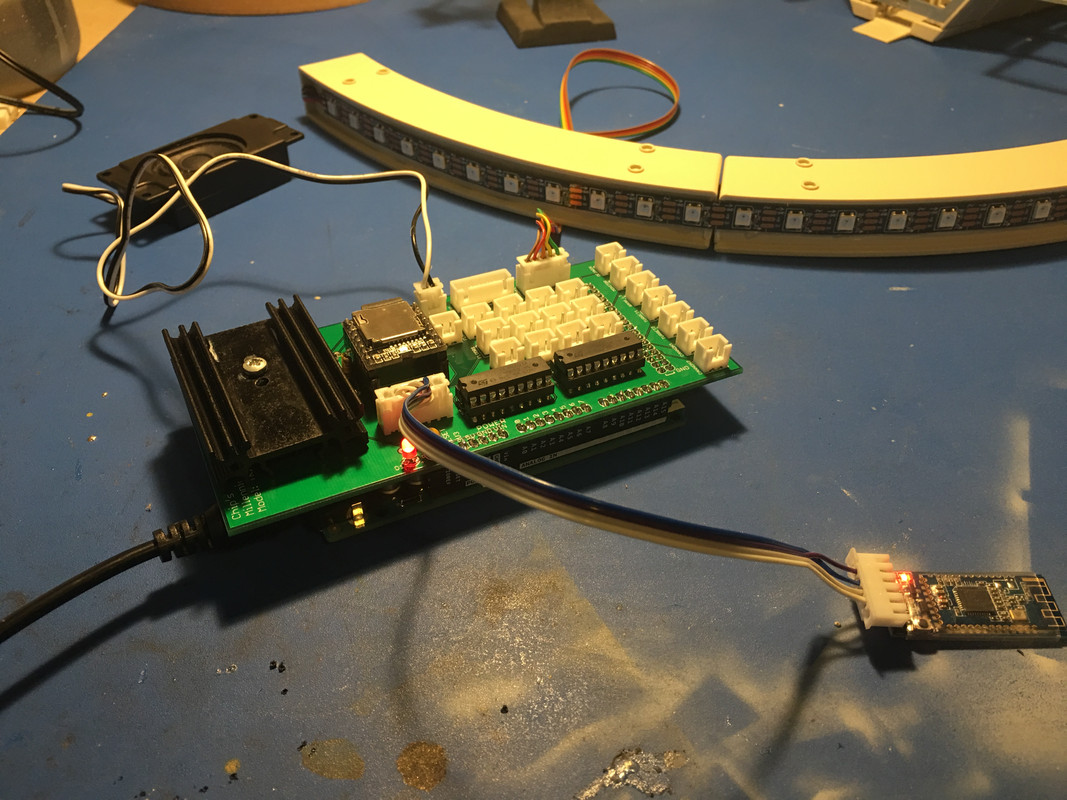 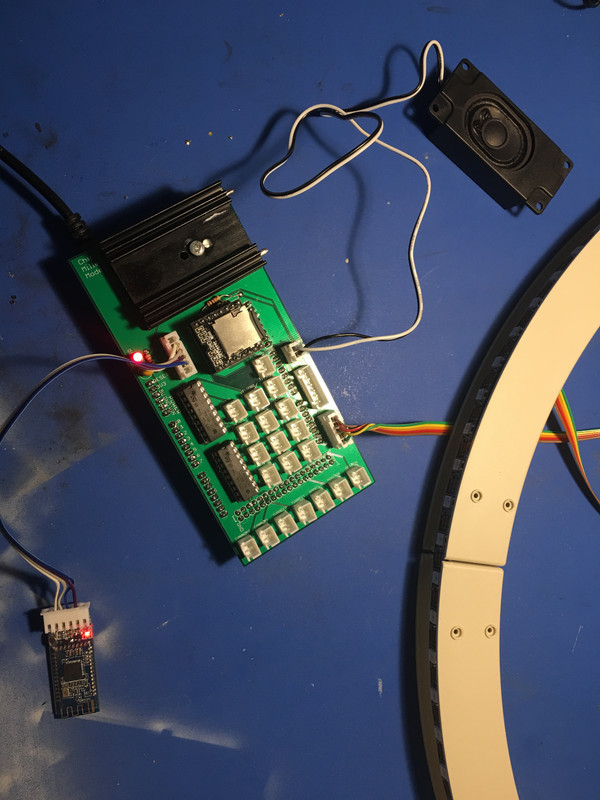
|
|
|
Rank: Amateur level 2 Groups: Registered
Joined: 15/03/2017 Posts: 46 Points: 138 Location: Outer reaches of the galaxy .... West Midlands
|
The only element of my circuit I hadn't yet addressed was the ramp circuit so I set about wiring up my stepper driver, should have really built that into the board but I already had a £2 L9110S stepper motor driver board (if I ever do this again I'll add it in for ease of wiring, needless to say it was a bit of a pain!). I also realised I had been using the keyway of the JST connectors as the front on my board in opposition to Deagostini but easy to solve by removing the sonnecting sockets in their connectors and swapping them over. (another not to self if I ever do another lol). Anyway I wired up the stepper motor driver board, connected her up, powered up connected the bluetooth, hit the ramp down button and ...... zip, nada, nowt, nothing!  Had I cross connected more lines? was my ramp faulty? was my PCB at fault again? 2 days of fault finding, and I couldn't work it out nothing was coming out of the Arduino Mega?? Had I destroyed it?!? Then I remembered I'd commented out the procedure call for the ramp so I could do all the lighting tests without needing to connect the ramp up... doh! I removed the commenting out and the ramp works fine, need to add a little more error checking into the code and make the ramp audio a little shorter but at least I know it works. Video Link: Youtube of working extertnal lighting and ramp control
|
|
|
Rank: Super-Elite Groups: Registered
Joined: 31/05/2010 Posts: 5,679 Points: 17,011 Location: Wiltshire
|
Really fantastic what you have put together. When this all gets installed you are going to have such a unique model that is for sure. Happy Modelling
BUILDING: Hachette Spitfire Mk 1A, Constructo Mayflower
SUBSCRIPTION COMPLETE (Awaiting building): USS Constitution, Sovereign of the Seas, 1:200 Bismarck (Hachette)
COMPLETED: Porsche 911, E-Type Jaguar, Lam Countach
|
|
|
|
|
Certainly going to look the business when all pieced together. Mark
|
|
|
Rank: Amateur level 2 Groups: Registered
Joined: 15/03/2017 Posts: 46 Points: 138 Location: Outer reaches of the galaxy .... West Midlands
|
Been considering how to route the cabling for the external power, whilst I like Mark’s ground power unit I would like to keep my display base clear. I contacted TonyRR through shapeways and he has agreed to do a version of his rear legs with a channel all the way through for a hollow rod and cabling to be inserted. Hoping this will work, time will tell Rear Leg Drilled 
|
|
|
|
Guest (10)
|
 US
US

