|
|
 Rank: Elite        Groups: Registered
Joined: 20/04/2012 Posts: 1,787 Points: 5,292 Location: Thurso
|
looking great, loving the plank holders.
Graeme
|
|
|
 Rank: Amateur level 2  Groups: Registered
Joined: 20/02/2016 Posts: 45 Points: 135 Location: SoCal
|
|
|
|
 Rank: Super-Elite  Groups: Registered
Joined: 27/01/2014 Posts: 5,060 Points: 14,980
|
The sharpie method can often result in ink bleed however the construction paper as 'grouting' looks really effective. Great Job 
|
|
|
|
|
Lovely work, very nice progress... Regards Alan
|
|
|
Rank: Amateur level 2 Groups: Registered
Joined: 20/02/2016 Posts: 45 Points: 135 Location: SoCal
|
davetwin wrote:The sharpie method can often result in ink bleed however the construction paper as 'grouting' looks really effective. Great Job Thanks Dave, I have heard that, the basswood I bought for the deck planking didn't look like it bled. I think if I had a square nose tip Sharpie where you could do the edge in one swipe it would have looked ok, but with the round tip I was kinda "painting" it on the edge, and it wasn't very even. I kinda had my mind made up about using paper for awhile but it took along time to figure out how to do it. I had it stuck in my head that I needed to stand up a bunch of strips in a vise or something like that and glue the paper to the top edges. Last week driving to work I had the "ah ha!!" moment of putting the paper down first.
|
|
|
Rank: Amateur level 2 Groups: Registered
Joined: 20/02/2016 Posts: 45 Points: 135 Location: SoCal
|
Hello again, I was able to get a lot of housecleaning done, finished the first row of gun port frames, which lead to finishing the hull fairing below the gun ports all the way down. Still have a bit to finish up the transition to the transom, that's just a whole lot of shape in a small area. I have the feeling I'll be shaping it still as I lay down each row. Finished the reinforcing walls in between decks 2 and three. Cut all the deck 3 supports to length but did not glue them down just yet, they're not done yet.  Dry fitted the false decking #3. Even though I don't plan on using these that doesn't make them useless.   I decided to do some experimenting with plank bending. I've found very little instruction on how to actually do it. The electric plank bender came with little instruction... Soak and bend. Spent a lot of time Googling and You Tubing with not real information. Sooo, lets just go ahead and try it and see what happens. Somewhere along the line I read of someone using PVC tube for soaking. I was initially thinking a pan of some kind but then they would float. Going vertical seems a better way to go. The only problem I thought might come up is if the plank dried out before I was done, I couldn't get it back in the tube. I set up my bending station and gave it a go.  I soaked a bamboo strip for about 10 minutes (I'm not very patient  ) and gave it a go. I was able to get more bend than even the bow will need!! Very pleasantly surprised. So then I tried to see just how much bend I could get. Using the tightest curve on the bending mandrel I got this.  And that was bending pretty much dry. So what I read somewhere is true, soaking is not required, it's just supposed to make it easier. Since I already made a soaker I'll continue to use it. Next up is blacking out the first 2 levels of gun ports and planking deck 3. Stay tuned..
|
|
|
|
|
Very nice update and she looks to be progressing beautifully.... .... Enjoy seeing your methodical approach to tasks..... Look forward to your next update.... Regards Alan
|
|
|
Rank: Elite  Groups: Registered
Joined: 22/03/2010 Posts: 2,065 Points: 6,295 Location: Gorleston-on-sea
|
All looking good!! She is rally taking shape now... Lovely work!!   Current Builds: Deagostini HMS Victory: Deagostini HMS Sovereign of the seas. Completed Builds: Del Prado: HMAS Bounty: Hachette: RMS Titanic: Del Prado: Cutty Sark...
|
|
|
Rank: Super-Elite  Groups: Registered
Joined: 28/07/2014 Posts: 4,269 Points: 12,713 Location: Scotland
|
Looking great there  love your work space regards Phil COMING SOON =1/72 Italeri diorama`s Battle for the Reichstag and Stalingrad battle at the tractor factory 1/16 Trumpeter King Tiger with loads of extras ON THE GO= refurbishment of 1/25 Tamiya tiger 1 , amt Star trek kits and space 1999 models
So Much to Build,But What a Hobby!
|
|
|
Rank: Amateur level 2 Groups: Registered
Joined: 20/02/2016 Posts: 45 Points: 135 Location: SoCal
|
Hello again, Progress being made on several fronts. As you've seen linear building is not in my wheel house  . Lets start with a little painting. First outing with the airbrush. I was pleasantly surprised with the precision it has. I had done some masking before starting but realized right away that at least for gun ports it was not needed. The dual action trigger needs getting used to, but I quickly went from terrible to just bad    Back to deck 3 construction. After fitting all the deck supports I plotted out the deck profile for all the ribs that will be planked with a curved profile and printed them out scale 1:1 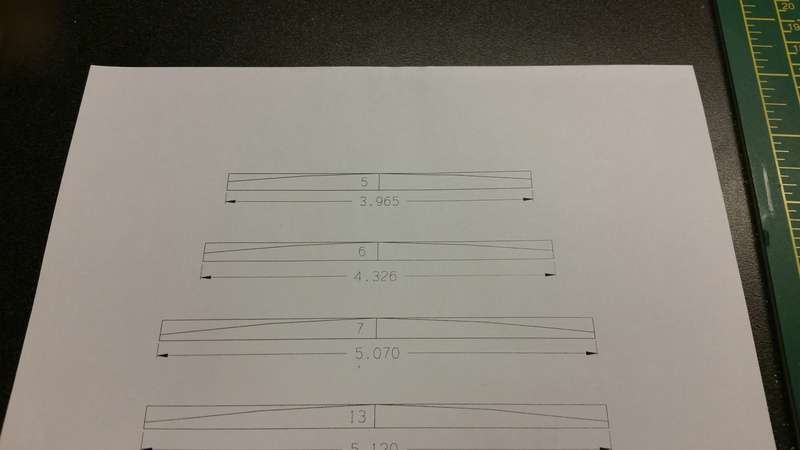 Now to cut a 1/8" x 1/4" piece of balsa to match the length.  Glue them together  Cut out the rib profile from the printout and glue it down  The Dremel came with a router attachment, I took a piece of sheet metal to make a table of sorts and super glued it. Clamped the Dremel in a vise with the business end pointing up and now I have a vertical sanding/shaping tool. After letting the rib dry overnight I gave it a go.   Now that I have proof of concept time to get on with the rest. Ribs 5 thru 21 will have this profile.   The first rib I did, #5 I smoothed out after shaping by hand clamping it in a vise. For proof of concept that was ok, but after rough shaping 5 ribs today I was looking for a more consistent technic for the finish shape. I thought double sticking sandpaper to a 6" flexible steel rule would work better but after only 1 or two strokes It was still basically hand sanding. I decided to clamp the rule to a steel parallel to get a square angle to the table top. It's still sanding by hand but now getting a very square and consistent edge. 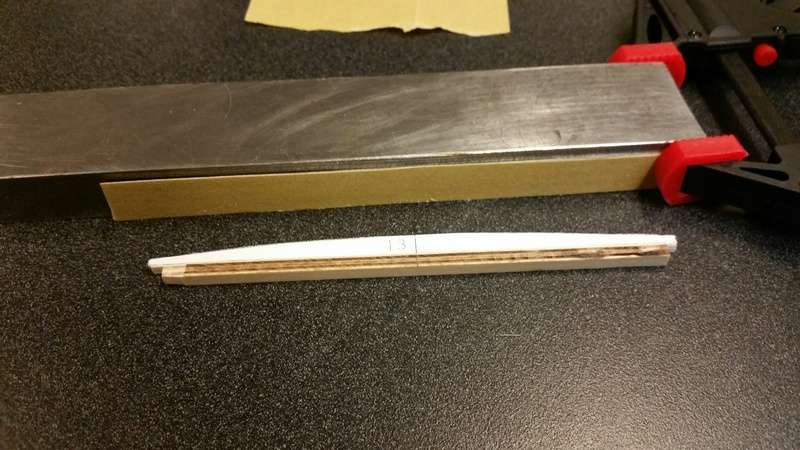  After refitting the finish shaped ribs lets start glueing them down. 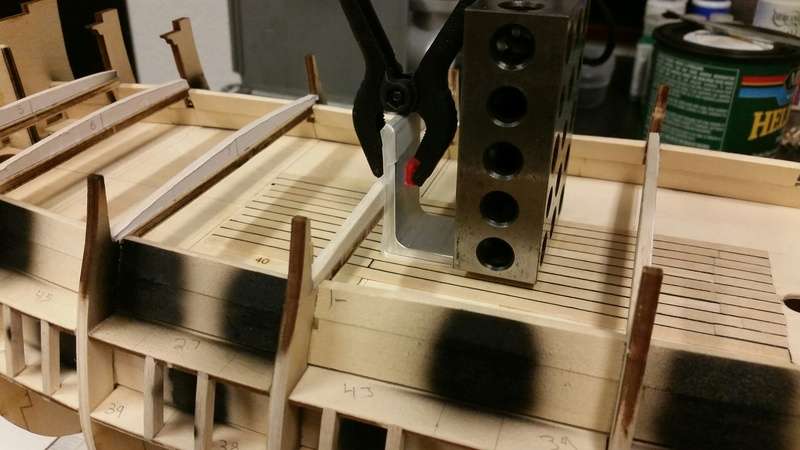 That's as far as I am. Need to step back a bit and give a lot of planning for framing grating and mast holes in the deck. Also coming up planking the hull around the first row of gun ports.. Stay tuned
|
|
|
|
|
She really is coming along a treat, some great work being shown..... Very well done.... Regards Alan
|
|
|
Rank: Super-Elite  Groups: Registered
Joined: 31/05/2010 Posts: 5,679 Points: 17,011 Location: Wiltshire
|
That is a very neat idea with the dremel accessory. Just wondering if dremel themselves might see this and introduce what looks like a really good accessory. Interested to see how your deck curving plan works out. Its certainly a very technical looking upgrade you are making and very skilfully as well from the updates. Hope it all continues well. Happy Modelling
BUILDING: Hachette Spitfire Mk 1A, Constructo Mayflower
SUBSCRIPTION COMPLETE (Awaiting building): USS Constitution, Sovereign of the Seas, 1:200 Bismarck (Hachette)
COMPLETED: Porsche 911, E-Type Jaguar, Lam Countach
|
|
|
 Rank: Master  Groups: Registered
Joined: 29/03/2011 Posts: 1,053 Points: 3,165 Location: Glenvista JHB
|
Hi Jeff, I have just been browsing through your build. I really like the approach that you have taken and your out-of-the-box thinking. Looking forward to your next update. Kind regards, Garth "Measure twice, cut once!!!"
Finished!!! HMS Victory,
Current build: Black Pearl.
On hold: Bismarck, Golden Hind, Flying Scotsman, Victory Cross Section, SOTS, Tiger 1.
Wish list: USS Constitution.
|
|
|
Rank: Amateur level 2 Groups: Registered
Joined: 20/02/2016 Posts: 45 Points: 135 Location: SoCal
|
birdaj2 wrote:That is a very neat idea with the dremel accessory. Just wondering if dremel themselves might see this and introduce what looks like a really good accessory.
actually they do sell this accessory, it's quite nice, about 30 bucks. Much nicer than mine. But I made mine, and it was free
|
|
|
Rank: Super-Elite Groups: Registered
Joined: 28/07/2014 Posts: 4,269 Points: 12,713 Location: Scotland
|
Really coming along Jeff excellent work regards Phil COMING SOON =1/72 Italeri diorama`s Battle for the Reichstag and Stalingrad battle at the tractor factory 1/16 Trumpeter King Tiger with loads of extras ON THE GO= refurbishment of 1/25 Tamiya tiger 1 , amt Star trek kits and space 1999 models
So Much to Build,But What a Hobby!
|
|
|
Rank: Amateur level 2 Groups: Registered
Joined: 20/02/2016 Posts: 45 Points: 135 Location: SoCal
|
Hello again, Work continues on deck 3. With all the deck ribs mounted I went ahead and airbrushed the tops of the curved ribs for fairing.  After that the next step is to fill in the sections in between the ribs all the way out to the hull. You can see above my first attempt at this which was not great. The grain was going the wrong way which made it weak and the matchup with the ribs was purely eyeballed. So out with it. I hate going backwards..  The second try was much better. Turned the grain parallel to the long axis for one. Extended the width inboard for better alignment. I'm now able to clamp a flexible steel scale to each section which allows matching the height at each rib and also to continue the angle of the ribs outward.   I'm very happy with the results.     After fairing the ribs a decking plank lies naturally across all ribs. Rib 13 is the lowest and widest part of the deck with a consistent rise fore and aft. Love it So after a nights setting time take it out in the shop and more fairing.   And with this done I can start to frame gun ports for deck 2  I will still be using the aft third of flat decking. I clamped one side in to see how things look. I like how the height of the outside edges of the flat and curved decks are matching up   I'm getting close to some actual decking happening Still sketching out how I'm going to do the grates. Speaking of grates, I was not impressed with how the grating came out so I ordered up some grates from Modelers Central and I am very impressed with these.  Talk about night and day. These are a much harder wood and fit and finish are perfect. I also picked up a couple different style doors for later on. These look to be quality items as well. Well that's it for now, stay tuned :)
|
|
|
|
|
Really enjoying your build and do like the changes you are making... looking great..... .. Look forward to seeing your next update..... Regards Alan
|
|
|
Rank: Super-Elite Groups: Registered
Joined: 31/05/2010 Posts: 5,679 Points: 17,011 Location: Wiltshire
|
Its very interesting to see your build progressing. Looking forward to seeing your decking start to go down. Happy Modelling
BUILDING: Hachette Spitfire Mk 1A, Constructo Mayflower
SUBSCRIPTION COMPLETE (Awaiting building): USS Constitution, Sovereign of the Seas, 1:200 Bismarck (Hachette)
COMPLETED: Porsche 911, E-Type Jaguar, Lam Countach
|
|
|
Rank: Amateur level 2 Groups: Registered
Joined: 20/02/2016 Posts: 45 Points: 135 Location: SoCal
|
Hello again, Things continue to advance. Work continues on the cargo hatches. Framing up the... frames  clamped up a couple sets of 123 blocks to keep things nice and square. 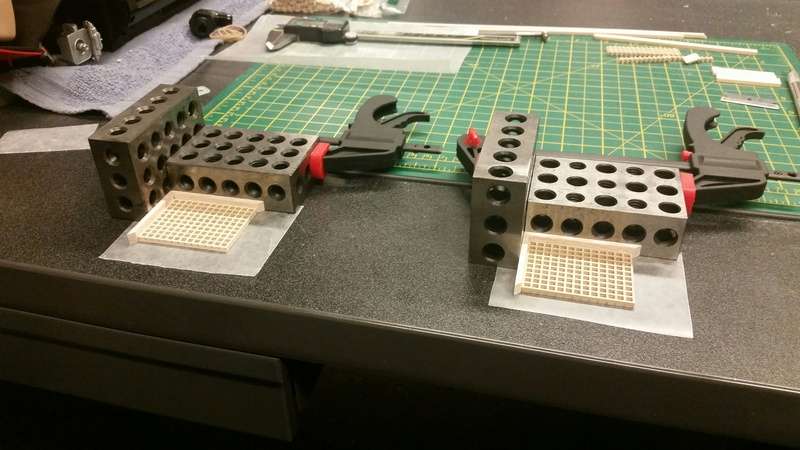 Made another sanding miter block for keeping things true. I cut slots for all the common sizes I see coming up. 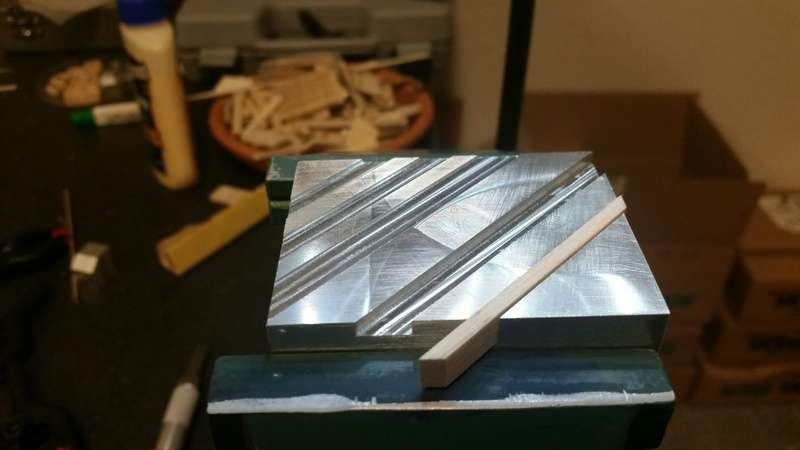    So now I need to frame up the frames for the frames...  I started with the ends, and the underside bracing for when I cut out the rib centers.   I wasn't confident I could get good alignment with the center sections with the ribs still there so I cut them out, sanded them smooth with the ends and then used the scale for clamping them nice and true with the ends.  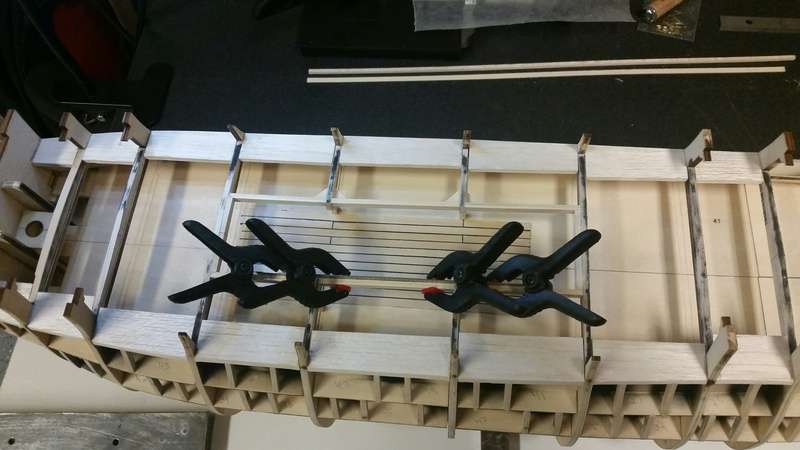 Now I have a nice true straight frame box to set the cargo grate frames into.  Now I'm in the long process of staining and lacquering the frames before I can glue them in. I try not to rush this, giving a day in between each coat. In the mean time I started bending the first strake on the bow until I burnt the hell out of my finger on the plank bender so that's on hold until I get feeling back in my fingertip. And I've been extremely negligent on making gun port frames. So I took the cutter and the strips home to catch up. the best part of working at home... Beer 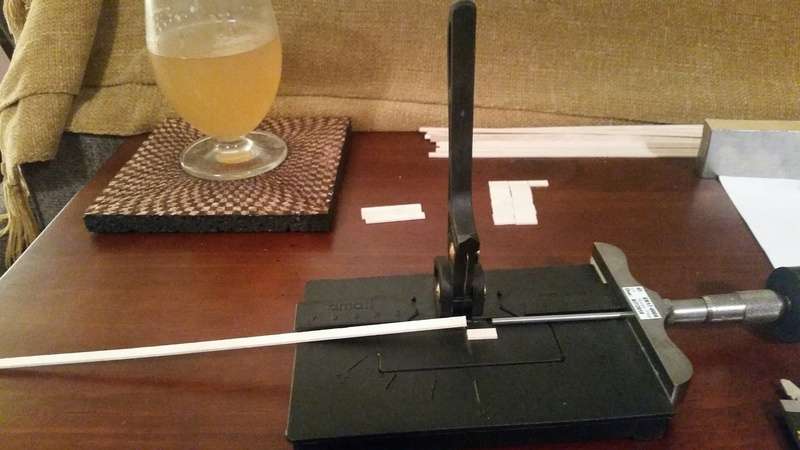 Still a bit of work before I can start laying some decking but getting closer. Stay tuned.
|
|
|
Rank: Super-Elite Groups: Registered
Joined: 31/05/2010 Posts: 5,679 Points: 17,011 Location: Wiltshire
|
Very nice update to your build. Your gratings have turned out very well. Happy Modelling
BUILDING: Hachette Spitfire Mk 1A, Constructo Mayflower
SUBSCRIPTION COMPLETE (Awaiting building): USS Constitution, Sovereign of the Seas, 1:200 Bismarck (Hachette)
COMPLETED: Porsche 911, E-Type Jaguar, Lam Countach
|
|
|
|
Guest
|
 US
US

